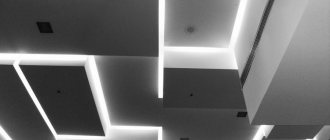
Long gone are the days when the main lighting of the room was only a chandelier in the center of the ceiling, and wall sconces for illumination. The view on lighting design has changed dramatically with the advent of new technologies, one of which is an LED strip in a plasterboard niche.
In addition to it, there are other options for built-in devices, which are placed not only in cornices and ceiling levels, but also in wall decorative structures.
Wall lighting
Advantages of illuminating suspended ceilings with LED strips
LEDs are not prone to heating drywall sheets. Even after a long time, yellow spots do not appear on the surface, and the finishing layer of decorative finishing remains attractive under the lighting of such lamps. LED backlight allows:
- emphasize the volume of the ceiling;
- divide the room into zones;
- highlight interior items;
- use a minimum amount of wiring, terminals, adapters;
- save energy costs.
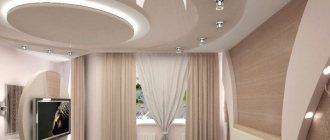
The effect of floating ceilings is created through optimally selected lighting.
Knowledge of the technology of installing a plasterboard ceiling with lighting involves a detailed study of how to arrange the frame, attach the lighting and what materials are best used for this. This means you can do the work yourself.
Tools and materials
To begin with, you should be patient, and, of course, the necessary materials and tools:
- plasterboard sheets;
- metal profile (guide and main);
- assembly adhesive;
- drywall knife;
- drill;
- a screwdriver (you can do without it by simply purchasing a special attachment for a drill);
- self-tapping screws (12 mm long);
- LED cord with transformer - they come in different types. They differ in color saturation, number of colors, and there are even options with remote control. The cheapest option is a regular one-color cord. If you decide not to save money, you can purchase a multi-color element with built-in various glow programs.
Find out also how to cover a ceiling with plasterboard yourself.
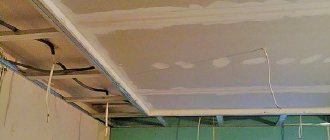
Frame assembly
Most often, the installation of a suspended ceiling made of plasterboard occurs in the living room. This is explained by the parameters of the room, because in most residential buildings the living room is the largest and allows you to effectively place light points.
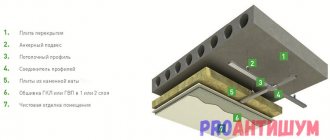
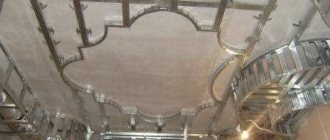
To assemble the basic frame, follow these steps:
- at the corners, stepping back 10 cm from the ceiling, make marks, connect them together in a horizontal line, check the correctness of the markings using a building level;
- along the drawn line, mount a UD profile with a shelf width of 40 mm, fixing it to the wall using dowels;
- perpendicular to the guide at a distance of 40-50 cm, CW profiles with a shelf width of 50 mm are fastened with self-tapping screws and fixed to the ceiling using hangers;
For rigidity between the starting profiles, it is recommended to install stiffening ribs (jumpers) in steps of 50 cm and connect them to the starting “crab” profile.
Then the frame is sheathed with sheets of plasterboard 6.5 or 9.5 mm thick, so as not to weigh down the structure. It is better to choose a brand of slabs that is moisture resistant. As a result of fulfilling the above requirements for the material and arrangement of the frame, the ceiling in the living room is obtained with optimal load-bearing capacity, the service life of which is unlimited.
Technology for manufacturing a frame from a metal profile
Before installation, the drawing of the future niche is transferred to the wall, measuring and marking the dimensions. If necessary, adjustments are made. Having retreated from the wall a distance equal to the required depth of the shelves, mark the place where the guides are attached to the ceiling.
A plumb line will help to achieve strict compliance with the location of the profile on the floor: when applying the thread to the line on the ceiling, you should put a mark where the tip of the load will be located.
For accurate measurements, remember that the plumb line must hang freely, without touching the floor or walls.
After marking, the frame from the profile is installed.
- Along the marking lines, metal profiles PN 30x27 are attached to the ceiling and floor with dowels, in which the vertical posts of the frame from the PP 60x27 profile are installed and fixed with self-tapping screws.
- Between the racks near the wall and at the outer part of the future niche, horizontal bundles of short sections of PP are laid, their length is equal to the depth of the recess. The distance between them should not be more than 40-50 cm. Fastening is carried out using self-tapping screws. Horizontal compliance is checked using a building level. This is especially important if you plan to install shelves that rest on these structural elements.
To give strength to the outer corners around the recess, 2 profiles can be connected so that they form a structure closed on all sides. Arched or curved lines in the design are made from a special profile or the sidewalls of a regular PP 60x27 are cut to the base so that it can be bent along the required contour.
If the niche is equipped with hidden lighting, a border can be made around the entire perimeter. To do this, profile sections on the outer wall are installed so that they extend beyond the frame. Elements of open lighting are installed after the final finishing of the surfaces.
Box formation
The box for hidden LED lighting is the most important component: a strip is mounted in it, which will reflect light rays from the ceiling surface and distribute them throughout the room.
Box assembly steps:
- draw the boundaries of the future box on the base ceiling;
- attach a supporting profile along the border of the drawn line;
- stepping back 10-15 cm from the wall, secure another load-bearing profile, forming the inner perimeter of the box;
- every 40 cm, attach cuttings of the starting strip to the profile, the length should extend beyond the base drawn line by 10 cm;
- connect the supporting and starting profiles with suspensions;
- sheathe the gypsum board frame;
- Install corner profiles at the joints of plasterboard sheets, seal the seams with putty, sand them, and prime them.
Box frame
Visual video instructions
LED lights.
Niches made of plasterboard. sandycheek
January 11th, 2018
Quite often, modern interiors use LED lighting for ceilings, shelves, racks and even baseboards. If you use lighting wisely and in the right place, it will create a cozy and enveloping atmosphere in the room. If the room is not used for human surgery or for assembling electronics, then a room filled with uniform light is not needed. Backlighting can be organized in several ways. These can be clever structures made of plasterboard or special profiles with diffusers. The main thing when organizing backlights is that the LED strip itself should not be visible and it should not be reflected or viewed in the form of luminous points. The light should lie evenly on the surface, gradually fading, i.e. should be distributed in a gradient over the surface. The first method is to organize niches for the LED strip. Niche parameters look different, depending on the type of structure and idea. Ceiling lighting is used more often. Along the perimeter (often, but not always), a 100 mm indentation from the wall is made from the wall (or 120 mm depending on the skill of the builders, sometimes it’s even 50 mm) and a niche is created with a side where the tape is laid. This is roughly what it looks like in cross-section So.
This is how the observer in the room sees it. There are various variations on this theme. Here the wall consists of blades, from behind which the light comes. Here the lighting goes up the wall and goes into the ceiling niches with lighting; the builders were able to make a gap of 5 cm between the wall and the side for lighting. It is also important to pay attention to where exactly to glue the LED strip. In this photo, the LED strip is glued so that it looks at the gray wall, because of this a clear edge has appeared at the light line. It's not very good. If you glue the tape so that the light goes parallel to the wall, then there will be a smooth attenuation.
[my_custom_ad_shortcode3]
Connecting the backlight
After the frame of the base level of the ceiling and finishing of the box in the living room are completed, the tape is installed. This can be easily done by leaving a distance of 10 cm when forming the cornice. To this cornice you can attach a side made from a strip of starting profile and gypsum board 50 mm wide.
- in a special place for making the cut, the tape is adjusted to size;
- using a special connector or by soldering, sections of different lengths are connected into one LED line;
- observing the polarity, the lamps are connected to the power supply;
- if LEDs are connected in different colors, a controller is installed between the power supply and the strip to adjust them;
- the tape is connected to the network, and if everything is in order, it is glued to the inside of the gypsum board.
Tips for choosing LED strips
To illuminate the plasterboard ceiling in the living room, you can choose three types of LED strip: SMD 5050, SMD 3028 and RGB. The brightness of the first two drops by 20-40% after several years of operation, but if they are used as additional (temporary) backlight, this figure drops to 10%. RGB tape is considered optimal for the ceiling: it is durable, does not lose light intensity, and diffuses a soft light flux with a power of about 12 lumens.
RGB strip device
The number of lamps in one meter of such a strip varies from 30 to 120 pieces. The more there are, the brighter the light source, but installation is also more expensive. This depends on the power source, which must not only be powerful (20-30% more than the total power of the connected lamps), but also compact so as not to hang from the suspended plasterboard ceiling in the form of an ugly pile of wires. Therefore, as the main lighting for the living room, it is better to choose RGB or SMD 5050 with the number of lamps within 60 pieces per meter.
Such lighting will protect your eyes from overstrain and will fill the room with bright and natural light. Furniture can be emphasized with less powerful SMD 3028 diodes - they will serve to create an ideal backlight with moderate brightness. As a color shade, it is better to pay attention to pure white colors or use an RGB strip with a built-in mode for changing the base color. How to install such a tape to a plasterboard ceiling can be seen in the video.
LED panels
This is a good alternative to tapes. They come in different colors and are between 13 and 15 centimeters thick. Unlike strips, LEDs are mounted on a profile or strip. On the market they are offered as separate elements or built-in, for example, for suspended ceilings. Such elements, when attached to a profile, can solve the problem of low ceilings. These models are equipped with a device for adjusting the light saturation, which makes it possible to select the most comfortable brightness level.
Lighting like the Starry Sky is ready - elegant and simple
Installing devices with LEDs on a plasterboard body will not cause any difficulties if you follow simple tips. It is important to study the installation instructions and select the required device. A responsible approach and compliance with standards during installation work is required. A strip with diodes will help you achieve an interesting ceiling design and give the room originality.
This video tip will help you understand and learn all the intricacies of installing LED lighting on a ceiling surface:
Do I need additional protection for LED strips after connection?
An important factor for choosing LED backlighting is its tightness. If the LED strip is supposed to be attached to a plasterboard ceiling in the living room, it is allowed to use lighting without sealing or additional processing of LED lamps. You will have to be extremely careful to maintain the cleanliness of such unprotected tapes so as not to snag the joints and conductive veins.
Schematic arrangement of tapes in a gypsum plasterboard niche
If you need suspended ceiling lighting in the kitchen or bathroom, choose strip models with a protection level of IP 65, 67 or 68. They are completely sealed, do not allow dust and moisture to pass through, and protect the junction points of the LEDs. They are much easier to care for. Additional protection allows you to extend the life of the lamps and eliminate the risk of short circuits.
The backlit plasterboard ceiling looks beautiful and creates a calm, intimate atmosphere in the room.
Exterior finishing
1. Apply putty to the surface of the entire niche. In this case, special attention should be paid to joints and fastening points; they should not have differences in level.
2. Use coarse-grained and then fine-grained sandpaper to rub the putty until it is perfectly smooth.
3. The putty must be treated with a layer of deep penetration primer.
After carrying out these manipulations, it is necessary to decorate a niche made of plasterboard with LED lighting in accordance with the interior of the entire room. It can be covered with wallpaper, covered with artificial stone, painted or made into decorative stucco from plaster. Photos of a plasterboard niche with lighting in it show the variety of finishing materials that can be used to decorate the structure.
Hidden lighting for plasterboard ceilings
Lighting in an apartment is of great importance for the comfortable pastime of people. Thanks to modern building materials, such as plasterboard, it is possible to create not only open lighting for a room, but also combine it with hidden lighting.
Which is better: heated floors or radiators?
Warm floorBatteries
Today, many people make plasterboard ceilings with a hidden type of lighting. The design features of the ceiling device with hidden lighting allow you to assemble it yourself. Moreover, any person can cope with the task; the main thing is to have the assembly instructions in front of your eyes. You will learn how to make a plasterboard ceiling with hidden lighting in this article.
Wiring Requirements
In any of the options for installing hidden lighting, do not allow the wires to twist; all electrical contacts must be made with special clamps or soldering. Wire connections must not be hidden in walls or boxes; all points must be located in junction boxes. The cross-section of the supply wires must correspond to the power of hidden lighting devices. To do this, add up the power of the connected lamps or strips and use the data in the table.
If you are connecting copper and aluminum wires, use brass crimping sleeves or special clamps.
[my_custom_ad_shortcode2]
Selecting a lamp
Plasterboard ceilings are often made of a combined type. This means that both open and hidden lighting are placed on one ceiling structure. To get such a ceiling, you need to assemble a box and a hidden niche. The following types of lighting fixtures are suitable for plasterboard ceilings:
- Spotlights. They are used to create open lighting. In addition to spotlights, you can use a classic chandelier;
- LED Strip Light. It most often serves as a light source for a hidden niche.
Combined backlight type
In addition, the LED strip in a hidden niche can be replaced with flexible neon or duralight. These lighting fixtures, like the strip, are flexible and can be easily installed in hidden niches, thereby achieving the effect of “floating air”. This effect is created due to the fact that light is reflected from the surface of the ceiling and scattered, thereby creating a soft and diffused glow.
Note! By combining a plasterboard box and a tension fabric using hidden lighting, you can create amazing lighting. The reflection of light is more beautiful from the stretched fabric, which has the appearance of a mirror reflection.
To make the right choice of light sources for hidden lighting, you must be guided by the following principles:
- financial capabilities of a person;
- type of ceiling (single-level, multi-level, figured);
- purpose of lighting;
- installation method (in boxes or niches);
- option for installing lighting elements (by yourself or by a specialist);
- the presence of insulation and sound insulation in the design.
Hidden lighting is used for:
- creating additional lighting in the room;
- creating a certain atmosphere in the room (romantic, fairy-tale, subdued, etc.);
- visualization of certain decorative elements;
- night lighting of the room.
With the right lighting fixtures for your room, you can achieve:
- high-quality lighting of space;
- visual expansion or reduction of space;
- zoning the premises into separate zones (rest, work, eating, etc.);
- exquisite decorative lighting of plasterboard ceiling elements.
Hidden lighting for plasterboard ceilings allows you to solve many design and lighting issues. Therefore, the choice of lighting fixtures for such lighting should be approached carefully.
Choosing light sources
Having decided to install a suspended plasterboard ceiling, you should remember that lighting is only a decoration of your interior. The flow of light coming from the ceiling will always be diffused, since it is directed towards the ceiling and not into the room. With the help of a competent lighting device, you can visually change the height of the room, visually raising the surface of the ceiling, but you will not be able to change the level of illumination in the room. To illuminate the room, you can use built-in lamps or traditional hanging chandeliers.
With the help of a competent lighting device, you can visually change the height of the room, visually raising the surface of the ceiling, but you will not be able to change the level of illumination in the room
There are several ways to install lighting in the ceiling, but only two are widely used:
- LED sources: strips, duralight;
- neon tubes.
Structural solutions
Plasterboard ceilings for the implementation of hidden lighting can have a wide variety of design solutions. The most popular solutions include:
- box installation;
- creating niches;
- installation of cornice with polystyrene foam.
The first two options are more popular - creating a box or niche. The last option with polystyrene foam is used in the case where the plasterboard ceiling was previously removed, and the desire to have hidden lighting appeared after its final finishing. In order to better understand the above options, we will consider them in more detail.
Popular options
The most popular options for masking lighting fixtures is installing a niche or box. Both options are suitable for multi-level plasterboard ceilings. Note! The box and niche do not require large sizes. It will be enough to create a narrow structure to hide even an LED strip with all its accompanying elements (controller, power supply).
The advantages of such design solutions are:
- The range of selectable lighting devices, which may become slightly warm during operation, is significantly expanded;
- allows you to install larger lamps, as the structure is strong and rigid;
- installation of lamps can be carried out to the profile itself;
- installation of the box will allow you to hide all the unevenness of the main ceiling, as well as communication means (wires, additional lighting equipment, etc.).
Note! If the LED strip is connected to a controller, then it is possible to create a controlled lighting system.
For hidden lighting, installation of the box and niche occurs according to the following scheme:
- the box is installed using guide profiles that are installed around the perimeter of the room;
- We raise the box to height using rack profiles cut into lintels;
- We connect all the profiles together with screws, and with the walls with dowels;
- Then the rack profiles are connected by guides. The result is a metal box frame;
- after that we run wires for lighting in the frame;
- then we cover the structure with plasterboard sheets.
At this stage, forming a niche involves installing the bottom sheet of drywall approximately 8-12 cm wider than the frame of the existing box. It is on the protruding part of the material that light sources should be placed. On such a niche you can place an LED strip, duralight or flexible neon.
This design will look beautiful in almost any room of the house.
Note! Some experts do not recommend this solution for the kitchen. This is due to the special microclimate of this room. To ensure that the box or niche lasts in the kitchen for as long as possible, use moisture-resistant sheets of plasterboard.
The disadvantages of this design solution include:
- these are quite time-consuming and physically labor-intensive structures;
- if the installation technology or final finishing is violated, cracks and chips may appear on such a ceiling within a few years;
- The work should be carried out together, since sheathing the ceiling with plasterboard sheets alone will not be very convenient.
Problems here may arise at the stage of installing profiles at the same level and cutting the material.
Box with hidden niche
In some cases, this is especially true if the illumination of a glossy stretch ceiling, described above, is installed, the system is not suitable, since the inside of the niche will be reflected on the mirror surface of the canvas. And this significantly spoils the appearance of such a ceiling. Therefore, a hidden niche is used, which provides uniform illumination of the ceiling along the perimeter, while all lighting fixtures remain inaccessible to the observer’s eyes.
The box of such a ceiling has a hidden niche. Externally, a structure of this kind looks like an ordinary box, but creating it is much more difficult than the previous system. In this case, the niche is located within the frame of the stretch ceiling, as a result of which the plasterboard box is located under the canvas and the lighting occurs from the inside. Thanks to this approach, lighting fixtures and electrical wiring will not be reflected on the mirror glossy surface.
Such a niche is considered to be completed correctly if the observer cannot see the lighting fixtures and communication elements located on the opposite side of the room (read: “Stretch ceiling with a niche for lighting”).
Another solution
Expanded polystyrene cornice
If for certain reasons the formation of a niche or box is impossible (for example, there is already a single-level ceiling made of plasterboard and you don’t want to break it), then in such a situation the solution would be to install a polystyrene foam cornice.
A wide decorative cornice is the simplest way to create a hidden type of lighting. But it is rare for several reasons:
- the cornice allows you to install only the lightest light sources;
Note! Only an LED strip can be installed on a polystyrene foam cornice without additional equipment.
- low strength of the resulting structure;
- low thermal stability.
At the same time, the advantage of using such a cornice is the ease of installation and the fact that all the work can be easily carried out by one person. Installation of the cornice occurs as follows:
- we retreat 5-10 cm from the ceiling surface. This is the optimal distance;
- draw a marking line around the perimeter of the room;
- Glue the cornices along the line. They can be glued both to wallpaper and to bare plaster (a more preferable option, but only after priming);
- We use liquid nails or acrylic putty as an adhesive;
- the joints between the cornices also need to be glued for camouflage;
- after this, the entire structure can be painted to match the color of the overall interior or ceiling:
- then install the backlight.
As you can see, installing a hidden type of lighting for plasterboard ceilings has several implementation options. Choose the most optimal one for you and forward to achievements!
Installation
Start installing the ceiling by taking measurements with a tape measure, visually transferring the sketch of the room onto a sheet of paper according to the calculations obtained. When carrying out repair and construction work, make sure that the room is warm enough, at least 15 degrees. And if you started renovating the entire room, start installing the ceiling after leveling and treating the walls, but leave the painting work for last.
At the same time, pay attention to the fact that there are no temperature jumps or changes in humidity levels in the room, as this may affect the quality of the drywall. Store gypsum board sheets exclusively in a horizontal position, without allowing deflections
Before installing the lighting, the plasterboard structure itself is installed. First, a frame made of a metal profile is fixed, while the necessary holes or niches for lighting are thought out. If you have construction skills, you can fix plasterboard boards to the ceiling yourself. Or invite a team of professionals who will not only install the ceiling, but also help with choosing the type of lighting.
Let's consider the main stages of work:
Clean the ceiling from any remnants of wallpaper, old whitewash and putty, remove the chandelier and other lighting fixtures. Along the perimeter of the room, draw a line a few centimeters from the ceiling along which you will attach the profiles. First, hangers for the main frame are mounted; to do this, you can apply a grid with markings to the ceiling and secure them with a hammer drill at an equal distance from each other. Then a guide profile is attached around the perimeter. As a result, you will get a “metal belt” into which the main profile will be inserted. It is attached with self-tapping screws to hangers that carry the load of gypsum board sheets. We insert the ends of the profiles into the grooves of the guides
Some craftsmen use adapters - “crabs” made of metal or profile extensions, which allows you to make a plasterboard ceiling in a large space and without the involvement of additional help.
Now comes the turn to sheathe the frame with gypsum board sheets. Mark the sheets and cut the drywall with a knife so that the parts fit together without gaps.
- Process gypsum board sheets exclusively on a flat surface.
- Once you have marked the cutting lines, place a ruler on the line and use a knife to cut through the top layer of drywall. Next, bend the sheet along the cut line and carefully break it.
- To achieve perfectly smooth edges, sand them with sandpaper.
- The resulting fragments are screwed with self-tapping screws to the main profiles. Self-tapping screws must be screwed in at an angle of 90 degrees and at least 1 cm deep into the profile so that the sheets are fastened with high quality. The caps should be “recessed” 1-2 mm inside the gypsum board sheet and then puttyed. Finally, level the surface to perfection by gluing the seams with reinforced tape and filling with putty.
- If you accidentally left a dent during installation, it can be filled with putty before painting, so that the defect will not be visible. After drying, the ceiling is sanded and covered with water-based paint of any shade. You can also cover the surface with wallpaper or even install stained glass windows, which will make the room unique in design.
The times when standard apartments had standard ceilings are far in the past. Modern technologies and innovative finishing materials make it possible to create incredible designs with unique lighting to decorate the ceiling space. Each owner is free to choose the option of decorating a living space to their liking and in accordance with their financial capabilities. The most affordable and at the same time effective option is a single-level plasterboard covering with a slight lowering of the ceiling level by 10-15 cm.
Installation of hidden plasterboard ceiling lighting
This is why designers recommend using RGB tape for lighting plasterboard structures, given that the product: The first option involves attaching the tape to the ceiling. Visually, this is not very beautiful, but in terms of installation it is as simple as possible, since to implement the idea you will not need to waste time, effort and materials on building a niche. At the final stage, the system is tested, if everything works, then the tape is attached to the cornice behind the side in such a way to prevent contact of lamps with metal components.
The finished frame is sheathed with sheets of plasterboard, using self-tapping screws as fastening elements. In this way, the first level of the plasterboard structure is constructed. Regardless of the color, the LED strip in the ceiling looks harmonious and creative, especially if it is correctly combined with spotlights. The main thing is to follow the basic recommendations, use really high-quality materials, and not violate the main safety rules. You will be working with electricity, and this is always associated with some danger.
Spotlights are used as night lighting, emergency lighting, space zoning, work area illumination, etc. This lighting option is budget-friendly and can be used for ceilings of any configuration. It is also possible to produce designer wall structures - recesses in the wall with decorative lamps. True, in this case, LED strips are rarely used; spotlights are more often used.
We will also need the LED strip itself, a power supply for it, and wires to connect the system to the electrical network (with a cross-section of 0.75 mm or more) (see also the article on the correct placement of spotlights on the ceiling).
Making a “floating ceiling from plasterboard with lighting with your own hands”
- With open lighting - lamps are installed in holes or suspended;
- With hidden lighting - the lamps are installed in a pre-prepared niche in a two-level plasterboard ceiling.
- One end from the power supply goes to the 220 volt wire, and the other to the LED strip.
- If you are using an RGB strip, then connect it through the controller while maintaining the polarity. The red wire is positive, blue or black is negative. You cannot swap them.
- Connect and check the functionality of the LEDs. If everything is in order, you can stick it to the required place using self-adhesive film.
- Type of LED (for example, popular SMD-5050 LEDs have a size of 5 * 5 mm).
- The glow color can be either monochrome or color (RGB). For colored tapes, 3 diodes are placed on one base: red, green and blue.
- LED density (number of bulbs per meter of strip).
- Color temperature (from 2700k to 10000k).
- Voltage (12 V tapes are the most popular, but 24 V are also available)
- Water resistance (some tapes are protected with silicone insulation, which allows you to illuminate the ceiling in the kitchen, bathroom and toilet)
When long sections of the tape are connected in series, the voltage at its end drops, and the glow differs in different sections. It would be more correct and safer to connect sections over 5 meters parallel to each other using a wire with a cross-section of 1.5 mm. In this case, you need to have a high-power power supply, and if you don’t have one, you can use two weaker ones. In this case, to extend the wire from the 220V network, a cross-section of 0.75 mm is enough.
If the protruding cornice turns out to be small, you can glue a narrow strip of plasterboard along its perimeter with liquid nails, which will hide the LED strip.
How to choose a light strip?
An important parameter of hidden lighting is the strip of light that it casts on the ceiling. All of them differ in the brightness of the glow and the width of the cast strip.
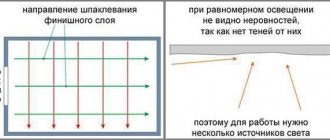
Rice. 2: Light strip width Look at the figure, the above parameters directly depend on the installation location of the lighting fixture. The brightness of the illumination is inversely proportional to the bandwidth.
If you only want to emphasize the contour as a decorative finish, then you should do less. If you want to make hidden lighting as a night light or even full-fledged lighting in a two-level ceiling, the strip should be as wide as possible.
[my_custom_ad_shortcode5]
Installation of LED strip on plasterboard structures
The emergence and development of such an element of technology as the light diode made a revolution in terms of arranging room lighting. This element is very simple, it is a conductor in the form of a crystal. When an electric current passes through it, it begins to emit a glow.
Different materials can produce a glow of different colors. The power supply system ensures the reliability, safety and longevity of LED strips. The transformer for this type of lighting operates on the 220-12 volt principle.
That is, reducing the voltage from the household network to an acceptable level. It is also important to choose the right power source in terms of power. Most adapters are designed for standard tapes up to 5 meters long. If you purchase a longer cable, you will also need a corresponding power supply.
This parameter is calculated in electricity consumption per meter of tape. Manufacturers offer LED strips with power from 4.8 W to 25 W per meter. Electricity consumption and the luminosity of the device will depend on this indicator.
In addition, tapes of different power require different power sources (transformer). Power supplies for five-meter loops operate from the mains, supplying 12 volts to the device. The control system or controller makes it possible to regulate the operation of the LED strip: reduce or increase the brightness, change the color, or set the light-music mode with blinking diodes.
The simplest models of controllers can change the color of the glow at most, but more expensive models can operate in different modes. Installation of LED strip in the ceiling has become a classic today. There are several types of ceiling lighting with gypsum plasterboard, but the most commonly used in various versions is hidden. Hidden lighting is mounted on multi-tiered structures in a niche specially made for this purpose.
Installation of drywall is carried out in two tiers. The second forms a niche in which a separate profile for the LED strip can be located.
What type of lighting fixtures should I choose?
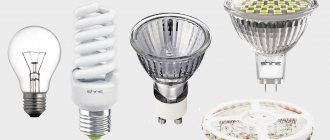
Depending on the type of light source, all devices for hidden lighting are divided into incandescent, fluorescent, neon, LED, and xenon (halogen) lamps.
- Incandescent is the simplest option and the cheapest. Disadvantages include high energy consumption and high temperature of the lamp itself, which can damage the ceiling canvas. They also often fail when the thread burns out.
- Fluorescent ones are more economical than incandescent ones, but are quite capricious in operation, so such devices are rarely used for hidden lighting.
- Neon lighting is great for installation around the perimeter of a room in straight lines or along a curve. This type of lighting device is made in the form of a cord filled with gas. Manufacturers offer about 60 shades for hidden lighting. But to turn them on, a high voltage is required, obtained from a converter unit or transformer, and the main disadvantage of neon light strips is their fairly high cost.
- LED - characterized by the most efficient use of power in relation to the resulting luminous flux. When installing LED strips, you can perform shaped lighting on round and straight surfaces. They have a wide range of colors, and RGB strips can change color when adjusting the control unit from the remote control or manually.
[my_custom_ad_shortcode4]
Niches made of plasterboard with lighting: how to make a frame and install lighting
- Partially compensates for the space wasted when leveling the walls.
- Provides convenient and reliable placement of household appliances. It is problematic to attach shelves or hang a TV on the gypsum board surface. A specially equipped niche will save the situation.
Mr. Build recommends: take the required dimensions from the frame, not from the drawing. During the installation process, changes in the dimensions of the structure are possible, and if the measurements are incorrect, the pieces of plasterboard do not fit together.
- Drywall. In most cases, a regular wall modification with a thickness of 12 mm will do. For rooms with high humidity, moisture-resistant plasterboard is used. Fireproof is used if the niche is combined with a powerful electric fireplace.
You can also cut the sides on the guide at certain intervals, as shown in the photo. The smaller the bend radius, the more often the cuts are made. The profile processed in this way can be easily bent to the required angle.
- Marking lines are applied to the plasterboard.
- A paint knife is used to cut through a layer of cardboard on one side of the sheet, after which it is carefully broken and turned over.
- The top covering is cut through on the second side (as in the picture).
How to make a plasterboard ceiling with lighting
- UD - guides. They are mounted on the ceiling and on the wall, also in the middle of the structure and at the place where the side is attached, if provided.
- CD is a load-bearing profile of greater rigidity. Racks and lintels are made from it, to which a plasterboard sheet is attached.
On the back side of the installed side we attach vertical posts from the CD (ceiling) profile. Their length is small - 9.8 cm (12 cm height of the box, minus 1 cm for installing profiles, and another minus 1.2 cm for the thickness of the gypsum board screwed on from below). These are glass tubes filled with a mixture of inert and luminous gases.
The brightness of the glow changes with changes in current strength, which is regulated by the convector. These devices are installed every 5 meters, their power consumption is about 100 W, and they do not make noise during operation. From the front side, we attach a strip of plasterboard 12 cm wide to the guide profile on the ceiling.
This will be the back side of our box. We fasten it around the entire perimeter with self-tapping screws with a screw at a distance of about 10 cm. In each segment, the lower part is trimmed. The side walls are removed so that another guide profile can be screwed on. As a result, its bottom shelf should be flush with the profile screwed to the wall.
The installation step of the vertical posts is about 40-50 cm.
- perforator;
- drill with drills;
- construction or laser level;
- tape measure with pencil;
- spatula;
- metal scissors and a drywall knife.
Most often, LED strip is used to create illuminated ceiling or wall structures. This popularity is due to a number of advantages of the LED strip: I was focused on ” >, but they have a 60x27 profile along the internal contour and with 2 sheets of gypsum board the shelf height is already 80 mm, which seems to me to be a lot, so I sketched out my own version. Will he be tough? I started with a picture from this forum” >I want to make niches out of plasterboard around the perimeter of the room and hide LED lighting inside. In addition to it there will be 6 LED rotating spotlights. 3 pcs. on the long side of the room.
There will also be a niche for the cornice. Available
How to treat the surface → Room decoration → How to choose the right paint → Surface treatment technologies → Leveling and finishing the walls → Selecting and applying a primer → Removal from the surface → Stretch ceilings and technologies → Reviews and testimonials
Preparatory work
Before installing a plasterboard niche under LED lighting or other types of it, it is necessary to carry out preliminary preparation, which consists of the following:
- removing all irregularities from the working surface;
- treating the wall with a primer;
- applying markings to the wall for attaching profiles.
It should be remembered that marking should be done only with the help of a building level, otherwise there is a high risk of curvature of the future structure.
Marking – it is worth noting here that before the procedure it is necessary to level the surface, get rid of bumps, irregularities and roughness. After this, you need to draw all the lines, they must be perfectly even and located strictly perpendicular to each other. To avoid unevenness in the niche frame, you can use a special level, which is great for creating even markings.
A very important point in marking is that you need to calculate all the dimensions as accurately as possible, not forgetting the thickness of the plasterboard sheets, as well as the size of the screwdriver, because it must fit into the structure for installing the side walls.
Fastening profiles - all profiles must be secured along the lines through a sealing tape; dowel-nails are perfect for this, because they are recognized as the most convenient and strong.
To finish the ceiling and floor with a profile, you also need to adhere to the parallel fastening technique (they must be parallel to the wall), and they must first be cut to their full width. This step is done so that in the future you can easily insert side profiles.
Read also: Making napkin holders with your own hands
Installation of side edges - they must be pre-cut and prepared, which consists of sewing vertical guide profiles onto them. After the preparation procedure is completed, you can begin installation. You need to carefully attach the workpiece to the frame and attach it with self-tapping screws.
If the side walls automatically stand up straight, then the work is going correctly, clearly and smoothly. Next, you need to proceed to installing the profiles into the side faces of the frame. One of the flow profiles must be installed at the top of the niche, and the other at the bottom. To facilitate the procedure, it is better to temporarily fix the profiles with self-tapping screws; this will allow you to cope with the work yourself and without resorting to the help of professionals.
Before installation, you need to make sure that all the sides are located exactly at right angles to the plane of the wall, this is necessary in order to avoid distortions. Next, you will need 4 pieces of PN slightly shorter than the thickness of the box, which need to be installed in vertical blanks, but so that they rest on the horizontal ones and secure it all with self-tapping screws.
Inserting vertical PP - they must be installed in the previously obtained segments, and then mounted into the box itself. To give the frame greater strength and stability, you can supplement the structure with special ceiling profiles, one of which is installed between the floor and the beginning of the niche, and the other between the ceiling and its end.
