Hello readers of my blog! Today we will talk about how to properly make the floor in an apartment with your own hands. It would seem that the matter is not tricky, but when you are faced with this problem, you have to think about how to do it correctly, what preparation to do, what materials to choose. Thus, I decided that this article would be useful to someone, and I am devoting my efforts to this subject. In it I will answer a number of questions that will arise immediately before How to properly make the floor in an apartment with your own hands, and some even after that. This topic is quite broad, because before work, thorough preparation is necessary, but how to do this? And this is a separate topic. You can learn about all this in great detail in the article below. Replacing the floor in an apartment with your own hands
The need to replace flooring elements in an apartment may arise for various reasons. Regardless of why it was necessary to do a major overhaul, the amount of work that remains is enormous. Replacing the floor in an apartment with your own hands is done in stages.
Reasons why you need to change gender
The list of work to be performed largely depends on the material of the old coating and the choice of a new type of floor surface. In addition, it will be necessary to plan activities related to protecting the premises from dampness and improving heat and sound insulation.
Information on how to change the floor in an apartment with your own hands will help you plan in advance all the stages of implementing your plans.
Types of flooring for apartments, country houses, cottages, offices
Floors in residential buildings, of course, do not bear as high a load as in commercial premises, but a long service life is an extremely pleasant characteristic for any floor covering.
Durability is not directly related to price. For example, those types of floors that we talked about in the article “4 budget ways to decorate a floor” also last quite a long time. Linoleum is in the lead - the commercial, most durable version will retain its performance properties for up to 30-50 years, but the outer layer with a pattern can wear out in places and look ugly. The highest quality tiles do not lag behind - also up to 50 years, if you update the grout and replace areas with chips. But laminate and carpet last a little over 10 years with proper care.
Let's talk about other types of flooring and their service life.
Removing outdated wood flooring
This process is the most labor-intensive and unpleasant, but it is impossible to do without it.
When the old floor covering is wooden, you will need to prepare the following tools for dismantling:
Dismantling begins with removing the baseboards along the perimeter of the room.
If you plan to re-lay floorboards or old boards will be used for the construction of joists, then they should be dismantled very carefully, trying to minimize damage. Use a nail puller to remove previously driven nails, and use a screwdriver to remove self-tapping screws.
When the removed wooden elements are no longer needed, they should be removed from the apartment.
After freeing up the space, they begin to dismantle the logs. Very often they are securely attached to the rough base, so they must be removed carefully so as not to damage the base. Otherwise, you will have to waste time sealing the resulting holes.
When the old covering is removed from the room, it needs to be thoroughly cleaned. Upon completion of this procedure, you can begin preparing the floor for installation.
Flooring in a private home: what you need to know to make the right choice
The desire to equip your home with a durable and super-reliable floor haunts any private developer. In order to find out which floors are better in a private home, let’s briefly look at the characteristics of the most used structures. These floors can be wooden, concrete or formed on a screed base.
Wooden floors
Wood is known to retain heat well and is environmentally friendly. However, wood is not resistant to moisture, so there will be a need to use waterproofing materials.
Concrete floors
Concrete floors in a private home are considered to be the most durable. But there is a drawback here too. Such a monolithic floor must be supplemented with careful insulation, since concrete itself is a very “cold” material.
Dry floor screed
A floor with a dry screed is relatively young. Dry floor screed has excellent thermal insulation; the main thing is to lay and compact all layers perfectly so that there are no distortions.
Concrete floor cleaning process
Old concrete pavement is removed only as a last resort, since it can usually be repaired. Major repairs of such a floor are done on the condition that it cannot be preserved.
For example, when the concrete base was regularly exposed to water and was not dried.
During this time, fungi and other microorganisms harmful to human health began to multiply in the concrete structure. The coating in this condition must be dismantled.
Also, sometimes the concrete floor is removed if the apartment has low ceilings, and it is planned to install a floor with thermal insulation, as a result of which it will be raised by some distance. The old coating is removed and thereby frees up space for installing the insulating structure.
When deciding to remove the screed, you must remember that it was installed on the interfloor ceiling, and therefore it should be removed with extreme caution.
The concrete layer is removed using a hammer drill, splitting it into separate fragments. Typically the height of the screed is 50–120 millimeters. After its dismantling, construction waste is removed.
Flooring in a private home: what you need to know to make the right choice
The desire to equip your home with a durable and super-reliable floor haunts any private developer. In order to find out which floors are better in a private home, let’s briefly look at the characteristics of the most used structures. These floors can be wooden, concrete or formed on a screed base.
Wooden floors
Wood is known to retain heat well and is environmentally friendly. However, wood is not resistant to moisture, so there will be a need to use waterproofing materials.
Concrete floors
Concrete floors in a private home are considered to be the most durable. But there is a drawback here too. Such a monolithic floor must be supplemented with careful insulation, since concrete itself is a very “cold” material.
Dry floor screed
A floor with a dry screed is relatively young. Dry floor screed has excellent thermal insulation; the main thing is to lay and compact all layers perfectly so that there are no distortions.
Carrying out preparatory activities
Before laying a new floor covering, the base, cleared of old material, must be brought into proper shape:
Dust is removed from the surface to see if there are any defects in the base, such as cracks or crevices, or areas with loose or crumbled pieces. Also pay attention to the presence of traces of mold and dampness.
If the above defects are detected, they must be eliminated - otherwise the effect of thermal and sound insulation will be less.
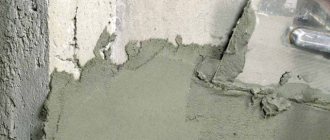
To do this, use cement mortar, sealant or foam. The choice of material depends on the extent of damage to the base. If fungus or mold is detected, the concrete is treated with impregnating antiseptics. After the subfloor has dried, the list of further measures depends on the type of new floor surface.
It should be noted: before changing the floors in an apartment from cement-sand screed to wooden floorboards, you will still need to install a new thin concrete layer.
Natural = environmentally friendly?
Let's just define the concepts right away. “Environmentally friendly” is not at all the same thing as “naturalness,” although often natural houses with natural finishing materials are among the most environmentally friendly. The concept of sustainability has become a gold mine for entrepreneurs today. After years of negative information about the dangers lurking in our homes in the form of new furniture, flooring or windows, most people would give anything to replace the silent killers with eco-friendly walls, furniture and flooring. Moreover, clay floors in a cottage, walls made of firewood in a country house and pebbles underfoot in the shower no longer cause laughter.
So, what is eco-friendly flooring? In official terms, this is the property of all structural elements not to emit harmful substances, especially during operation. This provision is even spelled out in the MDS 31-12.2007. But keep in mind that sometimes even the most natural coating has to be laid only with glue - and this is no longer environmentally friendly. That’s why we’ll now look into everything in detail - both the coatings and the methods for laying them.
Creating a new screed
There are several ways to make a new screed. When there are slight differences in height on the rough base and it is planned to lay a wooden floor on it, then its surface can be made ideal using a self-leveling coating such as in the photo. It is able to level out minor defects and flaws existing on the base.
All materials have their own maturation period, which depends on the components included in the dry building mixture.
Marmoleum or natural linoleum
This modern flooring option is environmentally friendly because it contains jute fiber, linseed oil, natural dyes, wood resins and other components of natural origin. Thanks to its antibacterial properties, it is ideal for use in hospitals and kindergartens. This material does not accumulate dust and dirt, and its wear resistance only increases over the years.
Marmoleum - natural linoleum
It is produced like regular linoleum - in rolls, but there are also marmoleum tiles with a click joint, which are laid similarly to laminate - Marmoleum click. Unlike ordinary linoleum, marmoleum tiles have a very wide variety of colors.
Marmoleum in the children's room
However, during transportation, natural linoleum should not be bent, otherwise it may break. It is recommended to lay marmoleum on a perfectly flat surface, and in the first week after installation, point loads on the floor should be avoided (for example, you should not place heavy furniture or walk in heels).
Screed plus expanded clay insulation
A completely different version of the screed is used when it is poured onto expanded clay - a good heat and sound insulating bulk material (for more details: “How to make expanded clay floors with your own hands”). In addition, it is lightweight and therefore its use will not put a strong load on the interfloor floors.
This is a very important point when arranging such screeds in an apartment, which are performed as follows:
When installing a concrete layer on the lower floor, located above a cold basement, waterproofing is first done. It can be mounted in different ways, for example, cast, glued, plastered, etc.
Waterproofing material must be placed both on the floor and on the lower part of the walls, which have been previously treated with a primer.
A thick polyethylene film is placed on the already prepared surface so that it extends 15-20 centimeters onto the walls. The pieces of material are fastened with special tape.
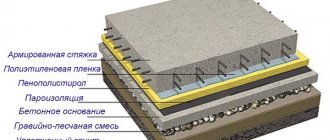
A damper tape is glued on top of the film along the perimeter of the room, which helps keep the screed intact in the event of temperature changes. Beacons are placed on top of the waterproofing and leveled.
They are usually fixed with concrete mortar. The height of the landmarks should correspond to the sum of the thicknesses of the expanded clay layer and the screed. Expanded clay is poured slightly lower than the edges of the mounted beacons and leveled. Concrete solution is poured on top. When the screed dries, it will sag a little and finally it can be filled with a thin layer of self-leveling mixture.
Any type of decorative coating can be laid on top of such a base.
What base to use
The rough foundation in an apartment can be made from:
2. Semi-dry screeds.
Wet screed
· Long drying time. After pouring, it should take about 30 days or more for complete hardening.
· Shrinkage may occur as moisture evaporates.
· Various engineering systems can be installed in the screed.
· To achieve the required level, a thick layer can be poured without consequences.
Provided that there will be at least three people pouring the screed: one on the batch, the second on the rule, the third on the tray, then on average you can fill the screed per working day with an area of up to 50 m2 with a thickness of about 50 mm. In this case, it takes about a day to install the beacons.
Semi-dry screed
· Dependence on weather conditions. It is prohibited to perform work at sub-zero temperatures.
· Excellent quality is maintained at high speed.
· After time, cracks do not appear on the surface.
· Eliminates the possibility of water leaking into the lower room.
· Unlike wet screed, semi-dry screed is 15% cheaper.
Dry screed
· Hydrophilicity. Let me explain: if a pipe breaks under a dry screed, then the screed will have to be completely re-done, with preliminary dismantling work.
· Little weight. Three times lighter than wet concrete screed.
Important! In one day, a team of qualified specialists is capable of producing 50 m2 of dry screed.
Installation of dry screed
Another way to level the base before changing the floor in the apartment is the so-called dry screed. This base reduction option is excellent for multi-story buildings. Its advantage is that there is no need to mix a solution containing water.
A polyethylene film is laid on the surface of the base so that it covers the wall to the thickness of the future floor covering with a 5-10 cm margin. A board is placed in the doorway to prevent the dry mixture from spilling out.
Beacons made of wooden beams or metal profiles are mounted on top of the film.
The landmarks are leveled using a building level until a horizontal plane is obtained. Filler is poured onto the film, the layer of which should be several centimeters thicker than the level of the mounted beacons.
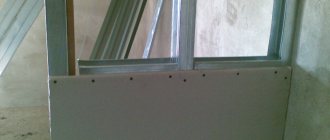
The dry material is leveled according to the guidelines. At the end of the process, GVP (gypsum fiber boards) with interlocking joints are laid.
The mating areas are treated with adhesive and the next panel is applied so that the locking elements fit smoothly.
The plates are additionally fastened with self-tapping screws. A decorative coating is installed on top of the prepared surface depending on personal preference.
No. 1 - Laminate
Among all floor coverings, this option is the most commonly used. Why is laminate so popular? It's simple: it's inexpensive, easy to install, practical, beautiful type of covering that's easy to install yourself.
Laminate is a material consisting of lamella boards with special locking joints that allow the floor to be assembled without the use of glue. However, types of laminate that are glued on also exist, but now such options are rarely seen on sale. When assembling the floor, the locks of two adjacent lamellas are connected to each other until they click, and thus two adjacent elements are securely fastened to each other. This is how the entire coating is assembled.
Laminate installation process
The laminate itself consists of several layers. In the middle there is material from wood processing waste, at the bottom of the lamella there is a protective layer, and above the wood material there is a layer with a pattern, usually imitating wood. On top of it is a laminated layer, which can be smooth or have a wood structure. The top and bottom layers are not afraid of moisture and protect the material from it and a number of other influences - for example, abrasion. But still, laminate itself is afraid of water. And, similar to most of the options described above, it cannot be installed in a bathroom or toilet. But for the kitchen, laminate flooring is quite suitable.
The material as a whole is not capricious, but requires special attention. Thus, installation of the laminate should be carried out on a flat surface free of debris using a special substrate. Otherwise, the coating will begin to creak over time and quickly become unusable.
It is also important to understand that moisture is dangerous for laminate flooring, and you should not spill anything on it, and if this happens, it is important to quickly wipe the floor to remove the moisture.
- looks good
- inexpensive
- There are several strength classes
- ideal for decorating floors in almost all types of rooms
- easy installation
- It is not necessary to use glue during installation
- tactilely pleasant
- can be bought at any hardware store
doesn't like moisture
Wooden floor structures
The wooden floor in the apartment is being replaced with a pre-equipped screed. The flooring is made either on logs or directly on a concrete base.
Typically, property owners choose the first option because it has many advantages.
The fact is that heat-insulating and noise-absorbing materials can be laid between the joists. In addition, the floor structure raised above the concrete enhances the insulating effect. The logs also give the flooring additional rigidity.
The lags in the apartment are replaced in several stages:
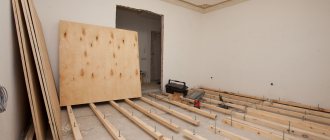
After dismantling the old logs as described above and arranging the screed, the installation of new bars begins. First they mark out the room. To draw lines, use stretched twine, painted blue. Installation is done by maintaining the gap between the joists, which should correspond to the width of the insulation. Then they begin cutting the bars to the required length.
At the same time, we must not forget that they should be installed from the wall at a distance no less than the thickness of the insulation. Most often, mineral wool is used for these purposes. As for the use of expanded polystyrene in living rooms, low-quality products can negatively affect the health of residents.
During the next stage, the logs are fixed to the base.
They can be fixed either on a concrete floor, or raised above it to a certain height, using special pins or metal holders. Between the racks of joists attached to the concrete floor, a distance of 40 to 50 centimeters must be maintained. By adjusting the height of the racks, the level of the mounted floor surface is brought to a horizontal plane.
Then the insulation is laid. First of all, this procedure is performed between the joists and the wall along the perimeter of the room and then between the bars. At the next stage, the entire assembled structure is covered with a vapor barrier film, fixing it to the joists with a stapler.
Creating plank flooring is one of the most important processes.
The first floorboards are laid at a distance of 5-7 millimeters from the wall, thereby creating a ventilation and compensation gap in case of linear expansion as a result of increased humidity or temperature changes in the room.
When the plank floor is laid, a plinth is attached on top of it. Fix it directly to the wall, and not to the wooden floorboards. If plywood was mounted on top of the joists, the joint of the two sheets should be positioned so that it falls in the middle of the joist. In order to impart additional rigidity to the surface, plywood sheets are fixed in a similar way to bricklaying, shifting the subsequent element by half of the product.
After completing the laying of the material, you need to seal the gaps between the sheets with putty, and after it has completely dried, the surface should be sanded. You can install different floor coverings on plywood, completing the design of the floor by installing skirting boards.
Often, a wooden floor is replaced with a concrete one in an apartment as a result of a decision to lay flooring such as tiles, laminate, etc.
Dismantling and installing the floor structure yourself will help you save a significant amount, since such services from professionals are expensive.
Making a self-leveling floor with your own hands
The goal of developing self-leveling floors was to reduce the labor costs and installation time associated with outdated leveling and finishing schemes.
A wide range of compositions are excellent in solving both problems, allowing in a short time to create a durable, perfectly smooth, monolithic surface, pleasing with tightness and the absence of seams.
Technological priorities are justifiably added to the list of operational advantages, thanks to which a home craftsman who does not have a construction specialty on his track record can fill the self-leveling floor with his own hands, subject to scrupulous observance of the rules.
Types of floors for private houses, their advantages and disadvantages
Wood flooring and concrete are most often used as flooring. Currently, self-leveling floors are becoming popular and are often used to furnish one or more rooms. Which material is better to choose for your home? In order to make the right decision, it is necessary to consider the advantages and disadvantages of each type of coating.
Wooden covering
Wood attracts consumers with its environmental friendliness. Pros of wooden floors:
- when choosing high-quality material, there is no need for flooring;
- retain heat well;
- do not create a large load on the supporting structures of the building;
- a damaged board can be easily replaced with a new one;
- you can change the design, since wood lends itself well to staining.
When arranging wooden flooring, you need to take into account the construction features. If a private house does not have a basement floor, then it is better to build a double floor to place a layer of insulation between the rough and finishing coating. Wooden boards of lower quality are used as a rough layer. Wood floors have a number of disadvantages:
- for installation it is necessary to provide additional structures - logs, which makes installation labor-intensive;
- it is necessary to treat materials with fire retardants and special substances to reduce fire hazard and increase service life;
- with increased humidity in the room, the wood begins to rot;
- wood is susceptible to rodents and insects;
- When it dries out, cracks form and the boards crack.
Concrete floor
The popularity of concrete floors is due to their durability. The benefits also include:
- quick and easy installation;
- cheaper than wooden ones;
- moisture resistance;
- high strength;
- not interesting to rodents and insects;
- fire resistance.
However, concrete creates additional load on the foundation and supporting structures of a private house, so you need to make calculations first. For wooden cottages and the second floor, a concrete floor is not the best solution. Other disadvantages:
- if the installation technology is violated, the concrete may crack;
- filling requires the use of rules and special beacons to control the level;
- after pouring, you cannot immediately begin using the premises (it takes about a month for the surface to completely dry);
- In living rooms, concrete floors should not be left without a floor covering, as they are cold;
- Without a fine finish, the surface looks unattractive.
Self-leveling floor
Self-leveling floors attract consumers with their ability to give the room an unusual and attractive look. They are made from special mixtures that can self-level after application to the surface. Advantages:
- a smooth and beautiful floor is created;
- the materials used save the owner from the need to use another decorative coating for the floors;
- There are numerous design options;
- you can move on the floor within 12 hours after applying the mixture;
- coatings retain heat well.
The main disadvantage is the high cost. The disadvantages of the coating also include:
- the need for preliminary preparation of the concrete screed;
- special equipment is required for application;
- If the technology is violated, bubbles form on the surface.
Specific features of self-leveling floors
With some degree of misconception, we include the following in the family of self-leveling floors, popularly called self-leveling mortars:
Despite the fact that they work predominantly in a well-coordinated tandem, are produced by the same manufacturers, and have a similar base, they are different materials, both in purpose and in installation methods. Levelers, which differ from old cement-sand mortars in their optimized spreadability and plasticity, are applied to the floor in the usual way with leveling along the beacons. They do not have the ability to independently form a flat plane under the influence of gravity.
The class of finishing mixtures is called leveling mixtures for a reason. In fact, they are self-leveling floors, colloquially referred to as liquid linoleum.
It is not prohibited to use them to eliminate large base defects, but due to the impressive cost there are few takers.
The liquid consistency and the presence of plasticizers in the finishing options ensure the spontaneous formation of a perfectly flat surface without the use of levels or placement of beacons. Their advantages are less work with incomparably higher results.
Types of coatings for kitchen floors
A well-chosen floor for the kitchen can give the room not only coziness, but also real chic, if the choice of all kitchen building materials was preceded by a discussion of what goes with what, what combination of colors in the kitchen will be the most advantageous, whether a particular floor covering will look good with the kitchen set, walls, curtains.
Professional builders and interior designers advise choosing a coating from the following materials:
- linoleum;
- tiles (tile, ceramic);
- self-leveling floor;
- parquet;
- laminate;
- traffic jams.
The following list is a rating of kitchen floors based on practicality, durability, and cost. The best option is at the beginning of the list and in descending order.
Functions of self-leveling levelers
Levelers are needed to fill the base subfloor. However, their use as a rough basis is completely optional.
A double-primed cement-sand screed, plywood flooring or a plank floor covered with insulation would serve as a perfect base for the finishing polymer coating. It’s just that when paired, materials of the same brand work better, and there are no problems with compatibility. In addition, the polymerization of the leveler occurs 4 or more times faster than the hardening of a screed made of sand and cement.
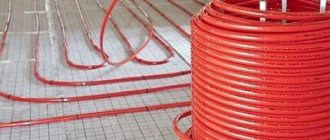
In terms of thermal conductivity, progressive and outdated leveling materials differ slightly. Therefore, in order to increase the thermal insulation qualities of the floor, they are laid over the same insulation materials. And they are also used as a heat-conducting element in underfloor heating systems, if the manufacturer has indicated this possibility in the labeling.
Note. The “underground” water heating system is filled with leveling agent layer by layer, in at least two stages. The pipes are pre-filled with liquid at room temperature.
Wet screed - a universal option
Wet screed is a classic option for leveling the floor. You can lay any clean material on top - be it tiles or parquet.
➕ Pros
➖ Mines
Installation
First, the walls near the floor around the perimeter of the room are glued with damper tape: this is a special tape made of foam polyethylene. The tape creates a soft layer between the wall and the screed.
When the screed dries, under the influence of temperature, it begins to expand and rests against a soft tape, and not against a hard wall. This way, cracks will not form on it.
Before pouring the screed, the craftsmen install a metal mesh on the floor. The mesh makes the screed stronger and prevents it from cracking and sagging. Then the cement is poured.
Wet screed is made from a mixture of sand and cement. There is no need to measure cement and sand yourself - the ready-made mixture is sold in stores. To fill the screed, craftsmen dilute this mixture with water according to the instructions on the package. The mixture is poured onto the floor and leveled.
Secrets of using finishing mixtures
Thin-layer final fill mixtures can be applied over virtually any substrate. You just need to select products in accordance with the manufacturer's instructions regarding compatibility. The priority is still cement and polymer bases.
Leveling proudly appears among the functions of finishing compositions, but since they are mainly filled with a layer of up to 5 mm, it is advisable to exclude gross flaws in the “relief”.
Even if the bumps and depressions can be smoothed out with a leveling mass, there is a strong argument in favor of first eliminating the defects.
Self-leveling floors of different thicknesses will harden unevenly, and strength indicators will vary significantly.
If previously the colorful range of finishing self-leveling compounds was dominated by dull gray and cream tones, now home craftsmen figuring out how to make a self-leveling floor can actively fantasize about their future decor. The result can be a monochromatic color coating with the color specified by the manufacturer, or a 3D version with a unique pattern, covered with an epoxy transparent layer on top.
Noise insulation
I recommend that when pouring the screed, be sure to lay a layer of sound insulation. I suggest you compare several of the most available technologies.
Styrofoam
· The presence of joints, which reduces sound insulation properties.
The cost of polystyrene foam per m 3 with a thickness of 10 mm is 280 rubles. (I couldn’t find a price for the work)
Mineral wool
In my opinion, mineral wool is one of the best building materials, providing excellent sound insulation of the floor. However, mineral wool cannot be poured into concrete. It is only suitable for wooden floors. For example, laying between floor beams.
· Throughout the entire service life, mineral wool retains its properties.
· Difficulties during installation (it is necessary to wear protective clothing).
The cost of mineral wool per package differs based on its thickness. For example, mineral wool 100 mm thick 600×800 mm costs 450 rubles. Mineral wool 600 mm thick 600×100 mm costs 650 rubles.
Important! The cost of installing sound insulation with mineral wool per m 2 will cost 200 rubles.
Expanded clay
If the screed is poured, then in my experience and practice, expanded clay is the best solution. Its price is much lower. The price depends on the faction. It is sold in bags. For example, a fraction of 10–20 mm with a volume of 0.05 m 3 costs 85 rubles, and a fraction up to 5 mm with a volume of 0.05 m 3 costs 140 rubles.
Important! The cost of filling expanded clay per m 2 is 60 rubles.
· Does not change its structure when temperature changes.
· Due to the low density, it is necessary to fill in a soundproofing cushion of a decent height. Impossible to implement in apartments with small ceilings.
Why is composition information needed?
Regardless of the basic or final purpose, the mixtures include a similar set of components, these are:
The binding components of foreign mixtures are polymers, due to which the characteristics are improved along with a parallel increase in prices.
The formulas of dry mixtures also include dyes that determine the color of the future floor or base background for applying stencils, hand painting, banner images, etc. To increase the bonds between the hardening components of the self-leveling floor, microfibers are included in a number of self-leveling mixtures. Their chaotic direction firmly connects the ingredients in all possible directions, eliminating the possibility of cracks.
The main component that influences the choice of a mixture suitable for arrangement is its base. Owners who want to install a self-leveling floor with their own hands need to deal with this issue before purchasing the material:
To install heated floors, you will need a leveling mass with increased elasticity, capable of expanding and contracting without forming a network of cracks.
If you want to complete finishing at an extremely high pace, you need to pay attention to fast-hardening products. There are also universal dry materials suitable for rough and final leveling; you can buy a mixture labeled “extra strong” for laying coatings without first strengthening the base. Information about specific properties is available on the packaging.
Making the floor with your own hands
First of all, it is necessary to assess the scope of work and outline a step-by-step action plan:
These factors will determine the further progress of work.
You have weighed the pros and cons, assessed your skills and abilities, and come to the decision to make the floor yourself. Great, you will succeed.
In most apartment buildings, the floor foundations are reinforced concrete slabs.
A sign of replacement of wooden floors is a mournful creaking, the formation of gaps, even the floor boards falling under your feet.
If there are existing flaws, it is better to breathe fresh life into the floor, which means replacing the old coating with a new one.
Options for installing self-leveling floors
The layout of the floor using self-leveling solutions depends on the planned thickness of the fill, on the degree of destruction and on the material from which the base is made:
A thin finishing layer of up to 0.5 mm is poured into a fresh screed, the surface of which complies with technical regulations.
Thin-layer liquid linoleum must adhere firmly to the base. To increase adhesion, the rough base is coated with primer. Often, to improve adhesion, the underlying cement floor is pre-treated with a coarse abrasive or scraper, and then coated with a primer.
The self-leveling floor, cut off from the base by a separating layer, is placed above the wooden base and above any type of screed with a layer of 1.0-2.0 cm.
To form a separating layer between the wooden floor and the fill, oiled paper is laid with an overlap. The boundary between the screed and the self-leveling floor is created by treating the surface with waterproofing impregnation. In this case, the poured layer does not adhere to the surface of the rough base.
Thanks to the separator, the eternal movements of wood will not cause damage to the floor, and the cement screed will not draw out moisture, creating unwanted cavities and sinks in the body of the fill. By the way, this principle is used to create 3D floors with a volumetric effect, only the separator is a banner with a design, a sticker or an original image made with acrylic paint.
Floating-type self-leveling floors are used in the case of subsequent installation of laminate, linoleum, parquet floor tiles - i.e. coatings that tend to change in a linear direction with temperature fluctuations and unstable humidity levels.
The reason for the preference for a floating floor may also be a thickness of 2.5 cm or more, which does not allow the self-leveling floor to harden without defects. The separating layer is created from polyethylene, rolled waterproofing or parchment, laid in strips with an 8-10 cm overlap.
It is necessary to lay the divider with 10-15 cm allowances on the walls. The floating layer is cut off from the walls with a damper tape used to ensure floor movement and for sound insulation.
The separator and damping material, which rises above the floor plane, is cut off before installing the baseboard and the seam is covered with it.
These are only the basic schemes for constructing self-leveling floors, which, if necessary, require modification and modernization taking into account specific conditions. In reality, there are many more options, but the principles are general.
How to pull together boards
The easiest way is to cut a piece with a groove from the same board.
And use a hammer to adjust the boards to each other. But this method is not for perfectionists. If you have the opportunity and desire, then you can make one of the magical devices.
Device for pulling together boards
In this video, the author demonstrates the operation of this thing: https://www.youtube.com/watch?v=PMEzEffA2-U
Unfortunately, the author did not give the dimensions.
Second device
Andrey Shaiter is famous for his extremely useful videos. And then he turned up the heat. I assembled a device from plywood, tested it and already made a tool from a 25x25mm square aluminum pipe. All sizes are in the video.
A self-builder doesn’t need such thoroughness; it can be made from plywood. It won't be difficult to assemble a couple of these pieces.
In fairness, it is worth mentioning the device from Kreg. This dream of a perfectionist costs 6000 rubles. Ideal angles, drilling and tightening with stops will eliminate pinching and cracking. Suitable for cladding walls, terraces and of course floors.
Rules for pouring self-leveling mortars
You can pour the sealed leveling mixture onto the floor in rooms with equipped window and door openings. There should be no drafts; you should forget about ventilation using natural and forced ventilation while the floor is hardening.
The solution, without external coercion, needs to lose moisture during the ripening process. The temperature during this period should be stable without readings below 5º C and without rises above 20º C. Priority humidity is 60%.
We will assume that the leveling and climb to the planned altitude have already been completed, i.e. We have already created the base layer or we use an existing tiled, cement or plank floor as it. Next, we find out how to make self-leveling floors with our own hands and say the magic word “so.”
Preparing the surface for the upcoming treatment:
We repair a concrete or cement subfloor, widen the cracks to the width of a centimeter and fill them with a repair compound, cement-sand or a mixture intended for future filling. We cut off noticeable raised bulges with a puncher and remove unreliable segments. We fill the cavities and small depressions remaining after removal with mortar and level them flush with the plane of the rough base. We check the floor tiles for strength of fixation.
We treat unreliable elements like concrete hills. Fill the seams and recesses with mortar.
We repair wooden floors according to the rules for their restoration. We replace questionable elements, renew fasteners, foam the cracks, fill them with wood glue with sawdust or sealant.
We remove oil paint, grease stains, and residual detergents using solvents, then carefully remove dust and dirt from the floor with a damp cloth and a vacuum cleaner.
Depending on the chosen scheme for pouring the leveling mixture, we prime or cover the insulation layer. We place a damper tape around the perimeter if a floating floor is to be constructed.
Requirements for floors in different types of rooms
When choosing the material and type of coating, it is necessary to take into account the purpose of the rooms. Requirements for floors in different rooms:
- Hallway. A large amount of dirt accumulates here. Floors are subject to high mechanical stress. You need to choose durable, moisture-resistant coatings that are easy to care for.
- Kitchen. The room is exposed to hot fumes, and dirt often gets on the kitchen floor. Coatings must be moisture resistant and easy to clean.
- Living rooms. For them, it is necessary to select environmentally friendly coatings that retain heat.
- Bath and toilet. These rooms have high humidity. Floors in bathrooms and toilets must be moisture-resistant and not deteriorate from exposure to household chemicals.
Filling process step by step
The solution must be mixed strictly following the instructions of the material manufacturer. Violations of proportions and deviations from instructions, entailing a deterioration in technological qualities and operational characteristics, are not allowed.
Important. Polymerization of the mixture for manual pouring occurs after 35-40 minutes. after cooking. Accurate data on the life of the solution must be indicated on the packaging.
Due to the short period of time when the solution is suitable for pouring, attempts to install a self-leveling floor without an assistant must be nipped in the bud. It is better to enlist two pairs of friendly hands and initially distribute responsibilities. One prepares the mass, the second pours it, the third distributes it with a spatula or a long-handled iron.
All that remains is to list the actions, following the sequence:
We install a limiter in the doorway - a rail, a piece of drywall or profile. We will do the same if it is not possible to fill in one step in a room that is too large or if you plan to install combined floors. Pour the mass prepared according to all the rules into strips no more than 50 cm wide.
The first lane runs along the wall opposite the entrance. Avoiding any breaks, fill in the second strip, at the same time evenly distributing the solution with a spatula or iron. And we continue like this until the end of the work. We treat the filled layer with an aeration roller, due to which the self-leveling floor will be free of air bubbles. During processing, we move along the surface in paint shoes - shoes with support spikes on the sole.
We cover the filling with polyethylene and wait the time required according to the instructions for the self-leveling mass to mature.
If the surface needs to be given anti-slip properties, the poured floor is sprinkled with washed sand or not too zealous, expelling air from the mixture with an aeration roller.
The “craters” left from the bursting bubbles will interfere with sliding.
It’s not difficult to understand the technology of applying self-leveling flooring, and it’s also easy to do it with skill. You just need to find out all the important points in advance, take into account the technological specifics and plan your actions correctly. Knowing the nuances of pouring will not harm those who decide to entrust it to workers.
How to make a plank floor in an apartment with your own hands
Wooden flooring, as in the photo, is very common in apartments and private houses, because they not only have a decent appearance, but are also reliable.
To make a wooden floor in an apartment not only beautiful, but also durable, you need to choose the right material and install it according to the technology.
Choosing a floor base and a method for constructing a good floor
Arranging a floor in a country cottage, in a country house or in your own home is a serious and responsible task that many try to solve on their own. However, without studying the features of the technology, it is problematic to give a clear answer on how to make a floor in a private house. It is important to think through not only design issues, but also decide on the method of installing the floor base and the materials used.
A serious and responsible task: arranging the floor in a country house
The most common in the private sector are the following self-installed flooring options:
- wood. The main advantages of wood flooring are environmental friendliness and increased thermal insulation characteristics. At the same time, wooden boards are characterized by increased hygroscopicity and require effective waterproofing protection. The wooden floor is laid on support beams located above the ground surface, on wooden beams resting on brick pedestals, as well as on planks laid on a concrete or cement screed. Building a wooden floor is not difficult. The plank base is durable, maintainable and attracts attention with its original texture. The correct selection of material for a plank base determines the performance characteristics. It is important to use dried wood, the moisture concentration of which does not exceed 12-14%. The use of boards with defects in the form of cracks, falling knots and chips is not allowed. The materials used are coniferous trees and hardwood. Impregnation of boards with antiseptic compounds ensures the durability of the structure;
Environmental friendliness and increased thermal insulation characteristics are the main advantages of wood flooring
- concrete. It surpasses all types of floor bases in terms of strength characteristics and service life. When making a concrete screed of increased height, the concrete mass is additionally reinforced with a reinforcement grid. It prevents cracking of the monolith. However, the concrete base has a serious drawback - increased thermal conductivity. To ensure a comfortable temperature of the concrete floor and reduce heat loss, be sure to lay insulation in the form of granulated expanded clay, polystyrene foam or extruded polystyrene foam. A waterproofing material is placed on top of the insulating layer, and then the concrete mixture is poured. It is important to use a fresh concrete solution made from Portland cement grade M400 and higher. To improve the appearance and increase thermal insulation, a concrete base is combined with a wooden one;
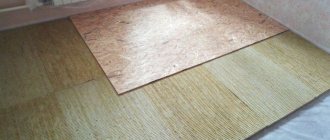
- floor base in the form of a dry screed. This type of floor has gained popularity relatively recently and is a progressive solution in the construction industry. A dry screed is also called a loose floor or a floating floor structure. This type of base attracts with its ease of formation and accelerated pace of work. Dry screed is performed on a planned base, which is waterproofed and then logs are laid. Fine expanded clay, slag or sifted sand are poured into the space between the joists. Then you need to pull off the bulk composition and distribute it evenly over the entire area. At the final stage of dry screed construction, OSB floor boards are laid or sheet plywood is installed. Floor screed with expanded clay is durable and prevents heat loss.
When choosing installation methods and material for the future floor, you should study the design features of the floor base, as well as analyze its advantages and weaknesses.
All types of flooring subfloors are superior to concrete flooring
Features of wooden floors
Wood is considered one of the most ancient floor coverings. Despite its centuries-old history, this material is still widely used in construction and home decoration. This is due to the special qualities of natural wood.
The main ones are:
Attractiveness. The wood pattern is never repeated, it remains unique every time.
In addition, various types of trees are used, each of which has its own unique texture and color.
Thanks to this, you can choose the type of wood that best suits the interior.
Wood is a universal material that suits rooms decorated in a wide variety of styles. Environmentally friendly and safe. If trees grow in a region with normal ecology, then the material is absolutely safe.
That is why wood is considered the cleanest and most environmentally friendly building material. Low degree of thermal conductivity. Such floors excellently retain thermal energy and are pleasant to the touch. You can lay wooden floors yourself, without using the services of specialists. Installation is simple and does not require special skills or tools.
Since wood transmits noise well, it is recommended to use sound insulation when installing floors made of this material.
Any wooden products are susceptible to damage by fungi and microorganisms, so they must be treated with antiseptics and other protective agents.
Wood burns, so it must be impregnated with fire retardants.
If the wood is not treated, it will quickly ignite. Wood absorbs moisture well, so it must be covered with drying oil, varnish or paint. The fact is that this material, when exposed to moisture, changes its geometric parameters (swells, bends), and with further drying the problem only gets worse. But even if the tree is coated on top with varnish or another composition, it still cannot be installed in rooms with high humidity.
Despite the fact that wood has as many disadvantages as advantages, it still does not lose its popularity. All negative aspects will not cause any concern if the wood is properly treated with all the necessary types of impregnations. If you purchase material that has not been treated with the necessary means, the floor covering will not last long.
Which screed to choose for an apartment
If you choose the wrong screed, after a year or two the floors will sag and begin to creak, and cracks will appear between the floorboards.
We will have to completely redo the floors - re-lay the screed and floor covering. And this is expensive and long.
Alexey Kypriyanchik
understands screeds
An experienced professional will know what types of floor screeds are suitable for the client’s apartment. Before the start of repairs, he helps you choose the best way to level the floor. The test takes into account the type of building, the condition of the apartment, time frame and budget.
Experts from the Larson company explained what types of floor screeds there are in an apartment and how they differ.
Prices for the work of masters are given in Moscow; in regions it may cost a little cheaper. Floor screed materials cost about the same everywhere.
How to choose material
The floorboard in the apartment serves for a long time and decorates the home.
But this is only if the material has been processed correctly. Doing this on your own is inconvenient and difficult, so when purchasing, you need to pay attention exclusively to boards that have been treated with antiseptics, fire retardants, and also dried, cut, polished and profiled. In other words, they must be fully prepared for installation.
You need to pay attention to the price - once upon a time, wood was cheap, and wooden floors were found everywhere. Currently, wood has become more expensive, but nevertheless remains a fairly popular finishing material. High-quality wood cannot be cheap, so you should not save.
If at least one of these points is not met, it is strongly recommended to refuse the purchase. Replacing plank floors in an apartment is time-consuming and expensive, so small savings will ultimately only lead to greater expenses.
Solid board, selected taking into account the above points. Timber for logs, treated with antiseptic, antifungal agents and fire retardants. Plywood sheets (preferably impregnated).
They are also cut independently and then treated with stain, copper sulfate, and used machine oil. Plywood is required to create linings when installing level logs
If you plan to create heated floors, then you also need an unedged board of the third grade for arranging the rough covering, as well as materials for heat and vapor barrier. A roll of roofing felt to isolate the joists from the concrete. Strips of material are placed between the concrete base and the bars.
Double wooden floor
If you are wondering how to make a wooden floor, then you are in luck, because we will look at this option in detail, since it is used most often.
If you want to do everything as efficiently and correctly as possible, then try to follow all the points of the instructions below as accurately as possible. So let's get started:
The first step is to lay the beams. They are placed on top of the installed pillars on the support beams. The beginning of any flooring construction begins with this.
Already on these installed parts you need to lay a subfloor made of boards, which should be fitted as tightly as possible to each other.
Absolutely any boards are suitable for this, as long as they have a thickness of two to four centimeters. It doesn’t matter what quality they are, but it is advisable to use coniferous wood material.
Pre-prepared boards are fastened with nails; they should be driven in at an angle of forty-five degrees. The distance from the edge should be at least twenty centimeters.
After the final installation of the subfloor, you need to begin laying the thermal insulation layer. To do this, use foam sheets or mineral wool mats.
On top of the laid layer you need to lay out a six-centimeter layer of expanded clay, and on top of it you need to apply a polymer film. She will be involved in vapor isolation.
Once you have completed all these processes, you can begin laying the finished floor. For this it is better to use high quality boards; they will be attached with nails.
Wooden floor installation
Now about how to make a wooden floor in an apartment. Despite the fact that this work is simple, you should still carefully follow the instructions. The installation process for each specialist is different, but the main points are unchanged - they must be strictly observed.
First, determine the direction in which the boards will be laid. It is desirable that it coincides with the daylight falling from the windows. In other words, the boards should be positioned so that the wall with the window is perpendicular to them. They dismantle the previous covering down to the concrete base, remove debris, and vacuum the room.
If there are flaws in the screed, they are leveled using a self-leveling mixture or putty.
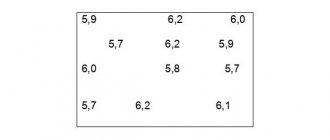
The level of the finished floor is drawn on the walls, which will be equal to the thickness of the coating (or rather, the bars for joists and floorboards) with a small margin of about 5 millimeters. The first joist is attached along the wall with the window opening, and the second – near the opposite one. They must be strictly horizontal and lie in the same plane. We must not forget about laying a double layer of roofing felt.
Twine (rope) is pulled between the logs at a distance of 70-100 centimeters from each other. Using them as beacons, the remaining logs are placed at a distance of 40-70 centimeters, focusing on the thickness of the boards. The larger they are, the wider the step is allowed. You can set the level using pieces of plywood of various thicknesses, pre-impregnated with an antiseptic composition and lubricated with a special wood glue.
The logs are fixed to the floor with anchors and dowels. Gaps of 5-10 millimeters must be left between the walls and joists. They stuff the boards. First, attach the first row of floorboards against the wall using headless nails, driving them into the tongue or bottom of the groove at a 45-degree angle.
Lay out 4 rows of floorboards, but without fixing them. The floor board in the apartment is only compacted with a wooden mallet or hammer using a block.
The fifth row is placed and the planks are pressed with wedges or staples.
In addition to the staple, a clamp or other similar tool is sometimes used as a stop. The boards should fit tightly, without gaps. The row is fixed with nails. The entire floor area is covered with boards, every fifth row is nailed down. The surface is processed using a parquet sander or scraping technique, covered with paint or varnish (read: “Floor sander: the right choice from the options”).
This completes the installation of wood flooring. The floors can be used as usual and furniture can be placed.
It is not difficult to lay a wooden floor in an apartment with your own hands.
With many other modern floor coverings there is much more work involved. You can cope with laying boards even without much experience in construction and repair - it is enough to have an idea of how flooring is done and have a standard set of tools.
If the work is done correctly, following the instructions exactly, the flooring will be strong and durable, and will please the eye for many years.
Well, now it's time to finish the article. All the material I wanted to share has been reviewed. I hope it will be useful to you, and you will use it if necessary. How to properly make the floor in an apartment with your own hands Improve your own practical skills and gain new knowledge, as they say: “It’s never too late to learn!” That's all, thank you for your attention, successful and easy repair!
Floor laying sequence
1. It is necessary to prepare a full set of materials and tools: flooring, insulation, waterproofing, beams for joists, a saw or jigsaw for sawing wood, self-tapping screws, a screwdriver, a building level to control the slope of the floor surface.
2. Logs are laid on the base, cleared of debris and dust, maintaining a distance of 40-50 cm between the bars. The lags are laid starting from the highest point of the floor, so that its surface can then be accurately leveled.
3. The logs are secured to the base using metal fasteners.
4. The floor surface is covered with a layer of waterproofing.
5. Sections of insulation are laid between the joists.
6. Floor boards are laid on the prepared base, starting from the wall farthest from the exit. A small compensation gap is left between the wall and the first board, which is then covered with a plinth.
7. Floor boards are screwed to the joists with self-tapping screws. The fasteners are positioned at an angle of 45 degrees. If a tongue and groove board is laid, it is mounted by connecting the locks all the way so that there is no distance between the boards.
How to properly coat a spruce or pine board with oil
The floorboard is usually made of softwood. This means that it contains a lot of resin. The resin will prevent oil from penetrating into the pores. On his Instagram, the manufacturer gave a way to properly coat spruce and pine with oil.
Question: I heard that oil is of little use on spruce and pine . There, they say, the resin is in the pores and the oil does not penetrate. Are they lying? ) Tell me how to do it correctly. Are there any nuances or differences from hardwood? Manufacturer's response: Resinous rocks can be treated with gum turpentine before impregnation with oil and all resin pockets can be cleaned. After this, soak in oil. There will be no sense if you do NOT process it, especially such porous wood species)
True, they gave this feature in the context of wooden furniture. But the mechanics and process are the same.
Something else worth paying attention to is the polymerization time of the oil. The surface can be used after 1-2 days. But the final formation of the oil layer will occur after 21 days. Until then, it must be handled with care.
Determining the scope of work
There are two main scenarios for the development of events: surface repair or repair with disassembly, and perhaps even with replacement of part of the boards. The second case will not be entirely budget-friendly, but there will be no other way out. Therefore, you can start with a difficult case - with disassembly. The main problem should be identified here:
- If the floor just creaks, and the boards and joists are not damaged, then getting rid of the defect will not be too expensive.
- If the logs or boards are damaged, you will have to replace them.
Each situation will require its own plan of action and must be considered separately.
Benefits of the oil
They won’t describe the advantages here—you can find them online. Very briefly:
- the damaged area can be washed, sanded and re-oiled without redoing the entire floor
- the wood remains to the touch and looks like wood
- “Zhivitsa” is 100% natural. You can work without gloves and respiratory protection. Unless you are prone to allergies to anything and everything. The base is linseed oil. There are no strong odors during work. The oil is washed off in the usual way with soap.
Eliminating squeaks
Determining why the floor creaks is not as difficult as it seems. Most often, this is caused by the friction of the boards against each other or their deflection relative to the plane. Friction causes squeaks when floorboards become dry or damaged. Deflections are a more complex case. Here you will have to change the supporting parts or eliminate the deflection in another way. In both cases, it is better to disassemble the surface in the place where creaks are detected.
After disassembling the surface, you will see the condition of the joists on which the coating rests. If they are in good condition, then the problem can be solved by replacing the damaged floorboards or installing additional support in the place of deflection. If the logs are significantly damaged, then they will have to be replaced. This is not the most budget-friendly repair of an old floor, but it almost one hundred percent guarantees getting rid of the problem. You can try to fill the gaps between the boards with a putty mixture - it will eliminate the creaking for a while, but the quality cannot be guaranteed here.