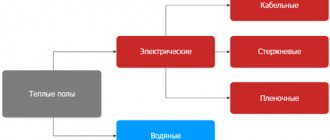
The performance of water underfloor heating depends on the layout and pitch of pipe laying. Therefore, to design a system, it is not enough just to buy components; you also need to calculate the heat transfer, choose the optimal arrangement of rings or turns of the pipeline.
Agree, no one is attracted by the prospect of investing money and not getting the intended effect. You will learn everything about the design of underfloor heating and the schemes according to which underfloor heating pipes are laid from the article we presented.
Familiarization with the information we have verified and systematized will help you create a perfectly functioning heated floor. The basis for the information we offer is the requirements of construction regulatory reference books.
We have outlined in detail the principle of operation of floor heating circuits, described the design options and technologies for their implementation. Informative photos and video tutorials clearly confirm the presented data and make the process easier to understand.
What is the beauty of heated floors?
Due to the fact that the underfloor heating pipes are laid out over the entire area of the room, the most uniform heating of each area is achieved. Wherever you are in your home, you will be equally comfortable.
With water floors, in most cases you get rid of heating radiators, which previously took up extra space in your home. For all these features, water-heated floors are loved in private homes. Let's take a step-by-step look at laying a water-heated floor with your own hands.
Rules for calculating pipe footage
You can calculate the footage of elements for assembling heated floors after drawing up a diagram of the entire system.
When calculating, the following nuances are taken into account:
- Pipes are not laid in places where furniture, large floor equipment, and household appliances are placed.
- The length of contours with different cross-sectional sizes must comply with the following parameters: for 16 mm it should not exceed 70 m, for 20 mm - no more than 120 m. The location of each circuit corresponds to an area of 15 m2. If you do not follow these recommendations, the pressure in the heating network will be low.
- The discrepancy between the length of the lines is no more than 15 m. For a large room, several heating branches are installed.
- Provided that effective heat-insulating materials are used, the optimal pipe spacing is 15 cm. If the house is located in an area with harsh climatic conditions, where the temperature drops below -15°C, the distance should be reduced to 10 cm.
- If the installation option was chosen in 15 cm increments, the material costs are 6.7 m per 1 m2. Laying pipes at intervals of 10 cm - 10 m per 1 m2.
Warm floors can only be equipped with a solid pipe. Depending on the footage, several or one coil with pipes for the water circuit is purchased. Then it is divided into the required number of lines.
When laying pipes, it is necessary to take into account hydraulic losses, which increase with each subsequent turn. It is considered that contours exceeding 70 m should not be used
Work on installing heated water floors always begins on the coldest side of the room. The issue of choosing the optimal route for the coolant is very important - the water temperature decreases closer to the end of the circuit.
Cost of installing heated floors
Many people are interested in the cost of installing heated floors. Let's share some numbers. If we take into account everything described above, then without pouring the screed and without taking into account the boiler room, the cost of components will cost approximately 1000-1200 rubles per square meter. You add the cost of the installer’s work in your region and get the final cost per square meter. If the areas are large, then in some cases this amount includes collectors for heated floors.
Taking into account the boiler room, turnkey installation of heated floors will cost approximately 2,500 rubles per square meter. This cost takes into account a boiler room with one boiler, an indirect heating boiler and related equipment. The figures are relevant for houses from 150 square meters. With a smaller area, the amount may be slightly higher due to the high cost of boiler equipment.
Collector connection diagram
The choice of a ready-made mechanical or automatic collector model depends on the characteristics of the heating system.
The first type of control module is recommended to be installed for heated floors without a radiator, the second can be used in all other cases.
Valtec collector groups are the most popular. The manufacturer provides a 7-year warranty on its products. The installation diagram for the liquid circuit manifold is already included in the package of the finished mixing unit
According to the diagram, the assembly of the distribution comb for heated floors is carried out as follows:
- Installation of the frame. The following can be selected as the installation area for the collector: a prepared niche in the wall or a collector cabinet. It is also possible to mount directly to the wall. However, the location must be strictly horizontal.
- Connection to the boiler. The supply pipeline is located at the bottom, the return pipeline is located at the top. Ball valves must be installed in front of the frame. They will be followed by a pump group.
- Installation of a bypass valve with a temperature limiter. After this, the collector is installed.
- Hydraulic test of the system. Check by connecting to a pump, which helps build up pressure in the heating system.
In a mixing unit, one of the required elements is a two- or three-way valve. This device mixes water flows of different temperatures and redistributes the trajectory of their movement.
Shut-off valves and fittings are installed on both pipelines, return and supply, connected to the manifold installation, designed to balance the volume of the coolant, as well as to block any of the circuits
If servo drives are used to control the manifold thermostats, then the mixing unit equipment is expanded with a bypass and bypass valve.
Brief description step by step
Let's look at the step-by-step process of laying the floor.
Main stages:
- preparation of the base;
- laying out elements;
- sensor installation;
- system connection;
- filling with screed.
Let's look at each step in detail to know all the details of such an important but simple process.
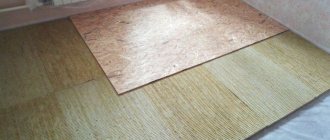
Application of thermal insulation
Electric floor heating elements are mounted on an insulated surface (gypsum fiber board, polystyrene or PVC boards, etc.).
It is desirable that the insulator have a foil surface. It should be located in the border zone, between the cement base and the self-leveling screed.
It should be noted that this installation option is not durable and reliable, but, nevertheless, its popularity is quite high, since it is easy to install.
Preliminary cement-sand screed and fixing the mounting tape
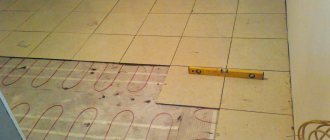
Before laying the heating cable, a cement-sand screed is poured onto the thermally insulated surface. The screed layer will help prevent overheating of the heating cable, and will also create a solid base for laying the heating cable.
If for some reason it is not possible to organize a preliminary screed, you can lay the cable on a metal mesh laid out on top of the thermal insulation (with a fine mesh of 1-2.5 cm). The mesh, in this case, together with the heating cable laid on top of it, is filled with the finishing screed in one step. Due to the metal mesh, the screed is strong and monolithic.
After the cement-sand screed has sufficiently hardened, the floor is covered with special foil-coated thermal insulation (installation foil). The entire surface of the floor is covered with foil, it is laid with a reserve at the joints, and the edges are glued with foil tape so that they do not wrap during the installation of the cable.
Such a heat-leveling screen in the form of foil will promote uniform heat distribution over the entire surface of the heated floor.
To securely fix the heating cable, use mounting tape. Lay the mounting tape on the floor surface every 50 cm and secure it with ordinary nails or self-tapping screws.
To fix the cable on the mounting tape, special brackets are provided, located at equal intervals from each other along its entire length (usually 25 mm). Using these brackets, it is easy to maintain the required cable laying spacing.
Areas of application of electric flooring
Due to its specificity, heated floors are used in conjunction with centralized heating in houses and apartments. Here are a few examples of its effective use:
Heating of kitchens and rooms. This type of space heating helps normalize humidity and temperature. Uniform heating of the floor surface does not allow convection currents to arise, and the electronic thermostat automatically maintains the set parameters.
Use in damp areas. If you connect the system correctly (via an RCD or differential circuit breaker), and also ensure reliable grounding of the electric floor and install waterproofing, then you can take a shower without a tray or rubber mat.
Balconies and loggias. Even on a glazed balcony or loggia you can get a cold in the winter; the situation can be corrected by equipping them with electric floors. This is smarter than making a heating battery there.
Installing and securing the temperature sensor and thermostat.
When the cable is laid completely over the entire surface, you need to install a temperature sensor. It is mounted in a corrugated tube and installed together with the supply end of the heating cable in one groove. A plug is placed at the end of the tube where the thermostat will be located to prevent solution from getting into it.
The tube with the sensor is laid on the floor, between the heating cable lines without crossing them.
In order for the temperature sensor to function normally, it and the tube are fixed in the middle of the cable lines on the mounting tape. The floor temperature sensor with a tube must be located along a cable at least 50-100 cm in length.
The thermostat is installed and connected after three wires have been connected to the junction box: the floor temperature sensor wire, the heating cable power wire and the 220 V mains wire. It is prohibited to place the thermostat in rooms with high humidity. It is not safe!
At this stage, the installation of the electric heated floor is completed. You can start pouring the heating cable system with cement-sand screed.
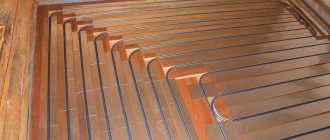
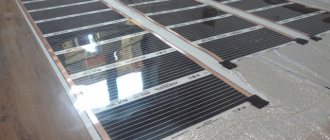
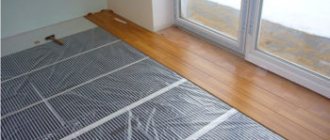
Basic methods of pipe installation
There are only two methods of laying pipes for arranging a heated floor - flooring and concrete. In the first method, ready-made materials are used for the base: polystyrene insulation and modular or slatted panels. There are no wet jobs that require a long drying time, so installation is quick.
When using the second option, the heating network is walled up with a screed. Depending on the thickness of the concrete, the time it takes for it to dry completely is calculated. It will take 28 days to harden and only after that is it possible to install the selected floor covering. This is the most labor-intensive and financially expensive method.
#1: Laying on profile thermal insulation boards
Arranging a warm floor system using this method is the simplest. Polystyrene insulation mats are used as the basis here.
The standard parameters of such slabs are 30*100*3 cm. They have grooves and low posts on which the finishing material is laid.
Polystyrene mats are not hygroscopic, so they do not lose their original characteristics when exposed to moisture. Even though this material is a polymer, it does not contain any components harmful to health.
In this case, pouring a concrete screed is not necessary. If tiles or linoleum are used for flooring, gypsum fiber sheets will initially be laid on the base. The thickness of such plates should be at least 2 cm.
#2: Device using modular and rack panels
In most cases, such panels are used in houses built from wood. Fastening of pipes for arranging a heated floor is carried out on a rough foundation.
The modular system is equipped with chipboard panels 2.2 cm thick, on which the heating lines are laid. These modules are equipped with channels to accommodate aluminum fixing plates. With this installation method, the insulation layer will be located in the wooden floor.
All strips are placed with a distance of 2 cm. Based on the applied pitch between the pipes, strips of the appropriate length (15–30 cm) and width (13–28 cm) are used.
To reduce heat loss, pipe latches are installed on the plates. If linoleum was chosen for the final floor covering, one layer of gypsum fiber boards is laid on the pipes; if laminate or parquet boards are used, they are dispensed with.
The installation of a modular floor is carried out using ready-made elements, which are chipboards. They are equipped with grooves for fixing coolant pipes
The slatted flooring system is almost identical to the modular one, however, it does not use panels, but strips, the minimum width of which is 2.8 cm.
Laying is done directly on the logs in increments of 40-60 cm, and the distance between the slats is at least 2 cm. For thermal insulation, extruded polystyrene foam or fibrous mineral wool is chosen.
Laying of heat-conducting lines is carried out by placing pipes in intermediate holes between chipboard sheets on aluminum plates equipped with grooves
Both methods are more suitable for wooden floors. In other cases, a more complex option with a concrete screed is chosen.
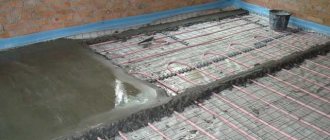
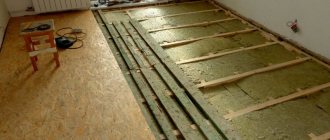
#3: Installation of pipeline with screed
Despite the labor-intensive process, installation of a heating network with a concrete screed is the most popular.
The process consists of the following steps:
- First of all, the base is prepared. Irregularities in the subfloor are eliminated using a hammer drill.
- The first layer is waterproofing material. It is spread in strips so that the edges overlap each other by 20–30 cm. The film should also extend to the base of the walls by 15 cm. The joints are glued with construction tape.
- Thermal insulation is laid over it.
- A damper tape is glued between the future fill and the walls. This action is required to compensate for the expansion of the screed when the floors are heated.
- Laying reinforcing mesh. It helps to increase the strength of the screed.
- Pipes are attached to the fittings according to the chosen pattern using plastic ties.
- A control check of the heated floor system is carried out by filling it with liquid and pressing it.
- Next, the guide beacons are installed.
- The final stage is pouring the cement screed.
For rooms with a large area, the sector division method should be used, with cells no more than 30 m2. For each of them it is necessary to arrange an individual circuit.
If the lower floor is heated, then polystyrene foam with a thickness of 20–50 mm is used as insulation. When there is an unheated basement floor or basement below, the thickness of the thermal insulation should be 50-100 mm. Pouring heated floors with a concrete-sand mixture can be done with or without a reinforcing mesh.
If polystyrene foam boards with connectors for the contours act as insulation, the use of a mesh is not necessary.
When standard thermal insulation material is used, a thin polymer or metal mesh is used to fix the heat-conducting line.
On our website there is a series of articles devoted to the design, installation and connection of water heated floors.
We advise you to read:
- How to make a water heated floor with your own hands: a step-by-step guide from design to assembly
- Connection diagram for water heated floor: design options and device manual
Creating a thermal insulation layer
This type of work allows us to minimize heat loss, and besides, the issue of heating basements (if any) disappears by itself. Again, if you neglect thermal insulation, then approximately 20% of the generated heat will go to waste.
As for the choice of materials, the assortment is quite large: expanded polystyrene, EPPL, mineral wool sheets, cork, profile heat-insulating mats.
To ease the issue of choosing thermal insulation, you can take a closer look at each of the options:
- As for thermal insulation mats, they are highly durable. In addition, their surface is covered with a ready-made vapor barrier film. The installation process is convenient and easy, while the surface structure already has recesses and protrusions that will facilitate the installation of pipes.
- The use of mineral wool slabs helps create good sound insulation. But there is also a peculiarity here - if such material gets wet, then a large amount of heat will “run away”.
- The most common material for such purposes today is polystyrene foam. But here you need to choose the right thickness when laying it, otherwise it will not fulfill its purpose.
Thermal insulation materials
The convenience of these materials is that in most cases they are already sold as prepared slabs. This is convenient for installation, but if a concrete screed is made in the future, the joints must be carefully sealed, otherwise all the moisture from the concrete will go under the layer. To avoid this situation, use tape or cover the surface with polyethylene film.
Experts recommend using a foil backing as an addition. The fastening of such a layer will be a screed that will cover it on top.
What you need
It is very important to plan your budget correctly so as not to save not only on the heating elements themselves, but also on all building materials. High-quality waterproofing is especially important; in some cases it is a decisive factor.
To lay the floor you will need the following materials:
- the flooring system itself (heating elements and reinforcing mesh included);
- connecting wires;
- fastenings;
- temperature controller;
- temperature sensor;
- RCD protection system (residual current device);
- cement with sand;
- copper cable for grounding.
It is also necessary to purchase the flooring in advance in order to determine its thickness, texture and other aesthetic characteristics.
Material selection
The heating cable can have various designs.
Main types of cables:
- Self-regulating. The element is a polymer matrix. When overheating occurs in the fault zone, the current flow is reduced to prevent breakdown. The remaining areas are operating normally. Thanks to this property, a cable of this type has durability and high reliability, but is characterized by high cost.
- Resistant. Consists of one or two wires that have very high resistance. Passing through them, the current is converted into thermal energy. The heating core is protected by a layer of insulation and a metal braid responsible for grounding. However, if one section of the core fails, the entire system breaks down irreversibly.
Installation of the heating branch cable is carried out in a layer of cement fill, which will additionally redistribute heat and perform the function of insulation from cold from external sources.