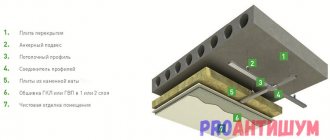
→ Materials
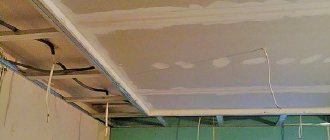
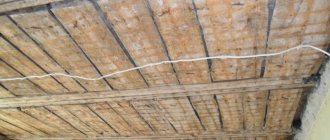
After installing plasterboard sheets on the frame, the suspended ceiling cannot yet be considered complete. The time has come for finishing work, that is, priming and puttying the surface. They are needed so that the wallpaper or paint that you want to apply to the surface adheres firmly. In fact, to know how to putty a plasterboard ceiling and easily cope with this task yourself, you just need to follow the exact instructions using the right set of tools.
Sealing seams in drywall
What will be needed to complete the work?
The tools recommended by experts may vary. What exactly to use is determined by your experience and the complexity of the work you are going to do. The standard set should usually include:
- Container for putty;
- Drill (regular or special) with a mixer;
- Mack brush;
- Grater with sandpaper;
- Painting knife;
- Wide and narrow spatulas.
Sometimes they may also mention building regulations and a spotlight on a tripod.
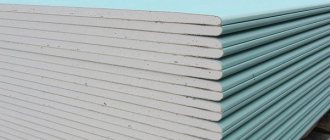
The materials you will need when putting drywall on the ceiling are:
- Serpyanka, or reinforcing tape;
- Primer;
- Putty.
Back to contents↑
Why do you putty a plasterboard ceiling before painting?
Despite the evenness of the material, finishing with gypsum board sheets leaves the joining seams and screw heads visible. In addition, when finishing, a lot of dust accumulates on the surface, and if you do not remove the unevenness by starting to paint right away, the dried surface will be rough, with visible seams and hardware.
Processing of a multi-level surface is necessary for the design of curved sections and even corners. The tools and materials used are the same as for the main plane, only the duration of the repair increases.
Complete finishing of a plasterboard ceiling for painting includes the following steps:
- plane preparation;
- primer;
- puttying corners, joints;
- sealing, reinforcement of seams;
- sealing screw heads;
- finishing putty of the entire ceiling;
- grinding;
- final primer.
All steps must be completed, otherwise you may end up with a surface with peeling and falling off paint.
Primer
The first step is to apply a primer to the drywall. This is done in order to improve the adhesion of the putty to the surface, which will help reduce its consumption. The primer should be applied in an even layer, especially carefully treating the drywall joints. After the mixture has dried, you can proceed to the next step. If necessary, re-treatment of the surface is allowed, which will help to seal all problem areas. When processing, it is prohibited to use alkyd primers, which can damage the cardboard coating of drywall.
Choosing putty for the ceiling
When selecting a material, it is important to pay attention to the characteristics and application features.
The material is classified according to the following factors:
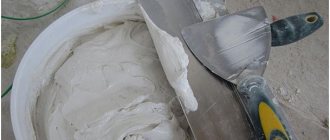
- Product readiness level. It can be a dry mixture or a paste-like substance. The powder can be stored longer, but the paste needs to be mixed well before application. There are pastes that do not lose their quality during storage and freezing, but only when stored in a tightly closed container.
- Special purpose. Starting mixtures are used for rough initial processing, filling cracks and joints. The finishing composition is suitable for applying a thin layer of putty, leveling the ceiling at the very end. Finishing putties can be stretched over the surface, they are elastic and have a long pot life. There are also universal putty mixtures, they are suitable for performing all stages of work.
- Component composition. Depending on the fillers, the mixtures can be used in dry or damp areas. A gypsum base is not suitable for areas with high humidity and temporary residences, but a cement base is suitable for bathrooms, kitchens, and rooms without heating. Polymer inclusions are universal and cope with the task in any room.
And now several brands of mixtures for preparing plasterboard ceilings for painting, tested by users:
- Fugen. The brand differs according to the type of sheets: Fugen GK, Fugen GV, Fugen-hydro. And Uniflot. Works with any types of HA, GV. Both compositions have a high degree of plasticity and are ready for use in 1-2 hours.
- Ceresit ST 127. This is a dry mixture of finishing putty. Polymer filling. It tightens minor defects and can be applied in a layer of up to 3 mm. It has good ductility and rub-ability. Suitable only for rooms with low to medium humidity levels.
- Siloite. This is a repair mixture with a polymer composition that fills well the seams between gypsum board sheets.
- Finishing putty based on cement (VH gray) and lime (VH white). Suitable for any type of premises, applied in a layer of up to 4 mm, remains viable for up to 48 hours.
- Putties KR, LR+. Polymer-based compositions suitable for rooms with low and medium humidity levels. They remain viable for up to 48 hours.
- LR Fine. Finishing putty with a fine-grained polymer-based composition. Sold as a ready-made paste, stored for up to 3 days (in a closed jar), dries up to 48 hours.
- PG 41, PSZ 11. Powder finishing putty containing polymers. The solution is suitable for use for up to 2 hours and rubs in well. There is putty PG-007 - a ready-made pasty analogue.
In addition to putties, you will need a primer, which is also selected according to the type of room.
Corner processing
Often, a plasterboard ceiling is a complex structure with internal and external corners. In this case, you will have to additionally buy perforated corners made of metal or plastic to reinforce the corners. This is especially important if the latter will not be subsequently covered with finishing - baguettes, plastic profiles.
Installation of perforated corners
The internal corners are reinforced with sickle tape, securing it from the center line and to the sides, and then covering it with a thin layer of putty. The profile is attached to the outer corners with gypsum mortar, temporarily fixed using self-tapping screws or 20 mm nails. The corner joints of the sheets are also sealed with serpentine and leveled with a special corner spatula.
Tools and materials for work
Leveling and plastering the ceiling for painting with your own hands
The master will need the following set:
- spatulas 10, 20, 30-35 cm;
- metal grater;
- grater with emery;
- primer roller;
- container for mixing dry powder;
- mixer or drill with attachment;
- sickle tape with adhesive backing;
- plastic or metal corners for complex shapes on the ceiling;
- screwdriver;
- sharp knife;
- putty;
- primer;
- ladder;
- personal protective equipment.
A piece of film to cover the doorway and protect the furniture wouldn't hurt.
Grinding
This stage is the final stage when filling a plasterboard ceiling. Before grinding, you should wear goggles and a respirator to protect your eyes and respiratory tract from dust, which will be quite abundant during the work.
You need to start the process only after the ceiling has completely dried. This can be determined by the color of the putty applied. A single-color coating indicates its hardening, and dark spots present on the surface indicate the accumulation of moisture in these areas. In the first case, you can start grinding.
It is much easier to carry out this work using a vacuum cleaner and a grinder, which you can borrow or rent. When doing it manually, you should use a grater with a mesh or fine-grained sandpaper, fixed to the tool using special clamps that can be easily unscrewed and allow you to quickly replace the abrasive material.
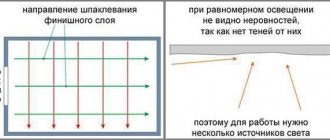
Note! To detect and correct the smallest irregularities, you can use a portable lamp or a spotlight on a tripod, with which you can illuminate the ceiling from different angles and achieve a perfectly flat surface.
Step-by-step puttying technology
Before you begin to putty the plasterboard ceiling for painting, you need to prepare the surface. The work is as follows:
- Check the tightness of the screws. They must be recessed into the sheet; if part of the cap sticks out above the sheet, the hardware must be tightened. If the screw is recessed very deeply, you need to unscrew it a little.
- Inspect the areas where the walls meet. There should be a gap of 2-3 mm everywhere, so that when filling with putty you get a tight and even seam.
- The cut edges must be chamfered, maintaining an angle of 45 degrees; factory edges should not be processed.
- Checking external corners involves eliminating sheets protruding beyond the corner. If you run the spatula first along one plane of the corner, then along the other, the tool will pass smoothly without catching on the edge of the gypsum board. If it gets caught, remove the unevenness with a sharp knife.
That's all the preparatory work.
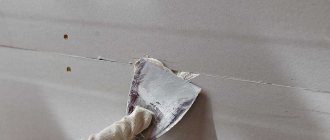
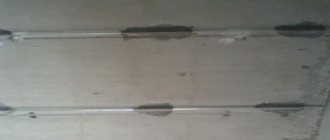
Reinforcement of drywall seams
The starting putty is applied only to the area where the sheets are joined. Sealing of joints and seams is carried out using serpyanka. This is a mesh tape with an adhesive layer on the reverse side. A piece of serpyanka is secured in such a way that the seam lies directly in the center of the tape.
A layer of putty is applied on top. The sealing is carried out as follows: first apply a layer of the mixture perpendicular to the seam on the serpyanka, and then parallel. After sealing the joint, the composition is leveled with a wide spatula, and at the same time, excess mixture is removed. After this, you need to hide the screw caps. Cover them too with putty, leveling the mixture.
Drying the composition takes up to 2 days. More details about drying time are indicated on the product packaging.
Surface primer
The ceiling will have to be primed several times, so there should be a lot of primer mixture. And you should choose a deep penetration primer, this ensures better adhesion of the paint to the ceiling.
However, when applying the composition, you should not be zealous; excess liquid will wet both the cardboard and gypsum layers, which will lead to the formation of wrinkles and bubbles on the surface.
The primer is applied twice. The first time along the long side of the gypsum board sheets, then drying and the second layer - across the first. You need to roll the surface quickly with a roller or brush, without stopping at one point, so as not to wet the cardboard.
Advice! The joints of complex structures, the junctions of walls and ceilings are passed with a narrow brush.
Proper ceiling putty for painting with your own hands
It is strictly not recommended to use alkyd primers - these mixtures destroy the paper and the cardboard will slide off the sheets behind a roller or brush.
Applying putty to the ceiling for painting
Finishing putty is carried out over the entire surface of the ceiling. The composition performs a leveling function and is applied in a thin layer. It is better to use a wide spatula and stretch the mixture, achieving a perfectly smooth surface. After sealing, the entire surface is dried and you can once again check the evenness of the ceiling.
If defects are found, the finishing putty is applied again, also leveled and dried.
Advice! Cement putties do not level out so well, so it is better not to use them for final finishing of the ceiling. Puttying a plasterboard ceiling for painting in wet rooms is carried out using waterproof polymer mixtures, and in dry rooms you can use lime compounds.
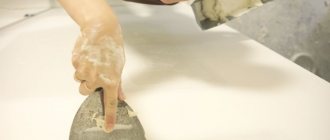
After sealing and drying of the mixture, the entire surface is sanded with a float and emery. Strong pressure is not necessary, it is only important to smooth out possible roughness. After all, the ceiling needs to be primed again, dried and can be painted.
Sealing seams
Before gluing sickle or paper tape at the joints, it is necessary to prepare a solution, since gluing them takes some time, during which it may not be possible to fully use the finished mixture. This process is quite simple to carry out; it is important that the material does not stick out on the sides, since in the future these threads will begin to come out and will not allow you to achieve a perfectly flat surface. Puttying joints is carried out as follows:
- Initially, the seams should be filled with a small amount of the mixture. It is not necessary to completely cover the recesses with it, since otherwise it will be difficult to attach the reinforcing tape.
Important! Without experience in carrying out this work, it is better to use not ordinary, but self-adhesive sickle tape, the reverse side of which has an adhesive layer.
- Fixation of the common sickleweed. It must be placed along the joint so that it is located exactly in the middle of it. To secure the mesh, the material needs to be slightly submerged in the solution, but not too much, in order to avoid bending it and forming an arc.
Self-adhesive serpyanka is even easier to glue, since it must be applied to a surface with dried putty, but its adhesive side is not always of sufficient quality, so it is advisable to apply an additional layer of PVA underneath it.
Note! Fixing the serpyanka with putty is more reliable.
- Alignment. After pasting the serpyanka, you need to cover it with a layer of masking plaster, in addition to which this will give the surface the required evenness. All actions related to the mixture should be carried out using a wide spatula, with which it will be possible to apply the composition to the width of the seam and the mesh placed on it.
Note! Before applying each subsequent layer, it is advisable to wait until the previous one has completely dried, so that it can be opened more evenly.
Usually the putty applied to the seams is left for a day, and only the next day, if necessary, the treated seams are rubbed with a float.
Requirements for the quality of putty for painting
The better the finishing of the plasterboard ceiling for painting, the smoother the decor will lie. All stages should be carried out exactly, without skipping either sealing and reinforcing the seams, or finishing the ceiling over the entire surface.
If there is no serpyanka, the composition will dry out and fall off. And without finishing puttying the entire plane, uneven seams will noticeably stand out on the finished ceiling. A surface with bumps, without sanding, will lead to paint peeling, and if you do not prime the ceiling, the decor may not “lay down” at all and roll off the ceiling.
If the work causes inconvenience or the area is too large, you can order a service from professionals. Standard puttying of a plasterboard ceiling for painting, the price of which starts from $5 per 1 m2, when using the customer’s material, will not greatly ruin the budget, but the work will be performed with proper quality.
Expert advice
The recommendations of professionals come down to general rules:
- Don't skimp on the quality of the ingredients.
- Do not use a tool that has been dry for a long time and has been lying at home. For example, a dried roller can be revived, but how it will behave during the process of applying primer is unknown.
- Be sure to read the instructions on the packaging of the formulations and trust the manufacturer’s opinion. You should not use a polymer composition for dry rooms and a lime composition for wet ones. Do not dilute dry powder with water in larger quantities, thinning the mixture so that it lasts for a long time. This putty loses its useful qualities and characteristics. Ultimately, you will have to apply the composition in several layers, which will increase the consumption of the mixture.
- The optimal temperature for work is +5...+30 C. In cold weather, the water composition freezes, and in hot weather it can dry unevenly.
- Sanding the ceiling after puttying is a mandatory step. You need to sand every suspicious area, achieving an even and smooth surface.
If during the painting process the composition does not linger on the ceiling, the reasons are poor primer, insufficient sanding quality or dust residues. In this case, the surface is sanded again, primed, dried and paint can be applied.
As for finishing the corners, they can be reinforced with sickle tape, then puttied and leveled. And then further strengthen it with metal or plastic corners, pressing the elements into the still wet composition. It is necessary to level the corners, while excess mixture is removed with a spatula. The remaining work: priming, leveling, grouting is carried out according to plan.