Drywall is an amazing material that is gaining great popularity every day. It is used both for repair work and for installing decorative structures. Let's look at how you can use drywall to renovate your living room, and what you can make from it.
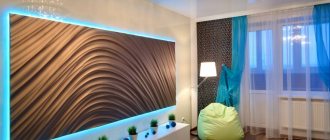
Original multi-level plasterboard ceiling with lighting
Options for decorative finishing of a niche
To design a niche in the wall, different building materials are used.
Set up lighting in the form of sconces, spotlights or colored LED strips. Niches on the wall made of plasterboardSource dekormyhome.ru
Materials for niche design:
- Wallpaper. They are used more often for shallow structures. With their help, you can give the room a modern look or add a vintage touch.
- Laminate. Practical material with a wide range of colors.
- Tile. Used for small asymmetrical niches. Depending on the color and structure, it will bring asceticism or freshness, and will help to place bright accents.
- Stone or brick. Suitable for creating a bold, unusual interior. It will help to zone the space.
- Decorative plaster. Enlivens the atmosphere, adds elegance and aesthetics.
- Tree. Eco-friendly material with good aesthetic and performance characteristics. Presented with lining and wooden panels of different types of wood.
Decorating a niche with brickworkSource kakpostroit.su
Beautiful hallway designSource repaireasily.ru
A recess in the wall will be an alternative to a wall painting or fresco; you can place indoor plants, candles or stylized decor on a flat surface.
Niches-shelves in the wallSource stavlib.org.ru
If you paint the recess to match the walls, it will not stand out from the general background
If you want to focus attention on it, you need to choose a contrasting shade of paint. An inscription or graphic looks good in a decorative niche.
Shelves or a cabinet will add practicality to the design. You can put a wardrobe in a large niche. Place candles, souvenirs, photos, books on narrow shelves. The bedroom design will be complemented by soft lighting in the depths of the alcove. A good idea would be a corner with soft seating for drinking tea or reading. In the latter case, you need a bright lamp.
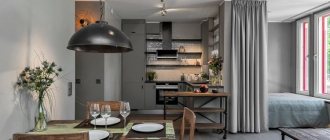
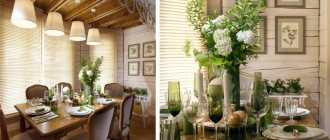
Dining space in the kitchenSource baneproject.com
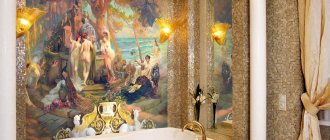
A niche in the bathroom can be decorated with a mirror and equipped with side lighting. Place beautiful bottles, shells, candles and things on the shelf that will help create a marine-style interior.
Decorating a bedroom in Japanese styleSource topdom.ru
Why do we need niches in the wall?
The niche has not only a decorative function. Allows you to solve many problems. Moreover, it can be created not only indoors, but also outside. Thus, niches for a watering tap can be arranged in the outer wall. Inside the room, a recess is also useful and solves the following problems:
- Refusal of large-sized furniture and inconvenient storage systems. The excess space will not be occupied;
- Creating a beautiful and functional area that combines decorative and useful functions;
- The ability to hide wiring and wires, making the interior neat and tidy;
- By excluding some furniture items from the interior of the room, you can save money.
Organizing a niche is not only practical, but also financially beneficial. Various decorative and practical items are placed inside the structure, including books, photographs, vases, etc.
Organizing a niche is not only practical, but also financially beneficial.
Furniture partition
The catalogs of furniture companies present a huge number of racks with open shelves. They can be double-sided or single-sided, with or without drawers.
The most important thing is to choose a shelving unit that matches the design of your living room. If all the furniture is in the same style, such a wall will fit harmoniously into the interior.
Note!
- Tulle for the living room: 135 photos and videos of examples of stylish window design in a modern interior
- IKEA living rooms - 165 photos and videos describing real options for using ideas from IKEA for living rooms
- Living room in Khrushchev - 165 photos and video description of how to decorate a typical living room in Khrushchev
Types of partitions
Depending on the tasks facing the owner or designer, you can use different types of partitions:
- Sliding curtain.
- Sliding screen.
- Niche or arched.
- Partition made of furniture and other interior items.
- Podiums.
- Plasterboard, acrylic or brick.
The most common are plasterboard partitions in the living room, as well as furniture. It is the last option that is the most functional.
They take up little space, are easy to move, and can be used to solve several problems. In addition, in the photo such partitions in the living room look especially attractive.
Useful tips
If you decide to work with plasterboard yourself, you need to remember a few simple but very important rules:
- Only sheets with a perfectly flat surface are suitable for work. The presence of microcracks makes the material unsuitable for use.
- Installation work must be carried out at a temperature of at least +10 degrees.
- When purchasing material, it is important to consider the humidity of the room and possible temperature indicators.
- It is prohibited to use nails to secure gypsum boards.
- Heavy objects should not be hung on plasterboard walls.
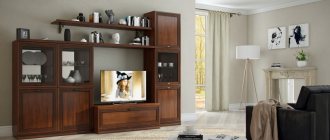
Plasterboard niches
Due to the elasticity of plasterboard, it can be used to create all sorts of decorative niches, for example arch niches, which are then used as shelves for souvenirs, for paintings, etc. The furniture frame is also built into them. Moreover, they can be located in any room of the apartment: in the hall. bedroom, kitchen, hallway and bathroom.
Niche for a fireplace made of plasterboard photo
Thanks to them, the interior of any apartment is transformed. They often have lighting installed, which makes the space of the apartment seem to start playing. Thanks to some design techniques, through the manufacture of decorative niches with lighting. It manages to visually increase the space of the room and make it modern.
Decorative plasterboard niches photo design
Drywall can be used to decorate any room, including kitchens and bathrooms. In the latter case, there is a special waterproof drywall. Large and small recesses in the wall everywhere replace shelves and even some furniture, which makes the interior less loaded and more modern.
TV niche made of plasterboard design photo
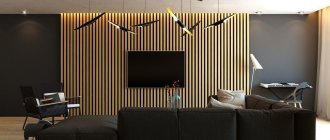
Niches in the living room
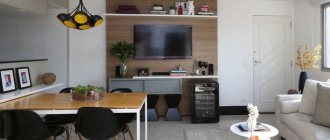
In the living room, as you know, the most “visible” place is the TV area. Due to the fact that modern TVs have a thin design, it has become possible to mount them on the wall; the end result is very stylish and practical. And in order to add even more style, they began to make niches and boxes from plasterboard for a place on the wall for a TV and other equipment.
How to make a niche for a TV, read the article: “A plasterboard niche for a TV”
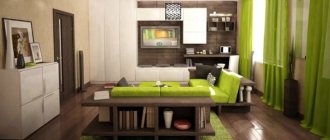
Living room interior with a niche in the wall photo
The box looks no less effective. The advantage of making a box is that you do not need to cover the entire wall with plasterboard. The box can cover only part of the wall, for example, around the TV. The box can be made for built-in appliances, which is very often used in the kitchen. Also in the kitchen, niches are made from plasterboard for decorative dishes and souvenirs.
Kitchen interior with a niche in the wall photo
In general, drywall and lighting are two interrelated components of a successful modern renovation.
In addition to a niche for a TV, plasterboard is often used to make places for various souvenirs, which are very beautifully illuminated.
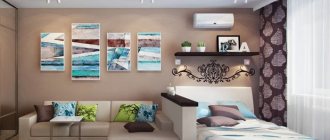
In the bedroom
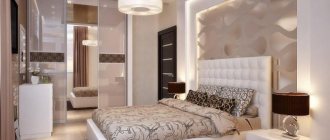
As in the living room, beautiful decorative niches are often made in the bedroom. As a rule, it is made above the head of the bed, in which a panel with a beautiful image is placed. It is usually complemented by lighting in the form of spotlights. The result is a very effective composition.
Niche in the wall with lighting photo
In the bathroom
In the bathroom, as mentioned above, special moisture-resistant plasterboard is used. The presence of a niche in this room is very convenient, because it is a wonderful replacement for shelves for storing hygiene products. It should be noted that the drywall in the bathroom is finished with tiles.
Niche in the bathroom made of tiles photo
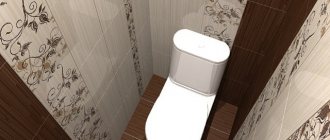
In addition, to make the bathroom interior more stylish, boxes for the washing machine are made. If you have a combined bathroom, it will be very useful to separate the toilet from the bathroom with a symbolic half-wall.
Plasterboard box in the toilet
Using drywall in a toilet is a very successful way to redesign and make it functional. Using drywall, it is very easy to hide sewer pipes and at the same time make a box for storing all sorts of things: toiletries, tools, etc. Or you can use the space of the back wall for purely aesthetic design.
Plasterboard partition with niches
Arches
With the help of arches of various types, corners are smoothed out, making plasterboard doorways and other elements of the apartment’s interior softer and more modern. To create an arch, you will need a set of drywall tools and material, which includes an arched profile, drywall, and self-tapping screws.
Plasterboard arches in the interior The profile can be bent by cutting its edges with a certain step. The profile should be secured using self-tapping screws. First you need to attach it vertically, then bend it on top. If lighting is provided in the arch, then you should lay a corrugated wire with wires under the drywall. This must be done carefully. The wires must be solid and not touch metal.
The wires are hidden and laid in corrugation. Drywall is applied to the profile. For better bending, you need to take a sheet 9 mm thick. There are several methods for bending gypsum boards. Having chosen one of them, the bent, cut sheet of drywall is attached to the profile with self-tapping screws.
After installing the gypsum board, you should start reinforcing the corners, joints and subsequent decoration. Plasterboard arches in an apartment or house make the atmosphere more pleasant, the room larger and brighter.
Option for a plasterboard arch in the interior of a room
Flaws:
- The space requires the creation of artificial lighting.
- Air exchange in the recess is reduced.
- Cleaning is complicated.
Functional and spacious shelves Source roomester.ru
The planes of the niche are used as a stand for equipment. The designs reduce the usable area, so they are only relevant for large rooms.
Recesses are well suited for the kitchen. They serve as stands for dishes, spices and cans of bulk products. A good idea would be to place narrow niches in the hallway wall or along the stairs. It is advisable to make several asymmetrical decorative elements and provide them with lighting.
A living flower on a niche shelf is an excellent solutionSource strojka-gid.ru
Modern bedroomSource strojka-gid.ru
Interior subtleties: accent wall in the living room
What is an accent wall in the main room of the house, and why install it in the living room? An accent wall is a section of the wall that is highlighted in a special way using all possible design techniques. The main requirement when decorating an accent wall is that it must completely coincide with the overall style of the interior.
So, what is an accent wall for?
If you want to decorate such a wall, then you need to prepare for solving a difficult task. The process must be approached competently and thoughtfully. If you don't take the matter seriously, you won't be able to avoid mistakes. Why waste money, time and nerves.
In order not to make any mistakes, experienced designers recommend adhering to the following principles when designing an accent wall:
- The area of the accent wall should be less than the total area.
- An accent wall does not have to be a single element.
- You can highlight a wall using either bright colors or an unusual texture.
- The psychology of colors should be taken into account.
- You need to choose the right location for the accent wall.
- An accent wall can highlight the functional area of the living room.
- The wall should create balance in the room, so you need to be very careful about its design.
Here are some tips for choosing a location:
- If possible, it is better to place the wall opposite the entrance to the room.
- It must be positioned so that there is a separation of functional zones.
- An accent wall can be located where you watch TV, but in this case you should avoid too bright colors.
A wide variety of materials can be used to create an accent wall.
Today the following are widely used:
- Tree;
- Dye;
- Brick;
- Tile;
- Stone;
- Wallpaper;
- Glass panels;
- Plaster.
Many people believe that it is enough to cover the wall in a bright color, and all the emphasis is done - this is not so. A mini color composition must be created.
Designers suggest remembering a number of rules:
Shower room
A shower cabin made of plasterboard takes up little space, but at the same time it is practical to use. They come to the creation of such a design when there are no appropriate cabin sizes. It can be straight, angular, semicircular.
Shower cabin design plan To produce this design with your own hands, you will need a diagram. Afterwards, markings are made according to the plan. Be sure to indicate the supply of water pipes, sewerage and electrical wiring.
Preparing the base for drywall
Diagram for installing a drain pipe in the floor of a shower stall. A plasterboard shower stall starts from the bottom. The pallet is made of brick and cement. In this process, a sewer outlet is manufactured. Afterwards the assembly of the frame begins. The frame must be strong, rigid, and even. It must be covered with moisture-resistant plasterboard. All profiles must be galvanized to prevent metal corrosion.
Creating, covering and finishing the frame of the shower cabin After covering the frame and reinforcing the joints, tiles are laid on the plasterboard surface.
Modern interior element - niche
One of the ideas for creative room design is a niche - a recess in the wall of various shapes. This technique is sometimes resorted to in order to hide the roughness of the layout and unevenness of the coating.
But, more often, this is a pre-planned space, as an alternative to a bulky furniture cabinet, a relic of the past.
This move is especially relevant in small apartments. A well-designed and well-thought-out niche in the wall in the living room can turn the wildest ideas into reality.
Thanks to the harmonious play of light, shape and color, it makes the space dynamic and correct, visually adjusting the room, adding variety and zest.
A photo of a niche in the living room for any aspiring designer can be the first work for a portfolio.
A niche in a plasterboard wall in the interior – 100 photo ideas
The first step is to mark on the wall where exactly the niche is planned to be placed - the plan is best perceived visually. After this, measurements are taken to calculate all the materials. Now the entire area of \u200b\u200bthe drywall needs to be puttied
Pay special attention to the joints - glue them with perforated tape or serpyanka mesh for strength, and also putty on top
For this, finishing putty is used (you can purchase a ready-made one). As mentioned above, quite often drywall is used for zoning rooms. For example, one of the most common options today is to decorate areas in a children's room with partitions that divide it into two parts: one for work and play, and the second for sleeping. To ensure that the partition does not take away part of the lighting between zones, it can be made with niche shelves in which toys, the child’s favorite books and other accessories will be stored.
Please note that choosing plasterboard for decorating a room must take into account its operational characteristics
For example, for a living room or children's room, an ordinary universal compound is suitable, but to equip niches or partitions for a kitchen or bathroom, you will need moisture-resistant plasterboard. Drywall is absolutely harmless to humans, non-toxic building material. It is produced in the form of slabs, the basis of which is gypsum, lined with special cardboard. The produced material has the dimensions established by the standards: width 120 cm and length 250-300 cm.
The most common three types of plasterboard: arched, wall and material for decorating the ceiling surface. Drywall can also be divided into types according to its area of application: In addition to hiding electrical wiring, communications and wall defects, niches in the hall successfully perform decorative and design functions. Their use in the living room is an excellent interior solution that fits into almost any stylistic direction from modern high-tech to classic or minimalism.
They will become an attractive and stylish accent. Niches with shelves are used to equip small living rooms, which should not be cluttered with bulky furniture. Such structures are used for storing books, souvenirs, placing photo frames and other small items, and with the help of effective lighting you can beautifully highlight all the objects displayed on them. The design with niches and a fireplace in the center looks original. Niches that are correctly integrated into the interior will help to visually enlarge the living room: horizontal ones will make the walls wider, and vertical ones will make the ceiling higher, even if it is multi-level, which usually conceals the height.
At the same time, the size of the niches themselves must be clearly calculated, because if you make them larger than required, then the niche itself will “eat up quite a significant part of the room.” It is necessary to think over the lighting option in advance in order to know whether an additional side is required in the niche and to design the structure correctly. To carry out zoning of the premises in this way, multi-level structures are made, the boundaries of the levels of which should be determined by the zones. This is an important point.
An unusual effect should appear in the interior. Very often, the boundaries between levels on the ceiling are decorated and decorated. To do this, you can use built-in spotlights or LED backlighting.
It is important to give the living room not only an aesthetic appearance, but also to make it as functional as possible.
It is plasterboard structures that will help make the interior unusual and original.
Additional information on the topic:
- Insulating the walls of a wooden house from the inside with mineral wool plus plasterboard video
- What is the price for cutting holes in drywall?
- Preparing plasterboard walls for painting with water-based paint
- Removable screen for a bathtub made of plasterboard and tiles photo
- Plasterboard ceilings for children's photo in the shape of a heart or sun
Features of the material
Drywall is a unique building material produced in sheets. Due to its specific structure and good flexibility, it can be applied to various surfaces without any problems, which makes it possible to realize the most daring design solutions. Among consumers, plasterboard arches and ceilings are most in demand. GCRs are light in weight, so they do not require additional reinforcement during installation.
To make plasterboard shaped parts, you need to prepare a diagram in advance, cut out the required elements according to them and secure them.
The main feature of the material is its ability to change shape after getting wet. This not only makes it easier to create shapes, but also allows you to use drywall to level the surface without much effort.
Experts note several undeniable advantages of drywall:
- creates an excellent even coating;
- can be used as a base for wallpapering, painting and tiling;
- allows you to create an original interior;
- fireproof and durable;
- inexpensive;
- ecologically pure;
- has good noise and heat insulation.
The main disadvantage of the material is fragility. Because of this, it cannot be used on a wall that is subject to strong mechanical stress.
Sequence of work
Tools and materials
To complete all work you will need the following equipment:
Aluminum profiles. These metal brackets will be attached to the wall so that the worms can then be attached to them. You can use profiles of any suitable type. The most suitable profile would be the PS profile, which allows you to easily organize wiring, but profiles of other types - PP or PN - may also be suitable;
Drywall. Actually, the material around which the whole idea revolves. You have sheets of thickness 12.5, 9.5 and 6.5 mm at your disposal. The former are used more often for walls, the latter for ceilings;
Auxiliary materials for profiles - all kinds of connectors and extensions; you often cannot do without these materials;
Fastening material – a whole set of self-tapping screws.
The solution to the problem of how to make a niche for a TV from plasterboard is largely determined by the correctly selected convenient tool.
Instructions for selecting tools:
Drill. It is best to choose a drill with variable speed control. If you are faced with choosing a model without such adjustment, it is better to give preference to a drill with low speeds; it is more flexible when working with drywall.
Knife. The most important tool for successful work. Make sure that the knife is perfectly sharpened and fits well in your hand. It’s better if you have a whole family of knives at your disposal.
Hacksaw for metal. You can’t do without it when working with your profile. Some people use an angle grinder quite successfully.
Planer for drywall. It is very useful for processing the ends of sheets, but in the absence of such a plane, it is quite possible to limit yourself to ordinary sandpaper.
If there is a desire to make the depth of the niche greater than the thickness of the profile, then you have to add horizontal profiles, but this also provides great opportunities for laying communications
Layout of the future niche
Creating a niche for a TV from plasterboard requires very precise calculations and preliminary careful study of the entire geometry of the future structure. First of all, the niche must accurately take into account the geometry of your TV.
Below we provide the dimensions in width, height and depth (in mm) of only some of the well-known models. Your DIY niche should be no smaller in size.
So, here are the sizes of LCD TVs:
- model 32-962-102 - 777x520x112;
- model 32-980-112 - 795x540x100;
- model 32-999-112 - 790x505x100.
And the dimensions given are without stands. The stand also adds 20-30 cm in height.
Niches for a plasterboard TV can be of any shape. The arched profile gives a special look to plasterboard structures, but working with it requires the ability to be precise in detail
What you need
In order for a gypsum board structure to last as long as possible, it is important to use the right tools to create it. The frame for plasterboard is made from cutter 0270 and U-shaped metal profiles 3-6 m long. Also, installation of the frame involves the use of guide and support profiles, which help create the required angle of the metal structure for drywall.
The structure is fastened with hangers, screws and dowels. The building can be sheathed with SP 551012000 sheets. Working with gypsum boards is impossible without a tape measure, level, tape roller and ruler.
Functional niche in the living room
If possible, it is worth making functional niches. They will completely replace many headsets. For example, you can build a niche for a TV in the living room.
The TV is aesthetically placed in a niche, while being fixed on the back wall. This allows you to hide all the wires for connecting the device
In addition, the plasma panel itself will draw less attention to itself.
The niche can also be used to place various other equipment, for example, a speaker system. You can install beautiful shelves made of wood or glass in the design, which will provide a pleasant appearance.
If necessary, sockets can be installed in the niches to connect various equipment. Floor niches can be made closed and used for storing equipment and things that are not used often and should not be in plain sight. For example, in such niches you can store a vacuum cleaner, iron and other household appliances.
How to design a niche with your own hands
Before you grab the tool, you should accurately determine the placement of the future recess. To do this, you need to answer yourself at least two questions:
- why do I need a niche in this room;
- Will the created recess in the wall interfere with the holistic perception of the interior?
Do you know the exact answers to the questions asked? Great, you can start marking.
Marking
- Based on the intended depth of the niche, height and width, we apply the necessary marks to the surface of the wall;
- check the evenness of the lines with a level;
- We mark the places where the metal profiles are attached.
Creating a wireframe
This stage is very familiar to anyone who has ever decorated the walls of an apartment or house.
- fix the guide profile around the perimeter;
- we attach plates to give the frame the required depth;
- we connect both types of profiles, strengthen the joints with additional fasteners;
- If desired, we strengthen the structure with stiffening ribs from individual fragments of guide profiles.
Sheathing with plasterboard
- prepared gypsum board sheets are fixed to the frame with self-tapping screws;
- the joints are treated with a primer and sealed with sickle tape;
- The niche is puttyed and finally polished.
Finishing
Depending on the aesthetic wishes and role of the niche in the interior, the following can be used:
- dye;
- whitewash;
- wallpaper;
- decorative plaster (how to choose the right decorative plaster);
- ceramic tile;
- artificial stone (gypsum).
The immediate perception of the interior by your household and guests depends on how beautifully you can decorate a niche. Study the video below - you can find a lot of useful visual information in it.
Step-by-step instruction
1. Markings should be applied.
To do this, using a pencil and a ruler, you need to mark on the surface the place where the guide profile is attached, which is installed on the floor and ceiling along the perimeter of the room with a margin of 5 cm. It should be taken into account that this gap is sufficient for laying internal electrical wiring, insulation or sound insulation.
For subsequent wall finishing, it is necessary to ensure that the angle between the touching walls is 90 degrees.
2.Install the guide profile.
First, you should install the guide profile on the floor and ceiling. Then use a level to secure the profile vertically to the wall. To do this, use dowel-nails or self-tapping screws, securing them after 50 - 60 cm.
3.Install straight hangers, attaching them to the wall every 50 - 60 cm.
4.Install vertical posts.
This must be done in increments of 60 cm. If a more rigid fastening is required, then the distance can be reduced to 40 cm.
The distance between the racks should be made taking into account the width of the drywall, that is, a multiple of it. For vertical racks, you should take a ceiling profile cut to the required length. Then it is installed in a guide profile on the floor and ceiling and secured with hangers. Fastening is carried out using self-tapping screws with a press washer.
5. Laying insulation and sound insulation.
After securing all vertical posts, if necessary, you can lay insulation and sound insulation. This must be done between the vertical posts.
It should be noted that if it is necessary to hide electrical wiring in a room, this must be done before laying insulation.
6.Installation of drywall sheets.
To level the walls in a dry room, ordinary plasterboard, 1.2 cm thick, is used. It is assigned a gray color. Moisture-resistant plasterboard of a greenish or blue tint is used for rooms with high humidity.
First you need to cut the sheets to the appropriate length. Then, leaning the sheet against the frame, secure it with drywall screws. The fastening step should be about 20 cm. The screw head should not protrude, but should be recessed into the sheet of drywall. But you also need to prevent the self-tapping screw from breaking through the cardboard sheet.
The fastening points and joints must be puttied. After drying, you should clean the putty areas and carry out the second stage - applying finishing putty to the walls.
This is necessary to give it final evenness. After the putty has dried, you can also smooth out any uneven areas. You can use sandpaper for this. Next, if necessary, the wall should be primed.
The rack frame is fastened in the same way as a metal frame.