When entering a room, the floor is the first thing we see after the doors. Therefore, there are always increased demands on it, and the best materials are used for finishing. But no matter how high-quality it is, an uneven surface or insufficient floor stability will destroy the expected effect. Therefore, before carrying out decorative work, laying linoleum or carpet, ceramic tiles or even painting, the floor surface must be perfectly level and stable.
DIY self-leveling floor screed
An old concrete or wooden floor can “come to life”, and potholes and chips can disappear thanks to modern fast-hardening plastic compounds. You no longer need to use old technologies and carry out special preparations; forget about complex leveling and long hardening times. Now you can make a floor screed much faster without any special knowledge using a self-leveling mixture. All you need to do is strictly follow the manufacturer's recommendations.
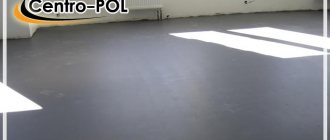
Decorative floor on top of a self-leveling screed
Advantages of self-leveling mixture
The composition for a self-leveling floor screed is a set of specially selected components. When the mixture is diluted to a liquid state, it acquires the ability to spread, creating a completely smooth surface. This composition of the mixture components has the property of rapid hardening, creating the opportunity to resume construction work in a short time.
Main brands of self-leveling floors and solutions used
You will not need heavy construction equipment to carry out the work.
The advantages include high levels of hardness, wear resistance, as well as a complete absence of shrinkage. Since the layer thickness is small, application in buildings with low ceilings will not affect the overall feeling of height of the room.
| Name. Short description | Packaging kg | Consumption kg/mm/m2 | Price | Strength MPa | Layer thickness in mm |
| ALFAPOL VP - finishing self-leveling self-leveling floor M200 F200 Pk5 W12 on a cement base | 25 | 1,75 | 375-471 | 20 | 2-40 |
| REAL Floor leveler, High-quality dry cement-based mortar | 25 | 1,7 | 360 | 20 | 2-80 |
| Bergauf BODEN ZEMENT MEDIUM, self-leveling floor for the final leveling of horizontal surfaces, ideal for further installation of any floor coverings (ceramic tiles, parquet, carpet, linoleum) | 25 | 2 | 289-324 | 20 | 6-60 |
| Forbo Eurobond 915, fast-hardening self-leveling floor, low shrinkage, self-leveling, quick-drying. Suitable for heated floors. For indoor use, incl. in damp areas. Withstands the load from furniture on casters. | 25 | 1,7 | 405 | 20 | 3-50 |
| Petromix PS, for leveling floors on concrete and other hard substrates in dry, damp and damp areas. Serves as a base for floor coverings (parquet, ceramic tiles, textile carpets, plastic coverings, linoleum, etc.) | 25 | 1,5 | 441-471 | 25 | 2-30 |
| The foundation will be T-42 Nipline, a self-leveling, high-strength, moisture-resistant, non-shrinking leveler on a cement-sand base using special chemical additives. | 25 | 1,7 | 342-433 | 25 | 3-30 |
| Ceresit CN 178, for the manufacture of screeds operating under conditions of low and moderate mechanical loads, incl. with constant exposure to moisture (in residential and public premises, on exploited roofs, balconies, terraces, open areas, etc.), during external and internal work, in civil and industrial construction. | 25 | 2 | 370 | 35 | 5-80 |
| Vetonit 4100 cement-based mixture for leveling concrete floors indoors | 25 | 1,6 | 520-537 | 20 | 2-30 |
| vetonit 4150, suitable for quickly leveling concrete floors and creating screeds in residential buildings, offices and public buildings. It is used for repairs and new construction under various types of floor coverings. Used in “Warm Floor” designs | 25 | 1,6 | 520-550 | 20 | 2-30 |
| Berghauf BODEN ZEMENT FINAL, self-leveling cement-based flooring for perfectly smooth surfaces. For rooms with normal and high humidity (bathroom). | 25 | 1,8 | 435-490 | 20 | 0,5-5 |
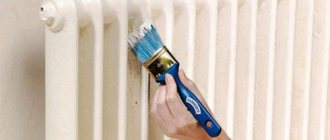
Painting the floor
Lightly sprinkle cement onto the still fresh layer and grind it with a trowel. The result is a strong crust that is easy to paint.
There are 3 types of enamels for painting floors:
- Acrylic. They consist of resins and polymer additives and are water-based. Penetrating into the pores of concrete, they create a protective film on the surface. The result is a matte or glossy surface. The paint dries quickly and is mainly used in residential areas.
- Polyurethane. The surface of these enamels does not allow moisture to pass through, and is not afraid of exposure to ultraviolet rays, mechanical stress and shock. The paint is used primarily for industrial floors and exterior applications. But it takes a long time for the floor to dry.
- Epoxy. They can even be applied to recently laid surfaces. They withstand high mechanical loads, provide good insulation, do not fade, and do not wear out for a long time. Such enamels are used to cover industrial floors and public buildings.
You need to stick paper tape on all sides of the area to be painted. The paint is applied evenly and not too thickly for quick drying. A day later, the concrete floor is painted a second time. The masking tape is removed.
Acrylic enamel dries faster. Within a day you can walk on the painted surface. Floors coated with epoxy paint dry quickly. Polyurethane enamels dry longer than others. You will have to wait about 2 weeks for complete drying.
One of the pressing issues in construction is determining the standard for using leveling agents.
Scope of application of self-leveling screed
- Preparation for finishing the floor. It is used to remove rough coating defects by applying a thin layer of self-leveling screed from 2 to 25 mm in height.
- When installing floor waterproofing. It is used when the base is saturated with oils or other aggressive media, and when the base is a wooden covering. The thickness of this screed ranges from 25 to 60 mm.
- When installing thermal insulation.
- When creating warm floors. A self-leveling screed hides cables and water pipes of heated floors well, at the same time leveling the surface. The thickness of the layer directly depends on the height of the laid heating element, but the total height of the screed layer should not exceed 60 mm.
Self-leveling mixtures can be used when installing heated floors
Types of mixtures for floor screed
Self-leveling mixtures can be roughly divided according to the main binding component or intended purpose.
Basically, during construction work, the main component of the mixture for leveling floors is cement or gypsum. There are also polymer mixtures, but they have a special scope and purpose.
Cement
For leveling and correction of concrete floors and monolithic cement screeds. To create sound- and heat-insulating floors and heated floors
Cement-based mixtures, in addition to cement and construction sand, contain polymer additives.
Designed for obtaining horizontal bases for finishing coatings, leveling concrete floors and creating a strong and level base floor, eliminating large differences and unevenness of the base (up to 30 mm)
Plasticizers give the liquid mixture increased spreadability and increase the rate of hardening. The finished floor is characterized by a high strength index. The product can be used in any room, regardless of the level of air humidity. A thin coating layer of several millimeters is achieved using a cement-based screed.
High quality leveler. Cement-sand base using polymer additives (Germany), “Wacker” (Germany), “Rhodia” (France)
Plaster
Gypsum mixtures also contain cement, but the main binding component is gypsum. Used for screeding in rooms with controlled air humidity. It is often used when leveling large differences in heights, when it is necessary to make a thick screed, sometimes the filling layer is up to 100 mm.
Self-leveling floor VOLMA-Nivelir Express
In terms of strength, gypsum screed is not inferior to cement screed, and taking into account the thickness of the layer, sometimes exceeds it.
Gypsum has high thermal conductivity, which is why it is actively used in the construction of heated floors.
Characteristics of cement and anhydrite mixtures
Mixtures can be divided according to their intended purpose:
- for rough leveling. It is used for screeds with a very uneven base or large defects, and the thickness of the created layer can reach up to 10 mm. Can be used as a base for laying ceramic tiles or laminate;
Hercules coarse floor leveler 25 kg
- for fine leveling. Scope of application: finishing, perfect leveling. Usually done by pouring a cement mixture onto an already leveled screed. The thickness of this coating is up to 5 mm. The quality of the finished floor is suitable for installation of all kinds of finishing and decorative coatings;
Fine leveler
- for difficult bases. The composition of such mixtures includes reinforcing fibers and plasticizers with special properties that give the screed additional properties: increased compressive strength, hydrophobicity, etc. Such compositions are used to install screeds on complex wood coverings, on a base with a separating layer.
Products of IVSIL company. Price list
Price
Advantages and disadvantages
The advantages of using this technology are its following features:
- simple procedure for preparing and using the solution . Before starting work, you just need to mix the composition with the required amount of water;
- fast drying time of the solution. They are usually indicated in the instructions supplied with the material;
- a large selection of different types of compositions. The building materials market offers products from both domestic and foreign manufacturers;
- the liquid solution fills all the unevenness and differences, forming a smooth surface;
- using the mixture requires minimal preparation. Such a screed does not require reinforcement.
Flaws:
- a thin-layer screed 5-20 mm thick forms an insufficiently strong floor;
- Screed made from a self-leveling mixture has low sound and heat insulation characteristics.
Calculation of the amount of material
We calculate the amount of material
Calculating the amount of material purchased is the most important step for a person who makes his own screed. Since the material is quite expensive, purchasing even an extra bag will be burdensome, and vice versa - an insufficient amount of prepared material will not allow the work to be completed, which means that the screed layer will not be monolithic and will lose the necessary quality characteristics.
Before purchasing, carefully analyze the market for the proposed mixtures; do not neglect to carefully read the instructions printed on the packaging or on the manufacturer’s website.
Although externally similar, the compositions have different purposes, characteristics, thickness, strength, and consumption. Be sure to pay attention to the units of measurement in which the flow rate is indicated.
A mathematical calculation of the required amount of self-leveling screed can be carried out using the formula:
Material = Area * Average Thickness * Consumption * 100
Dividing the calculation result by the weight of one bag, we obtain the required amount of mixture in the bags. To correct the result, taking into account the “just in case” reserve, we multiply the resulting number by 5%. You don’t have to adjust the “margin” at all if you feel that your calculations for the required height of the applied layer are accurate.
For clarity, let's give an example. Let the room be 17 square meters. meters, and the average floor level should rise by 6 mm. Let us assume that the instructions on the packaging of the mixture indicate the material consumption - 14 kg per 1 sq. m. meter of area, and the package weight is 20 kg.
M = 17 * 0.006 * 14 * 100 = 142.8 kg
5% reserve = 7.14 kg
142.8 + 7.14 = 149.94 kg
149.94 / 20 = 7.497 ≈ 8 bags
In this way you can calculate the amount of dry construction mixture in bags. Even with such a small area and thickness of the future coating, a lot of material will be needed, which is why special attention must be paid to careful measurement and calculation of the layer thickness.
Preparation of cement mortar
Preparing the solution is the most critical procedure. On our website you can find many videos with cooking instructions. But some of them may not address important nuances.
Preparation of the solution
Temperature. The operating temperature range is from 15 to 30 degrees. If you make a self-leveling floor in the cold, it will turn out fragile. Pouring in hot weather is much worse. Mixtures are temperature sensitive.
Best before date. The shelf life of ready-made cement mixtures is from 6 months to a year. Do not use expired mixtures. Ultimately, all this will affect the quality of the floor.
Water. The instructions specify a certain amount of water for kneading, and some allowance is made. And this permission is not made just like that. If conditions are favorable, then using this tolerance you can control the fluidity of the solution. If the temperature in the room is within the permissible limits, then the mixture is adjusted according to temperature using tolerances. In cold weather you should use a minimum of water. In the heat it’s the other way around.
Sand. Cement-sand mixtures are not stored, so you will need to buy sand separately. The instructions will tell you exactly what type of sand you will need. The requirements must be strictly followed. If there are no clear instructions, choose river sand.
Kneading process. The solution must be mixed in portions per bag or half a bag. Initially, water is poured into the vessel and only then the cement composition is poured. Kneading is done with a drill at low speeds - 100-300 rpm. The nozzle should be moved in a circle up and down. It is better not to touch the walls and bottom. Mix the solution for about 4 minutes. Afterwards the solution will have to mature. This will take another 4 minutes.
Tools and materials
The specificity of the work on creating a screed is the continuity of the pouring process. The availability of all the required devices and tools will help ensure the speed and accuracy of actions.
- Construction mixer. Needed for mixing self-leveling mass. Without mechanical mixing, the homogeneity of the solution and the speed of its preparation will not be achieved, even with an assistant. If you cannot get one, use a drill and a spiral-type belt attachment. It is this nozzle that will give a homogeneous mixture in a limited time.
Two-speed two-spindle construction mixer Interskol KMD-170/1600E-N
- Container for mixing. It must meet certain requirements: a volume of at least 20 liters, a flat bottom and rounded edges. The container must freely accommodate the solution from at least one full bag of dry mixture. You will need at least two such containers.
- Needle roller. There is no alternative tool for such a roller, so you will have to purchase one. When choosing a roller, pay attention to the length and sharpness of the needles. If you plan to pour a thick layer, a model with short needles will get bogged down in the mixture.
Needle roller
- Paintshoes. Will be needed for large leveling areas. A brush or a regular roller. For preparatory priming of the floor.
- Spatulas. You may need different sizes; they are convenient for evenly distributing the mixture spilled on the floor. It is possible that, depending on the presence of niches and the size of the room, as well as for preparing the surface, spatulas with a width of 30 to 600 mm will be needed.
A squeegee will be more convenient when distributing the solution, especially taking into account the possibility of adjusting the gap between the floor and the fill itself.
Squeegee blade size
Squeegee - a special spatula with an adjustable gap for applying self-leveling polymer floor coverings
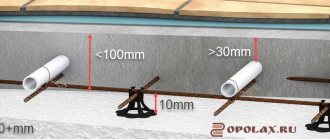
In addition to the dry mixture, you will also need some materials for the work. When the base for the screed is concrete, you will need a primer; if it is wooden, you will need an antiseptic. The damper tape laid around the perimeter of the room should be slightly wider than the height of the future floor.
Damper tape
Putty for eliminating defects during coating preparation; it must match the base coating. When screeding the base with a separating layer, waterproofing will be needed.
Rough and finishing compounds
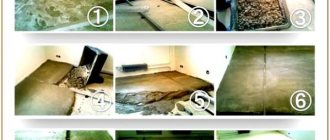
The use of a leveler becomes necessary when the old floor is removed to eliminate unevenness. Depending on how well the previous surface has been preserved, there are several methods for covering the surface.
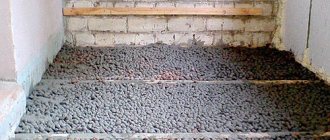
- Rough leveler is a mixture primarily consisting of cement. Use it for rough filling. A thick solution is prepared, then applied to the floor surface and fastens the base. After drying, it can withstand heavy loads, acquiring an even coating. Hides significant defects in the form of cracks and chips. If large chips occur, a gradual screed is used. First, those areas where unevenness has formed are processed. You should wait until it dries and only then cover the entire surface. Then the next layer is applied, which fits tightly to the surface.
- Corrective compounds are used on surfaces that have minor imperfections.
- The final coating has a fine porous surface. It contains polymers and minerals that give the floor an aesthetic appearance. The material is resistant to physical and external influences. Cement and gypsum are used in the leveling agent, which form a homogeneous composition when combined with water. The result is a thin, smooth coating.
To know which is the best finishing self-leveling leveler for the floor to choose, you need to proceed from the characteristics of the surface.
Preparing the base
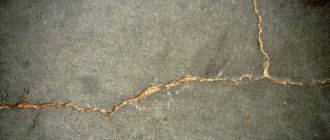
Due to the small thickness of the screed, any foreign matter (shards of old concrete coating, wood chips, etc.) can ruin the entire work. The floor must be thoroughly cleaned of dust and washed from dirt. This will make it possible to see potholes, chips and cracks in the base. Loose surface particles should be removed.
Floor cleaning
If the base is a wooden surface (for example, a parquet board), you need to check individual elements for rotting, wobbling, or falling out. All imperfections in the base surface must be corrected and sealed with putty or a solution of cement and sand.
Sealing cracks in a wooden floor with putty
Check the evenness of the base with a level; if there are significant deviations in height, level it as much as possible using the same materials. The smoother the floor is after preparation, the lower the cost of the base material. When all defects have been eliminated, the floor needs to be cleaned and washed again. After drying, prime the surface taking into account the consumption indicated on the packaging.
If the primer is absorbed quickly, it means that the base has high porosity, so after the first primer layer has completely dried, apply a second one.
Basic principles of selection
It is necessary to find out which self-leveling floor leveler is exactly right for the owner before purchasing it. By what parameters is the choice made?
- The humidity in the room is determined.
- It takes into account which rooms will be used: bedroom, bathroom, kitchen.
- Is leveling or finishing being done? Coarse and coarse solutions are suitable for roughing. For finishing, thin finishing ones are used.
- What is the nature of the foundation? Levelers for laying a thicker layer are used to level strong unevenness and holes, cracks and splinters. For a wooden base, a special composition is purchased.
- What should the result be: a floor with noise absorption effects, thermal insulation or non-slip? Special compositions are produced for underfloor heating systems.
- With or without decorative trim? The choice is made by the owner of the building.
- Different types of self-leveling floor levelers have different full hardening times: for regular ones - 30 minutes, for quick-drying ones - 15 minutes.
- The expiration date indicated on the packaging must be observed.
It is of no small importance which floor leveler to choose. Based on the goal the owner sets, the material needs to be purchased.
Process of applying the mixture
There is nothing complicated in this process; organization is important, since you need to work at a pace and without delays. It will be difficult for an untrained worker to cope with this task alone.
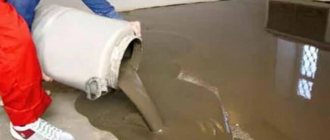
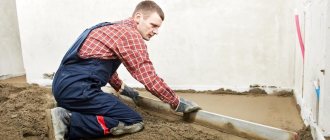
Pouring the finished solution onto the prepared surface
The whole process consists of repetitive actions: kneading, pouring, leveling. These steps are repeated several times until the entire surface is covered with a self-leveling solution. You only have 6-8 minutes between kneading and finishing leveling.
In detail it looks something like this:
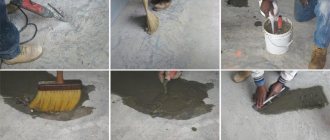
- The first batch is being prepared. First, water is poured into the container, strictly according to the amount indicated on the package. With the mixer running, gradually and carefully pour out the bag of dry mixture. The kneading time must be strictly observed, it is also indicated on the package, approximately 3-4 minutes. When the first batch is ready, set it aside for “ripening”, this will also take 3-4 minutes;
Kneading process
- At this time, prepare the second batch. When it is almost ready, pour the solution of the first batch into the farthest corner of the room and immediately give the container to an assistant. He, having put the second batch aside for “ripening”, begins to prepare the third;
- At the same time, you use a squeegee and a needle roller to level the surface of the spilled solution. The needle roller lifts air bubbles formed during kneading to the surface. Without doing this, they will slowly float to the surface, and when they solidify, small shells will form. When you're done, the second batch will just be ripe. And the whole process repeats.
Aligning the squeegee
Leveling the mixture with a roller
Please note that the poured solution hardens quickly. If you work without an assistant, the constant lack of time will lead to the fact that your solution will not have time to mature or you will not have enough time to properly level the poured mixture over the surface. If there is a delay, when part of the surface has already hardened and fresh solution is poured nearby, sagging will form. Which will negatively affect the evenness and quality of the finished coating.
As practice shows, it will be difficult for a beginner to make a floor screed on his own. But you need to try. Skills in this difficult matter come with experience.
DIY self-leveling floor screed
Video - Mixing and applying the solution
Do-it-yourself self-leveling self-leveling floor
If you need to renovate your apartment, leveling the floor with a self-leveling mixture is easy to do yourself. To do this you will need the tools and equipment listed above.
Leveling the base
After you have removed the old screed, you need to prepare the base. In old apartments, the base is a screed made from a waste of SNiP and GOST, so you have a lot of work to do. If there are places where the concrete has crumbled, knock them down with a hammer to reach a durable layer. A layer of cement must be applied to them, flush with the main screed.
Cracks that will not spread further must be stopped. It is best to do this with a grinder, making slits on the sides. You can make holes with a drill and hammer drill. You also need to treat the crack itself with a grinder.
Traces of paint or oil are removed with a grinder. They will not allow the layer to “stick” to the base and it will not be stable. In addition, this can lead to displacement of the entire screed.
Primer
Preparations continue and now we need to finish the floor. Concrete is very dusty, making adhesion weaker. The best way to get rid of this is with a primer.
The floor must be thoroughly cleaned. Sweep up the trash, vacuum (it is advisable to use a washing or just a powerful vacuum cleaner). After the procedure, use a deep penetration primer. This is a special liquid composition that penetrates deeply into the stone and “glues” all its components together. After drying, the surface will not be dusty and can be coated with the mixture.
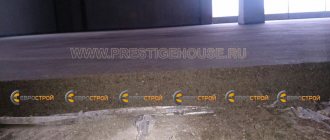
Technology for pouring self-leveling floors
- The filling must be done so that you can leave the room, that is, from the window to the door. You are unlikely to be able to avoid walking on the surface at all, but you need to minimize this. It is best to use paint shoes.
- If there is a risk that the liquid will overflow, make a side.
- Pouring occurs in strips while maintaining the required height.
- Distribution occurs using a special roller or spatula. It is advisable that they be of different sizes, as this will allow maneuvering. Especially if you have niches in the room.
- After the floor has been poured evenly, you need to go over it with a needle roller. This is required to displace air bubbles from the thickness. They will lead to big problems in the future.
- Work with a roller until the consistency begins to stick. After this you can expect drying.
It is desirable for everything to happen continuously, but this is not always possible. To ensure smooth casting, it is better to work with at least three people. Otherwise, there is a high probability of detachment.
How long does it take for a self-leveling floor to dry?
On average, the floor leveling mixture begins to harden within an hour, so the action must be accelerated. Do not linger or hesitate in mixing the composition. The instructions for almost all compositions indicate that after four hours you can walk on the surface. If you are not in a hurry, it is better to check readiness after 7 hours.
If everything was done correctly, the filling will be smooth, without kinks. The leveler can be checked using a level
To avoid additional problems during the drying process, it is worth ensuring the following conditions:
- Prevent exposure to moisture and water, as well as oils and paints;
- Avoid direct sunlight to prevent separation of minerals and moisture;
- There should be no drafts;
- To prevent the top layer from drying out and forming a film, cover the mixture with polyethylene;
- Restrict pets' access to the room.