Everyone who renovates their apartment on their own unanimously states that they have done paper wallpaper several times, and are experts in this matter. But we shouldn’t rush to conclusions. Do you know how to properly glue paper wallpaper? Are you afraid that tomorrow the wallpaper will come off the walls?
Are blisters or seams coming apart causing you problems? Let's remember step by step the whole process of gluing paper wallpaper, consider all the subtleties and nuances that help make the work much easier. After all, additional useful information never hurts.
Pros and cons of paper wallpaper
The most important advantage of wallpaper is its affordable cost. Beautiful material can be purchased for only 70-100 rubles per roll. It should be noted that there are also expensive samples, the price of which can exceed $1000, but these are special handmade designer canvases with multi-layer dyeing and the addition of precious components.
Paper wallpaper does not contain substances harmful to health and is breathable. They do not retain moisture and water vapor. The wall will be dry, which means mold or mildew will not appear on it. Wallpaper paper is pleasant to the touch, and the existing variety of colors and patterns allows you to decorate the room in any style.
At the same time, paper materials have a number of significant disadvantages. They are afraid of moisture, they cannot be washed and are easily damaged by mechanical stress. They are able to absorb odors and fade within 4-5 years (especially when exposed to direct sunlight). During gluing, they can be torn, and when the glue dries, the seams can come apart.
We glue new ones onto old ones
Is it possible to glue new wallpaper onto old paper wallpaper? Since they are thin on paper, they allow you to stick other materials onto old coatings. When gluing, consider the following:
- before starting work, you should glue all old wallpaper joints;
- you need to apply the glue carefully; if used incorrectly, the old finish may be damaged;
- new wallpaper should not be thinner than the old one. Thin single-layer materials should be overlapped with two-layer ones. See how to properly cover a room with the following materials:
- if the old walls were made in dark colors, the new ones should also be dark. Be careful with patterned and embossed coatings; the old pattern should not show through;
- If paint comes out when the wallpaper is wet, the old materials must be removed. Sticking to such coatings is not safe for health.
Watch how to properly remove old paper wallpaper in the video:
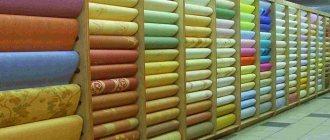
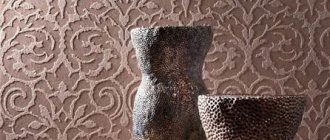
Which paper wallpaper is better to choose?
When choosing a material for gluing walls, it is necessary to take into account several important points, on which the final result will largely depend.
First of all, it should be remembered that manufacturers supply the market with single-layer and double-layer fabrics of various densities. The latter have a dense base on which a decorative layer is glued. This is a stronger and more durable material that does not become limp when glue is applied.
The surface of paper wallpaper can be:
- smooth;
- embossed;
- embossed;
- for painting.
The choice of colors and type of pattern, of course, depends on the taste and preferences of the owners. However, there are some peculiarities here too. If the windows of the room face north or west, then in such a room it is better to give preference to warm colors. For decorating large rooms, a large pattern is better suited, but in small rooms you can completely abandon it and use canvases with a geometric pattern.
When purchasing paper wallpaper, be sure to ensure that the production date and article number on the individual rolls are the same. The fact is that different batches of trellises may differ slightly in color tones, although they have the same pattern. When folded up it is not so noticeable, but on the wall the difference will immediately catch your eye.
Functionality of the room
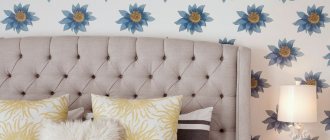
In terms of functionality, paper materials are best suited for bedrooms. This is due to their environmental friendliness and naturalness. As a rule, the sleeping area is used for relaxation, so the surfaces will be practically uncontaminated. In addition, most of these coverings are light-colored, which corresponds to the purpose of the bedrooms.
In modern living rooms, paper wallpapers are rarely used; embossed and structured wallpapers are popular among them. Vinyl, non-woven, and fiberglass are actively chosen for finishing halls. The kitchen is a functional room, which is often covered with coverings with simple kitchen designs.
When choosing paper wallpaper, remember that their service life is short, but your room will be environmentally friendly and safe for health. Follow these rules and tips, and the creation of a successful design project in your home is guaranteed! Imagine and create!
Recommended Posts
3d wallpaper for the living room + photo
How to properly glue wallpaper on drywall with and without putty…
How to hang wide wallpaper
Beige wallpaper in the interior
Brick wallpaper in the hallway and corridor
Erismann wallpaper in the interior
Materials and tools
Despite the apparent ease, gluing paper wallpaper requires care and has its own characteristics. Violation of technology and errors in the choice of materials can lead to the fact that the trellises will weakly adhere to the wall, the joints will separate, and bubbles or yellow spots will form on the surface.
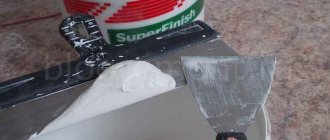
Glue selection
The determination of the adhesive composition depends on the selected type of wallpaper. For thin single-layer trellises, cotton or cellulose products are best suited. You can also use universal formulations. To glue a thicker two-layer duplex, non-woven compounds, CMC and even adhesives for vinyl wallpaper are used, if you add PVA to them, which will increase the adhesion strength. There are special varieties developed for paper wallpaper (this must be indicated on the packaging).
Glue for gluing paper trellises must meet the following requirements:
- dissolving in water to the desired consistency without forming lumps;
- good adhesion not only to paper, but also to stone walls;
- preservation of color shades on the surface after drying;
- affordable cost and simple preparation.
If we consider adhesive compositions by price indicators, we can highlight expensive European brands, “Metylan” and “Kleo”. The cost of these materials is fully justified by their high quality and excellent adhesion.
More popular glue varieties from the middle price range:
- “Quality” - mixes quickly and easily, recommended for gluing duplex canvases;
- “Moment” is a thick composition that slowly impregnates paper, thanks to which it can be used to secure thin single-layer trellises;
- "Econ" is a high-quality German-made adhesive designed specifically for paper wallpaper.
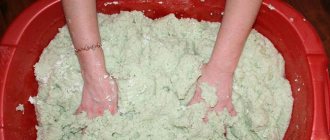
The cheapest gluing option involves the use of cellulose CMC, Bustilat, or their mixture with PVA.
In addition to glue, you need to buy primer for pre-treatment of walls. This will increase the adhesion of the paper coating to the stone, concrete or plastered surface.
Glue calculation
Almost all manufacturers indicate the standard consumption of adhesive solution for the number of standard rolls (10 x 0.53 meters). Sometimes the required amount of glue per 1 m2 is indicated. However, the standard consumption requires priming the surface, since a dry wall surface quickly absorbs moisture and glue consumption increases significantly.
Calculation of rolls
Determining the amount of wallpaper begins with measuring the height of the room and determining the length of the canvases. In this case, it is necessary to take into account the presence of permanent skirting boards. After this, you need to divide the length of the roll (usually 10 or 12 meters) by the resulting value and you can find out the number of strips obtained from one tube.
Next, the perimeter of the room is measured, the result is divided by the width of the roll. The area of windows and doors is not deducted. This will be your supply of material in case of unexpected losses. Once you know how many strips are required to decorate the room, it will be easy to calculate the number of rolls.
How long will it take for the swollen areas to stretch?
It happens that bubbles are an acceptable part of the technological process. This is typical for paper materials. When wet, a sheet of paper stretches somewhat and shrinks when it dries. If the edges of the sheet are glued well, the resulting voids will smooth out after drying. This usually happens on the second day after the sticker. The time frame is usually 1-3 days depending on the time of year and ambient temperature. The main thing is that it is not negative.
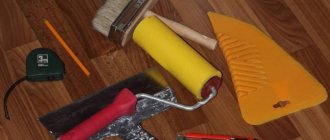
Tool
To complete the work you will need to prepare:
- a stepladder or small table of such a height that you can reach the ceiling with your hand;
- container for preparing glue and water supply;
- paint ditch for primer and adhesive;
- drill or screwdriver with a construction mixer;
- roller and brush for applying working solutions;
- a plumb line or laser level for drawing starting vertical lines;
- pencil and tape measure at least 3 meters long;
- thin stationery knife and scissors for cutting wallpaper;
- soft wallpaper spatula for leveling the canvases;
- a towel, napkins or a piece of soft cloth.
Once the set of tools and materials have been prepared, you can begin to carry out the work.
Features of gluing
The technique of wallpapering walls like this requires skills, abilities, and experience. Therefore, you should practice in advance and study the rules for pasting end-to-end roll material. Features of the method :
- There are no visible gaps or irregularities in the connection lines of individual strips of wallpaper if the work is done correctly. The method requires eliminating the slightest glue protrusions or gaps.
- In addition to a soft plastic or rubber spatula, a certain type of wallpaper may require a roller of low or medium hardness, a clean towel or diaper, and other additional equipment.
- It is very difficult to carry out work in rooms with complex geometry that contain many corners, niches, and other elements; they should be properly glued. It is important to provide the walls with a flat surface without the slightest flaws or defects, which can greatly affect the complexity of joining the panels.
- If materials or devices are chosen incorrectly, technology violations or other inaccuracies were made, then peeling areas or gaps may appear between the wallpaper strips as a result of pasting.
Advice
Butt gluing requires maintaining humidity and temperature conditions so that the material does not shrink, straighten out, or change its shape in any other way.
When gluing roll material, you need to turn off all existing heating system devices and ensure a closed space without the slightest drafts.
Preparatory work
Before you start gluing wallpaper, you must perform the following steps:
- prepare the surface of the walls;
- cut the wallpaper into strips of the required length;
- prepare an adhesive solution.
Wall preparation should include the removal of foreign objects, sockets and switches. There should be no uneven places on the surface, as they will become noticeable after finishing.
Old wallpaper, whitewash or paint should be removed. After this, the walls need to be treated with a deep penetration primer 2 times. You should not abandon the soil. The costs are small, but the effect is significant.
If gluing is done on plasterboard, then the wall must be puttied. This will ensure the safety of the plasterboard during the removal of wallpaper during the next repair. More nuances of gluing drywall are presented in this article.
Wallpaper cutting
The method of preparing wallpaper depends on the need to match the pattern on adjacent sheets. With an independent pattern, cutting is simpler and is done as follows:
- the height of each wall is measured in several places; if the measurement results do not match, you will have to take measurements for every third cut sheet, since the ceiling is not located in a horizontal plane;
- the roll needs to be rolled out on the floor with the pattern down, then the length of the first sheet is measured and the sheet of the required length is cut with a knife;
- After this, the operation is repeated to cut the next trellis.
In the case when adjustment of the pattern is required, the roll should be rolled out with the image facing up, marking the length of the first sheet. Then roll out the roll again and combine the patterns on adjacent sheets. Make marks and cut the second trellis. In order not to confuse the order of gluing, the sheets should be numbered.
Stage six - carefully trim off the excess
You need to firmly apply a spatula to the baseboard and use a sharp utility knife to trim off the excess edge of the wallpaper.
In order for the wallpaper to be cut without “shaggyness”, you need to take a knife - with a new blade.
Important: There is glue left in part of the edge, so it should be wiped with a damp, not wet rag, which does not fade and from which all sorts of steam does not come out.
Technology of covering walls with paper wallpaper
It is recommended to start gluing the first sheet from the doorway, window or corner. To ensure vertical accuracy, you need to use a plumb line and a pencil to draw a vertical line on the wall, indicating the location of the edge of the trellis.
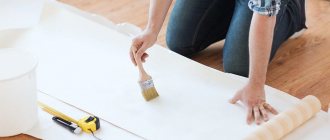
Applying glue
First of all, you need to find out where the manufacturer recommends applying the glue. In most cases, this is a paper canvas, and only for the thickest wallpaper is the adhesive composition applied both to the paper and to the wall.
Applying glue to the wallpaper sheet is carried out as follows:
- place the cut sheet on a clean, dry surface, pattern down;
- Using a wide brush, the prepared paste is applied to half of the back side of the canvas;
- part of the sheet is bent so that 2/4 of the sheets, coated with glue, lie on top of each other;
- then the second half of the trellis is processed in the same way;
- Fold the fabric in half again and leave it to soak.
The time it takes to soak paper with glue depends on the thickness of the material and the thickness of the solution. For a thin simplex it is 4-5 minutes, for a denser duplex it is 7-8 minutes.
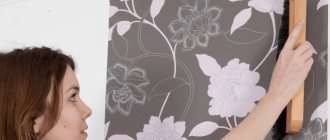
Laying on the wall surface
The saturated sheet can be glued to the wall. Unfold the top folded part of the canvas and attach it to the wall along the previously marked mark. Leveling the sheet from top to bottom and to the sides with a wallpaper spatula, remove any air bubbles that form and ensure that the paper adheres tightly to the wall.
Open the bottom half of the trellis and level it on the same plane as the top.
After this, roll the trellis with a rubber roller to better secure the finish.
The second sheet and all subsequent ones are glued in the same way. It is recommended to roll the seams after each new trellis.
How long does it take for paper wallpaper to dry?
The drying time of trellises depends on their thickness, glue brand, temperature and humidity in the room. The duration of moisture evaporation and hardening of the adhesive composition ranges from 10 to 20 hours.
Where to start?
The reference point does not matter for materials made of cork, vinyl or non-woven fabric. Thanks to the seamless joining, their connection is invisible. Method for determining the start of wall pasting :
- From the edge of the window opening.
- From the door jamb, which is most convenient to use as the initial horizontal line.
- If the corner is of the correct shape and its verticality has been checked by a level or plumb line, then you can step back the width of the canvas and make horizontal markings from which to begin pasting. They return to this line when completing work in the room.
- If the room has many openings or passages, then it is most convenient to select the largest object to start pasting.
- If the window opening is more than 2 meters, then it is easier to carry out actions on both sides, moving along the perimeter of the room.
The nuances of pasting paper wallpaper
Things like passing corners, doors, windows, switches and sockets can complicate your gluing work. The passage of doorways is simplified by removing the trim and installing them after fixing the trellises. When approaching the window, do not try to fit the cut of the sheets exactly to the size of the opening. After the glue has dried, the wallpaper can be easily cut with a utility knife.
When covering sockets and switches, turn off the power and only then continue working. After laying the sheet, make a cut above the rosette, after which you can install the cover.
We have already discussed the topic of pasting corners in this material.
How to prevent bubbles from appearing
To prevent bubbles from appearing on the finished surface:
- eliminate the possibility of drafts in the room;
- carefully cover the back side of the canvas with glue;
- choose the right adhesive composition;
- Roll the sheets tightly against the wall.
If a bubble does form, use a medical syringe with a thin needle. It can be used to pierce the fabric and remove air or excess glue.
What is the best way to glue - overlapping or butt
Only thin single-layer wallpaper is glued with an overlap. In this case, the joints will be invisible, and the gluing process itself will be greatly simplified. Thick duplex should be fixed end-to-end. Otherwise, protruding butt joints will clearly stand out on the surface.
How to get rid of bubbles
Even if paper wallpaper is properly glued, bubbles can still form on it - the worst nightmare of anyone who has ever done wallpaper repairs on their own.
It is almost impossible to paste wallpaper without the formation of bubbles - air bubbles always appear on a wet surface, even after you have perfectly smoothed the canvas. Usually the strips can dry for several hours, then they are stretched onto the wall - and the bubble disappears by itself. However, this does not always happen. If, after drying, air voids remain on the new wallpaper, you can remove them in two ways.
Take a syringe, fill it with liquid glue and carefully push it under the paper. Then smooth with a spatula and squeeze the excess onto the surface to wipe off with a wet sponge. If the voids are very large and the wallpaper is thin, you can try to make a cut at the bottom of the bubble with a sharp razor and inject glue there. However, this method can lead to cracks in the paper, so first check the reaction of the wallpaper in an inconspicuous place.
The process of gluing wallpaper is quite simple, and even a novice repairman can handle it if desired. But even if you are sure that you know how to glue paper wallpaper correctly and beautifully, it never hurts to study all the intricacies of the issue - and then your walls will look luxurious even with the simplest and most inexpensive coating.