The question of how to glue the ceiling plinth to the wallpaper arises when all the finishing work has already been completed and the final stage remains. Faced with such a situation, many involuntarily begin to think about how to achieve the most reliable and high-quality adhesion of baguettes to an already tiled surface. And indeed, if you make mistakes, then over time the parts will begin to fall off. To prevent such troubles, certain recommendations should be followed.
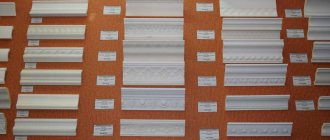
Types of skirting boards and their costs
- polyurethane 300-500 rubles per piece
- plastic from 40 rubles per piece
- expanded polystyrene from 20 rubles per piece
When purchasing planks you need to pay attention to:
- So that the skirting boards are the same color from the same batch
- Without defects
- No curvature
Step-by-step instruction
We will need:
- fillet
- roulette
- Can you use a laser builder?
- miter box and hacksaw for metal (or miter saw, or sharp knife, or grinder)
The blanks are cut using a miter box and a hacksaw according to the markings.
If you haven't hung wallpaper yet
- PVA glue
- container for stirring the mixture
- putty knife
- putty (read about putty on drywall and ceilings)
- water-based paint and brush
- sandpaper
If wallpaper is glued or there is a baseboard in the bathroom between the tiles and the ceiling
- white acrylic sealant
- mounting adhesive Moment Montazh Express decor white
- mounting gun
- rags
Adhesive for foam ceiling tiles. Universal glue
It is clear that there are currently no problems with buying adhesive for ceiling tiles - the main thing is to have the necessary amount of money and the desire to make repairs. The range of adhesive compositions in stores allows you to purchase quality products. Adhesives for expanded polystyrene make it possible to fix tiles on almost any surface - concrete, brick, plywood or plasterboard, galvanized iron, etc.
In any store selling building materials you can find universal compositions:
- Eltitans. As a result of its use, an elastic seam is formed between the sheets of tiles. Thanks to the use of this glue, polystyrene foam adheres well to wood, gypsum plaster, and most importantly, to concrete. Belongs to the middle price category. The only downside is that it takes a long time to dry.
- Titan. Most often found in retail chains. It has a viscous structure and can glue metal and glass in addition to plastic. It dries quickly, so it requires less effort and time. Titan adhesive for ceiling tiles is similar in cost to Eltitans;
- Master. The composition is similar to Titan, but has a number of significant disadvantages. The most common complaint is the pungent, disgusting odor that persists for a long time, so when working with it indoors it is necessary to ensure increased ventilation. In addition, it takes a long time to dry. One undeniable advantage is its low cost;
- Moment. Considers it expensive, but of high quality. Moment adhesive for ceiling tiles has a number of advantages: it quickly bonds the surface of the tile to the ceiling. But it also has disadvantages: it requires more of it and to work you need to purchase an additional application device in the form of a pistol.
In addition to the above-mentioned universal adhesive compositions, you can purchase products from the following brands that are similar in functionality: Dragon, Power, Anserglob, etc. The differences between them regarding characteristics and cost are minimal.
How to cut a corner and make a blank?
First you need to understand which corners are in the room and mark out your blanks for each type (they are different!).
- External corner - in this case, the length of the base of the workpiece will be equal to the length of the span, and the cutting angle will be obtuse (that is, the top edge of the workpiece will be longer than the length of the bottom edge, 135 degrees).
- Internal corner - in this case, the length of the base of the workpiece will be equal to the length of the span, and the cutting angle will be acute (the upper edge of the workpiece is shorter than the lower edge, 45 degrees).
The saw must be used carefully and accurately to prevent chipping.
The blanks are cut using a miter box and a hacksaw according to the markings. To check the correctness of the cut blanks, you can dock “your creation” on the floor. If all the corners meet correctly, then you can start gluing and join them in place.
To check the correctness of the cut blanks, model “your creation” on the floor. If all the corners meet correctly, then you can start gluing.
If the corners do not meet, we make a new blank - this is why we bought fillets with a reserve.
Often the angles between the walls in rooms are not equal to 90 degrees. In such cases, you need to mark the workpieces “in place” and cut the corner without using a miter box. To do this, templates are made from paper and cardboard, and then a fillet is cut out using a sharp stationery or shoe knife.
Adhesive for moldings: which one to choose?
Glue for moldings must be selected based on what material served as the basis for the manufacture of the product. So, for wood models you will need to use special adhesives designed for working with wood. Plastic variations should be glued with plastic glue, and foam plastic with any universal glue.
It is also important to focus on the weight of the material - the heavier the pad, the stronger and better quality the glue it will require. In general, some manufacturers make adhesives for different types of moldings, so it would be more advisable to use a specially designed adhesive instead of a universal compound.
Preparation of putty mixture
We prepare a mixture of putty and PVA glue for gluing the ceiling plinth to the wall and ceiling, as well as for sealing cracks and corner joints. Mix 4 parts of plaster and 1 part of PVA glue with water until it becomes sour cream, let it sit for 5 minutes and mix again. After this, you can use the mixture for 1.5 hours.
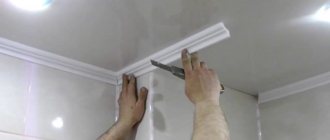
Apply putty in the center of the fillet along the entire length, press for 10 seconds, release, remove excess mixture.
- Dust the workpiece and the wall/ceiling area before applying the glue.
- Apply putty in the center of the fillet along the entire length, press for 10 seconds, release, remove excess mixture.
- We start gluing from the corner and from the wall that is opposite the door.
- You can draw a line around the perimeter using a laser builder and glue the fillet along it.
- We join pre-made blanks in the corners. If the spans are more than 2 meters, we make a direct joint of the fillets.
- Seal the cracks with the prepared mixture along the gluing process.
- The next day, after the putty has dried, we sand down the uneven areas and cover the baseboard with water-based paint.
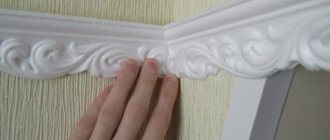
You need to press the ceiling fillet gently and smoothly so as not to leave fingerprints or breaks on it.
Remaining storage
The remaining wallpaper can be dried by spreading it on a baking sheet or polyethylene in a layer of 1.5-2 cm. We will need them if we suddenly need spot repairs.
Once dry, you can break off and soak a piece of the desired size. To repair damaged coatings.
How to attach a ceiling plinth if wallpaper is glued
Advantages
- Can be done at any time and even with existing repairs
- No need to get dirty and dilute the mixture
- You can change the baseboard at any time if you get tired of it
- Dust the workpiece and the wall/ceiling area before applying the glue.
- We start gluing from the corner and from the wall that is opposite the door.
- Apply glue in the center of the fillet along the entire length, press for 1 minute, remove excess glue.
- Presses well in corners and joints.
- We coat the cracks with acrylic sealant, and remove the excess with your finger.
- The main goal is to create the most even seam possible. If you can’t see an even seam by eye, you need to glue masking tape and create a seam along it.
The main goal is to create the most even seam possible. If you can’t see an even seam by eye, you need to glue masking tape and create a seam along it.
Tips and tricks
Below is a list of rules and tips that are best followed for quality work:
- To cut corners correctly, be sure to use a miter box. Borrow from neighbors, buy - it doesn’t matter. Without this tool it is very difficult to carry out high-quality pruning.
- 2 packs of acrylic sealant are enough for a room of 20-25 square meters.
- It is better to start installing the material from the corners and end with straight sections.
When asked what comes first - wallpaper or ceiling plinth, the answer is ambiguous. Most craftsmen work according to the principle - baseboard first. The fact is that the walls, although they look, are not always smooth. After installing the ceiling, it is necessary to seal all the resulting cracks with sealant. Then everything is painted with water-based paint. Only then is the coating glued on.
Ceiling
Many people perfectly imagine decorative stucco molding in the halls of castles and royal residences in the Baroque style, but have a weak or distorted idea of the use of molding in modern interiors.
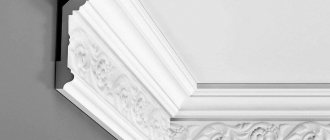
Molding is a fairly broad term that means any applied part, often for decorative purposes. The most common and frequently used type of molding is the ceiling plinth, which is also poetically called fillet, baguette or frieze.
Ceiling plinth is designed to visually smooth the transition between the surface of the walls and ceiling, hide the joint of wallpaper and correct crooked corners and beams.
Most often, ceiling plinths are made from artificial synthetic materials - polystyrene foam and polyurethane.
DIY foam glue. What kind of glue to glue foam plastic with: choose the right option
Several types of liquid and dry adhesives are used for foam products. Dry adhesives can generally be purchased ready-made or in powder form, which must be diluted yourself. A simple cement mortar will not work, since it does not contain the necessary additives to increase the adhesion of surfaces. To choose the right adhesive, you need to find out for what purposes the foam will be used and what the material consumption will be.
Today the market offers a wide selection of foam adhesives from various manufacturers.
The most popular brands of foam glue are:
- Avangard glue for polystyrene foam. This adhesive is ideal for installing foam sheets on concrete and brick bases, and also firmly glues foam to various types of plaster. You can buy this glue in 25 kg bags; the shelf life of such glue is six months from the date of manufacture. There are also adhesive compositions for sale for different air temperatures. There is glue for summer and winter. This type of glue is the most budget option.
- Ceresit is a very high-quality powder adhesive and has a long service life. It is suitable for gluing foam plastic to almost any substrate. Sold in bags of 25 kg. Water consumption is about 300 ml per 1 kg of glue. The cost of this glue is higher than the previous one, but the quality indicator is much better.
- Adhesive for foam plastic Titan Styro. It is a ready-made high-quality polyurethane adhesive. This glue is sold in cylinders with a volume of 0.75 mm. The use of such glue makes the fastening process faster. This glue is excellent for gluing foam boards to concrete surfaces.
- Foam glue Ceresit Express. This glue contains butane, propane and polyurethane. It is used at different temperatures, it is also universal and is used for gluing foam boards to any base.
Preparatory stage
Before purchasing a ceiling plinth, calculate the required number of strips.
Complex calculations are not required; you just need to know the perimeter of the room. Depending on the length of the skirting boards, you can easily determine the number of slats. We recommend buying one or two spare slats in case one of them gets damaged during operation.
- It is very important to correctly and accurately cut the baseboard slats for the corners of the room. To keep the gaps to a minimum, the contact angle of the slats should be 45°. Use a sharp mounting knife for cutting.
- Choose which side you will glue the baguette to the wall. It is better to use the wide side of the profile to cover the areas with the greatest flaws in the wallpaper.
Conclusion
The solution to the dilemma of how to glue the baseboard - before or after the wallpaper - depends on the wishes of the owner of the room. A number of factors are taken into account: frieze material, frequency of decor changes, the need for regular replacement of ceiling trim, and the presence of surface defects.
If the baseboards are glued on top of the wallpaper, then the next repair will have to be done by replacing both the wallpaper and the ceiling strips. After all, glued baseboards are dismantled along with the canvases.
Such repairs are short-lived. But when using inexpensive materials, this does not become a problem for many. Experienced craftsmen recommend gluing ceiling skirting boards over a clean work surface.
After all, this method is considered the most reliable and durable. With this gluing method, expensive finishing materials can be used. Replacing the wall covering in this case will not cause any difficulties, and the ceiling decor will remain unchanged.
How to glue foam ceiling plinth to wallpaper
Method 1. Fastening the ceiling plinth before wallpapering the walls.
This method is often used by professional craftsmen and is considered the most correct. Marks when attaching the baguette can be immediately removed without the threat of damage to the wallpaper; in addition, the frieze is easy to paint.
The plinth is glued to the prepared walls and ceiling.
How and what to glue? It is better to use special glue suitable for gluing different materials, as well as putty left after leveling the surface of the walls. It can also be used to carefully cover the space between the molding and the ceiling (wall).
You can start gluing wallpaper only after the putty has dried. The wallpaper is glued so that there is a slight overlap on the baseboard. Then it is advisable to trim off the excess using a spatula or a mounting knife.
Method 2. Installing the baseboard directly on the wallpaper.
What glue should you use if you decide to attach the ceiling plinth to wallpaper that has already been glued? Polymer-based glue, for example, “Dragon”, “Moment”, or assembly adhesive - liquid nails - is suitable. This method will require maximum concentration, attention and accuracy from you so as not to spoil the wallpaper.
A small amount of glue is applied to the foam molding and the wall (ceiling).
Usually you need to let the glue sit for 5-10 minutes or as long as indicated in the instructions, and then firmly press the baseboard to the surface. If excess appears, you need to immediately wipe it off with a rag. Seams and gaps can be hidden using white sealant.
If you want to change the color of the baguette, then before gluing it, it’s a good idea to paint the slats in any color. After installation, it will be possible to touch up the joints with a brush.
A few simple tips:
- Before cutting and gluing the plinth, it is very advisable to wash your hands thoroughly, since the delicate light surface quickly gets dirty.
- Remember that when gluing, you do not need to press the baguette very hard, otherwise fingerprints or even indentations will remain.
- When fitting the last plinth, you first need to adjust the angle, and then measure and cut the strip to length.
- For beginners, we recommend gluing the ceiling plinth onto already pasted wallpaper.
Preparation of tools and materials
Before gluing the foam ceiling plinth onto the wallpaper, you will need to prepare the following tools and materials:
- Pencil.
- Assembly knife.
- Hacksaw.
- Miter box.
- Putty knife.
- Brush.
- Glue.
- Ruler.
- Sandpaper.
- Dye.
- Putty.
- Water container.
- Colorless sealant.
- Ladder.
Despite the variety of materials for installing foam skirting boards, it is better to use adhesives recommended by manufacturers. In order not to spend extra money on glue and paint, you should calculate in advance the amount of material needed. To do this, measure the perimeter of the ceiling.
If the room dimensions are 4.5 x 5.0 m, its perimeter is (4.5 + 5.0) x 2 = 19 m. Since the length of the plank is 2 m, you can determine the required number of planks after dividing 19 by 2. It should be 8.5 , i.e. 9 pieces, and since you will need a supply, it is better to take 10 slats from the store.
Further work depends on the correct cutting of the ceiling planks. Before cutting the wallpaper under the ceiling plinth, you should prepare a miter box or mounting knife. If you plan to install wide ceiling slats, then high-quality cutting can be done with a hacksaw.
Installation of ceiling plinth
How to properly organize decorative finishing using ceiling skirting boards?
Before you begin to carry out your planned work, you need to buy a high-quality ceiling plinth on the basis that one standard strip is two meters long.
Also, when choosing the correct fillet width, you must take into account the height of the ceilings in the house. If you have high ceilings in your home, wide baseboards work well. If the height of your ceiling is standard, for example, 2.80 meters, then a fillet 5 cm wide would be an excellent option.
The ceiling plinth can be glued in two ways: using putty and using acrylic sealant.
Many professional builders come to the conclusion that when performing repair work, the first option is more practical than the second. The peculiarity of the first option is that there is no need to dismantle the fillet when changing the wallpaper, and it is also quite convenient to seal the gaps between the baseboard and the wall, especially if there are significant unevenness of the walls.
Let's consider the technology of gluing ceiling skirting boards using putty.
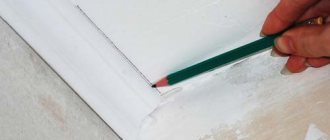
- Using a special building level and a pencil, you need to mark the lower border on the ceiling for installing the plinth.
- Mix the finishing putty in the proportions specified by the manufacturer. After you have mixed the solution and it is ready for use, they need to go over the places where you will attach the baguette. After this, it is necessary to moisten the treated areas with a primer and begin gluing the ceiling plinth. All actions must be performed until the wall surface is dry.
- Using a spatula, apply putty thickly along the entire length of the fillet on the back side of the ceiling plinth. After this, you need to press the plinth to the ceiling and wall, and remove the protruding putty from the ceiling plinth using a spatula.
- If there are gaps between the wall and the baseboard, they are well coated with putty.
- After the finishing solution has dried, be sure to coat all existing cracks well with it, and also hide the joints of the ceiling plinth sections.
- After the putty has dried, you can begin painting the fillet.
- How to properly glue ceiling plinth to wallpaper
How to glue foam ceiling tiles. Features of choice
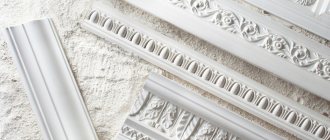
Attention: When choosing a tile, take into account not only aesthetic features, but also the quality and its operational features.
Pay attention to the edges of the material - they should not crumble or crumble, and the polystyrene particles should be the same size.
The shape of the material is of great importance - square products must have right angles, otherwise it will be difficult to join the tiles and it will not be possible to achieve the desired attractiveness. The surface should not have defects, since any chip or dent is clearly visible on the ceiling, regardless of the texture of the material and the color of the tile.
Figure 3 The right choice is the key to beauty and quality.
To make sure of its strength, take the product by the corner - a good tile will not crack under its own weight. If the opposite happens, the material is of poor quality and should not be purchased.
If you intend to purchase colored tiles, keep in mind that over time the paint will fade when exposed to sunlight. It is advisable to buy a white finishing material suitable for painting. If you are still more attracted to colored products, pay attention to the presence of a uniform shade over its entire area.
Expanded polystyrene ceiling tiles are available in a wide range in any specialty store. Its cost is affordable, and in terms of convenience, ease of installation, and maintenance, it is superior to suspended ceilings. When purchasing finishing material, do not forget to buy other accessories for its installation, in particular, glue.
When thinking about what is the best way to glue polystyrene foam ceiling tiles, keep in mind that one of the best compositions is “Titan”, which is characterized by quick adhesion to the surface, reasonable price, and reliability. Liquid nails and other transparent rubber-based compounds are effective for fixing finishing materials. After applying glue to the surface, reliable adhesion, depending on its type, occurs in about a few minutes.
[adsblock]
In the second chapter of the step-by-step instructions, we will learn how to properly glue the ceiling plinth to the wallpaper. To do this you need to do the following:
- For this work, you need to use a special glue, for example, “Moment Installation”, as well as white silicone sealant.
- On the reverse side of the ceiling plinth you need to apply a special adhesive solution in a continuous strip.
- The ceiling plinth must be pressed well against the corner between the ceiling and the wall.
- If gaps have formed between the baseboard and the wall, it is necessary to carefully treat the joints using white silicone sealant. Experts recommend sticking masking tape onto the adjacent part of the wallpaper to protect it from the adhesive solution.
- The fillet joint areas must be generously coated with acrylic sealant.
After the glue has dried, it is recommended to paint the ceiling plinth with water-based paint.
You can offer an alternative option: paint the ceiling skirting boards before gluing them. To do this, you need to cut out and prepare all the parts in advance with maximum precision, then paint, and after that start gluing the ceiling plinth to the ceiling.
Methods for insulating the ceiling in a wooden house, as well as the materials necessary for this, are described here.
Which laminate is better to choose for different rooms, what are the features of this choice and what does it depend on, you can find out by reading our article.
When is the frieze glued first?
The method of installing skirting boards before decorating walls with wallpaper is considered the most reliable. It is durable. With this finish, you can change the wallpaper during the next renovation, and the ceiling part will remain intact.
Before gluing the molding, you should level the walls and thoroughly prime them. All irregularities are removed with putty. After installing the skirting boards, at least three days must pass. Only then do they begin to decorate the rest of the room.
After gluing to a bare wall, the joint with the wallpaper will look more aesthetically pleasing