Currently, trends related to the variation of spaces and redevelopment are intensifying. The idea of transforming space and installing additional windows and doors is becoming increasingly developed. Our encyclopedia has already said a lot about how to choose a window or door. In this article, we will tell you how to correctly create an opening in the wall and properly strengthen it, so that the long-awaited redevelopment becomes not only beautiful, but also safe.
As a rule, to make such a dream come true, you need to make an opening in a load-bearing wall or demolish existing partitions. A wall is one of the elements of the supporting structure of a building, which together, interacting with each other statically, provide the necessary stability and strength of the house building. It is clear that any interference in this system can lead to fatal consequences. Any hole made in finished masonry requires an operation such as reinforcement. It is necessary to strengthen not only the openings of doors and large windows, but also sections of the wall into which even small windows will be inserted. It is worth adding that the tips below will not describe measures to coordinate changes in the building design, but will only talk about ways to strengthen the walls.
The only thing we will stress is that before making any changes to the load-bearing structures in the room, it is necessary to obtain the appropriate permission in accordance with the Housing Code of the Russian Federation.
Applications of reinforced cage
In order to strengthen the walls and prevent new damage from occurring, you can reinforce the walls.
This can be done using reinforcement cages, metal rods or reinforcing mesh. The simplest option is to carry out reinforcement using reinforcing mesh, in this case, the order of work will be as follows:
- You can fix the reinforcing mesh on the wall either on one side or on both sides;
- before this it is necessary to drill holes;
- To fasten the mesh, through studs are used or this can be done using anchor bolts;
- after attaching the mesh, concrete mortar is applied to it, the grade of which should not be lower than M 100;
- the thickness of the solution layer is usually in the range of 20-40 mm;
- auxiliary metal rods with a diameter of 6 mm are attached along the height of the corners, 25-30 cm retreat from the edge;
- if the mesh is installed on only one side, then studs or anchors with a diameter of 8 mm are used in increments of 60-75 cm;
- if the reinforcing mesh is attached to both sides of the wall, then the diameter of the studs is at least 12 mm and their pitch is 100-120 cm;
- The reinforcing mesh is attached to the anchors or studs using welding or knitting wire.
Subtleties of arranging openings
Experts divide all openings into 3 types:
Much also depends on the material from which the wall is made. It is harder to work with concrete and brick, but easier with wood and cellular concrete (foam and aerated concrete). The technology for arranging the first two types is almost the same. partitions , but they all have their own nuances.
How to cut a hole in a concrete wall
Of course, you can order a specialized team that will come and do everything quickly and beautifully, but the price in these offices fluctuates around 50 thousand rubles. And if you puzzle the team working for you or even do everything yourself, then you can fit in 15 - 20 thousand rubles.
First of all, remember - you can break through a load-bearing wall and a wall under the front door only after receiving permission from the relevant services. It’s easier with partitions; you can first cut an opening and then legitimize it.
Let's assume we have a technical report, specification and other documents on hand and now we can start arranging the doorway. First of all, we transfer the markings to the wall; in our case, the opening should be 90x210 cm.
The marking of the wall is done according to the technical specifications.
There is a small nuance, wherever you cut the opening, there must be at least 100 mm from its edge to the nearest internal or external corner. Otherwise, problems with cladding may arise later.
Next we need to make a mirror image of this marking on the back side of the wall. The instructions are simple, drill through holes in the corners and connect them on the back side.
You need to transfer the markings to the back side of the wall.
Now we need to cut out the opening according to the markings. To begin with, we drill a series of holes with a diameter of 10–12 mm around the perimeter in increments of 3–4 cm. After that, take a large grinder with a diamond wheel and cut through the wall on both sides.
We drill a series of holes around the perimeter.
You cannot completely cut out the opening from the start. We leave several small bridges to hold the slab in place, after which we cut it into square blocks about 40 cm in size. Then, step by step, from top to bottom, we cut and remove these blocks.
When removing blocks, it is advisable to cover the floor with a wooden shield so that an accidentally falling block does not damage it.
Now we need to strengthen the doorway. We will do this using a metal corner strap and jumpers. The technical documentation contains a diagram of the junction units, the materials are described in detail and a drawing of the assembly of the frame from the angle is given. In our case, the parameters are:
When fixing the frame, the studs on both sides are driven in independently of each other at an angle of about 45º. In the diagram below, the reinforcement is attached to the edge of the frame; we recommend drilling holes in the corner and driving the reinforcement into them at an angle as well. After this, you need to scald the rod and while the metal is hot, bend it parallel to the corner. Next, we cut the rod and weld the remaining tail to the corner.
veneered blind doors eagle
Scheme of fixing the frame with studs.
Now all we have to do is cover all the cavities with construction mixture and paint our frame so that it does not rust.
Gross mistakes
Often, unknown craftsmen undertake to quickly and inexpensively cut an opening in the wall, and here you need to watch their actions very carefully. The first common mistake of inexperienced craftsmen is that they cut out the opening completely, without dividing it into blocks.
Such an oversight can lead to damage to the ceiling. Even car tires laid on the floor may not save you from a sudden fall of such a serious mass.
High probability of damage to the ceiling.
Naturally, it is impossible to remove such a block entirely, so people take a sledgehammer and break it into fragments. Such extreme actions will almost certainly cause cracks in the ceilings and walls.
Hitting with a sledgehammer can cause cracks in the ceiling.
Making an opening in a solid brick wall
A reinforced concrete wall is monolithic and if you have a good tool, breaking through it will not be difficult, but arranging a doorway in a brick wall requires a fundamentally different approach. After all, if you cut an opening in a block wall, the upper sector of the ceiling may simply collapse.
To eliminate such a nuisance, we need to strengthen the upper sector; for this, a horizontal concrete beam about 2 m long is usually cut into the wall. Here everything depends on the width of the opening; on each side of the opening, the beam should enter the monolithic wall by about half a meter.
In thick and load-bearing walls, this beam consists of 2 - 3 sections. First you need to mark where exactly the beam will be located. Further along the height of the beam, several windows up to half a meter wide are knocked out. The width of the supports between the windows is made of brick.
The width of the supports between the windows is made of brick.
Next, part of the support is knocked out on one side. We will install a section of reinforced concrete lintel in this place. But until the jumper is inserted, the supports cannot be completely knocked out.
Some of the supports are removed from one side of the wall.
One of the sections of a reinforced concrete lintel.
Next, we take one of the sections of the reinforced concrete lintel and, using a cement-sand mortar, we embed it into the resulting niche. Keep in mind that until the mortar has set, you cannot knock out the brick supports from the back side. Typically, it takes 2 to 3 days for the solution to harden sufficiently.
A lintel embedded in the wall.
Now we knock out the brick supports on the back side of the wall and install the second section of the lintel in the same way. When the ceiling is strengthened, you can take a grinder with a diamond blade and cut the outline of the doorway on both sides.
Depending on the thickness of the wall, the lintel may have several sections, but this does not change the technology.
We cut through the outline of the doorway with a grinder.
Next, we take a hammer drill or a chipper and one by one, from top to bottom, knock out the bricks from the opening.
We clean the opening.
When the brick is completely removed, the edges of the doorway need to be cleaned, after which you can begin finishing.
The finished opening can begin to be finished.
Insertion into the partition and expansion of the opening
Expanding an opening in a brick wall is more difficult than breaking through a pier, because the piers are placed in half a brick. But the arrangement technology is the same in both cases.
As shown in the diagram below, if we simply extend the wall beyond the top load-bearing lintel, the lintel itself and everything above it will collapse. Therefore, we need to strengthen it.
Doorway expansion plan.
We will strengthen it by cutting powerful metal corners over the jumper on both sides. To do this, the horizontal seam between the bricks expands and deepens. Next, we drill through holes, insert pins into them and tighten the corners together.
We tighten the corners with through pins.
The main work is finished, now, according to the scheme described in the previous chapter, we make vertical cuts with a grinder, knock out the excess and arrange the perimeter of the opening. In this case, it is better to make a monolithic frame from the same corners.
Widened and reinforced opening.
Thin walls break through in about the same way. The standard thickness of such a wall is 75 mm; accordingly, we take a corner with a wing of up to 35 mm, so that it freely clasps the wall on both sides.
Some craftsmen, instead of 2 small corners on both sides, mount one large one with a 75 mm wing on one side. They cut through the horizontal seam of the partition and drive a corner into it. This can be done, but as you cut, you need to insert metal supports into the gap so that the ceiling does not sag.
Possible errors and difficulties in the process
This subsequently leads to problems with thermal insulation and a decrease in the reliability of installation work.
Incorrectly made clearances will need to be redone, and this will lead to higher costs for construction work. To prevent this from happening, you will need to link the openings to the wall.
Particular attention is paid to the top of the slopes; it is checked taking into account the design of the finished floor. It happens that when making openings the required gaps on the sides of the box 30 mm and below 60 mm are not observed
Also, the shape of the opening is often incorrectly executed with violation of the diagonals, when they are not equal to each other.
Incorrect calculations of a reduced double-glazed window: after installing PVC structures, the glazing area becomes insufficient and cannot provide sufficient natural light to the room.
Process
The arrangement of lintels, with the formation of a unit and taking into account support in the wall, must take place according to the rules described in SNiPs. Since reinforced concrete lintels are used most often in modern buildings, the process of their installation consists of the following nuances:
- For laying, a ledge is made with a width of at least 25 cm, and on each side of the opening, the length of the structure should exceed this width by 50 cm.
- For installation, use a truck crane to lift the lintel - it will lift and lower it to the desired support point, onto which uncured concrete mortar has already been applied.
- With prefabricated options, formwork is arranged, formed along the width of the opening, a reinforcement cage is knitted and the lintels are poured in a monolithic manner, leaving them until completely dry.
Metal jumpers are lightweight. Presented in the form of channels and various forms of rolled steel, their advantage is that during operation they can be cut to the required length.
Brick lintels are mounted to the main wall along the top of the opening, and then connected to each other using a shelf from which hang clamps placed in vertical seams. The clamps reliably reinforce the lintel, and it turns out strong.
Recently, in most cases, builders have placed the professional BAUT reinforcement system into brick lintels.
A simple and reliable way to install a brick lintel - in the video:
Methods for installing channels on the wall
1. Overlay of the Y-shaped channel with an overlap. This is the easiest way. Its disadvantage is that the shelves of the Y-shaped profile are rounded and beveled, and when installing the profile, an empty space is formed between the channel and the wall surface. To achieve the tightest possible fit of the structure, the gap is caulked by injection, or the channel is installed on a pre-applied solution.
2. Flush Y-channel cover. This is a more accurate way to install channels of a similar shape, since plastering the wall after strengthening the opening will be easier: there are no protruding parts. In this case, the edges of the wall are slightly beveled with a hammer drill to achieve a tighter connection between the metal and concrete. This is a very labor-intensive and not very common procedure, so it is often fixed as in the first case. In addition, a hammer drill is not a very “filigree” tool, and choosing the right angle of inclination is very difficult.
3. Overlaying a U-shaped channel on the wall with an overlap. As in the first case, this is a very simple method, but requires a perfectly flat wall surface. In this case, a U-shaped channel creates smaller gaps than a Y-shaped one.
4. Flush installation of the U-shaped channel. It also allows (similar to point 2) to easily plaster the wall after completing the installation of the opening reinforcement. The side grooves for the channel flanges are cut with a diamond saw to obtain a smooth surface. Expensive, but beautiful.
5. How the channel is most often laid in practice. As we have already noted, the hammer drill is not distinguished by jewelry precision, so the end of the wall is often “adjusted” for installing the channel “by eye.” At the same time, workers are often slapdash and cut off the edges very roughly - the principle is shown in the picture. The gap between the wall and the channel is filled with construction waste. In this case, of course, we are not talking about any filling of the cavity with a solution.
Note: when installing a channel with an overlap, it is selected a size or two larger than the wall, and when installing flush, it is selected according to the size of the wall.
Additionally: reinforcement of the opening with a corner
Is it always possible to cut into a concrete wall?
Work to create openings in concrete walls must be carried out in strict compliance with laws, building regulations and sanitary standards, taking into account fire safety. In most cases, when remodeling, it is unacceptable to touch load-bearing walls.
To obtain permission to carry out such work, you should think about how the reconstruction of the apartment does not entail damage to the entire building. To do this, you need to reinforce the opening in the load-bearing wall using metal structures. This applies to the upper floors; on the lower floors, changing the apartment plan may be prohibited.
When obtaining this permit, the following points are taken into account:
- the material from which the house is built;
- apartment layout;
- dimensions of the new opening and supporting structure;
- technical condition of the building and its ceilings;
- pressure exerted on the walls from above;
- wall thickness and condition.
In a private building, it is much easier to create a window or doorway in a concrete wall, since there are no lower or upper floors on which the load could increase. But it is imperative to take into account all aspects and details that may subsequently affect the stability of the floors of the house.
Unprofessional and illiterate redevelopment in a private house can lead to disastrous results, so before breaking through an additional opening, you need to study all the design features of the load-bearing walls of the house and find out the following:
- House project;
- the area of the new opening in relation to the area of the load-bearing wall;
- technical parameters of the house, the condition of its ceilings;
- thickness and strength of the load-bearing wall.
Coordination of redevelopment
We would like to briefly inform you that uncoordinated work on the redevelopment of apartments is fraught with at least a huge fine for the owner of the living space. In more serious cases, when the redevelopment led to a violation of the strength of the wall or its collapse, and even more so, with human casualties, criminal prosecution is threatened.
To obtain permission to cut a fragment in the wall, you need to collect documents and submit them to the housing inspectorate:
- BTI technical passport for the apartment.
- Redevelopment project from the design bureau.
- Technically sound conclusion.
- Certificate of ownership.
- A copy of the apartment owner's passport.
- Application for permission on behalf of the property owner.
Based on the results of consideration of the application, the housing inspection sends either a reasoned refusal or a permit to carry out construction and repair work, valid for a year. If you do not have time in this time, you must extend the permit by submitting a new application to the housing inspectorate. After completing the renovation, do not forget to call an inspector to record the new location in the apartment.
What are the difficulties?
An opening can be made in an iron-concrete floor, if the design of the floor itself allows it. In other words, if this is an old house, where the ceiling slabs are narrow and long, then creating an opening will be almost impossible, since an opening of this size will disrupt the design of the slab, and it will have to be strengthened in such a way that, firstly, this will not be agreed upon in the redevelopment, and secondly , this will become very costly.
But in houses with monolithic floors, just now everyone is making openings to accommodate stairs, when creating a transition in two-story or more apartments and private houses. You can even place an elevator in such an opening.
Technically, it is necessary to ensure that the cut part of the slab is supported from below, and then we cut or saw out, drill around the perimeter, and lower the fragment of the ceiling down. Next, we chop it up and take out the trash.
Openings can be of various shapes and sizes.
In some cases, significant strengthening of structures with rolled metal is required.
Special diamond circular saws are used for cutting concrete. You can also use other available tools (a professional large grinder with two handles). Cooling is required during the cutting process.
This video demonstrates stationary cutting of concrete, when the saw is fixedly fixed on the floor of the ceiling using a special frame.
The second video shows a device for drilling holes in the ceiling; there is also reinforcement inside the ceiling..
If the reinforced concrete floor does not have a stiffener rib or the next level, or something heavy is not installed on the floor slab, then you can make an opening, there will be nothing wrong with it, but you must also remember that the reinforced concrete floor itself remains in place as long as there are ribs rigidity or reinforcement in it, if the structure is damaged, the slab may collapse, and even after the opening is made, this ceiling cannot be loaded in other places.
So, for example, if you make an opening in the ceiling a-1 or a-2 from one side to the other, the slab will collapse, the same can happen with slabs a-3 and a-4 if you cut off the stiffening ribs.
The opening itself can be cut in two ways:
- Drilling through holes along the contour of the opening a few millimeters apart.
- Cut the opening using a diamond blade.
I like the second option better, since the edges are initially smooth and do not require further processing.
And now ATTENTION!
When you cut an opening, it will fall from a height of at least 1.8 meters, and this is fraught with destruction in the house, since the opening will be very heavy, because it is made of concrete and metal structures. Therefore, before cutting the opening, it is necessary to ensure safety so that the cut piece does not fall.
An opening in a reinforced concrete floor can only be made if you have some experience in construction and have coordinated this type of work with the competent authorities, since during the manufacture of the opening you will weaken the reinforced concrete slab, which can lead to the collapse of the rest of the slab or the destruction of the room, and this can cause damage to health people and even death. Therefore, you should not do this work yourself; use the help of specially trained people with a license (permit) to perform this type of work!
Types of loads and channels
Type A. This type includes beams with rigid embeddings. The load is usually applied evenly .
These could be canopies over entrances. Welding is used for their manufacture. They are made of two channels attached to the wall, and the space is filled with reinforced concrete.
Type B. This type includes single-span beams, the load is distributed evenly. Usually these are beams of interfloor floors.
View C. These are simply supported beams. They have two supports with a console, the load is distributed evenly between them. These are floor beams, usually they extend beyond the outer walls. This is necessary to create support for the balcony slabs.
View D. These are single-span simply supported beams on which there are two concentrated forces. These are usually lintels on which a pair of floor beams rest.
View.E These are single-span simply supported beams where one force is concentrated. Usually these are lintels on which the floor beams rest.
View F. These are cantilever beams where one force is concentrated. This could be a canopy over the entrance or entrance to the house. Only in this case, metal sheets are laid between the channels, and a brick wall is placed on top of them.
The diagrams will look like this: View A View D View B View E View C View F
Construction is difficult to imagine without the use of a channel. It is very popular in home construction and can be used as floor beams, lintels and other types of construction. Channel is one of the most common rolled metal products available.
It is important to remember that in construction everything should be clearly calculated and therefore there is no need to thoughtlessly buy and install a channel. To do this, we will look at how to calculate a channel in order to avoid unforeseen situations
The calculation itself is made in a special calculator by type and number. Let's look at each type, and also give an example and find out what it means:
Type 1 is a single-span hinged-supported beam with a stable distributed load. An example of the first type would be a beam with a floor between floors. Type 2 is a cantilever beam with rigid embedding and a uniformly distributed load. An example of the second type is a canopy, which was made by welding two channels on one side to the wall and was filled with space in the form of reinforced concrete. Type 3 is a hinged beam, which is supported by a cantilever on two supports with a stable distributed load. An example of the third type would be a beam that spans a balcony slab with an external wall. Type 4 is a single-span hinged-supported beam, concentrated by one force. An example of the fourth type would be a lintel on which only one floor beam rests. Type 5 is a simply supported beam, concentrated by two forces. An example of the fifth type would be a lintel on which about two floor beams can rest. Type 6 is a cantilever beam, concentrated by one force. An example of the sixth type would be a visor or also called a fantasy parade, it works on the principle of the second type, only the brick wall is located where the channels are, between which there is a metal sheet.
Channel Calculator
The calculator is very convenient because you can make channel calculations online. Select the dimensions you need and set the number of channels that will meet certain standards and GOSTs.
You can also find out the mass of the channel, its length, as a result you will get the initial data on the left side, and on the right the calculator will show the result for the deflection. According to the graph, you will clearly see the location of the channel along the axes and what the holding load will be along these axes, which is a clear example of further work.
The initial data of the calculation calculator includes: - span length denotes L - standard load is measured in kg/m - Fmax - number of channels at least one - location along the axes (X or Y) - design resistance R - channel size (with sloped flanges, with parallel edges, economical, special, light series). The result of calculating the channel bending in the calculator: with parallel edges: - Wreq and Fmax - calculation for deflection (Fbeams and reserve) With inclined flanges: - calculation for strength (Fbeams and reserve) And other types of beams are also calculated on their own.
Materials and tools for the device
To install lintels in brick walls, you will need the following consumables and tools:
- construction hammer, hacksaw, electric drill, screwdriver;
- set of installation accessories;
- trowel, putty, brushes, spatulas, bucket for mortar;
- edged boards of the same thickness, with metal or wooden supports;
- metal corners, self-tapping screws, reinforcing mesh or metal rods, nails with wide heads, binding wire;
- polyethylene film, roofing felt;
- composition for concrete in finished form or separately: cement, sand, gravel, water, slag.
Separately, gloves, overalls, rags, brushes and “levelers” for concrete may be useful so that the poured solution is well compacted when distributed, filling the pores of the wall and formwork attached to the surface.
steeldoor
In most new buildings, walls and partitions are made of foam blocks. These are masses that resemble large bricks in shape, but are made of foamed concrete mortar and are light enough for their volume.
This material is quite beneficial for builders: lower price, larger coverage area, etc. This material is too weak for load-bearing walls, and the foundation of the house is still made of reinforced concrete slabs. But as partitions between rooms and apartments, foam blocks are used in almost every new building. Despite the fact that these blocks crumble and are destroyed practically with a nail by hand.
When installing a metal entrance door into an opening made of foam blocks, most people encounter problems. The “pin” installation method, followed by foaming of the installation seam, in such openings promises several troubles. Over time, pins in foam block walls can break the fastening points, and the door can become loose. The second unpleasant moment: the protective properties of the door decrease, it becomes easier for a swindler to rip out the entire door rather than go “through it” or the locks.
electronic thermostat for underfloor heating connection
As we said earlier, we install our doors with concrete, so in most cases in an opening made of foam blocks, the installation of our doors does not require additional work.
But we encounter such openings that even before installing our door require strengthening. It also happens that the customer, seeing the “fragility” of his opening, wants to strengthen it fundamentally. In this case, the doorway is partially framed with metal profiles, with their subsequent fastening to the door frame. One example of such work is shown in the photograph below.
In this way, the opening in front of the installation of STAL-70 was strengthened. It should be noted that the required reinforcement method is selected for each specific opening and can include a variety of profile elements and their installation.
Source
Instructions for constructing an opening in a load-bearing brick wall
Korovin Sergey Dmitrievich
Master of Architecture, graduated from Samara State University of Architecture and Civil Engineering. 11 years of experience in design and construction.
Sometimes, for redevelopment in an apartment or private house, it is necessary to make a new door or window opening. Creating an opening in the load-bearing wall of an apartment brick building is not the easiest task. Things are easier with redevelopment in a private house, here everyone is their own boss.
What is a doorway? This is a hole in the wall intended for installing entrance units. The fixed fixed element in the inter-wall space is called a door frame. Often an arch is made as a decorative element of the interior.
How to properly brick a window
brick the window
Sometimes, on the contrary, it is necessary to reduce their number in the house. If the rear ones are made of the building material we specified, you will simply need to fill the opening with bricks. Some technologies will need to be followed:
- Mix a thick solution. This consistency is needed so that it does not crack.
- Clean the surface from dirt.
- The wall is primed.
- To save money, the brick is placed on the edge.
- The cracks are sealed with construction foam.
- Sheets of polystyrene foam are placed on top.
- The surface is finished.
There is nothing complicated about how to brick a window opening. But any of the above processes is very important: it should be carried out in accordance with the recommendations given. If they are ignored, there is a risk of deformation of the work done and even collapse of the entire building. If you still have questions, we recommend watching the video “how to brick windows”:
Sometimes situations arise when you need to cut in an additional door or window in a house, while making an opening in a blank partition or load-bearing wall. If we talk about buildings owned by the state or any company, then permission for such actions is extremely difficult to obtain, but in your own home you will do this without anyone’s permission, and now we will discuss the technical side of the issue.
Also, the video in this article will help you clearly understand this topic.
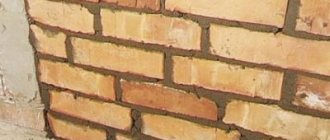
Finished section of a window in a brick wall
Reasons for strengthening
Reinforcement of brickwork is carried out to increase the strength of the structure. Such measures guarantee the preservation of the integrity of the structure during possible redevelopment of the house, displacement of internal partitions, or installation of additional window or door openings. Strengthening a brick wall helps prevent deformation of the building as a whole. At the first signs of a violation of the integrity of the structure, it is recommended to install reinforced walls.
Deformation of masonry occurs under the influence of such factors:
- Incorrectly calculated project. Violation of the standard distance between buildings, uneven distribution of the bearing capacity of elements, excessive loads on the foundation.
- Violation of foundation construction technology. Lack of additional strengthening of loose soil, incorrect foundation depth, use of additives in solutions.
- Poor quality masonry. The incorrect choice of method for constructing window and door openings, cladding with mixtures with a low level of air permeability, the use of low-quality mortar, and the absence of distribution slabs when laying floors.
- Violation of the rules for using walls. Lack of drainpipes and blind areas, leakage of underground communication systems, disruption of hinge connections of load-bearing elements with floors.
Price of work per 1 linear meter in the Russian Federation
Depending on the type of walls and the number of channels used, prices in the Russian Federation vary from 4,000 thousand rubles to 11,000 thousand rubles.
| Double-row reinforcement of brick walls | Number of channels | Cost of 1 p.m. (rub.) |
| 12 | 4000 | |
| 14 | 4500 | |
| 16 | 5500 | |
| 18 | 5800 |
Prices include transportation costs within the city without parking costs. Outside the city, transport costs also increase.
Openings in brick walls
You probably understand the danger of removing intermediate bricks from the wall - the situation is similar to the film “Operation Y”, when G. Vitsin took out the bottom pot from a vertical stack. The situation is the same here and not a single instruction will give you guidance on this type of partial dismantling. To figure out how to properly disassemble a wall in order to make an opening in it, you need to understand its design.
Types of brickwork
Names of the sides of the brick
The brick is a volumetric rectangle with three main sides, which, according to GOST 530-2007, are called spoon, poke and bed. In Russia, a single product standard has been adopted, therefore, red brick (ordinary or refractory) has the following dimensions: single - 250x120x65 mm, one-and-a-half - 250x120x88 mm and double - 250x120x103 mm. But the double sand-lime brick M 150 is slightly different and its dimensions are 250x120x138 mm.
Brick size by parts
In construction, the thickness of masonry is usually determined not by the metric system, but by parts of brick or stone. Therefore, the wall can be a full stone (full brick), three quarters of a stone, half a stone, a quarter of a stone, as well as two stones, two stones and a quarter, and so on.
First, a little theory about masonry - at the top you see three methods of tying masonry - spoon, chain and cross. The first method, when the entire brick lies with a spoon facing outwards, indicates that its depth is 120 mm. If in the masonry you see the side called the butt, then the thickness naturally increases to 250 mm, but this is no longer in partitions, but in load-bearing or semi-load-bearing walls (see also Is it possible to build a bathhouse with your own hands from brick).
Brick wall in section. Well masonry
Well masonry is so called because it has wells formed in the cavity between the walls, which are filled with some kind of insulation. In old houses, this is most often slag, which serves as insulation, but sometimes it can just be construction debris and even soil (that’s what the builders were like). In modern buildings, penoizol or urea-formaldehyde foam (CFP) is most often used as thermal insulation in such cases.
Thickened well masonry
But the well masonry does not always consist of two partitions; more often it is reinforced with one more (see photo above) or even two rows of bricks. Naturally, in such a situation the task becomes more complicated due to the depth of the obstacle.
Cutting out the opening
Marking the place for the opening
To make a cut in the wall of a brick house for a door or window, first of all you need to mark this place with chalk. It should be taken into account that the opening must be several centimeters larger than the door frame or window frame, since after installation, foam is blown into this gap, which serves as additional fixation, as well as insulation of the gap.
The upper part of the opening is widened to accommodate the beam
Look at the photo and you will see that the opening is made in the shape of a T, where the crossbar is created for the beam that will support the masonry hanging from above. A wooden beam is used as this beam in partitions, and in semi-load-bearing walls a board 50 mm thick is used, and if you disassemble such structures, this is exactly what you will see there. In load-bearing walls, reinforced concrete beams are used for openings (if you have ever made holes for cornice brackets on a load-bearing wall, then you have seen this for yourself).
First, let's try to make an opening in the partition of half a brick or a quarter brick (this is the usual thickness of partitions). Of course, it is easier to disassemble the partition, but using this example it will be possible to learn how to disassemble more complex (load-bearing and semi-load-bearing) structures. It’s just that on such partitions the principle of removing bricks will be clear. (see also Is it possible to build a tandoor out of brick with your own hands)
Reasons for strengthening the doorway
First of all, you need to figure out why exactly the strength of the doorway is not enough. And there can be two such situations:
· the walls around the opening are not able to withstand dynamic loads - that is, the door itself and the forces from its movement when opening and closing;
· there are doubts about the ability of the partitions to withstand forceful break-ins - in this case, it is necessary to obtain an expert opinion after strengthening the opening.
Such situations most often arise in the following cases.
1. The wall is not load-bearing, thin, laid out in half brick.
2. The opening is made of foam concrete - this problem exists in almost all new buildings. Foam concrete is cheap and lightweight, which is why it is very attractive for builders. But such a wall will not withstand a massive steel door, and therefore needs additional reinforcement.
3. In old houses, plaster walls are quite common, which are also not very durable.
4. Wooden houses require special reinforcement of the doorway due to the fact that several years after construction they shrink, which inevitably leads to deformation of the opening.
There are also situations when the opening does not seem reliable enough. For example, if it was unprofessionally laid with bricks for the purpose of narrowing. Or there is simply a desire to achieve the highest possible strength.
Mistakes a newbie can make
There are a large number of stages of work where an inexperienced worker can make a mistake. This often happens when determining the planting depth of the canvas, choosing fasteners, as well as when sealing plastic windows. In order for new window frames to last for a long time, it is necessary to take into account some features:
installation with glazing beads outward is not carried out, since this negatively affects the safety of the structure - such a canvas can be easily dismantled from the street; It is worth paying attention to the depth of the frame - an incorrectly positioned canvas can let in cold air or extraneous noise from the street; leveling the structure is a mandatory stage of installation - if installed incorrectly, the process of opening or closing the glass unit will be disrupted; polyurethane foam must be protected from UV radiation, otherwise it loses its properties and cracks, which breaks the seal; The structure must be secured not only with polyurethane foam - anchor bolts are used to securely fix the canvas.
If you follow the technology for preparing the window opening, the seating depth of the canvas and other installation rules, you will be able to install the structure yourself without fear for the result.
Installation of a horizontal jumper
First you need to make grooves for the channels, which originate from the seam between the masonry. In this case, the length of the metal profile is selected based on the height of the opening, divided by 2, and add 15 cm. During installation, it is worth using concrete mortar to make the reinforcing structure solid. The support area of each channel must be at least 250 mm. As for the depth of the niches, it will be equal to the thickness of the metal profile.
After the grooves are made, you should start strengthening the walls of the brick house with strands. To do this, insert a long drill into the outer holes of the metal profile (on both sides) and use a drill to make through holes in the corners of the opening. After this, another channel is applied to the reverse side so that the holes in it and the wall coincide. Now all that remains is to connect both reinforcing elements with anchor bolts along the pre-drilled holes.
In addition, it is worth connecting both metal profiles with transverse plates by welding. Now the entire load of the floors and walls will be partially taken up by the completed crossbar.
Work order
First of all, you need to decide where to organize additional space for entry and exit. It all starts with the markup. You need to decide on the width of the hole, and then begin to determine its future location with a pencil. You need to measure the distance from the outer wall and make a mark - from here we begin to draw the outline of the future interior space.
For their exact match, it is necessary to drill several holes according to the pencil markings (Fig. 1). And then on the other side connect all the holes with a pencil line.
The above-described manipulations should be carried out using a building level, a triangle and a ruler.
Since we will create the space in the load-bearing wall of a brick house, it is necessary to take care of auxiliary partitions and lintels in advance (Fig. 2).
Main stages of work
So, you have in your hands prepared design documentation, which clearly describes the entire sequence of construction work, starting with marking the opening and ending with its plastering, and also presents a specification of the material necessary for carrying out such work.
The main stages of work on the project will be:
- opening marking
- installation of temporary support posts
- Diamond cutting of the opening using special equipment
- reinforcement of the opening with metal structures
You can familiarize yourself with the first three stages of the main work by watching this video
https://youtu.be/nUL0PO9xkyM
.
We will dwell in more detail on strengthening openings with metal structures. The most common 3 options for strengthening load-bearing walls are:
- single-row – channel reinforcement
- corner – reinforced with a corner
- complex - a combination of both types
Openings in interior partitions
Partitions up to 100–150 mm thick are easier to cut, but careful alignment of the markings is required, because cutting is carried out on both sides. To align the markings, two control points are enough - the upper corners of the opening, in which through holes are drilled. When working, you need to carefully monitor the perpendicular position of the drill.
The control points must be connected with a horizontal line, and two vertical ones on both sides must be dropped using a plumb line. Afterwards, cutting lines are drawn with an indentation of 15–20 mm on both sides of the contour markings. In the room where you plan to remove and disassemble the core, the markings should be 10–15 mm larger to form a wedge-shaped gap.
Along the outer marking lines, a cut is made with a grinder to the entire effective depth of the disc. You can chop the core of the groove with a chisel or even with a hand, hammering it into one of the cuts. To select material from the groove, we can recommend crushing it by drilling 20-24 mm holes in the central part of the cut in increments of 10-15 cm - such fragments are easily removed with a hammer.
A few words about the types of doorways
Often people who are far from the intricacies of construction order craftsmen to create an opening in the wall that they like. In principle, there is nothing bad here, because whoever pays “calls the tune,” but in this case you need to be prepared for the fact that you will have to pay an order of magnitude more.
Types of doorways are divided mainly by width and height. You need to focus on what size door you want to install. The width of the door leaf ranges from 60 cm, up to 90 cm is the standard. As for the height, here the average is taken to be 2 m, +/- 100 - 150 mm.
Basic rules for calculating doorways.
If you do not get into the standard, then you will have to make a door block to order, and this is at least 2 times more expensive than the same block made according to GOST. You can find out more about domestic and foreign GOSTs, as well as the rules for calculating doorways with photos and videos, “here”.
Rules for calculating doorways with and without thresholds.
Another option is when at the moment the owners do not plan to install a door at all. But it is not a fact that after some time you will not want to install a door in this place, and then it is better that this opening be standard. By the way, you can find out about the types and methods of finishing doorways without doors “here”.
Varieties of doorways depending on the size of the door according to GOST.
How to strengthen
Often cracks in brick walls occur due to subsidence of the foundation, changes in the base
Repair work aimed at strengthening brick walls must be carried out in a certain sequence. First of all, the basement of the building should be repaired. Due to shrinkage processes, the base of a brick building may become covered with cracks, which in turn will provoke the appearance of similar defects on the wall itself.
Before starting repairs, you should find out the reasons for such changes in the basement of the building. Only after eliminating the cause can you begin to repair the cracks in the base. To do this, use high-strength cement mortar, which is pumped into the cracks.
Narrow defects can be repaired with a strong solution
Repairing and strengthening a brick wall begins with cleaning cracks along their width and depth. Narrow cracks are sealed with a strong mortar, and wide cracks are pre-strengthened with reinforced mesh. This will strengthen the load-bearing capacity of the wall, as well as prevent the formation of cracks during further operation of the building.
In the event that serious destructive processes are present, brick walls can be strengthened by installing a monolithic reinforced concrete belt around the entire perimeter of the building. Naturally, for this it will be necessary to dismantle the roof.
If cracks wider than 10 mm occur, it is recommended to install steel brackets
The technology for strengthening brick walls also involves installing brackets made of reinforced steel, provided that the cracks exceed 10 mm.
For wider cracks, staples are installed on both sides, fastened together with through bolts. A hard solution of the required consistency is pumped into the crack.
The main methods of strengthening are indicated in the following table:
What you need to pay attention to when strengthening a doorway
First of all, only a specialist can offer the best option for strengthening a doorway. Qualified installers will be able to perform this work efficiently and reliably. However, like any other type of construction work.
calculate turnkey apartment renovation
When strengthening a doorway, you need to remember the following points:
· foam concrete cannot withstand shock loads, therefore all fasteners can only be screwed into it;
· before starting work, it is recommended to further strengthen the walls themselves - prime them, or even better, stick a special mounting mesh;
· all metal elements must be treated with a primer or special paint to protect against corrosion.
Despite such difficulties, branded door sales stores provide a full range of related services. This includes strengthening doorways. A specialist will be able to determine the need for this, as well as select the most rational method and the most suitable materials.
Source
Cutting methods
In order to make a passage in the main wall, you will need special cutting tools. You cannot use a percussion tool, such as a hammer drill, for such work, because strong vibration will lead to cracks and chipping of the material.
Work on cutting openings is carried out by several types of cutting:
- diamond;
- cold cutting (water jet method);
- laser cutting (oxygen-lance drilling);
- hammer drill and grinder.
Diamond cutting
Diamond cutting is one of the most popular methods of forming a window or door opening. In this way you can make an opening for both a door and a window. To work, you will need a diamond-coated disk attachment and a container of water to immerse the tool in it for cooling and reduce the amount of dust.
The method has the following advantages:
- due to low vibration, cracks in the walls are excluded;
- the most accurate cutting along pre-designated lines;
- low noise level;
- a small amount of dust and debris.
Despite the large number of advantages, this method has some disadvantages:
- high price of working material (diamond blades);
- regular cooling with water;
- high energy consumption.
Waterjet method
This method is less popular compared to the previous one, because the work uses sand and a jet of water under pressure. The speed of the water jet is 1000 m/s.
Water enters a special tank, where it is mixed with sand, from there the mixture under high pressure through a nozzle with a hole diameter of 0.4 mm is sent to the cutting site. To reduce the residual force of the jet, a water trap is used.
Cutting with water has the following advantages:
- the cut location comes out precise and even;
- concrete does not become hot during cutting, so there are no harmful fumes;
- there is no strong noise or vibration during operation;
- cutting can be done at any angle;
- formation of openings of various shapes.
Disadvantages of water cutting:
- not applicable for apartments due to the large size of the fixture and water use;
- high cost of abrasive material.
Oxygen lance drilling or laser cutting
This type of work is carried out using a thick spear made in the shape of a pipe through which oxygen flows. The spear heats up to 1400°, at the end of which the temperature reaches 2000°.
The advantage of this type of cutting is as follows:
- accuracy and high efficiency of the method;
- minimum cutting width;
- maximum smoothness of edges and narrow heating zone;
- no edge deformation;
- Possibility of cutting concrete into different shapes.
Punching with a hammer drill and grinder
If you need to make an opening in a thin concrete wall, you can use a hammer drill and a good grinder. The discs are selected taking into account the thickness of the wall.
The advantages of this method include accessibility and low cost, but the disadvantages are that making an opening in a load-bearing concrete wall will require a lot of effort and time.
Ways to strengthen doorways
There are several common amplification options. The appropriate one is selected in each specific case, taking into account the material from which the walls are laid, their thickness, the weight of the future door and other particular features. For the chosen method, taking into account the above, the materials from which the reinforcement will be made are selected.
If construction technologies are followed, openings are strengthened even at the stage of building construction. This is the most correct and reliable option. But, unfortunately, quite rare. Therefore, much more often you have to resort to those methods that involve the presence of an already built house.
Use of mortgages
This method is especially relevant for modern buildings made of foam concrete or aerated concrete. A mortgage is a metal corner that is fixed in the opening. Reinforcing “whiskers” are welded to it and placed in the joints of the masonry. Such a mortgage is installed on each side of the doorway. Subsequently, the door frame is mounted directly to these elements.
The procedure for installing mortgages is as follows.
1. Measurements are taken, according to which the required number of embedded parts are made and reinforcement is welded to them in the right places.
2. Treat the parts with an anti-corrosion coating.
3. During the masonry process, mortgages are installed.
The length of the reinforcing “whiskers” must be at least 1200 millimeters. Anti-corrosion coating is mandatory.
Strapping with steel corners
This is the most common option for strengthening doorways. For this purpose, steel corners are used, from which the frame for the opening is made. The number of corners, their size and the number of mounting plates required to connect the frame are determined in each specific case.
The procedure for strengthening the opening using this method is as follows.
1. The metal corner is cut according to the height and width of the opening
2. Weld them together into two frames - one for the outside, the second for the inside of the opening.
3. The frames are installed in the opening and connected to each other by welding with metal plates.
All metal elements are primed and painted to prevent corrosion. This method of strengthening a doorway is no less reliable than using mortgages.
Reinforcement with pins
This method is used for weak-bearing walls. Here, metal rods with a thickness of 10-14 millimeters are used, which are driven into the wall at different angles at a distance of 15-35 centimeters. Instead, you can use plates that are mounted on the wall and connected with metal corners.
The method with pins cannot be used for foam concrete, since it will simply crumble, and over time the door will begin to noticeably wobble in the opening.
Strengthening an opening in a narrow wall
In such a situation, it is basically pointless to strengthen the wall itself due to its small thickness. That’s why channels are used. They are installed on the wall and attached with fittings to the floor and ceiling. The door frame is attached to these channels, and not to the wall itself.
Strengthening openings in wooden houses
As a result of the shrinkage of the house, it is impossible to simply install a door in the opening. Otherwise, in a few years the wall will rest on the door frame, which will lead to its deformation, and deformation of the door leaf too. The result may be the complete impossibility of using the steel door.
It uses its own technology. A sliding casing is performed on the doorway - it plays the role of a rough frame. This box is attached to the frame with spacers, and a gap is left on top where the seal is placed. The metal box is already installed on the casing. As a result, when shrinking, the logs simply slide along the rough frame without affecting the door itself in any way.
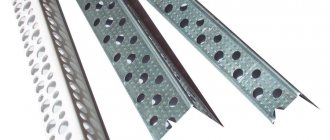
Reinforcement with channel profile
When working to strengthen a window or doorway in a brick wall, use:
- wall chaser (a tool in these circumstances is very useful, but expensive, but it can be replaced with a hammer drill or an angle grinder with a diamond wheel with a diameter of at least 200 mm);
- perforator;
- welding machine;
- studs with nuts and wide washers;
- wrenches or wrench;
- marking devices.
Options for strengthening openings with channels.
The outline of the future opening is drawn on the wall. The line of its top crossbar should coincide with the seam of the masonry. You need to drill through holes in the corners of the contour in order to make precise markings on the other side of the partition.
For channels in the wall, it is necessary to cut grooves with a depth and height corresponding to the dimensions of the profiles. The length of the steel crossbar should exceed the width of the opening by 1 m, so the niches for it should protrude beyond its edges by 0.5 m.
First, a groove is made on one side of the partition. A channel with holes drilled for the studs is inserted into it. It should fit tightly into the cavity prepared for it. Additionally, the channel is fixed in it with sand-cement mortar. After the mixture has hardened, the wall must be drilled through the holes in the profile.
Now knock out the groove from the back side. A second channel with holes drilled symmetrically to the holes of the first is inserted into it. The profiles are connected with pins. The nuts are screwed on top of the washers mounted on the fasteners. The second crossbar is also fixed in the cut-out niche with mortar.
After dismantling 2-3 rows of brickwork under the crossbar, steel plates need to be welded between the channels. The lintel, which can withstand the pressure of the structures located above it, is ready. You can continue to disassemble the masonry.
Installation of vertical supports
Door and wide window openings in load-bearing walls need additional reinforcement with vertical posts, which will take part of the load of the structure.
Jumper diagram with vertical posts.
Installation of vertical profiles is required if the opening width exceeds 1.5 m. In load-bearing brick walls, the racks are pairs of channels connected to each other by threaded fasteners and steel plates. The racks are welded to the channels of the horizontal lintel.
The method of installing vertical channels can be the same as when laying a horizontal crossbar. After they are secured, they begin to dismantle the brickwork within the marked perimeter.
The frame can be mounted differently. The supports are installed after cutting a hole in the wall. Pairs of channels, installed at the vertical parts of the opening, are connected to each other with steel strips. After installing the racks, a solution is placed in the voids between them. If the opening is reinforced in this way, then when calculating its width, the dimensions of the vertical supports should be taken into account. The steel frame will be even stronger if it is made closed. In this case, a jumper is welded between the supports in their lower part.
What you need to know about profile reinforcement
Reinforcement of openings in a brick wall is carried out with a steel profile:
- channels of brands 10P, 12P, 14P;
- corners with shelves of at least 60x60 mm and a thickness of at least 5 mm.
Scheme of finishing an opening in a brick wall with a steel profile.
Corners are recommended to be used to strengthen the openings of small windows (less than 60 cm wide) and in partitions that do not perform a load-bearing function. They are also used to frame the vertical parts of openings.
Reinforcement is carried out on 2 sides of the wall, tightening the profiles of the crossbars and racks with studs from M16 to M24. The fastener spacing should not exceed 0.3 m. In any case, less than 3 studs should not be used to connect both parts of the crossbar. Additionally, the opening is strengthened by welding steel plates with a thickness of at least 5 mm between parallel channels every 0.2 m. It’s even better to weld a continuous strip between the profiles.
The section of wall to be reconstructed is dismantled only after a horizontal crossbar has been secured above the future opening. Before starting work, you must make sure that there are no communications in the thickness of the partition.
Read with this article
Cutting openings with a diamond frieze in load-bearing walls.
Opening in a load-bearing wall. All requirements.
Illegal redevelopment in 2022. All aspects.
Inexpensive apartment redevelopment project in 2022.
Cancel reply
Good day. Please consult: There is a private house 8*8 2 floors, the walls are brick (250 mm), the interfloor ceiling is wood. On the ground floor, for new openings 0.9 m and 1.4 m wide, what channel number should be used?
Alexander, unfortunately, they cannot answer your question. First of all, it is necessary to calculate the walls for the redistributed load after the opening is completed. Also take into account the location of the openings so that the brick wall is stable.
Good afternoon, how can I contact you to discuss the issue about jumpers? Now I’m traveling - I can’t always answer right away, but the question is relevant, I need to deal with it
Alexander, you can call me at 8-926-389-49-72 Pavel.
Good afternoon. Opening 1280. According to the project, box reinforcement with channels along the perimeter. Please tell me, is it possible to expand the reinforcement itself - space the pillars 60 cm apart from the boundaries of the opening and, accordingly, lengthen the horizontal part by 120 cm? And the second question: the project contains arches and their reinforcement - is it necessary to re-coordinate the project if the arches are abandoned? Thank you.
Hello, Valery. The possibility of expanding the opening should be determined by the designer who developed the reinforcement project. In a good way, the project needs to be re-coordinated so that the plans with arches do not go to the BTI. Otherwise they will draw their absence in red lines.
Pavel, thank you. This is not about widening the opening, but about increasing the perimeter of the reinforcement. The opening remains 1280. Just attach the racks not along the border of the opening, but wider.
Valery, unfortunately, you can’t do that anyway. The whole point of the reinforcement is that it frames the opening. Only if your calculation designer agrees to this.
Hello, please tell me, I have a 10-story building. Apartment on the 4th floor. The wall is monolithic, the wall thickness is 250 mm. I need to open a doorway 2200x900. How can I strengthen the wall? What materials should I use?
Good afternoon. What does it mean to open an opening? Do you mean to create a new opening in a load-bearing wall? The doorway is usually reinforced with a metal frame made of corners. However, you must obtain appropriate permission for this.
Good afternoon. Is it possible to increase a 1000 mm opening in a monolithic wall to 1700 mm, taking it into a frame with 63 corner plates with a pitch of 300-400 mm?
Hello, Sergey. The possibility of expanding the opening in a load-bearing wall is determined by the organization that authored the house project.
Hello! Answer me please! Nine-story panel house. The load-bearing wall on the first floor was demolished. The wall is 4 meters long and 16 cm thick. 3 meters out of 4 were demolished (a meter remained near the window). They reinforced it with channel 20. Is this channel enough? Or sound the alarm, they don’t have documents for redevelopment.
Good afternoon, Anna. It is best to write a complaint to the Housing Inspectorate so that an inspector can come to them for inspection. Demolition of 3 meters of a load-bearing wall out of 4 is very dangerous.
Thank you very much for the quick response. I'll run to write. Our house is also old - 35 years old.
Please tell me, is it possible to increase the height of an existing opening without reinforcement? We are talking about the P-43 series.
Hello. It is impossible to increase the height of an existing opening without reinforcement.
Tell me, is it possible to use channels instead of corners to strengthen the opening?
The use of channels for these purposes is problematic. The corners can be pressed tightly against the wall, while the channel is either greater than the thickness of the wall, or, on the contrary, smaller, which is why it cannot be pressed tightly against the wall.
2 channels, and tighten them with studs. Channel on edge, empty towards itself, and weld scarves.
What do an I-beam, a channel and an angle have in common?
The first thing that these profiles have in common is the material from which they are made. The steel used is ordinary carbon, high-quality structural, and low-alloy.
Structural steel is preferably used in hot-rolled production. For profiles intended to work in more severe conditions, low-alloy steel is used. Products made from it can withstand temperatures from -70 to +450 degrees and significant mechanical loads. To protect against rust, stainless or carbon galvanized steel is used. Alloy steel is usually not used for shaped rolled products.
The second common feature of shaped steel is the production method. It can be made by welding, hot and cold rolling. In addition, shaped profiles are obtained by bending blanks. How the steel profile was obtained (welded or bent) can be determined simply by looking at it: for bent products the corner will be rounded, but for rolled products it will be clear.
The peculiarity of shaped metal products is that nothing is made from it itself. This is a ready-made product that goes straight into use. While flat and long products are used for the production of other types of rolled metal.
When you need to strengthen
If a new house is being built, then when drawing up the project, the most suitable method of strengthening door and window openings and arches is taken into account. But there are situations when it is necessary to strengthen the opening in an existing building.
Cases when it is necessary to strengthen openings:
- If the walls of the building have become deformed, cracked due to time or mechanical damage. The technical condition of the house needs to be monitored. If cracks appear, the cement bonding layer is destroyed, or bricks fall out, restoration work must be urgently carried out. Timely measures taken will help keep the premises in good condition longer.
- When redevelopment is carried out, the holes are widened or they are made in other places. In these cases, reinforcements are installed even before new openings are dismantled. First, you need to draw up a project for carrying out the work, after consulting with a specialist, whether it is possible to break through the wall in the chosen place, and whether this will weaken the structure of the building.
- When replacing windows, you need to check before carrying out the work how strong the opening is, and, if necessary, pre-strengthen it before dismantling the old window.
Do I need permission?
First of all, you need to conduct a survey of the premises, inviting specialists to do this. If the house is already old and multi-storey, then due to its dilapidation it is unlikely to be able to obtain such permission. Another situation is when the neighbors above or below have already done redevelopment. Then the new door can only be made on the same level as the one in their apartment. Because placing openings in one wall at different levels can greatly weaken its load-bearing capacity.