Installation of supports is the most important part of the work when constructing a fence. The reliability, durability and appearance of the entire structure depend on how well it is carried out. Before starting installation, it is necessary to determine at what depth to bury the fence posts, since they bear the main part of the load. Errors lead to sad consequences: distortions of racks, failures and even falls of entire sections. Friends, a detailed article about how to make a fence from corrugated sheets with your own hands, what types there are and step-by-step instructions are in a separate article, which you can find by following the link.
Types of fence posts
Fences can be temporary or permanent, located in an area not visible from the street, or precede the entrance to the site in front of the main facade of the building. Fence posts must be consistent with the purpose and overall design of the structure.
In private housing construction, fence supports are made:
- from a metal profile pipe of round or square section;
- concrete;
- bricks;
- asbestos cement pipes;
- tree.
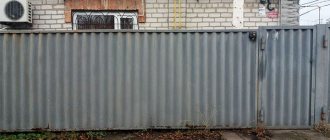
Profile pipes are the most versatile and common material in the construction of fences. They are durable, lightweight, and fairly easy to install. You can attach sections made of metal, wood or plastic to them. A serious drawback is instability to corrosion. Regular anti-corrosion treatment and adherence to installation technology help to avoid this.
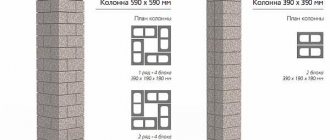
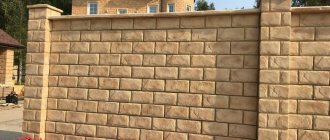
Brick or concrete pillars are reliable and massive. They are installed on a solid reinforced foundation. To reduce weight, manufacturers produce hollow blocks with imitation stone, tiles, and bricks. The elements are attached to the metal internal frame using embedded parts.
A budget option is asbestos cement pipes . They are moisture resistant, do not corrode, are quite strong and durable. Due to their low decorative qualities, they are used for fences in places where there are no requirements for appearance.
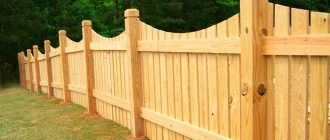
When constructing fences in summer cottages, wooden posts are still relevant. They are inexpensive and can withstand loads well from light picket fences, boards or mesh. Protective impregnation and waterproofing of the base immersed in the ground helps to extend the life of wood.
Choosing a tree
Considering that good quality wood is now quite expensive, and even if high-quality tree species are used in the manufacture of wooden poles, such structures will not last you very long.
The process of deepening wooden fence posts
Such fence supports are most often used as a decorative element. Although, with proper treatment, for example, in a solution of copper sulfate or with systematic painting, wooden supports can serve you for many decades. That is why, in most cases, such poles are used when you need to build a low hedge, temporary fence or front garden.
What determines the depth of the pillars?
The recessed end of the support must ensure the absorption of its own weight, lateral load from winds and other dynamic influences.
In areas where the soil is composed of water-saturated clays and loams, fine silty sands, the pillars additionally experience the forces of frost heaving. When the soil freezes and increases in volume, it tends to push the pillars out, and during spring thawing the reverse process occurs. The height of vibrations can reach 30 cm.
If the groundwater level in the area is low (below 3 m) or good drainage is laid, the heaving properties of the soil are less pronounced. But with rainy autumn and frosty winter, the risk still remains. Only coarse sand or gravel does not heave, so they are used to backfill the base of foundations, supports and other structures.
Factors to consider when installing poles:
- the weight of the structure - the more, the deeper the pit is made;
- soil characteristics - mechanical composition, groundwater level, strength, presence of rocky inclusions;
- bodies of water located nearby - during seasonal floods they can overflow their banks and flood fences;
- terrain - on hilly terrain with a large difference in elevation, the support may have to be strengthened;
- materials for the manufacture of fence sections, some of which increase the weight of the structure or its windage;
- installation step - as it increases, so does the load.
Important. The recommended distance between the posts is 2-2.5 m. If the distance is too large, the crossbars may sag and the posts themselves may bend.
When you need a foundation
On loose soils, the pillars are placed in the foundation.
Any fence requires a foundation. However, for lightweight models, a point option is used: partial concreting of the support after immersing it in the soil. The latter option is formally considered a fence without a foundation. This is possible when installing the fence on dense clay soils.
The heavier the fence, the more powerful the base is needed. If you are erecting a stone or brick fence, or a high wrought iron fence, a foundation strip is required. The options are different. A shallow foundation is built together with columnar foundations, and screw piles are combined with a grillage.
In order for the fence of the site to last for a long time, it is necessary to correctly calculate the load on the support pillars. Only after calculations can you choose the material of the posts, the depth of immersion in the ground and the installation method.
How to choose depth
At first glance, it seems that you need to bury the support into the ground as much as possible. But this is not always justified from an economic point of view. Unnecessarily spent material and physical resources lead to an increase in the cost of the fence, although the same result can be obtained by laying the post at a shallower depth.
Many sources recommend installing supports below the soil freezing level in the region. In fact, rigid pinching in the ground at 80-120 cm completely provides the necessary load-bearing capacity and resistance to lateral loads. And heaving as a result of frosty soil movements can be leveled out by other measures - the installation of drainage shells, reinforcement of the sole, and proper drainage.
Important. In most standard cases, it is enough to bury the post at 80-120 cm. On peat bogs, subsidence and marshy soils, the decision on the depth of installation is made individually based on the results of engineering-geological surveys.
Digging a hole under a fence post using a motor drill
A motor drill, or also called a pit drill, is a mechanized tool that works similarly to its manual counterpart. Its main difference is the presence of a drive. The motor allows you to rotate the barrel with a spiral without human effort. This significantly increases productivity and allows you to get perfect results in a short time.
Motor drills come with electric, pneumatic and fuel drive. The latter are divided into gasoline and diesel. Regardless of the drive type, the tool works very efficiently. Fuel models can be used at any distance to sites, since they are not tied to power sources. They are more popular.
Wells for fence posts can be drilled on any soil. But you should pay close attention to the process if digging is carried out on rocky ground. To avoid damaging the engine and working blades of the drill, on such soils you should only work at low speeds. Also, for this it is better to use more powerful equipment so that there is enough power reserve.
Why do fences fall?
Insufficient laying depth is not the only factor leading to damage to the fence. Often the reasons are violations of installation technology, in which a normally buried pole becomes loose, tilts and may even fall. This:
- poor-quality concreting without compaction;
- backfill with voids;
- absence of an anchor on the heel of the post in loose or highly heaving soils, high groundwater level;
- spans of different lengths, due to which the loads are distributed unevenly;
- erosion of the base under the column by water flowing from the site;
- weak reinforcement;
- poor quality protection against corrosion of metal structures;
- precipitation entering the rack cavity, causing rapid corrosion or rupture.
Deformation or destruction of the fence can be caused by a support cross-section that is too small and does not correspond to the current loads. For metal profile pipes, the optimal dimensions are 50x50 mm or 60x60 mm with a wall thickness of at least 2 mm.
Metal corner - the solution to all problems?
If we focus on budget solutions for installing fence posts, then practical observations show that frost heaving can squeeze out almost any post that stands above the freezing depth. This mainly happens in the spring, when the top layer of soil thaws. But the corner, driven to a depth of 1.5 meters, remains in place. What is the reason for this phenomenon?
Competent people with a technical education explain this “resistance” by the small cross-sectional plane of the steel angle. If you don’t go into theoretical research, then in practice everything works, starting from corner 32 to corner 75.
Technologies for installing fence posts
Installation of supports begins with clearing the area, marking and installing corner elements. A string is pulled along them, defining the line of the future fence. Subsequent operations depend on the selected technology. Here are some of the most proven options.
Hammering
It is used when installing light fences on dry, moderately dense soils. Before installation, wells are drilled to a depth of 20-30 cm. It is recommended to weld the upper end of the metal pipe to increase the area of interaction with the tool.
The supports are hammered in several ways:
- With a sledgehammer. One person holds the pipe, the other strikes while standing on a pedestal. The verticality of the element in two planes is periodically checked. The pipe is buried at least 80-100 cm. After installation, fill the hole with sand or crushed stone and compact it.
- A hammer drill or jackhammer. First, the support is driven in with a sledgehammer until a stable position is achieved. Then, using a power tool, they deepen it to the required level, checking the position with a building level. A reinforcing pad or “glass” is first welded onto the tool. The pit is filled with crushed stone and compacted.
- "Granny." The device is a piece of pipe with a heavy tip. It is put on a support, raised to a small height and released. Thanks to the force of gravity, the “grandmother” delivers a targeted blow to the head of the post. You can work alone, but it’s better to work together.
- Manual pile driver with gasoline engine or hydraulic drive. The tool is easy to use and does not require much physical effort even when installing the pole to a great depth. The pile driver is installed on the head of the pipe and driven at a speed of over 1000 blows per minute. On loose soil, installation is allowed without preliminary drilling of holes.
Important. It is not recommended to hammer in pillars if the ground on the site is very hard, rocky, contains construction waste, or, conversely, is too loose, with low bearing capacity.
Concreting
Installation of pillars with concreting of the base ensures high strength and durability of fences on any soil. The support can be installed using the following technologies:
- Full concreting. A layer of crushed stone is poured into a well drilled to the full depth and compacted. Install the pole without rigid fastening. Pour concrete, periodically compacting it with a stick to allow air to escape. For large volumes, a deep vibrator is used. The stand is leveled and finally fixed until the solution hardens.
- Partial concreting. This method combines concreting with driving. The hole is not drilled to the full depth, but to 1/2-1/3 of the height of the support. Install the pipe and drive it to the design mark. The well is filled with concrete and compacted.
- With a sleeve. Filling with crushed stone, compaction and installation of the support is carried out as with full concreting, but the solution is poured to 1/2-1/3 of the depth of the hole. Then a sleeve is put on the stand - a piece of plastic sewer pipe 30-70 cm long. The resulting “glass” is carefully filled with concrete. The hole around the post is filled with sand or crushed stone and compacted. This method, called “Finnish”, allows you to avoid bulging, distortions and failures of the structure during frosty soil movements.
- With reinforcing heel. A “shoe” made of a steel plate with dimensions equal to the cross-section of the well or slightly smaller is welded onto the lower end of the support. The base is concreted and compacted. This method increases the area of support and adhesion to concrete, which increases the strength and stability of the structure and the durability of the entire fence.
For lightweight fences made of mesh or picket fences that do not have a high windage capacity, instead of concrete, you can pour construction waste into the hole and then fill it with mortar. The quality and uniformity of the base are not very high, but quite acceptable.
Pillars on stilts
On subsiding soils, swamps and peat bogs, screw piles are used as fence posts. The screwing depth reaches 3-3.5 m depending on the soil characteristics.
The piles are mounted using a manual lever device or mechanized equipment. The design can be in the form of a whole or collapsible rod. In the latter case, the lower part is first installed - the pile itself, and then the fence post is bolted to its head. At the same time, achieving strict verticality is much easier than when installing a whole long pipe, and deformations that arise over time can be easily corrected by adjusting the bolts.
Important. The advantage of this method is high speed. It only takes a few minutes to install one pile. There is no need to wait for the concrete to harden; you can immediately begin installing the infill.
Supports in heaving soil
When it is necessary to install poles when erecting any fence on waterlogged heaving soils, it is important to know the freezing depth. This determines how many meters of the rack will go underground. The fact is that in winter, ground moisture turns into ice, which is why the soil begins to swell and push out all foreign bodies.
There are only two ways to solve the problem:
- Drill holes 50-60 cm below the frost line, install metal pillars and concrete them. Moreover, the concrete layer should not rise above this limit, and the rest of the cavity should be filled with crushed stone and sand with a tamper.
- Use screw piles that go into the non-freezing horizons of the earth.
It is inappropriate to consider other options because the cost of constructing such a fence is too high, because in some regions the soil freezes to a depth of over 2 m. Therefore, heavy fences have to be installed only on piles, and light ones - on pillars with a concrete base located in non-freezing soil.
Tricks and Tips
As in any work, when installing poles, it doesn’t hurt to know some of the nuances:
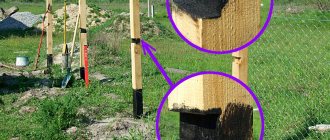
- To increase adhesion to concrete, a shallow longitudinal hole must be cut in the bottom of the pipe.
- 1 m long jibs or crosses made of reinforcing bars welded to the bottom of the post help to secure the post more firmly in the ground and concrete.
- To prevent precipitation from getting inside the support, the pipe is filled with a solution or the end is closed with a plug.
- The Stanly magnetic level, designed specifically for installing posts, will significantly simplify control operations and speed up the vertical alignment of the post.
- A string stretched over the top of the pipes to mark the contour does not get in the way underfoot and moves less, which makes installation easier. You can determine the position of the point for installing the stand using a plumb line attached to a string.
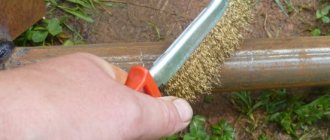
- Metal profiles must be very carefully cleaned of rust using a grinding machine and chemicals, and covered with a thin layer of primer and compatible paint.
Another option
The process of driving fence supports to the required depth
There is another way to drive in pillars, which does not require digging holes, and you do not have to concrete them. Using this method is effective if the soil composition on your territory does not have layers of compacted rocks.
Then driving in ordinary and low pillars, one and a half meters high, can be done using a sledgehammer. If your structure exceeds two meters in height, then a structure such as a “grandmother” is used. This product is made from a pipe about a meter long.
In such a pipe, one end is approximately 20 kg heavier than the other. When using such a “grandmother”, the accuracy of the blow should be taken into account. Performing this installation technique requires precision, and the blows are made strictly along the axis.
Difficulty may arise when lifting such a product. To improve the work, long handles are welded to the headstock on both sides. Such handles can be adjusted to a more comfortable position during the process of driving in the post.
We carry out calculations
For sectional fencing made of corrugated sheets, siding, or metal picket fences, it is worth choosing a distance between spans of no more than 2.5 m, or better yet, less, in order to reduce the windage of the structure. A large distance between the posts will gradually lead to the skew of the fence.
The number of transverse or longitudinal logs is determined by the height of the structure. For a 1.5–2 m fence, two pieces, located 25 cm from the top and bottom of the canvas, are enough.
The consumption of the solution depends on the depth of pouring the pillars.
Choosing the right pole type
Follow these tips when choosing supports:
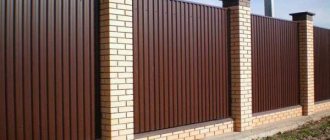
- For fences made of corrugated sheets, those supports that are able to stand reliably in the ground and support the structure without any problems are suitable. The weight of such a fence is light, so you can even use wooden posts. Although the best option is concrete types, as well as metal and brick. To make the structure more durable, use iron corners as a frame along the fence.
- Are you planning to install a chain-link mesh? Buy small-diameter iron poles. This option will not be expensive. Bury deeply so that the mesh, when stretched, does not bend the supports. Place a reinforced concrete pillar in the corner area.
- For a brick fence, take pillars made of brick, concrete with the correct dressing and with a high-quality foundation. Other options will not be able to withstand heavy loads and will spoil the overall appearance.
- For concrete structures - pillars made of concrete, metal (wide in diameter).
Metal supports are the most practical option
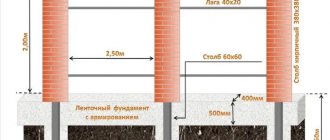
Determining the depth of concreting the supports
It is considered to be the soil level below the freezing point. For example, if the soil freezes to 1 m, then the depth should be taken with a margin of 1.1 m.
For most regions, the optimal depth is considered to be 1.5 m.
It is important to take this value into account when selecting the height of the pillars. So, for a two-meter fence it is necessary to take supports 3.5 m high.
To ensure the job is done well, you can order the services of craftsmen. They will not only install the posts, but also the entire fencing on a turnkey basis.
Is concreting always justified?
The thing is that sometimes specific construction conditions make the concreting process either absolutely impossible or impractical. The main reason for this is the characteristics of the soil layers on the site.
The result of soil swelling
The fact is that if the soils in the area are waterlogged, with high water layers, then the effect of winter heaving is inevitable.
The support is literally pushed upward
When water located close to the surface freezes, it expands and literally squeezes onto the surface all structures whose concrete belt is above the soil freezing level.
The result is a picture as if the earth itself had sank under the supports. In fact, this is a clear sign that winter swelling simply pushed the seemingly conscientiously made pillars to the surface. Naturally, such a process may proceed unevenly, which means the fence warps and the spans are deformed.
Expert opinion:
The pushing of installed pillars out of the ground under such circumstances directly depends on the area of application of force from below. This means that in this case we can say that the concrete belt around the pillar plays a completely opposite role - it does not improve the stability of the support, but only significantly reduces it. And the wider it is in diameter at the surface of the earth, the more this negative effect manifests itself.
Conclusion - concreting pillars cannot always solve the problem of building a fence. It will be optimal if the site is dominated by sandy soil, which simply due to its structure cannot support the pillars under load. Shallow concreting in black earth regions is fully justified - the level of soil freezing there does not reach significant depths. But if the soils are clayey (loamy), with a high “high water” location, then you need to either use a different installation method, or use special techniques when concreting, with the obligatory penetration into the ground below the freezing point.
In common practice, several methods of installing pillars are used - this is the usual driving them into the ground, backfilling (sometimes you can come across the term - dry concreting, although it is not distinguished by the correct formulation, since concrete is not used in this case at all), partial concreting only in the upper part buried area, spot concreting to the full depth, pouring a continuous strip foundation for a fence with posts.
Methods for installing fence posts
1 – normal driving of a post into the ground.
2 – partial concreting – in the upper half of the hole.
3 – complete concreting of the pillar.
4 – backfilling of the pillar with crushed stone.
Now let’s “go through” all these technologies in a little more detail.
Why is concreting necessary?
The main goal of this fastening method is to extend the service life and increase the stability of the structure.
Installation of supports with concrete mortar:
- Prevents the structure from loosening and makes the fence more resistant to wind loads.
- Increases the load-bearing capacity of the structure.
- Protects metal poles from corrosion.
But it is important to understand that supports can only be concreted on stable soils.
If you do this on heaving soil, then when it gets cold, they will simply start to be pushed out and the surface will become cracked.
You should not use the solution even if the groundwater level is high; in swampy areas it is better to choose other options.
It is important to maintain the proportions of the ingredients when mixing the solution so that it does not turn out too liquid or thick.
Hole parameters
Chernozem-sandy loam soil is less dense. Heaving (as a result of prolonged frosts) also makes adjustments to the depth and diameter of the hole. In such soil, the depth of the underground part of the pillar is at least a meter. Many owners of country houses, replacing an old mesh fence with a new one (made of corrugated pipes and roofing sheets), bury the posts to a level of 1.4 meters or more. Loamy (or clayey) as well as rocky (containing smooth stones or rock fragments) soil eliminates the need to bury the pillars to a depth of more than a meter. Common depth is 0.8-0.9 m.
A hole diameter greater than half a meter is not practical for fence sections. The fence does not belong to a permanent type of structure: it is only affected by its weight, hundreds of times less than the weight of a small country house, and possible windage during a hurricane (profiled sheet flooring resists the wind). The gate, combined with a wicket, allows you to slightly exceed the diameter of the hole, however, the user knows that the deeper and wider the hole under the post, the more concrete will be needed. The larger diameter, length and weight of the concrete “ingot” will make it possible to hold the pillar for decades, preventing it from tilting even a degree.
The height of the above-ground part of the post for the same fence is no more than 2 m. It makes sense to install a higher fence if the object is not a dacha or a country house, but a protected building, for example, a point or branch of a state office, a university, a hospital, a military unit, etc. d. A fence that is too low threatens a constant violation of the access regime adopted by the checkpoint. The distance between the centers of two adjacent holes (the location of the posts) is chosen so that the fence does not squint or fall, for example, due to frequent and strong winds in the area. For example, for pillars where a square corrugated pipe with a cross-section of 50*50 mm is used, and a rectangular pipe 40*20 is used as horizontal crossbars, the optimal distance between two adjacent supports is no more than 2 m.
Criterias of choice
Factors on which the choice of material and pole design depends:
- Purpose. Various solutions are being developed for options when it is necessary to build an economical fence between neighboring areas, a respectable fence as part of the entrance group, or a decorative fence to mark the boundaries of zones.
Type of section filling. The load on the pillars varies significantly, whether it is a light, breathable picket fence, solid corrugated board or heavy brick.
Required fence height. It is selected based on the recommendations of urban planning norms or SNT rules. In most cases, it is limited to 1.5-2.2 m.
Soil type. Sandy, rocky or waterlogged soils require different approaches. Possibility of DIY installation. Not all types of poles are suitable for self-installation. In particular, driven piles are mounted only with a special pile-driving mechanism.
The calculation is carried out based on the wind load, type of filling and bearing capacity of the soil. In accordance with the tasks set and the results obtained, the issue of the design of the pillar and the material for its manufacture is decided.