Plaster has long gone beyond the technical leveling layer in wall decoration. Even in Ancient Egypt, it was used to create various decorative effects in interior design. A large selection of compositions and application methods makes the material accessible, versatile and multifaceted. Volna plaster is popular on the decorative coatings market.
Decorative plaster wave
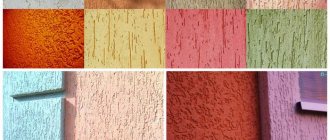
The name of the material speaks for itself: with proper skill, you can create a texture that repeats the pattern of light lambs running onto the shore, or a foamy raging sea. Further tinting and glazing will help to emphasize the effect.
Or you can move away from the obvious association with the name and instead of a wave, use special rollers, stamps, or various available materials to create a unique design. This wall decoration is very beautiful, but is completely unsuitable for noble classical interiors where Venetian, silk plaster and the like are more often used.
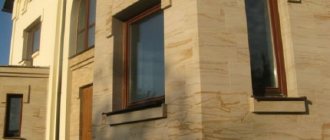
The composition of the decorative mixture was originally developed for use in aggressive conditions: salty sea air, bright sun and wind blowing sand along coastal streets. As you can imagine, a coating that is not afraid of such unfavorable conditions so much that it can even be used on facades quickly fell in love with designers and builders. Now Volna plaster is found not only on the facades of houses on the sea coasts. The coating is widely used in the decoration of private and public interiors everywhere.
The composition of the mixture ensures high resistance to all kinds of aggressive factors and allows you to wash the dried and treated coating even with the help of cleaning products with small abrasive particles.
How to make a wave coating with your own hands?
Having the tools and materials, you can create a very laconic texture. It will look beautiful in a new space where different shades and colors predominate. The texture can be created due to a light pattern in the form of lambs, rolling waves along the shore, a raging sea, with its help you can create decorative effects of a light sea breeze or raging waves on the surface of the walls. The effect is emphasized on the final surface by tinting or glazing.
Using special rollers, stamps, and other available means, you can create a special design that will be distinguished by its uniqueness and unique relief. This type of wall decoration is suitable for everyone. The composition of the decorative mixture is aimed at the fact that you first need to create a ready-made solution that can withstand any weather.
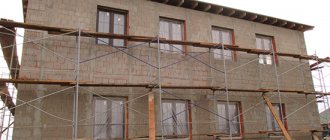
If a wave-like pattern is made on the facade of a building, then work can be carried out in conditions of bright sun or strong wind, which can scatter sand.
The acrylic-latex base gives the design the necessary characteristics , since the composition includes sand, thickeners, fillers, and additives that improve the properties of the plaster.
Material characteristics
Decorative plaster has an impressive list of advantages:
- as noted above, the coating is resistant to chemical and mechanical influences;
- the material is universal, there are practically no restrictions on its use;
- due to the high elasticity of the mixture, any pattern can be formed;
- It is worth noting the relatively low consumption: 0.8 – 2 kg/m², which means the material is economical;
- the composition of the plaster mixture is environmentally friendly: it does not contain harmful impurities, no pungent odor, and when dried, a vapor-permeable coating is obtained;
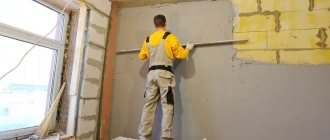
- the application technology does not require perfect preliminary alignment of the walls;
- With the proper patience and skill, wave decorative plaster can be applied with your own hands.
With so many undeniable advantages, the coating has a number of disadvantages:
- work on complex reliefs will significantly increase the cost of finishing work;
- dismantling a decorative plaster coating is a labor-intensive process, after which you will have to restore the wall surface;
- You need to work quickly with the mixture applied to the wall, since after drying the coating cannot be adjusted.
Consequence of errors
Due to errors in plastering, defects appear on the walls:
- - Cracks,
- — Peeling of the solution,
- - Uneven internal corners,
- — Fractures along the length of the plane.
It is easier to get rid of microcracks - to do this, just grind the plaster; if the crack is deep, then you will have to beat off the mortar and plaster the wall again.
Peeling of the mortar requires knocking down the plaster and doing the work again with grinding the entire plane, and uneven internal corners are corrected by additionally applying the mortar and removing its excess.
If the wall has breaks along its length, which happens when beacons are installed incorrectly, then the entire plane must be replastered from corner to corner.
Mixture composition
The material is made on an acrylic-latex base; fractionated sand, fillers, thickeners, and other special additives are also included in the composition to impart the necessary characteristics.
The acrylic-latex base makes the composition elastic during application and durable after drying. It also provides water resistance, durability, the ability to hide small cracks and other minor flaws on the surface being treated, and UV resistance.
Fractional sand provides decorativeness, creating a deep granular relief.
Tools required for work
As already noted, with due persistence, patience, several training sessions on tablets and on an inconspicuous section of the wall, it is possible to create waves on a wall made of decorative plaster yourself.
One of the main conditions will be to use the right tools, which include:
- stainless steel Venetian trowel;
- spatulas of different sizes;
- rubber or velor pressure roller, as well as fur;
- foam sponge;
- paint tray;
- a plate made of hardboard, glass or plywood for rolling out;
- hammer drill or drill with a “mixer” attachment;
- various textured rollers, spatulas, stamps.
Metal spatulas will be needed to apply the plaster to the trowel.
A fur roller is needed for painting and glazing the finished coating.
Velor and rubber rollers are used for partial shading of the relief.
A foam sponge will be needed to rub the glaze composition, which will ensure uniform coverage and hide the joints of the grips.
As mentioned above, with the help of special devices (rollers, stencils, stamps, spatulas, sponges, brushes) a varied relief of the freshly plastered surface is created. The boundaries here are set only by imagination and courage.
What does the mixture consist of and what is needed to apply it?
Volna is a decorative plaster made from acrylic and latex with the addition of fillers from marble, granite or quartz flour, cellulose, thickeners and plasticizers.
To give decorative effects, decorative sparkles, mother-of-pearl, gold, bronze, silver powder, and various pigments can be added to the mixture.
Ready-to-use mixtures are supplied in plastic containers.
For interior work, a mixture for interior decoration is purchased. For the decoration of facades - granite or marble plaster mixture for exterior work.
Before starting work, you should stock up on the following tools:
- paint tray;
- a set of steel spatulas;
- structural rollers and stencils;
- stainless steel trowel;
- foam sponges.
To mix the solution, you need a drill with an attachment or a construction mixer.
Surface preparation
Due to the peculiarities of the composition of the plaster mixture, decorative plaster is able to hide minor defects, such as small cracks, cavities, and chips. Therefore, most often, surface preparation comes down to degreasing and removing dust from the surface.
In case of detachment of fragments of the wall being treated, it is necessary to remove the parts that have separated from the surface. If after this there are large and deep chips left, we fill them with putty, and it is not necessary to achieve a smooth surface - decorative plaster conceals irregularities up to 2 mm deep. After drying, move on to the next step.
Next you need to apply a deep penetration primer. The treatment will prevent the occurrence of fungus under the coating in the future. Also, the soil evens out the absorbency of the surface and increases adhesion (the ability to adhere, stick layers together).
If the surface on which you plan to apply decorative plaster is dark or bright in color, it is recommended to treat it with a covering primer, which increases adhesion and creates a white matte finish when dry.
This completes the preparation of the surface for applying decorative plaster Volna, let’s proceed to the creative stage.
Adviсe
If after plastering you see defects, you should immediately point them out to the craftsman carrying out the work. If he refused to eliminate them, try to resolve the issue peacefully. In your work documents, be sure to include a clause stating the responsibility of both parties. In case of failure, you will have to correct the situation yourself.
If there is a deviation from the surface after applying the plaster, it is necessary to remove the old layer of material and apply a new one.
Technology of applying decorative plaster Volna
There is no need to apply plaster to the entire surface of the wall at once. The composition dries out quickly and cannot be adjusted. Decorators recommend dividing the work front into small sections (areas). Before starting work, you will need to mix the finished composition with a construction mixer.
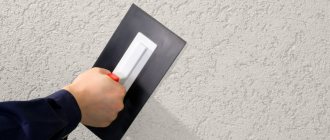
- Using the surface of the trowel, apply a layer of plaster to the wall, slightly leveling it.
- Next, we begin to form a pattern with the surface of the trowel, for which we make wavy and circular light movements with our hands. The pressure force and the trajectory of movement will have to be repeated at each area of application so that the coating is uniform and looks solid. But if the finishing concept suggests this, one pattern can flow into another.
- After the drawing is formed, adjustments are made, we leave the relief to dry. This will take 2-3 days.
Temperature for working with the material is 5…35°C.
- Using the surface of the trowel, apply a layer of plaster to the wall, slightly leveling it.
- We form the drawing using a regular paint brush, smoothing the plaster with wave-like movements and thus forming the crests of sea waves.
- After the drawing is formed, adjustments are made, we leave the relief to dry. This will take 2-3 days.
Which of the methods described above is up to you to decide. Try both of these methods on a small tablet and you will understand which is more convenient.
Textures created by relief rollers
Stores for decorators have a wide range of textured rollers and stamps for decoration, and various shaped spatulas. The packaging displays the pattern created by the tool, as well as the technology for applying it. You can find a large number of lessons on creating similar rollers from scrap materials. Among such rollers you can find a pattern of waves.
The texture may be different, but the roller must be rolled carefully, pressing firmly against the surface of the freshly applied plaster. For greater clarity of the drawing, it is recommended to wet the roller with water each time. The direction of movement determines the desired effect.
The main thing when working with embossed rollers is that you will have to withstand the same pressure while decorating the entire room; you should also avoid overlapping and diverging stripes.
Correct minor irregularities and defects with a sponge, brush or hand until the plaster has set.
How to create deep, sculpted waves
You may have seen photos with beautiful deep relief. This is not plaster, but decorative 3D panels made of gypsum, solid wood of various species, and MDF.
But a similar effect can be achieved by using a rotband, creating waves on a wall of decorative plaster yourself. The design is formed by the still liquid composition using spatulas, palette knives, brushes, and some modeling can be used. The permissible relief height is 2 cm. In a similar way, a world map relief is created from plaster.
The third way to obtain deep relief is counter-relief. It is also possible to take a rotband as a basis. Apply a layer of up to 5 cm to the surface. After the plaster begins to set, cut out the required pattern from the mass with a scraper or knife. You can correct with brushes or a damp sponge. After complete drying, sand with sandpaper and liquid putty.
Coloring plaster wave
The ready-made plaster mixture is not intended for tinting in bulk. It is painted after complete drying using water-dispersion paints, glazing compounds, dry pigments, and coating with sheets of gold leaf. Let's consider traditional dyeing technology step by step.
- Mix the glazing composition with a mixer. If necessary, tint in the chosen color.
- Apply the mixture to the wall surface with a fur roller. It is better not to break it into grips to avoid sloppy visible joints and overlaps.
- Before the paint has dried, quickly rub it with a foam sponge, achieving uniform coverage on the recessed part of the relief.
- Let dry.
- Pour white paint into a special tray. Dip a rubber or velor roller into it, remove the excess by rolling the roller on plywood, board or glass. Use a roller to go over the relief without pressing, painting only the protruding parts.
- Let the paint dry.
- Cover the finished surface with varnish or wax.
This is a classic technique, but no one bothers to diversify it. The relief can be emphasized with strokes of a semi-dry hard brush; instead of glazing composition and white paint, it is permissible to use two shades, perhaps even contrasting ones. You can also use decorative varnishes with the effect of craquelure, frost, textured paints, dry pigments, or include fragments of hand painting and airbrushing.
As you can see, if you practice and follow the technology, applying Volna decorative plaster with your own hands is not so difficult. The process is exciting and creative; perhaps you will create an art object in your apartment.
Photos of interior options
The following is a description and photo of examples of interiors decorated with “wave” decorative plaster:
- An option where the ceiling in the kitchen is not flat, but textured, and the walls are smooth, one or two colors, will look creative. You can recreate painting motifs or clouds.
- Decorative brick with a smooth surface creates an effect of style and atmosphere.
- Concrete plaster is often used in kitchens. In the apron area, you can use transparent or mirror wall panels.
- The living room is a mirror of the entire living space in the apartment, so soft colors, smooth surfaces and small-sized patterns are suitable for this area. To visually increase the space, decorative plaster of light shades with a granular texture is used. You can create a small pattern in the center that will attract attention with its originality.
- If the room has a fireplace, then the cladding is suitable in the style of brickwork. Under such a coating, chips and cracks on the surface will be hidden.
Textured ceiling:
Decorative brick:
For concrete:
For the living room:
Brickwork in a room with a fireplace:
Decorative plaster in waves can be combined with any type of interior. It can be used in combination with patterns or laid as a single-color coating. You can recreate the effect of waves with a trowel, roller and medium-sized brushes. The work is carried out independently or with the assistance of craftsmen.
Source
Decorative plaster Wave
Indeed, compared to other compositions for wall finishing, Volna decorative plaster has a fairly low consumption - only 0.8-2 kg per 1 m². In many ways, this indicator is influenced not only by the degree of preparation of the base for finishing, but also by the type of texture that will be created.
You can make Wave plaster with your own hands; the composition and manufacturing process are similar to Versailles plaster. You can read about how to make Versailles plaster with your own hands in the previous issue of the website https://samastroyka.ru.
As for the “Volna” plaster, it is made on an acrylic-latex base, which also includes various types of thickeners, fillers, water and special additives. At the same time, in order to correctly apply this plaster to the wall, you need certain knowledge and a tool designed for these purposes.
Application of decorative plaster Volna
In order to apply Volna decorative plaster to the wall, you will need to prepare the following tools and devices:
- Wide paint tray;
- Fur and rubber rollers;
- Several metal spatulas of different sizes;
- Small pieces of foam rubber.
You will also need a stainless metal trowel and a hammer drill with a special attachment for it in the form of a “mixer”. Using a hammer drill and this attachment, it is very convenient to bring the Volna plaster to the desired consistency and mix it thoroughly before applying.
The process of applying Volna decorative plaster is in many ways similar to the application of various other plaster compositions. No, of course, there are differences, but the main thing is to adhere to the correct sequence in performing all the work and throw away the rush.
So, the first thing you need to do is prepare and prime the surface on which Volna decorative plaster will be applied. As a result, the surface should not have cracks, too large irregularities or other very noticeable defects.
Next, you should make sure that the room where the finishing work will be carried out has a comfortable temperature and humidity. The optimal temperature for applying decorative plaster is an air temperature of no lower than 5 degrees and no higher than 35.
Before applying Volna plaster, the mixture must be thoroughly mixed until a homogeneous composition is obtained. At this stage, color is also added to the Volna decorative plaster if the color of the surface to be finished should be something different.
Plaster Parade for external work
Not only internal but also external surfaces need improvement. The Parade company offers materials in both the first and second categories, as well as universal ones that can be used for all types of work. Their main difference is the durability and strength of the resulting coating, so it is more fair to divide decorative plaster compositions into materials intended for high operating loads, and for use at low ones.
The first group includes the external facades of buildings, since they are strongly influenced by weather factors, and those interior spaces that are exposed to moisture or noticeable temperature fluctuations, as well as hard-to-reach areas.
Parade offers a range of textured and structured coatings to suit every taste.
- Bark beetle - when applied, forms specific grooves and grooves that imitate the result of the action of wood-boring beetles. Depending on the method of distributing the composition - in one direction, crosswise, in a circle, and so on, you can get very diverse and completely individual surfaces. The material can safely be classified as universal: it looks equally impressive both on the facade of a building and on internal partitions, but for the latter work it is recommended to use compositions with a finer grain - up to 2 mm. Judging by the reviews, Bark Beetle from Parade is the most popular method of decorating external surfaces. Consumption is about 2 kg per square meter. m. and applied in one layer.
- Coating with a “fur coat” effect is another example of a universal material. It can be used on concrete, brick, cement, stone surfaces, as well as on structures made of plasterboard, chipboard or fiberboard. The decorative coating perfectly withstands moisture, is easy to clean, and, like other Parade products, is approved for use in children's and medical institutions. The material belongs to the modeling group and to achieve greater effect requires the use of special structural rollers during application.
Plaster application technology
First, a so-called base layer is created, which has a thickness of no more than 2 mm. To form it, use a metal trowel, through which Volna plaster is carefully and evenly applied to the prepared surface.
You shouldn’t drag out the process of applying decorative plaster for too long; all the work needs to be done quickly enough. Of course, this requires a certain skill, so it is recommended to experiment and get better at this process by applying a little plaster somewhere in an inconspicuous place.
After the base layer is created, you immediately need to start creating a Wave pattern on it. The pattern is created using the same trowel, using uniform and wave-like movements of the hand. In this case, it is very important that the pattern has the same appearance throughout the entire length of the wall.
Once the pattern is formed, you need to wait a few days for the surface to dry completely. Only after this can you begin to apply the coating from the glaze mixture, after which the Volna decorative plaster will be completely ready.
Volna plaster rightfully occupies a leading position among decorative finishes due to its ease of application and high aesthetic and performance indicators.
Can be used for interior design and facade decoration.
With its help, you can create decorative effects of a light sea breeze or huge raging waves on the surface of the walls.
Grotto, application technique
- 24 December 2022 16:17:12
- Reviews:
In this article we will show how to apply grotto from medium-grained and coarse-grained decorative plasters.
Show this article to your master or apply it yourself if you like to work with your hands.
Cover price:
- Quartz soil - from 60 rub. m2
- Decorative plaster - from 300 rubles per m2
- Glazing - from 100 rubles per m2
We provide consultations by phone (viber, whatsapp).
This technique is incredibly popular due to its simplicity! You will be able to apply a beautiful and predictable relief, even if you are working with decorative plaster for the first time. The main thing is to strictly follow the recommendations in the article and choose the right material.
There are many advisers on the Internet who recommend regular dry putty instead of specialized putty. Choose this option only when appearance is not important to you. It will look organic in a municipal building or during a budget renovation. In the interior of an apartment or country house, dry putty looks foreign and significantly reduces the cost of repairs. In addition, the finishing coating is not as strong as when choosing decorative plaster, even if it is inexpensive.
Choosing coverage
Which decorative plaster to choose? It all depends on the style of the interior and your budget. A good option is cellulose-free medium-grain
compositions that compact well, for example Modena from Dessa Decor.
Coarse-grained
plaster is more expensive, and I recommend it when creating antique interiors. A good option is Rustic from Decorazza. We always select coverage individually according to the customer’s wishes and budget. To understand your preferences, send a picture of the interior that you like, and we will select for you options for decorative coatings from different price categories.
Preparing the walls
Basic preparation is enough, as for most decorative plasters. The surface must be free of gross defects and not crumble. Anything that crumbles must be sanded and primed with a strengthening primer. Fill potholes and cracks with putty. The surface is ready, you can start applying the grotto. First you need to go over it with a specialized quartz primer. We highly recommend not skipping this point. The primer significantly improves the adhesion of the plaster to the wall, which simplifies the work and makes the coating stronger. We apply quartz with a short or medium pile roller, trying not to miss areas on the wall. We wait a day for it to dry.
Applying the first layer
The next day we begin working with decorative plaster. First you need to decide what recesses your future coating will have: smooth or shagreen.
Decorative plaster Wave
Textured plaster is resistant to aggressive external influences of salts, ultraviolet radiation, and high humidity, so it is ideal for finishing buildings located on sea coasts.
Wavy patterns of decorative plaster create a unique, unique design of interior interiors and exterior facades of buildings.
The vapor-permeable plaster layer provides a comfortable indoor microclimate with normal humidity and constant air exchange.
Technology of applying decorative plaster wave
We clean the surface of walls and ceilings from dirt, crumbling coatings, oil stains and dust.
Textured plaster does not require a perfectly flat base.
Walls that have minor unevenness and minor defects are leveled with putty and treated with a deep penetration primer with antiseptics twice. We begin applying the second layer after the first has completely dried.
The primer can dry up to five days, depending on the temperature and humidity of the environment.
When performing plastering work, the ambient temperature should be from 5 to 35 degrees.
The work is performed in the following sequence:
- Mix the finished mixture thoroughly using a drill with an attachment or a construction mixer. If necessary, add dyes or other decorative elements to the mixture. Instructions for use, characteristics and consumption of the mixture are indicated on the packaging of the material.
- Apply the solution to a small area of the wall in an even layer, 1-1.5 millimeters thick, using a trowel and spatula.
- Using a damp mortar, use the flat of a trowel to form a textured pattern. The application method, sequence and amplitude of movements must be the same in order to create a single harmonious pattern over the entire surface of the wall. We carry out work quickly, without interruptions. Once the mixture dries, the drawing can no longer be modified. The elastic material is almost impossible to sand. You can start painting Volna plaster no earlier than two or three days later.
- Using a fur roller, roll a glazing polishing compound onto the textured surface and, without allowing it to dry, treat the surface with a foam sponge.
- After the polishing layer has dried, after 2-3 hours we pass over the dried layer, lightly touching the surface with a rubber roller with a small amount of paint. Dip the roller into paint and remove excess by rolling it on plywood or a wooden board. With light movements we roll over the plaster, painting only the protruding elements. Due to the unevenness of coloring, the relief of the pattern is emphasized.
Types and scope of application of Volma plaster
The range of dry building mixtures produced by Volma is varied, but the entire line can be successfully used for interior finishing work in rooms with high humidity and facade cladding.
Volma is a kind of “asymmetric answer” to the German Rotband plaster
On the construction markets you can purchase the following products, which differ in composition, and, consequently, in their physical and chemical characteristics:
- Volma-Aquaslayer MN;
- Volma Layer;
- Volma-Sloy-MN;
- Volma-Plast;
- Volma-Decor;
- Volma-Kholst;
- Volma Gips Aktiv;
- Volma Cement Active.
Depending on the base and additional components, it is effective for:
- finishing work inside or outside the premises;
- preparation of surfaces (walls or ceilings);
- increasing the strength of surfaces;
- maintaining an optimal indoor microclimate.
All types of dry plaster mixture can be divided into two categories depending on the base and the additional impurities contained:
- on a gypsum basis (Volma - Canvas, Volma-Layer, Volma Gips Aktiv, Volma Plast);
- cement-based (Volma-Akvasloy, Volna-Akvaplast, Volma-Tsokol).
The main function of all types of Volma plaster is to level ceilings and walls and prepare for subsequent finishing work using machine or manual application methods:
- wallpapering;
- facing with ceramic tiles;
- natural stone or decorative plaster;
- painting.
Volma is successfully used both for rooms with normal and high (including saunas, baths and showers) levels of humidity. A gypsum-based mixture can be used for decorative finishing of a room , because the end result is a glossy, even and smooth surface that does not require subsequent puttying.
Volma plaster mixture can be applied to concrete, plasterboard, brick, gas and foam concrete surfaces and chipboard.
Textures created by relief rollers
With the help of relief rollers you can create natural ornaments, marine-style plaster in the form of decorative waves and other repeating textured patterns.
To do this, apply the plaster solution to the wall and forcefully roll it over it with a figured roller.
The speed of application, direction and force of pressure must be the same on all sections of the wall to obtain a solid canvas with a repeating pattern.
We perform all the strips end-to-end to each other, avoiding overlaps and indentations. To create clear and pronounced reliefs, it is necessary to moisten the roller with water before each rolling.
All rough edges and minor defects are corrected using a brush or foam rubber. The resulting prints can be sanded with a special mesh.
After two days, the surface of the decorative plaster is ready for further painting and varnishing.