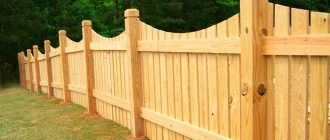
The distance between fence posts is a variable parameter that fluctuates within certain limits. Its universal value between pillars is 2.5–3 m, but this is only a conditional indicator of the normal distance. A lot depends on the type of fence to which the fence belongs, on the purchased supports and the method in which installation will be carried out. In turn, the installation of fence posts is carried out at a distance depending on the type of soil, weather and climatic conditions, and the location of the fence on the terrain.
Distance between supports
How to correctly determine and mark the distance between corrugated fence posts
One of the obvious advantages of fences made from a material such as corrugated sheets is that it is quite possible to build these fences with your own hands, without resorting to the help of expensive construction crews. The work is quite simple; after studying the instructions, in fact, any person who is familiar with the tool first-hand will probably be able to cope. But there are also relevant nuances. For example, one of the key problems is the correct installation of poles. How to cope with this task effectively? What should be the distance between corrugated fence posts, and how to calculate it correctly? After all, this is the main parameter that is designed to ensure the strength and durability of the structure. After all, even the most reliable material will not withstand the onslaught of weather conditions or an accidental mechanical shock if it is not securely secured with pillars. And they, in turn, will not bear the load when they are not installed according to the rules.
Advantages of tubing pipes:
- Such pipes are seamless, not welded.
- They are thick, reliable and durable, so they will last a long time.
- Much cheaper than new ones, which will help you save money that can be spent on purchasing corrugated sheets.
The only drawback is the lost presentation, but this is easy to fix - you just need to paint the pipes with metal paint, and they will be like new.
Used tubing pipes are the optimal solution; they meet quality certificates, are reliable and durable. The pipes are resistant to corrosion due to their large thickness and high-quality steel from which they are made. Pillars made from such pipes will faithfully serve you throughout your life. You can order and buy materials for building a fence in our online store at very affordable and reasonable prices. You will be satisfied with the quality of services provided by the company.
| Go to choosing fence posts |
Basics of calculation
To prevent a fence built with your own hands from becoming a source of severe headaches for you, you must carry out all the calculations correctly.
Article on the topic: Is it possible to leave the formwork under the foundation of a bathhouse for the winter?
It is important not only to calculate the design, but also to determine:
- optimal distance between pillars;
- the depth to which they need to be installed in the ground;
- parameters of pillars and sections, that is, height, thickness, area;
- the amount of material needed for construction.
Remember that for mistakes the fence will “revenge” its creator with rickety posts, cracks and other troubles. In the case of light fences, correcting the error is not so difficult. For heavy stone and brick fences, negligence in calculations will result in large financial losses and the need to completely redo all the work.
Calculate the amount of solution
Mortar for laying bricks on fence supports
For masonry, its volume is taken equal to 1/5 of the total volume of brick, which will be: 0.25 * 0.12 * 0.065 * 80 = 0.156 m3. Dividing by 5, we get a value of 0.032 m3 - this is the amount of mortar that will be needed for masonry.
But don’t forget that you still need to fill the cavity inside the column with the solution. It has the shape of a parallelepiped, at the base of which is a square with sides of 0.14 * 0.14 m and a height of 1.5 m. We calculate its volume: 0.14 * 0.14 * 1.5 = 0.0294 m3. Total amount of solution: 0.032 + 0.0294 = 0.0614 m3.
You can count it differently. Simply subtract the volume of the brick (0.2166–0.1560 = 0.606 m3) from the volume occupied by the pillar (0.3802 * 1.5 = 0.2166 m3) and get approximately the same value.
So, for one pillar you need 84 bricks and approximately 0.0614 m3 of mortar (to put it in simpler terms - a little more than six standard buckets).
In fact, the required amount will be slightly less, since the reinforcement also takes up some volume. The difference (if a steel pipe 80*80 mm with a thickness of 2 mm is used for these purposes will be about 1/10 of a standard bucket) can be written off as unforeseen expenses. And they are always present.
Similarly, you can calculate the amount of material for laying two bricks or for pillars of a different height. You will also have to calculate the required amount of brick and mortar for sections, reinforcement and everything necessary for the foundation.
If all the calculations are completed and all the nuances are taken into account, you can purchase the material. And start building your own fence. Let it be successful!
Calculation of fencing costs
Construction cost
When building a fence with your own hands, it is very important to know how to calculate the length of the fence in relation to the cost of a linear and square meter of the future fence.
Before deciding to build a structure, it is necessary to accurately calculate the cost of the fence.
The following instructions are suitable for carrying out calculations.
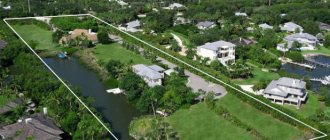
- The calculation begins with measurements of the perimeter of the object that needs to be fenced;
- After this, a decision is made on the type of load-bearing and enclosing part of the structure;
- Then the quantity of necessary building materials is determined, their price is necessarily taken into account and the cost of the work is added;
- To install a beautiful, practical and strong fence, it is necessary to accurately and correctly calculate the amount of building materials, including at what distance to place the fence posts. Both the reliability of the design and the financial costs depend on these calculations;
- The price per linear meter of fencing of the required height is calculated;
- The total length of the structure is multiplied by the cost per linear meter, and the approximate financial costs for the required structure are obtained.
Calculation of linear meter of fence
It is important to know how to calculate the linear meter of a fence:
- To do this, it is necessary to divide the total length of the structure by the useful width of the selected sheet of corrugated sheet for the fence. As a result, we get the required number of sheets;
- We multiply the resulting number of sheets by the required height of the fence;
- We multiply the result by the total width of the corrugated sheet and obtain the required area of material for the fence;
- By multiplying the area value by the cost of one sheet, we get the cost of a linear meter;
- It is imperative to take into account the cost of joists and supports.
Article on the topic: How to make a carved fence with your own hands
Calculation of the fence - a necessary circumstance
Calculation of support depth
Any fence is subject to the force of the structure’s own weight, which is directed strictly along the axis of the post, and the force of wind pressure, which is applied across the structure. Therefore, a torque (bending) moment acts on the support, which has a maximum at the point where it leaves the ground.
Bending moment is the main cause of destruction of enclosing structures. There is no point in taking into account the force of its own weight when calculating the racks, since it is minimal and does not have a significant effect on the strength of the base.
Many owners are also concerned with the question of how deep to bury a fence post?
Important! To determine the depth of the supports in the ground, the calculation of the wind load on the fence must be taken into account.
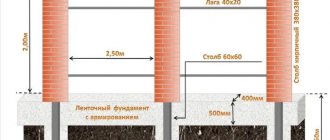
- First you need to calculate the estimated area of one link (section) of the future fence. If we assume that the width of the fence section (L) is planned to be 2 meters, and the height (H) is 1.5 meters, then the area (S) of one section will be 3 sq.m. (S = 2.0 m * 1.5 m = 3 sq.m.). The same area will be allocated to each pillar (1.5 meters of each section of the structure to the right and left of the support);
- To obtain the value of the wind load on the structure, it is necessary to multiply the section area by the aerodynamic coefficient and the magnitude of the wind speed pressure. The aerodynamic coefficient (constant value) for a vertical structure is 1.4. The accepted value of wind pressure is 40 kg per sq.m.;
- In our case, we find that the pole experiences a wind load of 168 kilograms (3 sq.m * 1.4 * 40 kg/sq.m. = 168 kg).
- We calculate the torque acting on the support. To do this, we multiply the wind load by a constant factor (168 kg * 0.8 = 134 kg/m); After determining the torque, divide it by the value of the drag moment coefficient - 225 (constant) (134 kg/m / 225 = 0.6 m);
- Calculations show that in order for the wind load to be fully compensated and the fence to be absolutely independent of the wind, it is necessary to lay the pillars to a depth of at least 60 cm. To be sure, you can add another 20 cm, since the soil at the very surface of the earth is quite loose;
Article on the topic: Steaming for a bath, what is it?
Billboard calculation scheme
Advice! To get one hundred percent confidence in the stability of the fence, regardless of the type of soil, groundwater level and material of the enclosing part of the structure, it is necessary to bury the frame into the ground to half the height of the fence, plus another 10 centimeters).
- If the soil at the site where the structure is installed swells during freezing, then the installation depth of the support posts must be further increased to 1.5 m. In places where it is not possible to deepen the supports to the calculated depth, corners are welded to the posts to expand the support area;
- If you use supports made of metal pipes for the fence, you need to fill them inside with liquid cement mortar. To protect metal pipes from corrosion, they are coated with red lead;
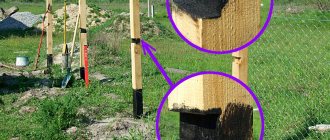
Advice! To extend the service life of wooden poles, their underground part must be treated with a blowtorch, impregnated (coated) with kerosene-bitumen antiseptic, heated bitumen or special impregnation, and also wrapped with roofing felt.
- The bottom of the pit is filled with sand. The support is sprinkled with broken bricks (gravel), covered with earth on top and thoroughly compacted. For greater stability, fence posts must be concreted.
You can learn more about the features of installing fence supports in the video in this article.
Calculation of the number of supports
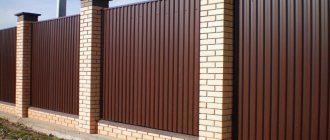
For example, it is planned to install a fence 1.6 m high with a total length of 40 meters. The role of the base will be performed by support posts cemented in the pits, and the enclosing part will be made of painted corrugated sheets.
Profile pipes are one of the most common materials for the manufacture of supports and frames, because the rectangular section is convenient to use during installation.
Knowing the parameters of the corrugated sheet, we determine the number of sheets that will be needed for the fence.
If the total width of such a sheet is 1.18 m (working width is 1.14 m), then we divide the total length of the fence by the working width of the sheet and get the value - 40 m / 1.14 m = 35.08 pcs. This means that to build a structure 40 meters long, 35 corrugated sheets are needed.
Advice! The resulting value must always be rounded up.
To calculate the number of pipes as a support, it is necessary to divide the total length of the upcoming fence by the length of one section (span), which is usually 2.0 - 2.5 meters, and add one to the resulting value (40 m / 2.5 = 16 + 1). Thus, 17 support posts are needed to install a fence with a total length of 40 meters with a section width of 2.5 meters.
Article on the topic: Is it possible to have a fence made of barbed wire?
Distance between supports
The selected distance between fence posts depends on their cross-section. The higher the structure you want to build, and the greater the distance planned between the support pillars, the more durable and larger the cross-section the pipes should be.
Installation of supports under the chain-link mesh
For example, for a fence 2 meters high and a section width also 2 meters, it is necessary to use a round pipe 76 x 4 mm, or a square pipe 60 x 4 mm or more for support.
Tips - how to save money without losing quality
In conclusion, let’s look at some practical tips for installing poles that will increase the shelf life of the structure:
- The poles can be painted both before and after installation in the ground. Metal should be painted with paint with anti-corrosion additives to avoid rust. For wood, use paints with antiseptic impregnation. Any acrylic or silicone based paints are suitable for concrete. But it is not recommended to paint brick, since it absorbs dye well.
- Metal poles have one convenient property - horizontal logs can be easily welded to them. Therefore, if you install metal logs, you can weld them directly to the posts. If the logs are made of other materials (for example, wood), then it is recommended to use clamps that will securely fix the logs to the supports.
In conclusion, we note that installing support pillars from scratch is a non-trivial task, which will be quite difficult for a beginner to cope with.
Therefore, if you are not confident in your abilities, it is recommended to transfer all the work (or at least part of it) to construction organizations. Of course, you will have to pay extra money, but you will be confident that the result will be a reliable design that will last for many years. How to calculate the number of fence posts video
Necessary conditions and basics for calculating the distance between fence posts
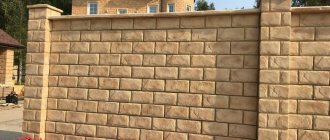
When building a fence made of profiled sheets, it is important to maintain the distance between the posts for a fence made of corrugated sheets, since it is deaf and experiences heavy loads during strong winds.
And if the distance between the posts of a fence made of corrugated sheets is chosen more than permissible, then this will soon be reflected in the structure in the form of leaning posts, sagging sheets and other troubles. Moreover, negligence in calculations can lead to serious financial losses, for example, alteration of brick and concrete supports.
The size between the racks directly depends on their cross-section. The higher the fence is, and the greater the distance between the fence posts, the stronger the pipes are installed and with a larger cut.
Calculation of distances for metal poles Source standart-zabor.ru
What else to consider
When building a permanent fence, everything needs to be taken into account, and this can be verified by carefully reviewing the requirements for installation and fastening means.
Correct calculation of all necessary parameters and drawing up a plan ensure the durability of the structure
The desire to save on building materials or labor time does not lead to anything good. That’s why there are unspoken standards that experienced builders use.
Concreting metal fence posts
After marking the site, determining the type of profile and the dimensions of the underground part of the pillars, they proceed to their installation. As noted above, the most reliable method is concreting.
In accordance with the calculated values of the area of the columnar foundation, the diameter of the hole is selected. It is best to make a hole for a post using a drill. The depth of the hole should be 20-30 cm greater than the underground part - this volume is covered with sand or fine crushed stone and compacted.
Article on the topic: How to make a fence with barbed wire in unturned
Then a post is inserted, a pre-prepared solution is poured into the hole, bayoneted with a piece of reinforcement (to remove air), the post is leveled, fixed in this state and left until the concrete has completely hardened.
For weak soils and heavy loads, complete concreting of fence posts as part of a strip foundation (with mesh reinforcement) is sometimes used.
For mixed soil, in which the top layer is loose and the bottom layer is dense clay, partial concreting can be used. In this case, the pillar is first driven into dense soil, and the upper part is concreted.
The solution for pouring fence posts is mixed in proportions for concrete grade M300. And to protect it in the ground from the effects of water, they use a “glass” made of roofing material inserted into the hole. It will not allow water from the concrete to “go” into the ground and will ensure normal hydration of the cement mortar.
Support processing
Fence support posts, being the most important part of the structure, require additional processing and protection from aggressive influences, especially their underground part. Wooden supports must be impregnated with antiseptics and treated with bitumen mastic. It is possible to install a roofing felt cup or wrap it in thick polyethylene.
The recessed part of metal supports must be treated with an anti-corrosion primer and painted.
Compliance with all requirements and rules will allow you to build a durable and reliable fence.
What does the span length depend on?
To calculate the optimal distance between fence posts, you need to take into account the type and height of the structure, the method of installing the posts, the wind load and soil characteristics on the building site, the material of the spans and supports.
Fences along the front side of the site are made solid or translucent with a height of 1.6-2.2 m. Fences that are installed between sites should only be translucent, and their height should not exceed 1.5 m.
Support columns are installed using the driving method, by partial concreting, with pouring concrete to the full depth, with crushed stone. Fences are also installed on screw piles, on a concrete base with concreted pillars.
The choice of foundation type and the immersion depth of the pillars directly depend on the type of soil and the weight of the spans:
- For the construction of a high continuous fence with a large windage on clay soil, it is recommended to install a concrete strip with concreting of the supports.
- To erect a lightweight fence made of chain-link mesh in an area with stable soil, drive-in pillars or supports with crushed stone or partial concreting are used.
- Construction of a blind fence on weak, subsiding or swampy soil will require a more stable foundation. In this case, screw piles are most often used to construct a pile or pile-grillage foundation.
Article on the topic: Drainage ditch along the fence, can it be filled with crushed stone?
For example, to build a fence made of corrugated sheets in an area with moist soil prone to frost heaving, it is better to use pile structures. To install sections of wooden or metal picket fences on sandy soil, sandy loam and loam, the best option would be to immerse the pillars to a depth below freezing of the soil with full concreting. In central Russia, for pebble and gravel soils the freezing point is at a depth of 0.5-0.6 m, for sandy soils - from 0.4 to 0.7 m, for clay and loams - up to 1.2 -1.3 m .
Nuances of choice
Choosing bricks for building fence supports
Selecting a good brick and laying it correctly requires certain knowledge and skill.
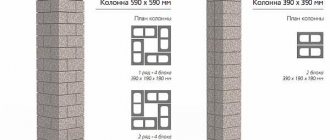
Brick pillars vary:
- according to the type of brick used. It can be a regular ceramic, silicate, clinker, hyper-pressed type;
- in height, which depends on the height of the fence itself;
- according to the installation depth of the metal pipe, which is selected taking into account the characteristics of the terrain and soil, as well as the height of the fence;
- by type of masonry. The most popular is one and a half or two bricks. The thickness of the pillar and the amount of material required will depend on the type of masonry.
The disadvantages of brick pillars include their high cost. Therefore, it is especially important to choose the right type of pillar and calculate how much material is needed for its construction.
Basics of calculation
To understand the amount of work, count the number of supports or materials, you need to determine the span between the pipes. This is not so easy to do. Costs are also directly related to the distance between posts. After some thought we come to two options:
- Wide, economical span. Cheap, but the structural strength leaves much to be desired.
- Short distance between piles. The number of piles in a dense building will make the structure expensive.
Therefore, we are looking for a “golden mean”, if there is one. Now, in order.
Distance between pillars
The distance between fence posts is influenced by three factors:
- Depth of digging pillars. The deeper, the more load the supports can withstand.
- Construction material. If the frame is made of metal or slate, there will be additional load on the supports. This means either digging deeper or increasing the distance.
- Height of the fence. The higher the fence, the more clearly the pressure of wind gusts is felt. More weight per fastener area. This especially applies to solid panels.
To satisfy economy and reliability, the structure is made with spans of 2 to 3 meters. A larger distance will be critical for the structure.
Installation depth
As stated above, depth directly affects the pitch distance of the columns. More often than not, it’s better to play it safe and bury the support to a greater distance.
Article on the topic: Why do you dream about an inscription on a fence?
Therefore, supports are often planted at a depth of 80–100 cm. In this case, a sand cushion is used, and sometimes special drainage. For reliability, the pipes are filled with cement mortar.
Calculation examples
When calculating, we use coefficients that affect the physical resistance of a blind fence made of corrugated sheets. Let the fence height be 160 cm and the span width 270 cm. Then:
- We calculate the wind pressure: Area 4.32*Aerodynamic coefficient 1.4*Wind load 40 = 241.92.
- Overturning moment: Height of applied load 0.8*241.92 = 193.536.
- Support laying depth: 193.563/241.92=0.8 meters.
Also, when calculating, take into account height differences and physical properties of the soil at the location of the supports.
Wooden supports are easy to process, in some areas they are much cheaper than metal and brick, it is easier to attach logs to them, and they are more aesthetically pleasing. Unlike metal supports, they do not bend. The weak point is that the size of the pillars is much larger than metal ones with the same strength. Wood, in addition, is susceptible to rotting, even after treatment with an antiseptic.
Metal ones are more resistant to wear, especially if they are protected with paint, and have greater strength. The disadvantages include the fact that the choice of pipes or profile pipes on sale is not very large. Fastening the veins is possible by welding or clamps; the latter method loses in strength, therefore it is used mainly for temporary structures.
Important. When installing metal pipes, the upper end must be closed to prevent water from getting inside; the lower end, on the contrary, is left open.
Columns made of facing bricks are the most beautiful and practical. They can be installed either on a common foundation or separately, organically combined with corrugated sheets. As a rule, they are laid out in one and a half bricks, but even this is not enough to form a strong support. More often, metal supports are installed, connected with veins, and then covered with stone, giving the metal additional strength. Their construction requires skill and additional material.
Article on the topic: Is it possible to plaster a sip panel from the outside?
Manufacturing of gates and wickets.
The frame of swing gates and wickets, as noted above, is made of 40x20x2 mm pipe. Since they are cantilevered to the posts, additional diagonal reinforcement is required.
A total of 37.5 meters of pipe will be needed for the wicket and gate. In total, together with the veins for the fence, it will be necessary to purchase 14 pipes 40x20x2 mm, 6 meters long ((45+37.5)/6=13.75 pcs.).
Gate leaves and wicket doors are hung on welded hinges. For gates, hinges with a diameter of 25/140 mm are used; for a gate, a diameter of 10-12 mm is sufficient.
Vertical locks for swing gates
To lock the gate, it is necessary to install two vertical and horizontal locks. If desired, the horizontal lock is equipped with eyes for a padlock. The gate is locked with a deadbolt lock with a latch and handles.
How to extend the service life of a fence made of corrugated sheets?
Since the material for the fence is quite durable (designed for 25 years of service), it does not require special care, but some nuances during operation should be adhered to:
- Do not clean the surface with metal brushes or use powder detergents.
- Do not expose the surface to chemical solutions, namely solvents.
- Avoid deep scratches that expose the metal to corrosion. If they are detected, they are immediately painted over with paint or clear varnish.
- Do not light a fire near the fence or install a barbecue, as high temperatures can cause the paintwork to crack.
- The entire metal frame and pillars must be coated with a special water-repellent impregnation once a year.
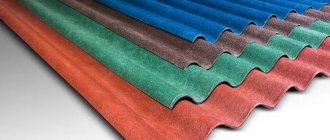
Profiled sheet
A profiled sheet is a sheet of thin metal that has longitudinal recesses (corrugations) of varying depths and can be coated with a special paint and varnish composition. Depending on the consumer purpose, it has different thickness and length.
The sheet can be used as roofing, wall, and facade finishing material.
The height of the corrugation ranges from 10 to 114 mm. Low height (10 – 20mm) is used for finishing walls and fences. Average heights (20-60mm) are intended for roofing work. High profiles (60 – 114mm) are required for the construction of formwork (foundation).
Sheet manufacturers provide the opportunity to select a protective coating layer for it. This means that the sheet can be painted with a special paint (polymer) in any color or remain galvanized.
The classification of profiled sheets occurs according to their purpose, the presence of a protective coating and the quality of the blank material.
Destination types:
- N - sheet is intended for flooring.
- NS - sheet is intended for flooring and wall fencing.
- C - sheet is intended only for wall decoration.
Material for the original workpiece:
- Galvanized thin sheets.
- Thin sheet metal coated with aluminum-zinc coating.
- Thin-sheet aluminized rolled products with silicon coating.
- Thin sheet metal with zinc coating.
Availability of protective paint coating:
- Galvanized sheets with a silver tint.
- The sheets are covered with paint in different colors.