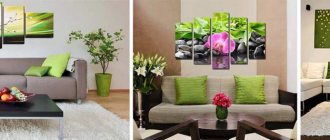
Decor plays a very important role in the design of a room. With its help, you can create an atmosphere of comfort or emphasize the freshness and modernity of the interior. A variety of objects can be used for this, including paintings. We have selected several master classes for you, with the help of which you can make your own painting in a suitable color scheme.
Abstraction
For those who do not have any special talent for drawing, we suggest not to be upset. Try making an abstract painting. Believe me, the result will pleasantly surprise you.
We will prepare the following materials:
- canvas of the required size;
- liquid paints;
- brush;
- brush;
- brush;
- broom.
Squeeze the paint onto the canvas in random order.
We distribute the paint with any tool. There are no specific rules here, just use your imagination.
Mix different shades on the canvas and continue to distribute them with brushes or other tools.
Leave the painting for a few minutes to allow the paint to dry a little.
We continue to fill the canvas with paints until the desired result is achieved.
Leave the painting until completely dry, after which you can hang it on the wall.
Execution options
The execution option directly depends on the materials you choose, because there are a great many ways to create paintings with your own hands.
The picture can be drawn in oils, pastels, pencils, watercolors, gouache or even children's markers. The painted pictures will easily fit into any interior, the main thing is to choose the right color scheme.
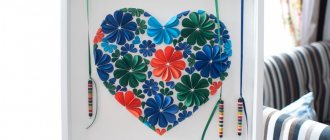
Pictures are created from beads and satin ribbons, sewing all this to canvas or any other fabric.
Glass, old disks and eggshells make very beautiful objects for playing with light, which reflects from the “mosaic” particles and casts beautiful reflections on other walls of the room.
You can create paintings with your children from beans, peas and even pasta. Then it will not only be a decorative element, but also an opportunity to develop fine motor skills.
Fabric paintings can be called a separate art form, rich in its textures and execution options.
Dried plants, flowers and leaves make beautiful wall bouquets that will delight the eye at any time of the year.
- Angorka. What it is?
- Flowers as gifts.
Dream Island - a place for a family holiday
From salt dough, clay, plaster or modeling paste, you can make a real fresco or panel; these will be wonderful three-dimensional paintings with your own hands, which in the future can be painted with paints.
The picture can be felted from special wool. Felted paintings are now in great demand due to the fact that their execution is quite simple, and the result is spectacular.
Knitted or hand-embroidered paintings will add a feeling of incredible comfort and warmth. Moreover, the process of creating them will help calm your nerves very well.
And this list can be continued indefinitely, as long as there is enough imagination, time and clean walls in the house.
Light painting
You will need:
- sketch for a painting;
- paper or cardboard;
- frame for fastening sheets;
- knife;
- LED strip;
- frame box.
Making a sketch for such a picture is quite simple, because you can print it on a printer. Prepare the work surface. It is best to use a wooden board. Using a knife, carefully cut out the details in the sketch, as shown in the photo.
If only one drawing is used to create a picture, then we fix it on each side.
We install the backlight in the frame and attach the sketch on top.
Close the frame box and turn on the backlight. A beautiful light painting is ready!
Inspiration
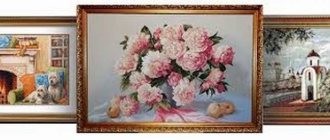
Photos of handmade paintings show real works of art. This is a great way to transform your home with minimal funds and in a short period of time.
You should allocate time for this process, think about the technique, prepare equipment. It is important to think through everything to the smallest detail to translate the desired picture into reality.
Set a goal, visualize and create.
Thread painting
Let's prepare materials:
- wooden plank;
- yarn or twine;
- big nails
- hammer;
- template with a picture.
Place the template on a wooden board and drive nails around it.
In this example, you need to use a few more nails in the central part of the design.
We tie the thread to the outermost nail and begin to weave it around the caps.
When the picture is ready, secure the thread by tying it to a nail.
Such a masterpiece looks great both as an independent decorative element and in combination with other items.
Embroidery and crystals
Many people are fond of embroidering pictures, and in handicraft stores you can find a variety of patterns and kits for creating masterpieces. You can embroider the canvas with beads with your own hands or try your hand at laying out mosaic paintings. The latter are made using diamond technology, that is, by laying out rhinestones.
On a note! This process is quite labor-intensive and requires perseverance and accuracy, but the result exceeds all expectations. You can use either a full lay-out technique or a partial one, where crystals cover individual areas of the canvas.
Very stylish picture made of fabric accessories
Original wall decoration for Halloween
Stylish silhouette paintings
Of course, not everyone can boast of artistic talent. But if you really want, you can make silhouette paintings that will become a stylish addition to your home.
You will need the following materials:
- acrylic paints;
- wax paper;
- black marker;
- stationery knife;
- brush;
- cardboard for the base;
- paper;
- an image of what you want to create;
- picture frame.
We print the images on a printer.
We outline the outlines of the images with a black marker. Transfer it to wax paper. Cut out the silhouette according to the transferred markings. Place it in the center of the sheet of paper and fix it in this position.
We paint over the surface not covered with the stencil. At this stage, use your imagination to get a unique picture.
Leave until completely dry and remove the stencil. If desired, you can make several more such images. We place each of them in a frame.
What if you have no drawing ability?
Still, this seems more like an excuse used by those who are afraid to experiment and try something new, so think again about whether your hands are really placed so out of place.
- Gas burners for heating metal: where to buy on the most favorable terms?
Gazelle. Why is she so popular?
Elbrus - a history of conquest.
But if you are still convinced that you have absolutely no creative abilities, don’t give up, there are wonderful options for you too, we will look at them in more detail.
Eco paintings
Every year the popularity of eco-themes is increasing. That is why we offer several options for paintings using natural materials.
First, we prepare the frames for the paintings. We measure their sizes and transfer them to cardboard.
We cut out the parts from cardboard according to the measurements.
Coffee bean painting
To create a fragrant picture you will need the following materials:
- wooden frame;
- cardboard;
- sackcloth;
- leg-split;
- scissors;
- wooden buttons;
- coffee beans;
- star anise;
- glue in a gun.
We take the previously prepared cardboard and cut the burlap to its size.
Glue the burlap onto the cardboard and insert it into the frame.
Glue three pieces of star anise onto the bottom part. Above them we begin to lay out a beautiful heart made of coffee beans.
We glue each grain and make the heart more voluminous.
Glue a wooden button in the center of the heart.
If desired, make a knot in the button using twine.
Show your imagination, use additional accessories and then your painting will be truly unique.
Moss painting
To make such a picture, let's prepare the following:
- wooden frame;
- cardboard;
- scissors;
- a thread;
- moss;
- buttons;
- cinnamon;
- glue in a gun.
Draw a beautiful heart on cardboard and cut it out.
Glue moss to it.
We wrap the heart with moss with thread for better fixation.
We take a piece of cardboard in the shape of a frame and tear off the top layer. We leave only the corrugated part.
We place it in a frame and glue it to the back wall for reliability.
Glue the heart to the cardboard. Decorate it with a cinnamon stick and other additional decor.
To make the picture even more beautiful, attach a button with a twine knot.
Painting from dried flowers
You will need:
- wooden frame;
- cardboard;
- bamboo rug;
- scissors;
- dried flowers;
- leg-split;
- sackcloth;
- wooden buttons;
- lace;
- glue in a gun;
We cut out a piece of bamboo mat according to the size of the cardboard blank. Glue the two parts together.
Insert the blank into the photo frame.
Glue a small piece of burlap in the shape of an envelope to the rug.
We collect a bouquet from dried flowers and tie it with twine.
Glue the bouquet to the burlap.
We make a bow from lace and connect it with the bouquet.
Glue a wooden button on top of the lace.
Stylish eco-picture is ready!
Painting with wool
Wool painting is a whole art from an unexpected perspective. This is where you don’t have to worry about your artistic abilities: a sketch of a drawing can also be applied under a stencil. Warmth, depth, volume are just a few of the epithets for such a work. A painting made of wool breathes, lives its own life and brings special warmth to the interior.
You will need:
- clamping frame;
- non-woven or flannel backing;
- scissors, tweezers;
- wool of different colors.
Now we begin to paint a picture with wool.
- Draw a sketch on the base.
- Start laying out the wool with the main background color, and then lay out the wool of other colors in layers. You can apply the wool by pulling it into a strand, plucking it into a “cloud”, or tearing it off. Each method creates a different effect: delicate color transitions, transparency or richness of texture, light haze or dense fluffy balls of fur.
- Give wool objects the desired shapes: convexity, texture, layering.
Important! Sometimes apply glass to the wool composition. This way you will evaluate the intermediate result and be able to eliminate shortcomings in a timely manner.
- Clean the glass with alcohol, press it against the painting with clamps and trim off any protruding hair.
- Secure the frame and enjoy the result.
USEFUL INFORMATION: What wallpaper will make the bedroom beautiful and cozy
Paper painting
You will need the following materials:
- wooden frame;
- metal grid;
- colored paper;
- white spray paint;
- drill;
- stapler;
- mounting screws;
- wire cutters
Attaches the mesh to the frame using a stapler. We cut off the remaining mesh with wire cutters. Paint the frame with the mesh white and leave until completely dry.
Using a drill and screws, attach the frame to the wall.
Cut colored paper into strips. We twist each of them into a tube one by one and insert it into the holes of the mesh.
If desired, you can add various shades to the composition.
Use your imagination so that the painting better emphasizes the interior of the room.
Legume painting
You can repeat this picture using the following materials:
- legumes (lentils, beans, beans, soybeans);
- printed drawing;
- glue in a gun;
- frame.
Glue a printed design to the inside of the frame or draw it yourself.
Glue each grain one by one. When the painting is ready, leave it until completely dry.
We put it in a frame and hang it on the wall.
Handy materials for creating panels with your own hands
Creating a panel with your own hands is not a difficult task. Back in school, each of us created something similar. The materials from which crafts are made can be found in almost every home, and if something is missing, it can be purchased in the store at minimal expense.
Shop panels are usually made of ceramics, glass, metal using photo printing. Homemade paintings have a simpler composition, but in appearance they are not inferior to those that can be seen in shop windows.
A homemade panel involves the use of the following materials:
- textile;
- threads;
- buttons;
- leaves;
- flowers;
- cereals;
- pasta;
- coffee beans;
- shells, etc.
There are a huge variety of themes for creating panels: kitchen, children's, holiday, etc.
Foam painting
You will need:
- wooden frame;
- Styrofoam;
- textile;
- ribbon matching color;
- glue;
- scissors.
We cut off the required piece of polystyrene foam and glue the fabric to it.
We decorate the side parts with a ribbon matching the color.
Leave the painting until completely dry. We attach a bracket or loop to the inside and decorate the wall.
How to make a wall panel at home
The first thing you need to decide is the location of the product. Next, depending on the interior and the color in which the room is designed, you need to choose the most suitable version of the painting.
Before you start creating a craft, it is important to consider several important factors:
- For a brightly decorated room, a panel of calm colors with a minimal combination of colors is suitable.
- If you plan to place several paintings on one wall, it is important to take into account their themes and colors: they should look harmonious.
- Small panels are suitable for small rooms. Placing three-dimensional paintings in a small room makes it visually smaller.
- When choosing a panel for a large room, you can choose one large one or several smaller ones. The main thing is that they are on the same theme and match in color.