Baguette is a plank used to make frames for paintings, photographs, mirrors, etc., and is also used to decorate walls.
Products framed in a baguette look very beautiful, stylish, and elegant.
A baguette gives charm and a finished, presentable look.
Of course, there are many ways to frame a picture, as well as many techniques for making the frames themselves, but baguette is still a classic option that will be relevant at all times.
This article shows how to make a frame from a baguette, which you can make at home with your own hands.
Types of baguette
Today, the baguette market is full of all sorts of options for this material.
The stores offer options not only of different designs, but also made from different materials.
So, a baguette can be made from the following materials:
Styrofoam
Does not require skills in working with wood, easy to use, very light, low cost, can be given any shade, quite waterproof, flexible.
But there are also disadvantages - it is fragile.
Plastic
Not susceptible to moisture, you can imitate wood, cheaper than wood.
The downside is the artificiality of the materials from which it is made.
Metal
Modern, but more suitable for office spaces and showrooms.
Tree
Environmentally friendly material, beautiful and noble appearance, resistance to mechanical stress.
The disadvantages include high cost and the ability to absorb moisture.
When choosing a baguette for a frame, do not forget about these qualities of these materials.
How to make a picture frame from wood
What you will need:
- Wooden frame or baguette
- Miter box
- Fine-tooth cross-cut saw
- Fitting device
- Clamps
- Carpenter's corner
- Chisel
- Plane
- Roulette
- Sandpaper
- PVA glue
- Rope for tying the frame and bars for tension.
It is best to carry out work on a workbench, or, if one is not available, on a table.
How to choose platband and baguette
The width of the baguette should be proportionate to the picture. An element that is too narrow or, conversely, wide can deprive the painting of some of its artistic merits. The tree must be dry, smooth, without large knots. You should also take into account the texture, which depends on the type of wood: in larch the structure of the longitudinal cut is slightly twisted with a screw, in oak the fibers have different widths and sinuous bends, in pine they are long and even, but different in color.
Instructions for making a wooden baguette
It is very important to measure the picture correctly and transfer the dimensions to the blank parts of the future frame. The starting point for the marking, which is made according to the internal size of the baguette groove, is the vertex of the right angle. Vertical and horizontal parts must be cut at an angle of 45°. Remember that the picture should fit into the frame freely, without effort, so when choosing the size on the baguette markings, allow for a small gap.
How to properly cut at 45°? A miter box is used for this purpose. It can be factory-made (metal) or homemade (wooden). Pressing the baguette rail against the wall of the miter box with your left hand, insert the hacksaw into the groove of the miter box with your right hand and saw down the baguette. File the next part so that it forms a right angle with the first. Beginning craftsmen often make a common mistake: they file the mating parts in the same way, when they should be done mirrored in relation to each other.
Markings for guide cuts are applied along a square, two sides of which are the outer planes of the miter box. The corners of the square are connected by diagonals. Using a carpenter's corner, vertical lines are also drawn from the corners of the square on the outside of the miter box.
The cut with a hacksaw is made diagonally exactly according to the applied horizontal and vertical markings.
The detailed process is shown in the video.
Instructions for making from a wooden frame
To form an internal groove on the reverse side, a strip is glued to the platband (with its wide side), the width of which corresponds to the thickness of the picture stretcher, and the thickness is 15-20 mm narrower than its width. The parts to be glued are tightened with clamps, and excess glue is removed with a clean cloth. In order not to wait for the glue to dry and not to delay subsequent operations, the planks can be connected from the inside with small nails. The platband improved in this way is sawn in the same way as an industrial molding.
At home, straight cut corners are not always obtained. To accurately maintain a right angle, the frame parts should be adjusted using a purchased or homemade special device. If there is none, a similar result can be achieved using clamps and a carpenter's corner. Fasten the parts in the device and use a hacksaw to make a cut that will remove irregularities and ensure that the corners align exactly at right angles.
Now we glue the parts. Apply PVA glue to the ends with a brush, then assemble the frame and tighten it around the perimeter with a rope, pulling it from the middle to the corner on four sides using wooden blocks. It is advisable to lightly press all four slats to the plane of the table so that they do not move while the glue dries. The structure must dry for at least a day.
Then reinforce the corners. Glue a wooden or plywood corner on the back side, which is best embedded flush with the plane of the frame, retreating 15-20 mm from the outer edge of the baguette. Trace the scarf with a pencil, use a hammer and chisel to make a groove and place the part in it using PVA glue.
After the glue has dried, the frame must be given a finished look, that is, the final finishing must be done. Trim along the outer perimeter with a plane, sand down any existing unevenness on the outside. After this, coat with varnish, stain or paint, depending on the desired decorative effect.
9 photos
Professional tools for working with baguette
Professional workshops usually use three main tools for working with baguette:
Miter saw for cutting baguette or guillotine;
Frame connector;
Mat cutting machine
Photo source: www.rubankom.com, www.stroi-zashita.ru, www.st-student.com.ua
How to make a frame from ceiling plinth
This material will make a white, modern frame, and for many this method is also much easier.
What you will need:
- Medium width ceiling skirting boards
- Adhesive for skirting boards
- Stationery knife
- Ruler
- Measuring tool, you can use a regular protractor
- Paint as desired
- Wort
Manufacturing instructions
- Measure dimensions on the baseboards at an angle of 45°.
- Make cuts with a knife according to the markings and cut off the elements using a chair.
- Connect all the sides together and then glue them together.
- After this, leave the structure to dry.
Watch the detailed process in the video.
- Decoration
Without holes and nails: 8 reliable ways to hang a picture on the wall
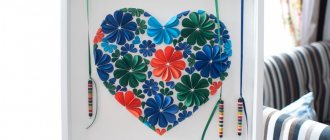
Photo gallery
Making a photo frame with your own hands is an interesting creative process that allows you to make a real masterpiece from simple materials. Don't forget to check out our photo gallery! Here you will find even more interesting ideas that you can safely experiment with using different decorating methods.
Photo: mebel-v-nsk.ru
Photo: culture.ru
Photo: livemaster.ru
Photo: dk-ritm.ru
Photo: skolkogramm.ru
Photo: plusto.ru
Photo: koffkindom.ru
Photo: azbukaplavania.ru
Photo: azbukaplavania.ru
Photo: clevercamp.ru
Photo: dmitryk.ru
Photo: severdv.ru
Photo: in.pinterest.com
Photo: pinterest.ru
Photo: eldomo.ru
Photo: pinterest.co.uk
Photo: culture.ru
Photo: dompodelok.ru
Photo: km-toys.ru
Photo: domhauz.ru
Photo: pinterest.ru
Photo: shh.cso52.ru
Photo: eldomo.ru
Photo: mikrobleyding-msk.ru
Photo: decor-decoupage.do.am
Photo: furnilux.ru
Photo: deco-magic.ru
Photo: skolkogramm.ru
Photo: hostboard.ru
Photo: liveinternet.ru
What to pay attention to
If you don’t have a corner clamp on your property, use another alternative: make grooves on the joints into which, when gluing the parts, thin elements cut from plywood and coated with glue will be inserted. After drying, the excess parts are cut off, resulting in a smooth product.
Now you know how to make a picture frame with your own hands. There is nothing complicated about this.
Sometimes, during the use of products, minor restoration of the picture frame is required. You can also handle this task yourself. When working with wooden elements, they are first cleaned, puttied and re-painted.
It is more difficult with polyurethane baguettes; they must be thoroughly and systematically cleaned, blowing away dust and avoiding contamination.
How to peel the top layer of cardboard down to the corrugations
Of course, before starting work on any project, you need to prepare all the materials so as not to be distracted by this while working.
For corrugated cardboard projects, it's very common to use old boxes you have on hand. But for work you need to prepare such cardboard, or rather, separate the top layer of paper to a corrugated layer
.The problem is that this can be difficult to do for several reasons:
- When making cardboard sheets, different manufacturers use different amounts of glue between the layers of cardboard;
- the strength of the glued layers depends on the thickness of the existing grooves; different manufacturers use paper of different qualities in the production of cardboard;
- the presence of layers is also an important factor.
There are two ways to remove the top layer of paper from cardboard:
- tear the paper in different directions immediately from the cardboard;
- first moisten the surface of the paper and let it soak a little so that the glue “softens”, and then remove the top layer.
Finishing methods
There are quite a few ways to finish such a baguette - you can paint the relief pattern on the plinth with a contrasting color, age the material in a certain way, or even just paint it in one desired color.
As an option, you can simply make a two-color baguette on the mirror with your own hands. For this you will need additional things, for example, black and silver water-soluble acrylic paints. After puttying, we paint the frame black on the front side, the ends and the inner border on the back. When the paint has dried, use a sponge to apply silver paint only to the raised areas and sides. Dry and apply clear acrylic varnish to the entire baguette.
Before connecting the baguette to the mirror, you can glue a beautiful lace on the back side of the frame to the inner border, which will decoratively fill the existing gap between the frame and the mirror. If you use non-acrylic or water-based paint, then it is advisable to first coat the surface of a do-it-yourself baguette on a mirror with 2-3 layers of PVA glue or a plaster solution.
READ ON TOPIC: How to make a rug with your own hands from wine corks
What else can you put into a baguette?
Nowadays various types of baguette are used not only in decorating mirrors with their own hands, but also for framing paintings, photographs, collages, engravings, reproductions, watercolors, canvas, children's drawings and appliqués, embroidery, tapestry, etc. A large selection of ready-made baguettes, from which frames are made with your own hands, allows the work to have a finished and original look and fit into almost any interior of the house. Such a masterpiece is a wonderful and unique gift for a holiday, anniversary event, or just as a keepsake.
Cook photo frame
A reliable and original design of a photo frame can even be made from salt dough. Creating it is quite simple: pour a glass of flour and half a glass of salt into a bowl, add 100 ml of water (if you want the frame to be colored, dilute the water with food coloring). Knead the dough and season it with 50 ml of vegetable oil.
The dough should “rest” for two hours, after which you can begin modeling. Place the finished product in a preheated oven and bake for two hours, remembering to turn it over.
If you do not color the dough initially, you can paint the finished product after it has completely cooled. A dough photo frame will last longer if you open it with a layer of varnish.
Photo: copytsvet.rf
Photo: shop-myhobby.ru
Photo: mebel-miru.ru
Photo: mamadochka.ru
Photo: mamadochka.ru
How to choose for different types of interior?
Of course, before buying a frame you need to decide on many factors:
It is advisable to choose frames that will not be too conspicuous, so they should not be bright or too intrusive colors.
Aluminum baguettes are the easiest to fit into your space so that they look as natural and laconic as possible.
Ornate and fancy types of baguette are best used when decorating a classic type of room , where they will become an additional touch in creating the overall image.
For places with high humidity, it is necessary to use wooden frames coated with varnish or made of plastic. In ordinary rooms, it all depends on the style in which the renovation was done.
Width
Large frames will attract the visitor's eye and make the mirror a more significant object in the overall picture. In addition, it is worth paying attention to the size of the glass itself. A large baguette will make a small mirror more significant in the eyes of the beholder . It is also used for large mirrors, because a thin frame on them will not look very appropriate.
But again, it all depends on what role the mirror plays in your space - if you do not want to focus attention on the mirror, and it is just a background, wide frames will be superfluous.
Style
For modern premises, products made from any type of material are suitable: wooden, carved polyurethane, MDF profile with PVC film coating for frames and others.
If your house is made in eco-style, a mirror in a simple wooden frame will look best.
For rooms where renovations were done in the Baroque style or in some ethnic style, it is advisable to use a heavy “lace” wooden baguette. In this case, pretentiousness will not be a mistake. Oval baguette mirrors look beautiful.
The color of your baguette may be different; it should look most appropriate in the color scheme of the entire room. It should not be too bright and contrasting in relation to other decorative items. A plastic frame for a mirror placed in the bathroom may be slightly brighter than the tiles, but the brightness should not be an eyesore to the beholder.
Workflow Description
We will talk about two options for carrying out the work, the first, when the baguette is attached at the junction of the wall and ceiling, and the second, when frames for the panels are constructed from these elements on the wall.
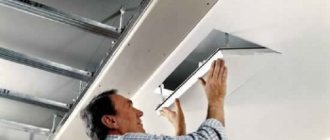
Design of the ceiling joint
As for this option, the installation instructions are as follows:
- First of all, you should clean the surfaces; it is best to glue the wallpaper in advance, firstly, this will make the work process easier, and secondly, you will not need to make the top perfectly flat, since the baguette will still cover at least a few centimeters of space;
- Next, you need to take careful measurements to cut the elements correctly, otherwise the result of the work will not be very attractive, it is best to measure no more than two elements at a time to make sure that they match. After attaching them, two more parts are taken, etc. This way you will proceed from the actual situation, which is much more convenient than cutting material for the entire room and then discovering discrepancies;
- Cutting with a miter box will not cause any difficulties, the only thing worth remembering when choosing this device is that the tooth on the wood hacksaw should be as small as possible, this will ensure the best cleanliness of the cutting;
When cutting, be sure to check how well the elements fit together
- As for gluing, you need to apply the composition either to the elements themselves or to the wall surface, based on what the manufacturer of the composition recommends. Be sure to lubricate the corner joints, since these places must be fastened as firmly as possible, some compounds must be left after application, and some are glued immediately, this nuance also needs to be paid attention to when working;
Important! Since the baguette is most often made of polystyrene foam, if you press it with your fingers, indentations may remain on the surface, which will spoil the appearance; to avoid this, press the elements with the edge of your palm.
- After fixing, the excess glue is immediately wiped off, and the seams can be coated with an acrylic-based sealant, it is easy to paint and sand, and at this point the question of how to glue baguettes to the ceiling and wallpaper can be considered closed.
You also need to tell us how to glue wallpaper onto baguettes, since sometimes there are situations where the elements are already fixed. Everything is simple here: when gluing, take enough material so that it fits onto the element; after careful leveling, the excess part along the joint is cut off with a construction knife for wood.
Liquid nails will help you quickly and reliably glue baguette onto wallpaper.
Wall mount
If you decide to make a panel, the work will be in many ways similar to those described above; we will tell you about the main differences:
- First of all, you should carefully mark the position of the structure on the wall; of course, the ideal option is to attach the baguettes before the wallpaper, but if the coating is durable, you can glue it to it; the weight of the products is light, which allows you not to worry about reliability;
- But you can highlight not only individual areas; one of the options for decorating wallpaper with baguette is a solution using two types of coating, most often a dark bottom and a light top.
Another interesting way to use a baguette
How to carefully stretch embroidery onto a stretcher
Any decoration of embroidery in a frame with your own hands begins with stretching the fabric onto a stretcher. The latter can be bought with a frame (usually included in the kit) or made independently.
The easiest and fastest way is to make a stretcher from thick cardboard. The cardboard does not bend and does not spoil the embroidery, but it is quite durable and easy to attach fabric to. You can also use a thin piece of foam of the appropriate size, but this material is easier to break. Third option: thin plywood or chipboard.
Before starting embroidery you need to prepare:
Must be washed by hand
Important! Embroidery made from ribbons, beads, rhinestones, sequins or diamond embroidery cannot be washed.
The tensioning process itself occurs in several steps:
It is necessary to leave a little “extra” fabric on all sides. You can finally secure the fabric in several ways.
The canvas is stretched and fixed with threads
After stretching, the canvas should protrude a few centimeters beyond the edge on all sides. The edges of the fabric are folded and sewn together at the corners.
Corners should be sewn neatly
Then you need to stretch the threads crosswise between the opposite sides, which will hold the embroidery in place.
The canvas is cut to fit the baguette and is not fixed
This is not the best option as the fabric may slip off. This option is suitable if the glass fits very tightly, and between it and the backing there is only room for the embroidery itself. In this case, you need to carefully trim the fabric around the edges. For additional fixation, you can secure them with buttons, a stapler or tape.
The disadvantages of this method include the inability to design the work differently in the future, since the edges will be cut off.
Corners can also be secured with a stapler
Method of stretching embroidery using double-sided tape
First you need to glue the tape around the perimeter of the stretcher so that the edges of the embroidery when folded do not go beyond the edge of the tape. Then, one by one, peel off the protection and glue the canvas, pressing it carefully.
You might be interested in this: MK on embroidery on mesh fabric for wedding dresses
Important! Using the same method, you can additionally secure the fabric by sewing the edges together with thread.
You can also stick tape on the front side, then stretch the fabric over it and press it. This is a simple method in which you can immediately notice and correct the problem that has arisen (a fold or too much tension). For better fixation, the tape can be applied not only along the edges, but also in the center.
Stretching and securing embroidery with push pins
This is not the best option, since over time the buttons may become loose and the embroidery will move away. It is best to use buttons on a stretcher made of plywood or chipboard and squeeze tightly, bending the ends of the buttons if necessary.
You need to work carefully, otherwise the edges will be visible
The canvas is attached to the stretcher with a stapler
Usually, embroidery is attached to a wooden stretcher with a stapler: the embroidery is folded and secured.
Important! We are talking about a large construction stapler, not a stationery stapler.
It is noted that this method is more suitable for fastening large-sized fabrics, as well as tapestries, batiks, and hand-drawn paintings.