The countertop is one of the most vulnerable surfaces in the kitchen. Chips, cuts, and traces of dishes appear on it. At the same time, the neatness of the entire interior depends on its appearance. To freshen up your space without replacing furniture or repairs, you can try restoring it yourself. In this article we tell you how to update your kitchen countertops with your own hands.
Types of countertops and their main defects
The working surface can be made of different materials. Each of them is susceptible to the appearance of different defects that will have to be dealt with:
- Natural stone is the most popular and durable material, least susceptible to wear and tear, and has a long service life. A kitchen table top made of natural granite is not afraid of either temperature or mechanical influence, and is also not susceptible to damage due to chemicals.
- Acrylic. This type of artificial material looks very attractive. But it has its drawbacks. Acrylic is resistant to scratches and cuts, while other artificial stone kitchen countertops, such as colored concrete, are more durable.
- Quartz agglomerate. Resistant to all types of impact, as durable as natural granite. But over time it loses its aesthetics.
- Casting stone is a type of thin-layer polymer that has a base. The material cannot withstand grinding with force, so you need to be extremely careful when doing this.
- Plastic is the most budget-friendly option for decorating a kitchen work surface, which explains its low performance characteristics. When cutting without using special boards, it wears out quickly.
- Tree. The tabletop uses material treated with impregnations and varnishes. Since the top polish can wear off over time, you need to think ahead about how to refinish your wood countertop.
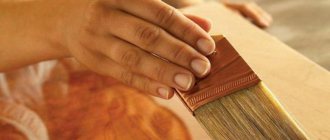
Renewal by varnishing
The stronger the smell of varnish, the more resistant it is to mechanical stress. Alas, a durable varnish without a pungent odor has not yet been created.
The best varnishes are at the beginning of the list:
- nitrocellulose,
- alkyd,
- polyurethane,
- epoxy,
- acrylic.
There are a lot of “combi” varnishes with partial addition of certain substances: shellac, resin, drying oil, acrylic suspension. The wide variety is associated both with the purpose of improving the compositions and with different purposes. It is often necessary to re-varnish surfaces containing lecithin (converted fats). Nitro varnish will no longer stick to this. In any case, varnishing is the most reliable way to protect solid wood and paint on furniture. If you don’t like shiny shine, choose a matte composition. You can add particles for sparkle, tint to taste (tinting reduces transparency). By selecting the composition and mode of the nozzle of the spraying device, the varnish creates the effect of raindrops, bubble skin, silk, and mica plates.
Some varnishing tips:
- the first layer must be extremely thin, dry, and carefully sanded - a high degree of gloss depends primarily on this process;
- the varnishing roller must be made of fur that is resistant to caustic thinners; even before use, the roller is washed, even a new one, and the strength of the bristles is checked;
- the same requirement for brushes;
- Any brush lint or bristles that accidentally get caught are quickly picked out with an awl;
- varnishing is carried out only in a clean room;
- to avoid splashes, the spray nozzle is first tested on cardboard and only then the torch is transferred to the surface to be painted;
- using tinted polyurethane varnish to transform ordinary glass into tinted glass;
- varnish with a small “chameleon” additive becomes pearlescent.
Renewal by polishing and grinding
The simplest and most optimal method of updating a working surface is polishing and grinding. In this way, you can restore kitchen countertops made of artificial stone or other similar material. When updating the surface of cast stone, you need to be extremely careful, since this material can only withstand 2-3 such updates. This is due to the fact that the stone itself is applied in too thin a layer to the base.
The following tools and materials are needed for work:
- Sander;
- polishing machine;
- special polishing paste.
There can be one tool for grinding and polishing (grinder), but with different attachments. In the first case it is abrasive P120, in the second - up to P1500.
The following steps need to be performed:
- Before updating the kitchen countertop with your own hands, you need to level the top layer with a grinding machine. During this, water must be constantly added to the surface to prevent the stone from heating up and deteriorating.
- Using polishing attachments (first with a coarse abrasive, gradually reducing it) to make the surface of the tabletop matte. The circles need to be constantly wetted. After this, you can use a special paste if you want to have a glossy countertop in the kitchen.
From laminate
This material can be used for countertops instead of natural boards. It is important to provide enhanced protection against water and the coating will last no less than wood.
We will need:
- Treat all locking joints with sealant or special protective impregnation.
- Glue the end caps around the perimeter.
It makes no sense to specifically purchase laminate for kitchen surfaces. But if it remains after repair, you should not refuse such a decision.
You need to handle the material in the kitchen with care: do not forget about cutting boards and hot pads, and also do not leave spilled water on it.
If you decide to make a countertop with your own hands, it is important to soberly assess your strengths. And choose the option that seems less labor-intensive and costly. Then homemade designs will not be inferior to factory ones and will be the best praise for your skill.
How to update a tabletop with film?
Pasting is considered a radical renovation method, as it allows you to radically change the appearance of the countertop. For this, thick vinyl film on a self-adhesive base or photo wallpaper is used. If you don’t know how to update your kitchen countertops with your own hands, you can follow the standard scheme:
- Degrease the surface and then sand it with a sanding machine. Inspect carefully. If there are chips or potholes, they must first be filled with repair putty, and then the described steps must be followed.
- Now you can stick the film on the tabletop. In this case, it is important to fix one side as well as possible, which will prevent distortions and movements of the canvas during rolling. You can simplify the gluing process by using a plastic or rubber spatula, which should be used to expel bubbles and smooth out the coating.
The service life of such a film is no more than 4 years, so the countertop will have to be updated more often. But her appearance will not bother you.
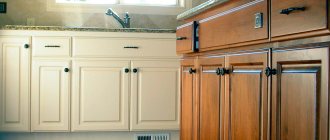
Film - quick design of the facade of a kitchen unit
This option for updating the headset turned out to be the cheapest and most accessible, because each of us can use self-adhesive film. Modern film can imitate natural materials such as leather, wood or stone. The only thing when choosing a material is not to give preference to the most inexpensive options, because the film must be of high quality and practical. For myself, I selected vinyl film, which is resistant to moisture, sudden changes in temperature, and also retains its color and appearance for a long time.
Renewing the tabletop with film
Before updating your old kitchen set, stock up on the following tools:
- Film
- Knife
- Ruler and pencil
- Centimeter
- Scraper
First you need to take measurements of all kitchen surfaces that are to be updated. Usually, for such processes, all cabinets are disassembled, since it is very difficult to carry out any repair work with an assembled and installed set. High-quality preparation requires not only cleaning the headset from dirt and dust, but also sealing cracks and chips. This will require putty, which we are all so used to.
Important! Self-adhesive film has one property that should not be forgotten - it highlights all surface imperfections. Therefore, the preparation process must be serious, and the foundation after it must be smooth.
After the dimensions are made, we will make marks on the reverse side of the film. The fabric is cut along them into the required pieces. When using a film with a pattern, make sure it matches. Use a utility knife and a ruler to cut the pieces as evenly as possible. When gluing, a rubber scraper allows you to smooth out places where bubbles form. You may not be able to paste the parts the first time, but after completing the renovation process, your kitchen will sparkle with new colors. Do not forget that fittings also play an important role and therefore it is worth purchasing them too. Unlike purchasing the entire kitchen set, purchasing individual parts will be very beneficial in terms of inexpensive repairs.
Painting using a stencil
This method of updating a kitchen countertop with your own hands can be considered one of the most original and creative. In this way, even the most risky fantasies and wishes are realized. Another advantage can be considered low financial costs. The update itself is performed in the following sequence:
- The first step is to choose a design for the stencil. Ideas can be found on the Internet and then printed on paper.
- Now you need to transfer the design onto the stencil material. It can be thick cardboard or thin plastic. Choose a material so that you can cut the template with scissors.
- Prepare brushes of the required size, foam sponge and acrylic paints.
- Wash the countertop surface thoroughly and degrease.
- Now you need to cover it with the main color, which will be the background. You can proceed to the next stage only after this layer has dried.
- Using the prepared stencil and sponge, apply the selected design. The paint layer should be thin. This will prevent paint from flowing under the stencil and making the design blurry. If there is any doubt that you will be able to apply the pattern carefully with a sponge, you can do it with a brush.
If desired, this method can be safely combined with decoupage, but it is not recommended to do this to update the working surface.
From mosaic
The mosaic countertop is a bright accent that gives the kitchen a Mediterranean flavor. Small tiles are indispensable for complex curved surfaces and multi-level joints, for example, in the window sill area. Countertops are finished with ceramic or frosted glass mosaic (smalt) - this is the most common and practical option.
Also, for bohemian-style interiors, you can use compositions of broken tiles with different textures and patterns. You will have to spend more time laying “mismatched” pieces of ceramics than ready-made mosaic panels. But as a reward we will get a truly exclusive and budget-friendly countertop. In addition, we will be able to utilize the battle in the best possible way.
Laying features
The preparation of surfaces for mosaics is the same as for other types of tiles. The material is supplied on a special support, in the form of sheets of different sizes. Mosaics on paper are laid in tiles on glue, and then the base is removed, revealing the front side. The panel on a silicone or polymer substrate is attached directly to it, without turning it over or removing it.
Only light glue is chosen, especially for translucent smalt. It is better to use epoxy-based grout.
Advantages and disadvantages
Ceramic mosaic has the same advantages as tiles or porcelain stoneware, but it provides more decorative possibilities. Smalt is stronger than ceramic analogues and looks impressive, as if transmitting light from within. The main disadvantage of mosaic is the high cost and large number of seams that require maintenance.
How to update an old kitchen countertop with paint and glass?
This type of countertop renovation is suitable for all worktop materials that must first be prepared. There are two ways:
- putty;
- grinding.
You can use any paint for painting, but the most suitable is:
- acrylic paint;
- alkyd enamel;
- water-based paint.
Before applying a layer of paint (there should be at least two, or preferably three, with each subsequent layer applied only after the previous one has dried), the surface must be degreased.
You can increase the service life of the tabletop by placing tempered glass on top. This will prevent damage to the painted coating and paint chips from getting into food. By the way, tempered glass can also be used in other renovation methods, for example, pasting, painting.
Which film should I choose?
First of all, you need to look at the thickness of the material and the manufacturer. German “self-adhesive” tapes are of good quality; their price depends on the thickness.
Dutch and Italian manufacturers have proven themselves to be excellent. You can choose something from budget series or take a closer look at exclusive products, but then the price will be quite high.
The most inexpensive are Chinese adhesive decorative materials from unknown manufacturers. However, low price should not be the main selection criterion, otherwise a beautiful kitchen decorated with self-adhesive vinyl film can quickly lose its appearance.
Not all adhesive materials intended for promotional products can be used in the interior. Some of them are designed for short-term use. Choose high-quality decor, and then the restoration will be durable, and a simple kitchen cabinet will become an interior decoration.
The color can be any. If you want to take a creative approach to kitchen design, place photos of fruits, vegetables or flowers on the facades, thereby decorating ordinary old furniture. The drawing can also be applied using photo printing.
Decoupage under glass
You must first select a suitable pattern. Ready-made decoupage pictures are sold in specialized stores, but there is a more economical way. Drawings can be cut out from napkins, magazines, newspapers, or you can print a composition selected on the Internet. All work is carried out in several stages:
- First you need to clean and then degrease the surface.
- Dilute PVA with water in equal proportions. You can also take special glue for decoupage, but as a rule, it is sold in small quantities, so before updating the countertop in the kitchen with your own hands, you will need to make careful calculations. Moisten the prepared picture in this mixture.
- Glue the soaked image to the surface of the tabletop, smooth it, removing all bubbles.
- Leave the countertop to dry completely.
- Now the surface needs to be covered with several layers of varnish. There should be at least three, but ideally it is better to make four. In this case, each subsequent layer can be applied only after the previous one has completely dried.
You can increase the service life of such a countertop by using tempered glass. In this case, decoupage can also be used to update the work area. The fact is that such a surface is afraid of exposure to aggressive detergents, high humidity and temperature. And tempered glass prevents damage.
Create decor using tiles
When making a concrete countertop on your own, it is best to choose decor in the form of applying tiles to the surface. This way you can restore the product or update it. Suitable for the task: ceramic, composite and mosaic tiles. Mosaic gives the decoration originality and a special style thanks to a wide range of colors.
You can improve your kitchen interior design by integrating tiles into the decor, which decorate the apron area of the work area. A very interesting effect will be created by a combination of tiles and mosaics. Mosaics can be made like large tiles, so such combinations are not difficult to create.
To make a tile countertop with your own hands, you need to prepare the tiles, glue and grout in advance.
The work is performed in the following sequence:
- Cleaning and drying the table;
- Application of adhesive and tiles;
- Applying grout.
This is how a table is transformed from a tabletop. The tiles are not afraid of increased loads. Wet cleaning and aggressive detergents will not harm it. Above is a diagram of how to make a table from tiles. Using the same method, it is recommended to make window sills that serve as table tops. Dining tables should not be made of tiles.
Covering with decorative tiles
This method is suitable for updating products made from any materials. And this is also how the restoration of tabletops made of wood, plastic, chipboard or fiberboard is carried out. You can choose regular ceramic tiles or mosaics (using the second option has more possibilities). When choosing a color scheme, you need to take into account the color of the apron, which is located directly above the countertop.
You can make your design more original by using tiles of different sizes and shapes.
Before updating the kitchen countertop with your own hands, you need to prepare the following materials and tools:
- directly tile according to the chosen design;
- glue;
- grout.
After preparing the necessary tools and materials, you can start working:
- Clean the surface, degrease and dry.
- Apply glue to the countertop and directly to the ceramics.
- Place the tiles on the surface.
- Leave until completely dry.
- Now you can sand the seams. Apply the grout with a spatula, and then remove the remaining residue with a damp cloth.
Repair of countertops made of various materials
Repairing a kitchen countertop differs depending on the type of materials:
- wood, chipboard;
- stone or artificial stone;
- plastic;
- strained glass.
Tabletop made of wood or chipboard
When planning renovation work on tables made of wood or chipboards, it is necessary to take into account the characteristics of the materials.
Chipboard or fiberboard boards are impregnated with special compounds that increase the resistance of the coating to moisture and temperature changes, mechanical stress and cleaning with acidic chemical compounds. The material is distinguished by a variety of shades, textures, and affordable prices. However, it is necessary to take into account the possibility of scratches and stains appearing during operation.
Wood tables have an exquisite texture. The material is environmentally friendly, aesthetic, and has a tactilely pleasant surface. However, the wear resistance of the material is average; the coating requires careful cleaning and renewal of the protective layer and coating, which prevents the negative effects of sunlight.
You can restore a countertop made of chipboard and wood using special restoration compounds. To eliminate chips, dents and cracks from the surfaces of wood and chipboards, special restorative agents are used:
- soft or hard wax for furniture;
- furniture touch;
- water-repellent sealant.
Hard texture wax is used to eliminate mechanical damage on coatings that can withstand medium and heavy mechanical loads. The material is available in a small palette of shades and gives surfaces waterproof characteristics. Before use, the wax must be melted using a gas soldering iron, then the desired area should be covered with the composition. You need to wait a few seconds for the wax to cool, then use a knife to scrape off any excess material.
Soft wax is rubbed into the damaged coating using a spatula or an edge knife. The composition is optimal for eliminating cracks and small dents, holes left by self-tapping screws. Soft wax is applied to the surface, then the coating is polished with felt. The composition is suitable for eliminating defects in natural wood and allows you to emphasize the texture of wood fibers using an alcohol marker.
A furniture touch allows you to repair minor damage. The composition must be shaken in a container, then applied to the area. Depending on the degree of damage, 1-3 layers are applied. Each coating is dried for 5-8 minutes. Remains of the product are cleaned off with a felt cloth or cotton rag.
A sealant with water-repellent characteristics is used to hide the joints of elements to prevent surface deformation.
Stone countertop
The countertop of a kitchen set made of artificial or natural stone is highly durable, resistant to mechanical damage, high temperature, and high humidity. It is necessary to take into account the massiveness of the natural material, the high price and low maintainability. If part of the coating is damaged (chips), the entire surface will need to be replaced.
Artificial stone elements must be carefully treated with special chemical compounds. Repair work is carried out immediately after damage. The maintainability of artificial stone is high.
To remove stubborn stains on the surface, a polyester composition is used. It is allowed to sand the coating using sandpaper with a grit level of P120-P400. After sanding, the area needs to be polished with a felt cloth.
To eliminate chips, you need a special composition based on polyester resinous substances. It is necessary to clean and degrease the surface of the area and the area around it. The damage is rubbed with the compound, left to dry for 18-20 hours, then the coating is sanded with abrasive materials and polished with a felt rag.
Plastic table top
Coverings made of plastic materials are waterproof, durable, and resistant to chemical detergents. However, the fragility and brittleness of the plastic surface must be taken into account. Chips occur in the corner parts of the table. In order to update the tabletop, you will need a special adhesive base.
The compositions are applied using a construction gun. If the surface thickness is small, you can apply “Moment” or “Superglue” glue with a spatula. “Titan” adhesive composition is suitable for plastic surfaces. Before performing work, you need to fix the table, process it and leave it to dry. When repairing joints, the adhesive can be mixed with powder compounds.
Glass table top
Glass surfaces in the kitchen are used in modern styles. The material is durable, resistant to air humidity and water ingress, temperature changes, and is available in a wide range of shades and textures. However, glass is expensive and requires careful maintenance.
Glass restoration includes the following steps:
- surface cleaning;
- degreasing the material;
- applying varnish or paint;
- After drying, the element is fixed on the legs.
In addition to plain coloring, artistic painting can be used. For severe damage, glass replacement is recommended.
The following methods are used to remove scratches:
- You will need water and an ammonia solution. The composition will correct minor scratches. When preparing the product, the proportions must be observed; water (6 glasses) must be added to ammonia (30 g). Then you need to dip a napkin in the solution and wipe the surface. Remains of the composition are removed with a dry towel. The procedure can be repeated several times.
- Restoration work is carried out using a specialized paste (GOI), which is offered in automotive departments. Before use, you need to grind the paste to a powder. Then a cotton swab is dipped into the mixture and the scratches are treated for about 10 seconds. The movements should be polishing. The treatment can be repeated 2-3 times. Residues are removed with a dry cloth.
- The universal method involves the use of toothpaste. The composition is applied to a cotton pad and distributed using circular movements over the glass surface. Then you need to wet the cotton wool and wipe the table, removing any remaining paste. The technology allows you to eliminate traces of scratches, enhance the protective characteristics of glass, and prevent further damage. However, it is not recommended to use bleaching compounds that contain abrasive particles that damage the integrity of the coating.
In order to prevent damage, it is recommended to provide special care to surfaces and take into account the characteristics of the material:
- Cleaning wipes should be soft.
- Specialized glass products are used for cleaning.
- Do not place hot dishes on tables with photo printing; it is recommended to use special stands.
To prevent scratches, it is necessary to cover the glass with a tablecloth or fabric linings for dishes while eating.
Restoration with concrete
Not all renovation methods are suitable for worn concrete countertops due to the characteristics of the material itself. But concrete can be safely used to restore a working surface made of stone, both artificial and natural. The following materials are needed for work:
- mixture for finishing concrete screed;
- sealant (preferably acrylic);
- concrete varnish;
- volumetric container for preparing the solution;
- 2 spatulas of different sizes (20 mm and 10 mm);
- coarse sandpaper;
- industrial mixer (can be replaced with a drill with a special attachment);
- grinder with grinding disc.
The amount of mixture for the concrete screed depends on the size of the countertop itself. This information can be read directly on the packaging. The standard consumption is 1.2-1.5 kg per 1 m2 of surface with a layer thickness of 1 mm.
The restoration process itself is as follows:
- Before applying concrete, you need to carefully prepare the surface. It needs to be cleaned of dirt; it is recommended to pay special attention to leftover food and fat. You can use dishwashing detergents for this. If, during inspection, residues of silicone sealant were found, they must be removed, since concrete has low adhesion to this material (that’s why you need to use acrylic sealant).
- After all contaminants have been removed, the surface must be treated with sandpaper of different calibers (25-N and 20-N). This procedure will increase the adhesion of concrete to the old surface. That's why you don't need to think about how to remove a scratch on a countertop.
- Now the surface needs to be washed and then left to dry.
- After this, you can begin preparing the solution. How exactly to do this is indicated on the packaging, as there may be some nuances. In most cases, the mixture must be diluted with water in a 2:1 ratio. It is better to add water gradually so that the solution is not too thin or thick. Ideally, the consistency should be like sour cream. It is recommended to first prepare a small portion in order to be sure of the correct proportions later on.
- The prepared solution must be applied to the surface of the countertop with a spatula. Distribute the composition over the countertop with smooth and slow movements. This will reduce the risk of bubbles. To restore the tabletop, a concrete layer of 1-2 mm is sufficient (this depends directly on the material of the product and the existing problems). But to improve performance characteristics, it is recommended to make several such layers.
- The next step is sanding. You can start working on it only after the layer has completely dried. This will take at least 24 hours. For sanding you need to use coarse sandpaper or a grinder with a sanding disc. When covering with concrete in several layers, the procedure must be repeated for each layer. The latter should also be treated with fine-grained sandpaper.
- The restoration must be completed by coating with acrylic sealant (it must be applied with a brush). And you can also cover the surface with a layer of varnish if you want to get a glossy surface; by the way, you can use it to change the color of the countertop. Afterwards, you need to sand the top again with fine-caliber sandpaper.
Volume tabletop with various fillings
This method is more labor-intensive, but it gives the kitchen interior an original and stylish look. As a filler, you can use any small items, whatever is at hand. For greater effect, it is recommended to select decor of several colors that are in harmony with each other. Contrasting combinations look good.
For finishing you will need:
- tempered clear glass;
- wooden slats;
- level;
- assembly adhesive.
| Step 1. | The table is strengthened and the surface is cleaned of dirt. |
| Step 2. | The tabletop is drawn into sectors, then along the marking lines they are glued to the edge of the slats. |
| Step 3. | The same slats are glued around the perimeter of the tabletop. A level is used to control the plane of the wooden frame so that the glass fits tightly to the slats. |
| Step 4. | Fill the resulting cells; the filler should be well leveled. |
| Step 5. | Glue is applied pointwise to the slats and glass is placed on top. |
Replacing the countertop
In some cases, restoring a countertop made of artificial stone or other material is impossible for various reasons. Then it is much easier and cheaper to buy and replace the surface than to restore it. You can make the replacement yourself. You will need the following tools and materials:
- drill with a set of different drills;
- electric jigsaw;
- files;
- fine-grained sandpaper;
- sealant;
- putty knife;
- pencil;
- pattern;
- roulette;
- square
You can replace the tabletop by proceeding as follows:
- Turn off water and other communications, then remove the sink.
- Remove the tabletop. This must be done extremely carefully, while preserving the elements that secured the surface to the table, for example, screws, corners and other fasteners.
- Clean the area where the new work surface will be installed in the future. Particular attention should be paid to the joints.
- If the new countertop for the kitchen table was purchased without holes for the sink and stove, then at this stage they need to be made. Although it is better to entrust this work to specialists, especially if it is a stone or glass product.
- The prepared surface should be installed in place. Before final fastening, you need to make sure that it lies strictly horizontally.
- Finish the installation of the tabletop using special corners. They will not only give the structure a complete appearance, but also increase its performance characteristics.
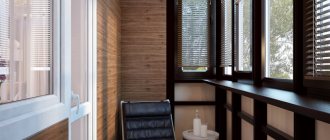
Unlimited possibilities of self-adhesive film
Kitchens covered with film look impressive both in photos and in real life. Surfaces are updated using vinyl or other film. The range of this material is amazing in its diversity, and the price pleases with its affordable price.
Decorative “self-adhesive” imitates:
- natural wood of different species;
- natural stone;
- ceramics and tile texture;
- leather and fabric.
In the photo - imitation wood.
Its texture can resemble patterned silk, a colorful tapestry or cute chintz. The material is produced in matte and glossy versions. There are films with holographic and mirror patterns. And all this can be combined with each other, creating interesting effects, changing an ordinary kitchen cabinet beyond recognition, as in the photo below.
The price of the film depends on the manufacturer and the decorative surface.
Vinyl “self-adhesive” is quite practical because it:
- not afraid of moisture;
- does not fade in the sun;
- does not respond to temperature changes.
With its help, you can completely update the design of both the kitchen and the bathroom, transform the kitchen cabinet or the entire set.
Adhesive film is a good budget replacement for a full-fledged repair. Of course, you need certain knowledge and skills, but the video will help you quickly understand the intricacies of the process.
Tabletop care
Proper care will help increase the service life of your countertop. There are five golden rules, the observance of which will allow you to update your work surface much less frequently:
- Use a cutting board to cut food, even if it's just one piece of bread.
- Do not place hot dishes on the countertop, even if the work surface is made of stone.
- Do not use abrasive cleaners to clean the surface. It is better to replace the latter with more gentle ones.
- Try to avoid hitting the surface, so it’s better to beat the meat in a different place.
- Do not leave the tabletop wet; it must be wiped dry with a cloth after each wash.
Despite the apparent simplicity of all update methods, in some cases it is better to trust the professionals. This is due to the need to have certain skills, tools and experience.
General tips for tiling countertops
The execution of work must be approached very carefully. It must be said right away that using tiles as finishing coatings for countertops is not the most optimal solution and has many risks, which we will talk about in this article a little lower. If for floor coverings such errors go unnoticed, then countertops react extremely negatively to them. What is the best tile to use?
Table. Types of tiles for finishing countertops
| Tile material | Brief description of technical parameters and operational characteristics |
| Ceramic tile | The cheapest and most common option in budget versions. In terms of mechanical resistance of the surface to various types of damage, it occupies a leading position and is far ahead of the properties of artificial and natural stone. The tile is covered with glaze, and this is glass, a very hard material. Ceramics have an unlimited choice of design solutions and linear dimensions. The disadvantage is great fragility. Ceramic tiles are completely non-plastic; when exposed to critical forces, they do not bend, but immediately crack. |
Porcelain tiles | In all respects it occupies a middle position between ceramics and natural stone. The tiles have different thicknesses and surface areas, the appearance most often imitates natural stone. The cost is cheaper than natural stone tiles, but much more expensive than ceramic tiles. It is made using synthetic resins - this is a significant drawback. Professionals strongly do not recommend using it for kitchen countertops. The lining has direct contact with food products, including hot ones. Under such conditions, porcelain stoneware releases harmful chemical compounds that end up in food. |
Natural stone tiles | The most expensive option, used only in exclusive interiors. Stone tiles are thick and are more often used as a countertop without various bases. Such kitchens are very prestigious and indicate the high social status of the owners. As for performance characteristics, natural stone is significantly inferior in all respects to the two described above. Its surfaces are easily scratched, the stone reacts with many chemical compounds, and cracks under the influence of moderate dynamic forces. |
Choosing tiles for countertops
We have outlined brief physical characteristics of the tiles, but there are also very strict requirements for the bases of the countertops.