Introduction: What is “Oil Painting Technique”?
Translated from Greek, the word “technique” means art, skill. In the case of painting, it is the ability to convey the plot of a painting with paints in a certain manner, to create beautiful visual images.
You need to know the basic techniques of painting, first of all, in order to learn how to create beautiful and durable works, to paint pictures using the most diverse and best materials, taking into account all their features.
In the modern creative world, especially with the development of production and technology, some artistic techniques have also changed, new techniques have appeared, sometimes combining the incongruous. In this article I want to tell you about some classical and modern oil painting techniques, knowing which will make it easier and easier for you to learn to paint and understand painting as such.
I talk in more detail about techniques and techniques in my master class on the theory of oil painting, registration for which is FREE. We won’t paint on it, but we will discuss in great detail everything related to working with oils! And after the master class, I will give you a free lesson on painting the “Starry Sky” painting so that you can immediately try out the knowledge you have acquired.
Register for the master class using the link - https://nyschool.ru/reg_artmk?utm_source=seo&utm_medium=blog&utm_campaign=allseo
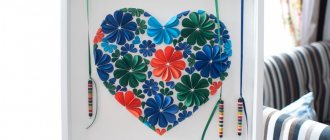
Volumetric bead paintings
We will need:
- beads of the desired color and size;
- threads;
- needles;
- ready-made plot for embroidery;
- frame.
If you have never dealt with embroidery and beads before, you can go the simple route: buy a ready-made bead embroidery kit. If you are ready to take on more complicated work, then you will need to choose a design for the future painting and independently select the necessary beads for it in the store.
Three-dimensional mosaic painting
The work will consist of stringing beads onto a needle and making bead stitches on a fabric base with design lines applied to it. This work is very similar to regular satin stitch embroidery. At the end of the embroidery, we also frame the resulting three-dimensional image.
Three-dimensional painting depicting autumn
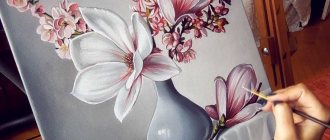
Glaze
The famous “Mona Lisa” by da Vinci and “Penitent Mary Magdalene” by Titian were painted using the glaze technique.
So, the first oil painting technique is the glaze technique. I have already told you in detail about this classic technique, so here I will dwell on it briefly.
Glazing is the application of paint in a thin layer to a primed canvas or to a dried layer of already applied paint. This technique is most often used when painting with transparent and translucent paints. It is because of these properties, and because you apply different colors of paint on top of each other, that you can achieve a beautiful and unusual effect, your own unique bright colors.
In addition to working with oil, this technique can also be used when working with watercolor paints, and less often with acrylic paints. If you combine transparent and opaque paints together, you can achieve a beautiful depth effect in the picture.
Volumetric paintings made of wood
Such paintings look luxurious, but require a lot of effort and perseverance. To work, you will need chisels, a special jamb knife, furniture varnish, stain and wooden cloth. You need to transfer the drawing onto the wood and cut grooves of different depths along the contour with a knife to give the image volume. Stain of different colors will add even more volume. Cover the finished painting with varnish.
Volumetric picture with glass
As we see, there are many opportunities to create a beautiful, unique thing with your own hands. The main thing is that the work gives you pleasure, and that the finished three-dimensional painting fits into the interior and becomes a source of pride in your skillful and hardworking hands.
Three-dimensional painting made of fabric
Alla Prima
Again, I already wrote a separate article about this popular technique, and also conducted a free online master class on the painting “Pomegranate” using this technique.
So what is so special about it that both beginning artists and professionals love and use it?
Let's start with the fact that translated from Italian, this word literally means “in one sitting.” That is, using this technique you immediately paint your picture. Don’t put it off for a long time to dry so that you can then apply another layer of paint, but finish the job right there on the spot.
My painting “Pomegranate” using the alla prima technique
This artistic technique can be used in both watercolor and oil painting. To work in this technique with watercolors, it is better for the artist to learn the basics and know what and how to paint - the paint will dry quickly, there will not be much time to work. There is also a risk of creating dirt on the paper if you don't know the basic principles of mixing paints. In any case, you can do the work using this technique, and then, once dry, go over it again with a brush and paint and place the accents necessary to complete it.
For oil painting, the alla prima technique is much more suitable. Unlike the previous, multi-layer technique, which is so loved by the masters of classical painting, the alla prima technique involves paintings in one, first and last layer. Therefore, such work will look more fresh, lively and dynamic. Landscapes and still lifes with oil using this technique will look especially beautiful.
By the way, the fact that oil paint takes a long time to dry has its own advantage specifically for the alla prima technique: if you don’t like some aspect or result, you can easily correct the work, at least within a week.
Volumetric Oil Painting – and at the same time – sculpture!!!
This HANDMADE THREE DE PAINTING can be viewed from all angles. The Idea itself is a “well-forgotten old” invention, but it is fraught with magical possibilities of incredible self-expression - the wildest fantasies of ARTISTS, and for some reason - has not yet been used by anyone.
Here's the video:
Incredible 3D goldfish painted in layers of resin
Japanese artist Riuzuke Fukaori paints three-dimensional goldfish using a complex resin casting process. The fish are meticulously painted, layer by layer, each brush stroke has its own texture and properties - metallic, matte, pearlescent. Each layer of resin is 1–3 mm.
Every part of the fish is drawn in such detail that it looks like it was printed using a 3D printer. Be sure to watch the video - it's incredible!
The depth of color, meticulous detail, and optical illusion make these works of art both painting and sculpture.
Fukaori's exhibition "Saving the Goldfish" has just closed at the ICN Gallery in London, and at the end of the video you can see the logo of the exhibition - a large goldfish.
- this is based on materials from the Internet, I’ll add on my own:
This idea may be missed and forgotten again; I specifically put it in the title of the topic - not FISH. Since back in the middle of the 20th century - almost every taxi driver on the handle of the gear lever could see a ROSE or SPIDER, SKULL, DOME cast in resin - the fantasy of the “sidekicks” of the craftsmen - fundamentally did not go any further. And the idea remained at the level of souvenir nesting dolls.
And even the most successful computer 3-D models - laser-crunched inside a plexiglass cube - somehow also remained in the souvenir sector. AND THEY CAN BE OBSERVED IN MANY SOUVENIR STORES.
These goldfish differ only in that their craftsmanship is clearly higher than the “matryoshka” level.
Now imagine that if you add to this type of image - High Artistic Skill, all available Creativity, Invention and Fantasy, then the possibilities for self-expression are simply endless. If, in addition to dabs of paint, you experiment with materials that can be used to realize the most daring ideas (for example: finely colored dust placed in a special way, “frozen” in layers - can create atmosphere and depth) - play with lighting - which can also be made moving - which will enliven “painting floating in space.” The further the idea moves away from “souvenir”, the more gorgeous the result will be.
The simplest subjects that come to mind at random are only the beginning of what this type of art can do:
The fairy-tale Neuschwanstein Castle, nestled in the picturesque Alps (any castle more beautifully crafted than Disney's will be a hit in any gallery)
Underwater landscapes, sunken ships and other diving exotics.
Outdo the design of the flora and fauna of the planet from Avatar - this design is not the limit for the ARTIST
And much more.
Resin (with a large product format) - the result will not be the cheapest material, but if you take on making not just another “matryoshka doll” - namely a Luxury product, then it should not be cheap.
As they say: Every soldier... once becomes a general...
- so why waste your time on trifles?
PEES: this is when cheap illustrations completely lead to boredom - why not experiment and treat yourself to pleasant activities
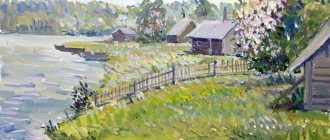
Overlaying strokes
Another very interesting painting technique is painting with brush strokes. Moreover, there is both rough, impasto (we will talk about it below) and less voluminous.
This technique is used to show and convey all the beauty of the paints and the artist’s color palette.
It is in this technique that knowledge and ability to mix paints is very important. To paint with strokes, you will need to create specific color combinations and divide them into strokes and then apply them to the canvas.
Initially, it may seem that this is just a set of strokes of different colors, but when the picture is ready, you will see the completed work, striking in its richness and dynamism.
Claude Monet loved to paint with brushstrokes. His famous painting “London. Parliament" was written in precisely this technique. Thick and grainy, the brushstrokes cover the entire canvas, enhancing the hazy effect and conveying a wonderful play of light.
Three-dimensional paintings made from putty
You've probably already worked with putty. For example, sealing seams before painting or smoothing out cracks in the walls before wallpapering. Having minimal skills in working with a spatula, you can try to make a three-dimensional picture from putty with your own hands.
Volumetric painting with roses
We will need:
- putty;
- primer;
- spatulas of different widths;
- water-based and acrylic paints.
First of all, it is necessary to prepare the surface: level, seal cracks, prime and clean with sandpaper. Next, use carbon paper to draw the outlines of the future painting. Then measure out the required amount of putty, dilute with water and stir thoroughly until a homogeneous mass is formed.
The easiest way to create a three-dimensional image from putty is to work with a spatula. With its help you can create simple ornaments, abstractions, tree branches, flowers. Place a small amount of putty on a spatula and apply to the desired location.
The excess can be cleaned off later, but now you need to apply the composition wherever it is needed.
Volumetric picture made of chiffon
After some time, the composition will harden somewhat, and it will be easier to give it the desired shape. Run a damp brush over the finished image; this will smooth out any unevenness and give it soft outlines.
Three-dimensional painting made of putty
After drying, you should clean off any excess with a piece of sandpaper, being careful not to remove any excess. The finished painting is painted over with primer again. Then you can start working with paints and a brush. Finally, apply acrylic varnish to the image. Now the painting will not be afraid of water.
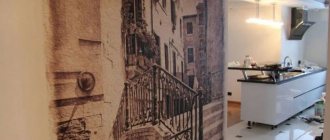
Three-dimensional painting on the wall in the bedroom
Impasto
This is an oil painting technique, thanks to which you can achieve a very beautiful and voluminous effect in your works! Again, translated from Italian, “impasto” is a pasty, dense layer.
Here the strokes will no longer be so thin and light; on the contrary, the thicker and more voluminous you apply the layer of paint, the more textured your work will be.
This technique is characterized by the use of various spatulas, palette knives, and wide brushes with coarse bristles. Some sometimes even use their own fingers to create a unique and unique stroke. They say that even the great Vincent Van Gogh himself did this when working on some of his works.
"Starry Night" by Vincent Van Gogh, painted using brush strokes
If you want your painting and strokes to be even denser, then you can add texture paste or other additional decorative materials to the paint.
And if you work with “pure” colors, without mixing paints on the palette, then for convenience and greater originality of the painting, squeeze the paint from the tube directly onto the canvas!
Dry brush
You've probably already heard about this technique and know about it if you studied in my course “Fundamentals of Portraiture”. And if you haven’t yet, you’ve probably seen street artists sitting on Arbat or Nevsky Prospekt, or any other busy tourist street or embankment. So, almost always these artists paint portraits of passers-by using the dry brush technique! They write quickly, in about 15 minutes, using oil paints.
Actually, it was street artists who laid the foundation for this technique in the 80-90s of the last century. Many classical painters never recognized this technique as a real, academic one, and consider it more of a commercial painting technique because of its shading technique.
The essence of this technique is that you apply oil paint to the canvas with a dry brush and begin to intensively shade it, creating a sort of graphic effect. Hence the great similarity between portraits using the dry brush technique and photography - you literally draw every detail.
My works using dry brush technique
Do-it-yourself volumetric paper paintings
The easiest way to start is with a paper picture - paper is cheap, it’s easy to buy, and the range in stores is huge. To create a three-dimensional picture we will need:
- paper;
- stationery knife;
- scissors, paints;
- colored cardboard;
- PVA glue;
- frame with low sides;
- suitable plot.
Take the glass out of the frame and cover the backing with plain paper. It will serve as a background. Creating three-dimensional parts involves bending a piece cut out of paper or cardboard and partially gluing it to the background. Individual parts must be painted and allowed to dry before gluing.
Paper 3D painting
Three-dimensional painting made of wood
Butterflies, flowers, animal figures, and bouquets glued in this way look beautiful. The applique will be successfully complemented by individual elements made using the quilling technique. This is the name given to long strips of paper arranged in a composition, twisted into spirals. We will put the finished three-dimensional painting back into the frame and place it in a permanent place.
Three-dimensional painting in the nursery
Three-dimensional painting made of plaster
Reception of contrast of light and shadow
Another favorite technique of painters of the classical school is playing on the contrast of light and shadows.
Translated from the same Italian, “chiaroscuro” means “light dark” and gives the name to a painting technique in which light and shadow must reach a certain balance.
This technique originated in the 16th century, when artists played on contrasts to make their paintings with already dark and exciting subjects even more dramatic.
The works of Michelangelo Merisi da Caravaggio and Giovanni Baglione are a striking example of this technique.
In Russian, the name of this technique sounds like chiascuro. This technique helps to create a certain illusion of relief and volume by creating a color effect.
Volumetric paintings made of fabric
Each needlewoman has stocks of fabrics and many scraps left over from sewing. A good housewife will always find a use for them. Patchwork, a patchwork technique, has been known for a long time and combines the beauty of well-chosen patches and practicality. A skilled seamstress will be able to create from them a real work of art that you will want to look at for a long time.
Three-dimensional painting made of coffee
Volumetric fresco painting
To create a three-dimensional painting from fabric we will need:
- frame;
- scraps of fabric;
- batting;
- multi-colored threads;
- needles;
- sewing machine with zig-zag function;
- liked the story.
First you need to disassemble the frame: take out the glass and the backdrop. Cover the backdrop with batting and leave it for now. Choose a large piece of fabric that is suitable in color and size, which will serve as the background. You need to transfer the contours of the future painting onto this background using carbon paper. Then transfer the outlines onto tracing paper again and cut out. So we got a “pattern” for which we will select patches of suitable color and size. This process can take quite a long time until the pieces come together nicely.
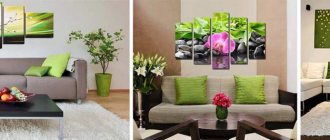
Three-dimensional painting for the kitchen
Three-dimensional painting with embroidery
Now the pieces of the picture need to be stitched onto the background on a sewing machine, using a fine zig-zag and choosing matching or contrasting threads. Individual small elements of the picture can be embroidered by hand. At the end, the finished fabric appliqué is carefully pulled onto the backdrop over the batting and secured to the back with glue. Now you can assemble the frame by inserting the glass and the backdrop with the finished picture.
Three-dimensional painting made of multilayer paper
Another technique for creating three-dimensional paintings from fabric is to cut out individual parts of the painting from thick cardboard, stick foam rubber of the same size on them and cover it with fabric on top. After all the parts are covered with fabric, they should be assembled on a backing and glued tightly to each other, without leaving any gaps.
Three-dimensional painting of coins
Combination of different techniques with each other
Artists have always been and will be in search of new forms, materials, new sounds. Classic is good, but what happens when you combine some basic classical techniques? Will it turn out to be such a beautiful and interesting technique? And what techniques can be combined together in one painting?
You can combine the glazing technique with opaque paints, that is, corpus letters. Or, selectively and optionally apply impasto strokes onto a completely even and smooth painting.
The main thing here is to choose artistic techniques so that they contrast with each other. Then, based on the technique described above, you can achieve an unusual effect and attract the viewer’s attention to the idea and main problem of your work.
Volumetric paintings made of leather
To create such a picture it is not at all necessary to buy expensive new leather. Whole pieces from worn-out items will be used: bags, boots, raincoats and even gloves. Leather can be painted with acrylic paints if a suitable color is not found. In general, the technology for creating a three-dimensional painting from leather is no different from the same one from paper.
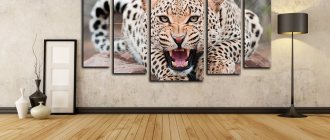
Three-dimensional painting in the living room
Three-dimensional painting in high-tech style