After the entrance doors are installed, the next step is finishing the slopes. It is best not to delay this, since unsealed slopes not only spoil the appearance of the hallway, but also dust and dirt are constantly getting into the apartment from them.
Modern materials make it possible to make door slopes using a variety of methods and materials. These are various plaster mixtures, decorative panels, glue and frame methods. This article will discuss in detail the technology of covering door slopes using laminate.
Selection of window sill material
Balcony window sills are made of wood, plastic, chipboard or natural stone. Which material to choose depends only on your preferences and financial capabilities.
Tree
To make wooden window sills, pine, ash, oak, cherry, and beech are used, which are well dried, then the surface is polished and treated with antiseptics, mastic made from natural oils and wax to make it waterproof. Despite all the advantages, such window sills have a significant drawback - they are afraid of moisture, so they cannot be washed with water, but only wiped with a dry cloth and treated from time to time with special antiseptic and protective agents. Therefore, for a balcony, where there is always high humidity, it is better to use more stable materials.
Plastic window sills are in greatest demand. This is not surprising, because such products are strong, durable, have excellent heat-insulating properties, do not rot or decompose, and are resistant to aggressive environments. They are easy to care for. In addition, you can make a window sill for the balcony from PVC with a pattern, for example, imitating the texture of wood or marble.
Chipboard and MDF
They are well-compressed wood shavings covered with a laminate. They are strong and rigid, wear-resistant and easy to maintain, but you need to ensure the integrity of the laminating layer. There is a choice of color and pattern, which can also imitate natural wood, granite, marble. A significant advantage is their lower price compared to natural materials.
Chipboard window sill
A natural stone
A window sill on a loggia or balcony made of this material looks rich and elegant. Marble, granite, onyx, labradorite and others can be used. The most durable stone is granite, but you should know that it tends to accumulate radiation, so when purchasing such a product you need to ask the seller to show a certificate of its safety. Natural stone window sills are resistant to abrasive cleaning agents and colored liquids, such as tea or coffee.
Window sill made of natural stone
Fake diamond
Its properties are in no way inferior to natural, and in some cases even surpasses it. Dyes are used in production, so you can choose any color. Balcony window sills made of artificial stone are very strong, durable, not afraid of impacts, and are also cheaper than their natural counterparts. Disadvantage: not resistant to abrasives. But scratches can be eliminated using polishes.
Window sill made of artificial stone
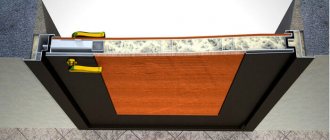
Installation of a slope using liquid nails and foam
If the width of the slope does not exceed 20-25 cm, the laminated panel can be installed using liquid nails and polyurethane foam. The method requires a minimum of time, and the result is good.
Preparing the slope elements
Laminate door slopes consist of three parts: two side parts and one top part. If the slopes are made at an angle, then one edge of the sidewalls will be beveled.
This is what the “pattern” for a slope made of MDF or laminated chipboard looks like:
Measure the distances from the door jamb to the corner in several places, cut the strip to the required width and height. The cut out sides should be a couple of centimeters higher than the required length - just in case they missed the dimensions. You can cut it off, but you can’t build it up.
You try on the sides, insert the top. If the edge is flush with the main wall, and the gaps near the door frame are minimal, everything is done correctly. If there are mistakes, we correct them.
After cutting off the parts, try them on on the spot.
Then the outer edge of the chipboard or MDF is trimmed - a trim film is glued on: you do not nail the platbands to the very edge, so that some part will be visible. That's why it needs to be decorated. You can do without trimming if you trim the edge with a matching decorative corner. But it is made of plastic, and how good it will look is a question.
It is easy to apply the trim film. It is on an adhesive basis. Only the edge should be smooth and clean - free of dust and dirt. Glue the trim strip evenly onto it, then take a dry cotton fabric that does not fade, and iron the end through it with an iron (at medium power). Then it sticks tightly, but all the irregularities are visible, so saw off evenly.
If you can choose a plastic corner to match, it looks good, and there is less work: it is glued with liquid nails or silicone
If a telescopic platband is used at the final stage of finishing the slope, a groove is made under it using a milling cutter in the laminated end. The width is exactly for the tenon of the platband, the depth is a little more than required so that it “fits” well. For a regular MDF platband you don’t need anything. It simply sticks onto liquid nails.
Installation of slopes
Having completed all the preparations, we begin to install slopes made of MDF (laminated chipboard). The end facing the door is coated with liquid nails. It is better to take a transparent composition - it will not be visible. The jamb to which the MDF is glued is degreased. Having pressed the sidewall, it is placed in the desired position, checking the verticality and maintaining the same indentation. Then peel it off and wait until the glue dries a little. After 5-7 minutes, the fragment is installed in place, checking the position relative to the walls.
The second side panel is installed in the same way, and then the upper part. The top expands additionally: spacer wedges are installed above the place where it joins the sidewalls. This will prevent the trim from bending and additionally “pinches” the sidewalls.
Having installed all parts of the MDF slope, place wedges at the top
Fixation
After the wedges are inserted, check whether everything is aligned correctly and evenly. If everything is fine, take the foam and place “patches” in the gap between the panel and the wall - apply a small amount of foam in islands. They should be full depth, but not wide. There is no need to fill the entire volume: a lot of foam will be required, and it may bend. Therefore, make islands.
After polymerization of the applied foam, the slope fragments are held rigidly. Now you can start filling the empty space. It is also more convenient to seal it with foam, but not to the full depth, but only in front.
The procedure for fixing slopes made of laminated fiberboard
After the foam has hardened, its excess is cut off with a knife. You can start finishing.
Installation of platbands
This part of the work is carried out in a standard way: first, one side panel is measured and cut, then the top one, then the second side panel. After trying on everything folded and checking the accuracy of the joining, the platbands are installed on foam or liquid nails, depending on the situation.
How to plaster slopes is described here.
Plastic cladding
- Along the perimeter of the opening, wooden slats or a profile are attached to the wall. Their installation must be carried out using a level, but it is better to stretch 2 cords from top to bottom at the 2 vertical ends of the opening. The distance from the threads to the wall depends on the thickness of the profile. The sags are set level and attached to self-tapping screws, which are screwed into the upper and lower parts of the opening. Along these planes, base profiles are nailed to the ends of the wall with dowels. The plane above the box is built using horizontal threads.
- The starting bar is nailed close to the box.
- Plastic panels are cut according to the vertical and horizontal dimensions of the opening.
- Vertical sheets are installed and fastened with self-tapping screws to the slats.
- The top panels are placed and also secured.
- The finishing profile is installed.
- Corner joints are sealed with sealant.
- sander;
- jigsaw;
- impact drill or hammer drill;
- screwdriver;
- hammer;
- carpenter's knife;
- level.
You can choose the most suitable method for constructing slopes based on the availability of a particular material, economic or design reasons.
The technology of such work involves several stages. Preparatory work is carried out in the following sequence:
Slopes can be plastered with ready-made mixtures sold in stores, or you can use cement mortar. The finished mixture is applied to the surface with a special grater. You can also use a small spatula. The solution should lie very evenly; it must be constantly leveled. Flatness is checked with a building level. When the plaster is completely dry, it is treated with primer paint.
The slopes begin to be installed after the primer has dried well. Gluing is carried out with liquid nails or special synthetic glue. All work is carried out using the following technology:
Good to know! To avoid holding the laminate blanks while the glue sets, you can install wooden spacers if the opening is made of wood.
What are the types of doorways?
Before you design the doorway, let's figure out what kind of entrance doorways there are.
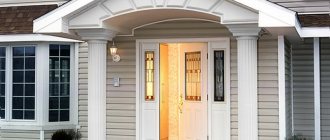
- The classic regular rectangle is the standard, most common option. No matter how strange it may sound, deciding how to decorate the doorway of an entrance door with classic shapes is the most difficult thing. You can decorate with anything, but the problem is the large selection of materials, which can be difficult to decide on. The main advantage is that decorating rectangular doorways with your own hands will not cause much difficulty.
- The arch looks more impressive, but finishing the door slopes after installing an arched entrance door is technologically more difficult. Plus, not all materials are suitable. If you don’t count the branded linings that come with the door, then all that remains is plaster, drywall and elastic polyurethane slopes.
Advantages of using laminate panels
Such a familiar finishing material as laminate has a number of advantages over other materials for slopes.
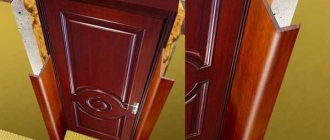
Speaking about finishing the opening after installing a steel entrance door to an apartment or house, it is worth noting that this type of door involves installing the structure in a fully assembled state. Such technology will inevitably lead to consequences in the form of impressive cracks. Owners often decide to finish the resulting gaps with laminate with their own hands.
The advantages of this solution:
Interestingly, slopes made of laminated panels are not very easy to visually distinguish from natural wood. The space acquires a decent, complete look with minimal costs for finishing materials. In some interiors, such as loft, Scandinavian style, minimalism, the use of laminate for door slopes becomes an ideal solution.
Pros and cons of laminate for finishing slopes
Flooring material began to be used in this form for many reasons:
- a large selection of colors and textures, so the material can be easily matched to other interior items;
- high strength and wear resistance;
- resistance to mechanical stress;
- easy to maintain - just wipe the surface with damp textiles;
- attractive appearance.
But laminate has one significant drawback - exposure to moisture is contraindicated. Therefore, such finishing is permissible only in the apartment, but not on the outside of the house. The same applies to temperature fluctuations, under the influence of which the lamellas are deformed. You should not cover slopes with them in damp, warm rooms, for example, in the kitchen and bathroom. Plastic is more suitable there.
Advantages of design
The popularity of finishing slopes with laminate is due to the advantages of this material:
- Economical. For installation on walls, there is no point in choosing an expensive coating of a high strength class - the load on the internal surfaces of the openings will be insignificant.
- Long service life, moisture resistance.
- A wide range of laminate flooring - a variety of colors and shades of material, types of textures (imitation wood, tile, natural stone, leather).
Cutting laminate and assembling it will not be difficult for a person doing this work for the first time.
This is interesting: Entrance doors with a mirror: reliable protection and stylish design (21 photos)
Preparing for work
The preparatory stage includes the following actions:
- to avoid contamination or damage during work, cover the door or window frame with masking tape;
- if you need to connect a switch for lighting devices, think over and outline the cable routing diagram;
- provide free access to openings, remove curtains, move furniture and prepare all necessary materials and tools.
Selecting the best materials
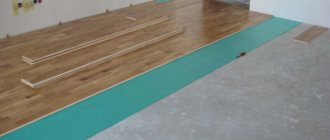
To decorate door or window openings, laminate is suitable, which is left over after covering the floors in the apartment.
If there are no such residues, buy panels intended for residential premises. The optimal thickness of the product is from 6 mm to 8 mm. An important selection parameter is the environmental friendliness of the laminate (formaldehyde emission class) - the “E1” sign on the product packaging indicates that the amount of organic compound emissions is safe for human and animal health.
Before purchasing, make sure that the surfaces of the material are intact and that there are no dents or cracks. Compare the shades of the stripes - there may be differences in the color of products in the same package.
What tools are needed?
Before starting work, prepare the necessary tools:
- metal square;
- roulette;
- pencil;
- jigsaw or hacksaw for metal;
- rule;
- level.
If installation involves arranging a frame, you will additionally need:
- perforator;
- screwdriver;
- metal scissors.
- laminate;
- profiles or wooden beams (slats);
- polyurethane foam or adhesive;
- self-tapping screws;
- dowel-nails;
- wooden planks or decorative corners for finishing slopes;
- primer.
How to do it yourself?
The initial stage of finishing the openings with your own hands is to prepare the rough foundation.
Preparing the base
Follow these steps:
- eliminate all protruding areas on the surface of the opening, remove peeling paint or plaster;
- Clean all surfaces to be finished from dust with a moistened sponge, wait until the surfaces dry;
- plaster or foam all holes and cracks.
Regardless of the method of constructing slopes, be sure to treat the rough base 2-3 times with a primer mixture - this will prevent the development of mold and mildew under the laminate.
Marking and cutting
First of all, use a tape measure to measure the openings, taking into account the angle of deviation of the slopes from the door or window. When using a horizontal method of arranging the laminate and interlocking the planks, apply the markings to the pre-assembled material.
Please take into account that the decorative covering of the slope should extend onto the window or door frame by a few millimeters. Measure the sides of the openings only after preliminary “trying on” (without fixing) the top laminate strip.
Advice
Make sure that the covering does not interfere with the opening of the window or door.
Transfer the pencil markings onto the laminate and start sawing:
- If you use a jigsaw, use a knife to cut through the protective film on the front side of the laminate (along the marked line), fix the bar with the outer side down. Set the power tool to a high speed and smoothly, without moving the jigsaw from side to side, cut the material.
- A hacksaw with fine teeth is also suitable for working with laminate. To avoid chipping, apply masking tape to the cut line. Perform the process with the plank facing down.
How to decorate the front door or window?
The installation of panels also begins with the installation of the top panel.
Mounting on a profile frame
- Remove any remaining foam after sealing the cracks around the perimeter of the door or window frame.
- Drill holes and use dowel nails to secure vertical profiles on the inside, adjacent to the window or door, and on the outside of the opening. Attach the plank with one side to the wall.
- Install horizontal slats at the bottom and top of the sides of the opening. Also fix the transverse profiles on the upper section of the opening. Thus, you will form 3 perimeters from the profiles - 2 side and 1 top. If the opening is large, secure several more cross bars between the guide profiles.
- Screw the laminate to the frame using self-tapping screws.
On a wooden sheathing
- Drill holes of the required diameter and secure wooden slats along the inner and outer perimeter of the opening.
AdviceBe careful - the frame elements should not protrude above the wall surface.
- To create additional structural rigidity, fix several more transverse slats into the vertical posts of the sheathing.
- If the surface of the slats corresponds to the location of the parts of the laminate and the area of their contact is sufficient, glue the sawn parts of the floor covering to the frame. Otherwise, screw the laminate with self-tapping screws.
Cover the heads of the screws with furniture plugs that match the color.
By glue method
Level the rough base:
- Mix the amount of plaster required for the job.
- Scoop the solution onto a spatula and apply it to the surface of the base, starting from the bottom of the slope and moving upward.
- Apply the rule and lift it up, leveling the layer of plaster. After the procedure, inspect the surface - if there are unevenness, add solution to these areas, repeat the leveling procedure with a spatula with a wide blade. Check the evenness of the base with a level.
- After the solution has dried, work the slopes with a construction float in a circular motion, paying attention to the corners.
- Cover the surface with primer mixture 2-3 times.
When the slopes are dry, start gluing the laminate: apply glue to the back side of the laminate, press the material to the plastered surface, and hold for a while.
Attention
To prevent the panels from moving, secure the top strip with masking tape and the side strips with spacers.
Why is it necessary to install slopes on the door opening?
To give the doorway a finished look, laminate parts are installed. In most cases, the installation of such elements must be performed after replacing a door with smaller dimensions.
If a beautiful door is decorated with ugly slopes, it will take on an unsightly appearance. The reason is very simple - when the old box was dismantled, the side walls of the opening were damaged. In order to avoid making additional repairs and re-forming slopes when the use of wet mixtures is impossible, laminated boards will come to the rescue.
More recently, door slopes were installed only in certain cases:
- when strengthening the entrance block itself;
- for a beautiful design.
The development of design, the emergence of a large number of finishing materials - all this became the starting point for the use of laminate slopes
Today, such finishing of openings is considered very important for giving the interior a certain shape.
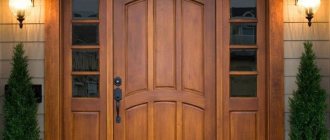
Finishing the opening with laminate with built-in lamps
Laminate selection criteria
When choosing this material to make laminate slopes, it is recommended to adhere to the following rules:
- There must be compatibility of both types and shades of flooring and door leaves with slope cladding.
- It is better to avoid contrasting colors; as a rule, this is a sign of bad taste.
- When choosing an expensive wear-resistant laminate, you must also take into account the fact that after 15 or 20 years, the interior of the room in which a particular laminate door frame is located may change significantly, and perhaps more than once.
- The slopes on a laminate door look good, matching the color of the door itself.
- An important role is also played by the plinth, which should also be in harmony with its color both with the color of the floor and doors, and with the material of the slopes.
If you are covering the floor with laminate, then given that in this case there are almost always many pieces of different lengths left, think about whether they can be used to cover the door slopes. This, on the one hand, will allow you to save money, and on the other hand, it will be a deliberately beneficial solution from the point of view of observing the laws of aesthetics and ensuring a combination of shades.
Sources
- https://okcomfort.com/okna/otkosy/iz-laminata-svoimi-rukami.html
- https://pol-master.com/dizain/otkosy-iz-laminata-na-okna.html
- https://vlasta-dv.ru/otkosy/otkosy-iz-laminata-na-okna.html
- https://esto-okna.ru/steklyannye-konstrukcii/otkosy-iz-laminata.html
- https://EuroKafel.ru/klej/otkosy-iz-laminata-na-okna-svoimi-rukami.html
- https://vadim-dekor.ru/lkm/otdelka-okonnyh-otkosov-laminatom-2.html
- https://MistNN.ru/kraski/otdelka-okonnyh-otkosov-laminatom-2.html
- https://stroy-rem.net/otkosy/otkosy-iz-laminata-na-okna.html
- https://laminatepol.ru/6135-otkosyi-iz-laminirovannyih.html
- https://RoomPlan.ru/dekorirovanie/otkosy-iz-laminata/
Preparatory work
All types of finishing of door slopes require surface preparation. However, it will be the same in any case.
You will need to do the following:
- Cover the door and frame with masking tape and film. This measure is necessary to protect them from damage and various contaminants.
- Trim off any protruding elements that may interfere with installation. If necessary, you can apply a thin layer of plaster.
- Then the surface should be primed. It is advisable to purchase a deep penetration primer. Of course, its price is a little higher, but it is worth it since it is very practical.
Soundproofing iron entrance doors for apartment doors prices with - tunnelexitblogfc2com.free.bg
Rated 4 /5 based on 419 customer reviews August 29, 2019
Kg price for 1 waterproofing bitumen per
Download Technological Regulations Technological Regulations for design and. At the same time, almost single-layer structures imply the use of (plasterboard.
Fused roof vapor barrier device
Warm floors in a frame house - how to do it? Navigation1 Repair of soft roofing Required repair safety measures. At.
For hip roofing materials calculation
Cut-off waterproofing TechnoNIKOL 200 20x0.2 m at a competitive price. 20 m. Material. waterproofing the seam between the wall and the foundation. buildings etc.
Bridge span structures waterproofing
08/04/2011 · dosya, I can only offer the option of dismantling the roof covering made from rolled materials. Garage roof repair from Garage roof repair in St. Petersburg Included in price.