New technologies have made it possible to create inexpensive mixtures from which you can create an epoxy self-leveling floor. You should be careful when choosing such a coating. Choose epoxy floors only from reliable, trusted manufacturers.
The main composition of the mixture is liquid epoxy resin for pouring the floor. If the mixture should be of an aesthetic nature, particles of flock and quartz can be poured into it. You can fill the floor with epoxy resin with your own hands and make it a bright decorative element if you follow the instructions for doing this work.
Pros and cons of polymer floor coverings
There are two types of self-leveling floors: organic binder and polymer. On organic it is based on Portland cement and gypsum, on polymer it is made of acrylic and polyurethane. Despite the fact that they are all “liquid”, they have quite serious differences. So we need to clarify what specific type we are talking about. We'll take a closer look at acrylic, touching on polyurethane along the way. These are the advantages of polymer flooring.
Two-component epoxy floor coating just needs to be mixed and applied.
- Polymer self-leveling floor spreads much better, even expensive compounds with organic binder. Their minimum layer is 1 mm, on cement or gypsum binder - from 5 mm. And if you use polymer-based paints, the layer will be from 0.5 mm.
- They do not generate dust, even after the top layer is worn out, because there is nothing to generate dust. According to the technology, the concrete base is primed, and then a polymer composition is applied. So, the soil itself makes the concrete low-dust. This, by the way, is the cheapest and most effective way to remove dust from concrete.
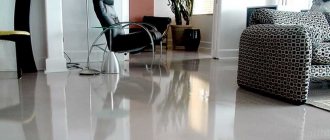
Epoxy self-leveling floor - the most hygienic coating - And the polymer coating wears out much less than even high-quality concrete coatings. The leader here is polyurethane - it is almost indestructible. But even good quality epoxy resin, especially with mineral fillers, wears off very little. Less than M500 concrete.
- Polymer self-leveling floors (PNP) do not peel off. Or rather, you need to greatly violate the technology (not use a primer or the wrong composition, apply it to wet concrete) for this to happen.
- Due to elasticity they absorb shocks. Chips and dents appear rarely, from very serious loads.
Epoxy coating is durable, beautiful, hygienic - Polymers - epoxy resin and polyurethane - do not allow moisture to pass through. Some species also do not carry out steam. This seems good, but if it is guaranteed not to get wet from below. That is, in order not to flood the neighbors below, this is an excellent choice. But laying it on the ground can be dangerous. If the waterproofing on the lower layers leaks, the water, unable to find a way out, will undermine the coating.
The disadvantages of polymer self-leveling floors are serious, but there are not so many of them. The main one is the price. They cost 10 times more than good brands of self-leveling floors based on cement or gypsum. But their consumption can be several times less - they begin to level out from a few millimeters. However, in order for the layer to be small, the base must be perfectly flat. And this is not easy. And one more point: it is better to pour polymers onto a base with a cement binder. They adhere less well to plaster. Well, the disadvantages include the fact that they get scratched and become less attractive. True, the attractiveness is restored after polishing.
How I remove chips from laminate flooring using a piece of topcoat and glue. I'm telling you from personal experience.
It happens that very unpleasant things happen, for example, such as the formation of chips on a LAMINATE type floor covering.
This problem occurs quite often. In most cases, it causes the development of further problems with the flooring, such as moisture ingress and swelling of the base itself. Subsequently, this cannot be corrected without replacing the damaged element with a new one.
Also not an unimportant factor is the spoiled aesthetic appearance, which will constantly spoil the mood. Since you don’t want to, you will definitely fix your gaze on the damaged area.
In order to avoid damage to the entire coating and the hassle associated with dismantling and replacing the damaged element, I bring to your attention a wonderful restoration method that has helped me out more than once.
Forget about waxing and other temporary measures. We need it to be of high quality and for a long time!
Step one. Search for a donor.
For restoration we need a donor, it’s good if you have leftovers from the laid laminate. If not, then it doesn’t matter either, you can use any place hidden from view - for example, areas behind the baseboard or under the thresholds.
Step two. Surface preparation.
It is necessary to designate the area to be restored. Clean and degrease the surface. The same applies to the donor.
Source
Types of Epoxy Floor Coatings
Epoxy floor coating is a composition based on epoxy resin. This type of self-leveling floor is cheaper than polyurethane, but still much more expensive than cement. It can be one or two-component (consists of components A and B). Poured onto a concrete base. The minimum layer is 1.5 mm, the maximum is 4-4.5 mm. Usually they try to make the layer smaller, since the material is expensive. This is only possible on a flat concrete floor. To reduce consumption, preliminary priming is carried out. There are special priming compositions, but you can also use a diluted base composition.
You can make an epoxy self-leveling floor with your own hands. I mean, you can mix, pour and distribute
Epoxy self-leveling flooring can be transparent or dyed in the paste. Painted ones can be plain or with color transitions. You can fill it in stages, creating patterns and designs. The surface can be glossy with varying degrees of gloss, or it can be matte. Those same 3D floors are the same transparent polymer compound applied to a picture spread on the floor.
Fillers may be added to clear or colored compositions. Both natural - stone or mica chips, for example, and artificial - various sparkles, phlox, etc. In general, the appearance is varied.
Epoxy resin - what is it
Epoxy resin is a strong, durable material. It is able to withstand severe physical stress and mechanical stress.
Its distinctive feature is the variety of types and colors - with their help you can create a unique design for any room.
Properties, positive and negative points
Epoxy self-leveling flooring is not that new. It just began to be used not so long ago - 10-15 years ago. It’s worth saying right away that before hardening, epoxy resin releases toxic substances. Therefore, you need to work in a respirator. Just a “ventilated room” will not provide the required level of safety - you can get poisoned. So if you are going to pour epoxy floors yourself, stock up on protective equipment.
Even if you are making an epoxy floor only for yourself, and will not do it professionally, you need protective equipment. The main thing is a respirator and a protective suit
pros
Why is it still used? After all, it’s expensive and unsafe... But because the properties of epoxy self-leveling flooring are ideal for some industries or situations:
- Very “sanitary” coating. Doesn't absorb or absorb anything. Resistant to oils, chemicals, paints. Everything spilled on the surface remains. Due to this property, it is always easy to wash/clean. Therefore, it is often used in industries where hygiene is very important.
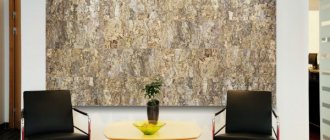
Epoxy resin flooring is not perfect, but it is hygienic. In the bathroom, shower, toilet, hallway and kitchen - this is perhaps the best option - Dense, smooth, durable. The surface is smooth and hard. There may be problems with household use, since the surface is slippery when wet. There are non-slip variations with quartz sand, but they are good for industrial premises, garages, etc. They are not used at home because, well, they don’t look “homey” at all, and they are difficult to clean. There are also those in which dullness and some roughness are achieved by adding special substances. A small layer of matte resin forms on the surface. But under significant load, it can wear out, which looks unsightly. In principle, it is almost impossible to erase epoxy resin in the house. And for production, such coverage requires updating.
- Epoxy flooring feels a little “softer” than tile. Due to its greater elasticity, it absorbs shock loads better. But if you drop something really heavy, it may chip.
The positive aspects include the seamlessness of the coating. You can also have the degree of gloss that you need. In some interiors, such a floor is simply a godsend. And it is difficult to replace it with something else.
Minuses
The disadvantages of acrylic self-leveling floors include high requirements for the base (more details below). Another minus is that the epoxy self-leveling floor is not as wear-resistant as we would like. Wheeled chairs will leave marks on it. It also gets scratched by high-heeled shoes. Where they walk more, changes will be clearly visible - less shine, more scratches. The appearance is restored by sanding, but with a coating thickness of several millimeters, you can’t sand it much.
Epoxy coating is the sequential application of polymer-based materials to a concrete base.
For longer service without changing the appearance, it is recommended to apply two layers of polymer (polyurethane) varnish over the epoxy coating. Polyurethane is much stronger and scratches less often. Why not use a self-leveling polyurethane compound then? But because it turns out to be almost twice as expensive.
Epoxy resin flooring is repairable. Yes, chips and dents can be filled. But the “repair zone” will be visible. For industrial premises this is not a problem. This is not very good for offices and apartments/houses.
Another disadvantage emerges from its advantage: complete impermeability to any substances. That is, the epoxy self-leveling floor does not conduct water and its vapors. If it is poured onto a concrete slab in ground floors, moisture entering through imperfect insulation can tear off the polymer layer from the base.
Is it possible to make a self-leveling epoxy floor yourself? Yes. Buying it is not a problem, and no special equipment is required for application. But you need a flat, dry concrete surface and knowledge of some of the features of the process
All these shortcomings would be more or less tolerable even for use in private houses and apartments. But the high price neutralizes all the advantages. For the same price you can make more practical coatings. But it is, of course, up to you to decide. From an aesthetic point of view, it is difficult to find a replacement. It is difficult to make an absolutely smooth surface, shiny or not, by other means. An alternative is to pour a self-leveling cement floor and cover it with polymer (even epoxy or polyurethane) paint. Costs are lower, the effect is the same. It’s still difficult to come up with other options.
Advantages and disadvantages
Having figured out the composition, we came to the conclusion that epoxy floors in an apartment will be a non-toxic, visually attractive solution. The benefits of epoxy flooring don't end there. There are several more points that relate to its use.
- Solidity. If you use a slab to cover the floor, but you will not be able to avoid joints and seams, moreover, over time they will become dirty. When you fill your floors with epoxy resin, you won't have to deal with imperfections in the seams or uneven areas. If you approach the process correctly, the result will be a monolithic and even floor.
- Operating time. Rumor has it that if you fill your floor with epoxy resin, it will last forever. Of course, for this you need to follow all the nuances during the pouring process (we talk about them below).
- Water resistance. If you have ever had flooring and laminate and were flooded by your upstairs neighbors, then you know the problem of swollen floors better than anyone else. So, epoxy floors will not only not swell and deform, they will also dry in a very short period of time.
- Care after pouring. It is very easy to wash and care for the coating. The lack of seams has a big impact here. It is enough to regularly wash the flooring with special detergents (although their presence cannot be called mandatory), and it will shine like on the first day of use.
- Heat resistance. The heat resistance of the resin is at the highest level. You can even light a fire on her - nothing will happen to her.
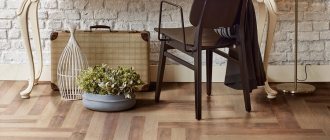
- Design solutions. If you consult with a knowledgeable person in advance, you can create a whole masterpiece under the ceiling in your apartment. Landscapes, abstractions and much more are created using examples from photos of epoxy resin floors.
There were also a number of shortcomings . But they are not permanent and are directly related to how you treat the flooring.
- Damage. If you do manage to somehow damage the floor, it will become quite difficult to correct the situation. If you pour another layer into the resulting hole, the solidity will be broken and a certain amount of air will be visible to the naked eye;
- Dismantling. And if you can fill the floors yourself, there is no way to dismantle them without special tools. Hard material cannot be removed like wood laminate.
Among the disadvantages, one could highlight the cost of the work. But, since we will be making the epoxy floor in the apartment with our own hands, this factor can be excluded.
As you can see, the number of advantages clearly outweighs the list of disadvantages.
Surface Requirements
Epoxy self-leveling flooring can only be applied to a stable, rigid base. All floors that may experience vibration are not suitable. Only a concrete slab. Moreover, the concrete must be dry. Here is a list of requirements:
- The grade strength of concrete is not lower than M250 (some compositions allow M200).
- Residual humidity - no more than 4%. You can check the humidity using a piece of thick plastic film and tape. Glue a piece of polyethylene to the floor and leave it for a day. If there is no moisture on the film, the humidity is normal. Epoxy self-leveling flooring can be applied.
- Floors on the ground must have high-quality waterproofing.
The floor surface must be clean, level and dry - If the concrete floor has been used, the top layer must be removed. There should be no oil or paints. Only concrete, preferably with open pores. If the screed is “fresh” (but definitely already dry), you don’t have to sand it. If it has been used and the top layer has worn out in places, it must be removed completely.
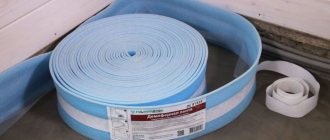
- The screed must be cut off from the walls with damper tape.
- Before applying the epoxy coating, remove dust with an industrial vacuum cleaner.
To reduce the consumption of epoxy self-leveling floor, the base is first primed. To do this, use a special primer or a base composition diluted with a solvent. Check with the manufacturers for details, as there may be quite significant differences.
Types of coatings
In the apartment they use two types of coatings: thin-layer and thick-layer.
Thin layer . Pour in one thin layer and dry for six hours. In this case, using photo printing or other decorative solutions will not work. Plus, the strength indicators will be lower than in the case of a thick-layer coating.
Thick layer . It is poured in two or even three layers and forms a flooring several centimeters high. You can use photo printing or other design solutions.
What Tools Are Needed to Apply Epoxy Coating to Concrete Floors?
To pour an epoxy floor, you need tools. Not to say that something special is needed, but the list is solid. It won't be possible to do without them.
- Wet feet. These are boots with soles on rods. They leave no traces. You need to step in them, not slide or shuffle. If you pull them across the surface, stripes remain.
- Rollers for priming. The pile should be made of polyamide or nylon with a length of 10-12 mm. You can apply the primer with a flat spatula, but this requires some skill.
It is better to distribute the composition using a notched spatula. To make it easier to work, tie it to a holder - Stainless steel notched spatula. To evenly distribute the epoxy self-leveling floor, use a notched trowel. “Liquid” does not mean that they do not need to be distributed. This means that the composition spreads on its own, but you still need to help it. The use of a spatula allows you to quickly and evenly “disperse” the composition. The lifespan of two-component epoxy floors is not that long, so you have to work quickly. To do this, the height of the “tooth” must be equal or approximately equal to the thickness of the layer. Please note: new spatulas are coated with a layer of lubricant. If it gets into the epoxy composition of the self-leveling floor, there will be defects in the surface. Therefore, before use, soak the spatulas in a solvent (solvent or xylene). After four hours, remove and wipe dry.
- A needle-shaped metal or polymer roller with a long handle. When the resin is poured onto the floor, air bubbles appear in the resin. To remove them you need a needle roller. After the composition has been distributed over the floor surface, it is rolled. The needles remove air bubbles and at the same time distribute the polymer more evenly. The roller must also be clean. No traces of old paint, oils or other contaminants. The roller itself should rotate easily around its axis.
What tools and supplies are needed for the job? - Mixer with adjustable speed. You will also need a mixer with attachments for mixing. The recommended minimum power is 1 kW, and it should also be possible to change the speed. They will need to be selected in order to mix the composition well.
To mix the composition, you will need clean and dry plastic containers with high sides. Metal (old buckets) is not suitable. If you need to divide the composition into portions (fill two rooms or do a batch filling), you will need electronic scales. In principle, you can use kitchen ones. If only the measurement limit was sufficient.
Pouring technology
The filling technology is as simple as possible. The most important thing is to follow the described technology. In this case, the coating will be smooth.
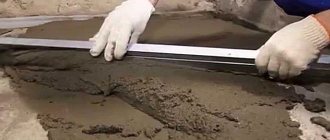
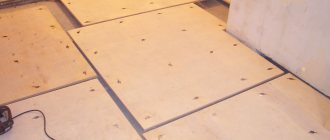
Preparing the base
Depending on the type of base, preparatory procedures may vary. If there are joints in the base, they must be primed so that the coating becomes absolutely even.
Before pouring, remove debris from the floor surface. After this, the surface is poured immediately so that the dust does not have time to settle.
Padding
A ready-made epoxy primer mixture is used. It is distributed in zigzags over the floor surface. It distributes itself evenly across the floor.
Important: depending on the brand of concrete, the primer consumption will vary.
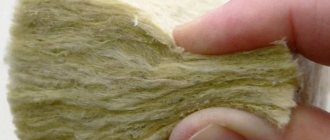
The second coat of primer is applied after the first has completely dried. When distributing the tread coating, you need to add dry quartz sand (fraction 0.3-0.6 mm). This will increase the strength of the coating.
Important: the drying time for the soil is 18-24 hours at a temperature of about 20°C.
Base layer
Sometimes a base coat of epoxy resin is used instead of a primer. In this case, it is diluted in a plastic container. You can level the applied coating using a spatula. The layer should be approximately 1 mm, in the future it will be possible to apply another one.
Finishing layer
The finishing layer is applied in wide strips and distributed using a squeegee. It must be rolled with a roller with needles so that no air bubbles remain.
After a day the layer sets. Complete drying takes about a week.
Technology and features of work
When using two-component epoxy self-leveling floors, it is important to mix them well. The dishes are selected in such a volume that at least half is free. The mixing container must be absolutely clean and dry. If you will not mix the entire volume, but only a part, it is better to measure it by weight. Place the dishes on the scale, reset the container to zero and pour in the main component. Then zero again and add hardener. You need to pour it in a thin stream. As soon as the weight reaches the desired value, we stop.
If you need a single-color composition, tinting takes place in the store. And you add hardener and all sorts of “decorations” at home
How to mix epoxy self-leveling floor components
The mixing area must be removed from the room where you will be pouring the floor. It is best to spread double film over a large area. It is necessary to ensure that unmixed components do not fall into the pouring area, otherwise blisters and delaminations will appear in these places. The compositions can be on clothing or shoes. Therefore, it is advisable that two people work - one stirs the mixtures, the other pours/levels.
When mixing components, you must follow certain rules
When the compounds are poured into a container, try to keep the walls clean. First, pour component A. If it contains glitter or other filler, mix it for a couple of minutes until the inclusions are evenly distributed. Then the second component (B) is poured in and mixed for another 3-4 minutes. If you need to introduce some other filler (quartz sand, for example), add it all at once and mix until smooth.
When mixing, make sure that there are no unmixed areas. The walls of the dish, the edges, the bottom. Everything needs to be carefully processed. When stirring, you need to select the speed so that the entire composition moves. This creates a funnel. Its depth should be approximately 1/4 of the total thickness of the material in the container. When the composition becomes homogeneous, leave it for 2-3 minutes to allow the air to escape. Then they pour it all out and distribute it all at once.
Primer Features
The primer for epoxy self-leveling flooring is applied to a clean open-pore concrete floor - without a top film. The film is removed using grinders. At home, use a grinder with a disc. The garbage is removed, the dust is swept away, and the remains are collected with a vacuum cleaner. Moreover, there is a recommendation - press the nozzle tightly to the floor to remove all the dust. It is important.
The sequence and number of layers may differ from some manufacturers
The primer is applied no later than 2 hours after dust removal. It is stirred as described above. It is poured from the container onto the surface in the form of a snake. Make the snake span wider, it will be easier to distribute. The composition is spread with a roller or spatula in an even layer over the entire floor. The soil dries at temperatures above 18°C for about a day. If it’s warmer, it dries faster; if it’s cooler, you have to wait up to two days. After drying, inspect the surface. All concrete pores must be closed and the floor must have a glossy finish. If there are bald spots, prime a second time. The second layer will require less composition, since some of the pores are already closed and it is not absorbed to the same extent.
Self-leveling layer and protective
The mixed self-leveling epoxy compound is poured onto the primed floor. Do not scrape off the walls, only pour in what is pouring out. Unmixed components remain on the walls. If they get into the composition, there will be defects.
It’s better to pour it with a snake too. If the entire area is filled at once, then we draw a “snake” over the entire area. If the composition is poured only onto part of the floor, then pour it only in this part. The polymer is then spread over the surface with a notched trowel. The next part should be poured quickly. There cannot be a break of more than 20-30 minutes between pours (depending on the manufacturer). If you need to take a long break, the zones are separated in advance with thick masking tape. It is then removed before pouring the second half.
The main task is to quickly disperse the composition over the floor in an even layer.
So, we distributed the composition over the surface using a notched trowel. When the marks from the “teeth” have healed (about 10 minutes pass), take a needle roller and roll over the entire surface. The marks from the roller will disperse approximately 15 minutes after application. When the surface becomes smooth, either wait for it to dry, or add glitter and phlox.
The decor can be applied using a machine or manually. If you make an epoxy self-leveling floor yourself, you need to practice applying the decor. Spread a clean piece of film on the floor and scatter glitter and phlox. Then reassemble and try again. Having filled your hand, you can start pouring the polymer floor.
Rolling with a spiked roller is a mandatory technological step.
After the resin with glitter scattered on top has dried, the floor is covered with the first layer of varnish. The varnish usually takes 6-8 hours to dry. Then the protruding fragments of decor are removed and a second layer of varnish is poured.
Drying and commissioning
How long does it take for epoxy self-leveling floor to dry? Depends on the floor temperature. Please note - not on the air temperature, but on the floor temperature. For domestic premises you will have to wait 3 days at a temperature of 20°C and 6 days if only +10°C. But you cannot turn on the floor heating.
Epoxy resin scratches quite easily. Protect it with polyurethane varnish
When drying, the polymer coating cannot be covered with anything - it must be open. But you also need to make sure that pollutants do not come into contact with it. If repairs are underway, it is better to postpone dirty and dusty work to another time.
The “normal” sheen of an epoxy coating—glossy or semi-gloss—depends on the formulation. If you don't like it, you can change the gloss level by using the desired type of varnish. It is applied as usual, in two layers. The varnish simultaneously protects the surface from scratches. So it is always recommended to apply it.
The appearance of epoxy floor coating may vary
Features of the material
Epoxy resin as a building material has been on the market for a long time. It was actively used as an adhesive composition, as well as a primer or filler for insulating coatings. Relatively recently, some other properties have been identified that make it possible to use epoxy as an independent material in the production of furniture or when pouring floors.
To fill the floor, a special resin is used - a compound, which is a liquid polymer. It consists of epoxy groups and, when mixed with a hardener, is capable of hardening, that is, forming a bound polymer.
The use of epoxy resin in its pure form is also associated with construction. It is added to varnishes, paints or glue. However, the resin itself without a hardener does not have any production value. The two-component composition is perfectly combined with soluble and insoluble impurities, which allows you to color the resin (the initially hardened material is transparent), as well as add various decorative elements to it.
Epoxy resin in its cured state is safe for the human body, but there is a certain temperature range. In principle, home and industrial use of epoxy falls well within this range. In order to improve certain physical properties, various additives can be added to the composition; they affect strength, ductility and fluidity.
The scope of application of epoxy resin in the installation of self-leveling floors has recently expanded rapidly. At the moment, manufacturers are ready to introduce several types of polymer coatings to the market. Their properties determine the limits of applicability and correspond to specific operating conditions. The classification of floors must be taken into account before installation.
- Thin-layer epoxy floors are poured in one layer, the thickness of which does not exceed 1 mm. However, they have excellent resistance to mechanical or chemical influences. They are used mainly in residential premises.
- Thick-layer epoxy resin floors can consist of several sequentially poured layers, which allows the coating thickness to be increased to several centimeters. As a result, it is possible to increase strength indicators. The scope of application covers not only residential premises, but also office rooms with relatively low traffic.
- Industrial coatings are used in various workshops or workshops. They withstand high loads, including shock. They are distinguished by a variety of colors and textures.
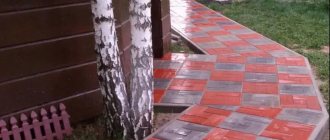
- Quartz floors are poured onto a base made of sand. Reliable adhesion of layers increases strength indicators. In addition, quartz floors are easy to decorate.
There is a division of coatings by color, transparency and surface smoothness. When choosing a material, you should take into account the conditions and the possibility of decoration. In some cases, layers of epoxy resin are used as a strong and reliable base for subsequent pouring of floors.