How to glue gypsum decorative stone on a wall - technology
Finishing the wall surface with decorative stone is now increasingly appearing in country houses. The fact is that such material has always been considered an unusual option that creates an unusually beautiful look.
But before gluing decorative stone to the walls, you should understand the fact that such material is presented in a wide range on the construction market today.
For this reason, you should not only strictly adhere to the facing technology, but also choose the right material for the work.
Advantages of gypsum stone
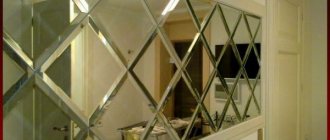
Gypsum stone is used very widely for finishing the interior of a room. Stucco can imitate any material, but often it looks identical to natural stone. The material is widely used for decorative interior design and creating unique designs.
Speaking about the advantages of decorative gypsum stone, it is worth noting the following:
- wide range of colors and textures;
- creating a pleasant microclimate inside the building;
- resistance to deformation and temperature changes;
- light weight, environmental friendliness and long service life.
The material has few disadvantages, but they are also worth mentioning. It is poorly resistant to the negative effects of moisture, as well as physical influences. It is worth taking these features into account when choosing materials for finishing the bathroom, kitchen and other rooms with high humidity.
Gypsum stone is an excellent material that is good for large volumes of work. Its cost is much lower than that of natural materials, especially when purchased in bulk.
What materials and tools will be needed
To glue plaster cladding you will need:
- cross-stitching;
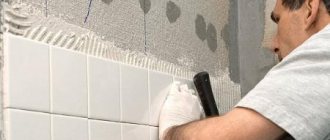
- regular and notched spatula;
- hacksaw;
- miter box;
- brush;
- foam sponge;
- rubber hammer;
- a container for preparing glue and a construction mixer;
- cream injector.
If you plan to create the effect of uneven edges, you will also need a flat file. In addition to this list, you need to purchase glue, a primer for walls and plaster, acrylic impregnation (colorless varnish) and paint for processing artificial stone and seams.
Glue selection
There are different types of glue for decorative gypsum stone. This can be a special gypsum-based glue or glue for clinker tiles, which is also well suited for decorative stone. You can purchase glue in the form of a dry mixture or a ready-made solution.
The dry mixture is diluted with water in the proportion indicated in the instructions. The dry mixture contains alabaster and plasticizing additives. And although the composition of the mixtures is approximately the same, they have different properties. Initially, you should pay attention to the speed of its hardening.
When choosing an adhesive for working with gypsum finishing material, you should choose one that has a minimum content of quartz sand - it significantly impairs adhesion. Remember, the right adhesive ensures a long service life of the stone. We recommend giving preference to brands such as “Ferozit”, “Elite Construction”, “Knauf Perflix”, “Lacrisil”.
The advantage of the material is also that you can choose almost any glue to work with it: PVA, acrylic, bustylate, polymer sealant. All of them will fulfill the task, but it is still better to give preference to gypsum-based glue.
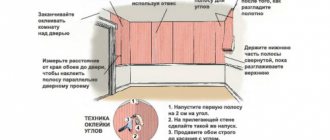
Rustication
In most cases, decorative stone is placed under the jointing. This implies a certain distance of the tiles from each other. These seams can be filled with glue during the process of pressing the stone. Therefore, it should be carefully removed. These seams are then filled with special jointing. If the jointing mixture consists of the same adhesive composition, then there is no point in removing residual glue from the seams. When the mastic has completely hardened, it can be tinted a different color, which will enhance the expressiveness of the decorative stone. As for the width of the seam, everything will depend on the tile you choose. The seam can be millimeter wide or several centimeters wide. For example, when laying a brick under jointing, the standard seam width is 1.2 cm. In the case where there should be no seams between the stones in the masonry, it should be laid as closely as possible to each other. If the process of gluing the tiles was carried out correctly, then the glue that came out into the seams may be enough to form a seam. To form it, you should wait a little so that the mixture hardens slightly. Forming can be done using a special wooden spatula, which must have a certain shape and appropriate thickness for the seam.
Joining seams
If the squeezed out glue is not enough to form a beautiful seam, then you should prepare an additional mixture. To apply it, you will need a special bag from which it will be convenient to squeeze the mixture into the seam. This way, there is less risk that you will stain the tiles. When the seams have dried and the mixture is crumbly, the surface of the stone can be cleaned of any remaining glue that may have gotten on it. This can be done with a dry brush, but under no circumstances with a wet and hard brush. This can cause irreparable harm to the decorative stone.
Gluing methods
Decorative gypsum stone can be glued in several different ways. The choice of method for laying the stone depends on which surface you plan to glue the gypsum product to.
Be that as it may, the walls will need preliminary preparation. You will need to level the walls, filling holes and cracks, removing too much surface relief. If the gypsum stone and its texture are similar to natural stone, you don’t have to deal with the elimination of small and minor defects. If the wall decoration is very old, it is worth removing the plaster and removing the old wallpaper. After completing the preparatory work, the wall is coated with a liquid primer, which will ensure good adhesion. Decorative stone can be laid immediately after the surface is completely dry.
Using gypsum-based adhesive
If you decide to glue gypsum stone, it is recommended to use a special gypsum-based adhesive. This is quite simple to do: you should choose a good glue, for example, Volma or Knauf. Next you will need to do the following:
- Dilute dry glue with water in the proportion determined by the instructions. As a rule, this is a kilogram of dry mixture per half liter of water.
- Stir the mixture thoroughly so that no lumps remain.
- Treat the walls with a hydrophobic primer to ensure a high level of adhesion.
- You will need to carefully cut the coating along the contour. The design should be made a little smaller than what was originally conceived.
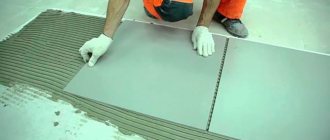
- Lay a guide strip of stones on the wall, then lay the remaining stones.
Using ceramic glue
This gluing method is also considered acceptable. It can only be used in rooms where there are no difficult operating conditions. This is done simply:
- The wall is coated with a hydrophobic primer. If you plan to glue stones to a metal surface, you will also need reinforcement.
- After this, a guide strip of stones is laid out.
- The way the stone is held is checked. After the glue has hardened, you need to lightly pull the stone towards you. If it does not fall off, you can continue gluing.
- If glue seeps between the joints of the stones, it must be immediately removed with a sponge before it hardens.
It is worth remembering that this type of gluing is possible, but it is difficult to call it expedient, because glue for ceramics is more expensive and takes longer to dry. Its advantage is durability, but gypsum stones are rarely intended to be used for long periods of time.
Using liquid nails
This method is appropriate to use only if you plan to finish a small section of the wall, or to spot repair an already finished surface. The operating instructions are as follows:
- If necessary, apply markings in the form of horizontal lines along the surface of the wall.
- If the rows do not fit on the wall, it is worth leaving space for trimming at the bottom of the wall - this way it can be hidden behind the baseboard.
- Apply glue to the decorative stone, then let the mixture sit for 10-15 minutes so that it has time to dry a little and does not seep between the seams.
- Place stones on the surface of the wall. Installation should begin from the corner of the building.
“Liquid nails” are a high-quality material that is completely ready for use, but it is not practical to use it for covering large areas due to its high cost.
We recommend watching a video about using sealant for installation:
Finishing the wall surface with bricks
Bricks were also constantly considered to be stones of artificial origin. And today this building material is very popular when the task is to complete wall decoration. Solving the problem of how to decorate wall surfaces with decorative bricks is required in the same way as in the situation with stones. That is, first of all, you should carry out preparatory work on the plane of the walls, and then lay the material, taking into account all the rules described above. It should just be noted that the bricks should be laid in such a way that all the seams match perfectly both vertically and horizontally. For this reason, one of the main tools in this process will be the building level. And although experienced specialists can perform finishing with bricks almost by eye, novice craftsmen are not recommended to let go of the building level.
Application of flexible stone
This type of finishing material appeared on the construction market relatively recently. The stone has not gained much popularity, but most designers began to use it when decorating interior walls. Firstly, this is not a stone in the full sense of the word, and it is a composite material, the base of which is fiberglass, and the external finish is a thin self-tapping screw of stone, usually sandstone. This is the reason why the material is very similar to stone. It is really quite flexible, and this makes it possible not to cut it, which is done when finishing the corners. It just needs to be bent to the shape of the corner in the room. It doesn’t matter at all whether the corner is external or internal, and an adhesive composition is also used as fastening.
pros
Advantages:
- Lightweight decorative stone.
- Long service life, and the manufacturer's warranty is 35 years.
- It will withstand temperatures from -46 to +66 degrees.
- The material is environmentally friendly.
- Just installation.
- Easy to maintain, does not require large material and time costs.
- Gives you the opportunity to implement the most unusual projects.
The disadvantage will be the high cost.
Finish coating
In order to ensure a long service life, it is worth applying a topcoat.
This can be done after 24 hours from the end of installation so that the glue has time to set. If the room is damp, you should wait a little longer. After this, you will need to wash the stone with a wet sponge and clean the seams. Next, you will need to dilute the grout of the required shade and grout the seams so that they do not stand out against the background of the overall picture. It is better to take the grout a little darker than the stone - this way you can create an interesting and unusual design.
If something goes wrong during grouting, the coating can be washed off with a damp sponge. At the end of the work, wipe the surface with a dry cloth. After this you can enjoy the result.
Today you learned what to glue gypsum decorative stone to and how the methods of gluing it differ depending on the surface. This is not too difficult to do, so even if you are not an expert in repair work, the result will not disappoint you, and the process will be exciting and interesting.
Installation of decorative tiles. Stages!
Installation of decorative tiles
All work on installing decorative tiles can be divided into several stages, namely:
- Applying an adhesive layer.
- Laying decorative stone.
- Rustication.
- Application of a protective coating.
Each of these stages must be performed with the highest quality, in accordance with all technological requirements and regulations. Now we will look at the basics, step by step.
Start of installation work
Mix the artificial stone intended for cladding from at least 5-10 boxes before starting work. Lay it out on a horizontal surface so you can see the future masonry pattern. These manipulations will help you successfully group them by size and color to select individual elements. Use a “grinder” - an angle grinder equipped with a stone disc, if there is a need to adjust the stones to the size of the elements.
Attention! Pay attention to whether the so-called “cement laitance” is present on the back side of the facing material - a thin foamy layer, up to 0.5 mm thick. If there is such a layer, it must be cleaned with a stiff metal brush.
Before starting installation, it is recommended to moisten the installation surface of the artificial stone, as well as the working side of the tiles, using a paint brush. Lay from top to bottom, starting from the first tile in any corner of the room where, according to your calculations, the first uncut tile should be located. This way, you can prevent glue from getting on the laid rows of tiles.
Begin installation by installing corner elements. Next, alternate the sides of the corners - short and long. Carry out the work as indicated above - from top to bottom.
If laying artificial stone involves jointing, be sure to observe the width of the gap between the stones. Remember: for different textures of the facing material, a stone tempering is established, taking into account the joint width recommended by the standards.
Attention! Recalculation of the amount of required material will require installation options that provide for a different width of the masonry joint.
Features of wallpapering
It is not recommended to glue decorative stone to wallpaper. This is explained by the fact that if the base moves away from the wall, the decorative cladding will collapse. But if you can’t peel off the wallpaper, then to paste the material you need to do the following:
- Mark the area where the decorative stone will be located on the wall, retreat 1-3 centimeters and draw the perimeter of the future masonry.
- Using a utility knife, cut the wallpaper along the marked mark and remove excess fragments.
- Prepare the adhesive composition and fix the decorative stone according to the described algorithm.
- Treat the panels with a protective layer.
If necessary, the walls in the places where the cladding is attached are additionally leveled and primed.
Application of a protective composition
Even before varnishing or painting the stone, you need to impregnate it with a special hydrophobic agent. It is required to reduce hygroscopicity, prevent moisture saturation, and reduce the risk of mold growth. Stores sell ready-made liquid formulations or concentrates that you need to dilute with your own hands. The following are considered good impregnations for decorative stone:
- "Optimist S405";
- White Hill;
- "Tiprom" and others.
Application of the solution does not lead to the appearance of a film that could interfere with the vapor permeability of the surface. The product penetrates 10–15 mm into the plaster, which prevents its damage when applying paint. It is usually recommended to apply 2-3 layers of protective agent one after another, without waiting for the previous one to dry completely. The easiest way to work is with a spray gun, but you can use a regular roller.
Common Mistakes
When laying decorative tiles in an apartment, installers often cut off more material than necessary. As a result, small bricks either go to waste or are attached to the walls, thereby spoiling the created pattern from the facing material.
Often installers (especially inexperienced ones) forget to remove any glue that gets on the plaster surface. And after hardening, it is difficult to remove such a composition without damaging the lining. Inexperienced installers, when forming joints, forget about the need to align the tiles along the same line. Thanks to this, a beautiful and clear drawing is created. There are also frequent cases when a wide gap is left between the tiles, as a result of which the cladding takes on an aesthetically unattractive appearance.
And the last common mistake is ignoring the priming of the walls and the inside of the tiles and refusing to treat the decorative material with a protective layer. In the first case, the chances of mold appearing on the walls increase, in the second, the service life of the finishing material is reduced.