Mosaic tiles for a kitchen backsplash are an original design solution, because ordinary tiles are found in almost every house or apartment. An apron is a place that should be a reliable barrier to water and grease vapors.
Will a mosaic cope with this function? What materials it comes from, what design solutions can be implemented, how to install it yourself to avoid mistakes - simple and clear instructions in this article.
Advantages of mosaic
Not everyone will dare to use a kitchen apron made of mosaic tiles, since this option seems very impractical. But it has many advantages:
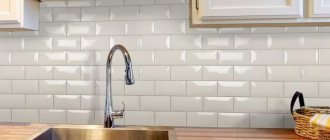
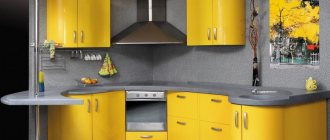
- appearance - decorating the kitchen with mosaics looks very original. Moreover, there is a huge selection of different colors and designs, it is possible to create an overall picture from different tile collections yourself;
- There is a wide choice - mosaics differ not only in color, but also in size and even shape. This will allow you to create unique compositions and add style and originality to the kitchen;
- versatility - correctly selected mosaic tiles will suit any kitchen style, from minimalism to art deco and neoclassical;
- moisture resistance - the tile itself is moisture resistant. This is a very important quality, because the kitchen is a room with high humidity. The weak point, as was said, is the seams. If you give preference to epoxy grout, then this problem can be solved;
- resistance to high temperatures is also an important property for the kitchen, since the stove is located nearby. You need to be especially careful with gas versions, since there is a fire that has damaged more than one plastic apron;
- immutability - even with the passage of time and direct sunlight, the tile does not change. It retains brightness, pattern, and does not fade;
- durability - the last three advantages can be combined into one. Resistance to water, temperature and sun allows the mosaic to serve for a long time and delight the owner of the kitchen for many years. You can even change the kitchen set, but leave the mosaic apron the same - since it can easily last 20 years or even more. It all depends on the quality of the materials - glue and grout. But, of course, everything, including this type of finish, has several disadvantages.
Preparing the walls
The main secret of high-quality mosaic cladding is perfectly smooth walls. The plane must be flat, without differences horizontally or vertically. The best way to achieve smooth walls is to plaster them along the beacons.
I will talk about plaster briefly, since this topic deserves a separate article.
- The walls are cleaned of old finishing and plaster. We remove all layers that do not adhere well.
- If the wall is too smooth, use an ax to make notches to increase adhesion.
- We prime the walls and install beacons. First, the outer beacons are installed. They are attached to the wall using gypsum plaster and are leveled in one plane. Then threads are stretched between them and intermediate beacons are placed. The step between them should be less than the width of the rule, that is, for a 2-meter rule we take a step of 1.5-1.8 m.
The beacons are installed level in the same plane. Notches on the wall to improve adhesion.
We apply plaster and wait until the walls dry. It is advisable to use cement plaster for tiles and mosaics, but gypsum plaster (Rotband) is also suitable for the kitchen.
Disadvantages of mosaic
The first thing everyone talks about when they talk about the disadvantages of mosaics is the seams. Yes, this is really a big problem, since there are a lot of seams, germs , dust and other dirt love them, which can interfere with presentability.
But for this, as mentioned above, there is an expensive medicine - epoxy grout. By itself, it doesn’t cost much more than usual, but don’t forget about paying the technician who will work with this grout. A beginner cannot handle it with his own hands, since such grout dries very quickly. There is one more minus.
Need for careful care. Even though epoxy does not absorb water and grease, dust settles on it, which means it will have to be wiped frequently. After all, when there are a lot of seams, they become more noticeable, and with them, dirt.
It is worth periodically treating seams and tiles with antifungal agents. The difficulty of care also depends on the material from which the mosaic is made - glass is much easier to care for than natural stone.
If the price, complexity of installation and maintenance do not scare you, then you can safely choose mosaic for the kitchen, because it looks very original, stylish and expensive. And advice on choosing and design options for an apron will help you decide on the final design.
Do you like the mosaic apron?
Not really
Color
The mosaic should match the color style of the rest of the kitchen. The apron can be decorated in a single color or create a gradient, as in the photo.
Either with ornaments, drawings or patterns.
Another stylish move is to use grout that contrasts with the mosaic tiles. For example:
- for white mosaic, black or gray grout;
- for beige - beige-brown epoxy - so dirt will not be noticeable on it.
A stylish move is to add pearlescent powder to the grout, so the seams will shine and the dirt will be less noticeable. This looks especially impressive with deep blue tiles.
Selecting the size and format
To cover the workspace in the kitchen with mosaics, it is necessary to develop a design project, measure the dimensions of the apron, and calculate the volume of raw materials according to the diagram. Decorative elements are offered by manufacturers in the form of small parts or matrix blanks with dimensions of 24x24, 28x28, 30x30, 32x32 cm.
To cover a surface area of 1 m², 9-10 matrices will be required.
Small elements (chips) are produced in sizes 1x1-10x10 cm. A common format for standard kitchens is slabs 2x2-5x5 cm.
Mosaic is available in the form:
- squares;
- triangles;
- diamonds;
- hexagons;
- rectangles.
A common format for laying mosaic panels is square elements. The configuration is optimal for interiors of different styles. Rectangular chips allow you to visually adjust the height and width of the room.
The elements of the mosaic panel are connected using 3 methods:
- fastened using polymer bridges;
- fixed on a polyurethane mesh, the technology ensures reliable, long-lasting joining of parts of the composition;
- They are attached to the paper base with the front side, the film is removed before making the seams.
Consumption
The approximate consumption of the clutch component is indicated in the instructions provided by the manufacturer. But in practice, the thickness and size of the tile itself affects the mass consumption. To more accurately calculate the consumption, you need to divide the tile thickness by 2, and multiply the resulting figure by the average glue consumption specified by the manufacturer.
In this case, we will get the amount of glue that is needed for 1 m². Next, we multiply the value for 1 m² by the area that needs to be covered. This is how we find out the volume of the substance to work with.
Deciding on the design
Common options for kitchen apron compositions:
- monocolor;
- mix;
- gradient;
- panel
The monocolor composition is laid out in blocks of the same color and is optimal in classic interiors.
A mix image combines elements of different shades in any combination. Modular slabs must be uniform in size.
The gradient mosaic composition should be rectangular according to standards. Elements are arranged with shade transitions from bright to neutral.
The panel is a complex artistic composition. Manufacturers offer ready-made combinations of mosaic tiles on a modular grid. It is possible to independently create a composition according to the scheme.
Ceramic mosaic
Mosaic ceramics are small-sized ceramic tiles made from clay and sand by molding and firing. The material is wear-resistant, moisture- and heat-resistant, durable. The products are distinguished by an elegant design, textured surfaces, and are optimal for interiors in Provence, Oriental, and Country styles.
The surfaces of products, in accordance with the production method, are divided into matte, glossy, with an imitation of an aged layer, with an imitation of brick and stone.
It is necessary to take into account the large weight and thickness of the elements (8-10 mm). The plates are mounted on a special adhesive base either randomly or according to a pattern. The surfaces of the panels are easy to clean and retain their rich colors.
Glass mosaic
Glass mosaic is aesthetically pleasing, durable, easy to maintain, resistant to mechanical damage, and repairable. The products are fired at high temperatures and are more durable than standard glass. The size of the elements is from 2x2 cm. Transparent decor allows you to add depth to the room and visually expand the space.
Glass elements are produced matte, transparent, tinted, with the addition of minerals, and made of smalt.
Parts with a homogeneous composition are produced with a glossy sheen or matte finish. Original glass blocks with inclusions of sparkles and foil.
Smalt mosaic is made from a compressed mixture of glass and metal oxides (chrome, iron, silver, nickel, copper). The finish is semi-matte, with an internal glow or pearlescent sheen. Smalt is stronger than tempered glass. The products are expensive and suitable for custom kitchen apron projects.
Glass mosaic with the inclusion of minerals is similar to precious stones, characterized by a shimmering or iridescent shine, and a rich palette of shades. The inclusion of particles of aventurine, iridium, and quartz makes the products aesthetically pleasing.
Stone mosaic
Stone mosaic is made from natural stone (onyx, marble, malachite) and mineral raw materials. The finish is durable, durable, and resistant to mechanical damage. The elements have a textured surface.
To maintain aesthetics, it is necessary to apply protective agents to the material, which fill the porous surface and make the apron easier to clean.
It is not recommended to use species with a soft structure, since heat resistance and moisture resistance of the material are important for finishing a kitchen apron.
Stone mosaics are heavier and thicker (8-10 mm) compared to glass elements. The material is expensive.
Stone elements are made with smooth, rough, embossed surfaces, complemented by graphic designs. Manufacturers produce stone elements based on mesh. Modules can be combined with glass, mirror, and ceramic parts.
The methods for making stone mosaics differ:
- Roman technology involves the use of marble chips;
- the Florentine method allows you to combine components of different stones;
- Russian technology involves the use of polymer raw materials, which are processed with expensive species.
Porcelain mosaic tiles
Mosaic tiles for the kitchen on a porcelain stoneware backsplash are strong, durable, aesthetically pleasing, and affordable. The color range of the slabs is represented by natural shades (beige, terracotta, brown). When molding, porcelain stoneware is cut with special tools. The apron finish is easy to clean and resistant to chemical detergents.
Mother of pearl mosaic
Mother-of-pearl mosaic is aesthetically pleasing, original, and durable. The surfaces of the elements are distinguished by a diffused glow and shimmer with rainbow shades. Plates are made from natural or artificial raw materials. The material is presented in a wide range of shades, shapes, and dimensions.
Metal mosaic
Metal mosaic is distinguished by the use of several components. The elements are created with a base made of rubber, ceramics or plastic. The blocks are covered with a layer of stainless foil, bronze or brass alloys. The elements acquire a golden or steel shine.
An apron made of blocks with metal processing is durable, reliable, and aesthetically pleasing. However, due to the multi-layer composition, the coating may wear off over time.
The surfaces of the elements can be matted or polished. The material is combined with glass and mirror elements. The coating is optimal for interiors in high-tech, military, vintage, loft, and avant-garde styles.
It is necessary to take into account the peculiarities of caring for metal surfaces to prevent scratches, chips, and oxidation.
Mirror mosaic
Mirror mosaic is aesthetically pleasing, durable, and is used as inserts when decorating a kitchen work area. The thickness of the blocks is standardized - 5 mm. Chips made of mirror materials are transparent or tinted, available in the form of squares and rectangles.
Experts do not recommend making a kitchen apron entirely from glass surfaces, since the material requires careful care and regular cleaning.
Inserts into mirror mosaic panels will increase the illumination of the kitchen space and visually enlarge the room. The combination of mirrors, ceramics and wood is original.
Choosing grout and glue
After determining the material, it is necessary to select an adhesive for fixing the elements and grout for the seams. The compositions must be moisture-resistant and heat-resistant.
Grout mixtures for assembling mosaics are produced with a base of epoxy resin or cement.
Cement raw materials are inexpensive, easy to apply, distribute, and are suitable for laying out ornaments yourself. Cement grout can darken over time, absorb dirt, and be difficult to clean.
The grout mixture based on epoxy resin is of high quality and has high performance characteristics. The material does not absorb dirt or water and can withstand frequent cleaning with chemicals. Grouts are available in different shades and retain color.
It is necessary to take into account the high price of the material and the rapid drying of the mixture during operation.
When choosing glue, it is recommended to use compounds with moisture-resistant and antifungal parameters. The adhesive base for laying glass mosaics must be white.
Laying mosaics on an apron with your own hands: step-by-step instructions
Laying a kitchen apron made of mosaic tiles is carried out in stages. It will be necessary to prepare the base for the artistic panel, draw up a diagram, make markings, prepare glue, lay out the elements, and grout the connecting seams.
Preparing the base of the apron
It is necessary to prepare the base by cleaning the surfaces from dust, dirt, and old materials. The coating must be grease-free for reliable fixation of the elements. To create a smooth surface, you need to apply a white putty; the coating dries for 10 days.
Marking
To create joints of the same size and symmetrically join the slabs, it is necessary to mark the surface. The mosaic elements are assembled on a paper base, and the distance between the chips is measured. The layout must be moved to the kitchen wall. Precise markings allow you to quickly install the mosaic and ensure durability of the interior decoration.
Glue dilution
The glue is diluted according to the manufacturer's instructions until thick. The work uses an electric drill with an attachment.
Experts recommend diluting the glue in small portions as the layout is completed to prevent the composition from drying out. Cured glue must not be re-diluted with water.
Laying mosaics on an apron
To fix the mosaic, apply an adhesive base to the wall surface using a smooth spatula. The material is leveled with a serrated spatula. Laying is done along the marking lines from the center of the image. The elements are fixed by tapping with a rubber tool. Work is carried out from the central part down, then from the middle up. At the laying stage, you can trim the elements and cut off excess parts to form a symmetrical apron.
Grouting joints
The finishing of the kitchen work area is completed by sealing the seams. Work is carried out after the glue has dried (after 3 hours). The film must be removed from the mosaic elements. The grout mixture is spread onto the seams using a rubber spatula. The material is distributed along horizontal and vertical lines. Excess composition is removed using diagonal movements.
After 30-60 minutes, the grout begins to harden; you need to clean the surface again with a sponge, without touching the seams. Grout that has hardened on the tiles can be removed with an alkaline compound. The kitchen apron is wiped and polished with flannelette or felt cloth.
Selection and cutting of mosaic sheets to length
To minimize mosaic waste, it is necessary to select and cut mosaic sheets. Starting from the center marker, lay out the sheets to the corner of the kitchen splashback. If necessary, move the marked center to the right or left. When marking, do not forget to take into account the distances between the mosaic sheets. They should be equal to the mosaic seams on the sheet.
Cut the mosaic sheets to size. Mark the cut sheets with a marker and mark the stacking number.
How to avoid mistakes - design style recommendations
When selecting materials and creating the composition of the apron, it is necessary to take into account standard design rules. The dimensions of an ornament or artistic image can visually change the size of the room.
A pattern with large parts will narrow the room, while small patterns will expand the space.
Diamond-shaped ornaments are not recommended for compact kitchens. It is optimal to use plant and floral patterns in soft colors.
An easy-to-use technique is to apply flowers to the kitchen apron on a glossy or matte surface. Elements must match in color.
The use of golden and silver elements in the decoration of the apron is original, which will create an atmosphere of luxury. The finishing should be complemented by appropriate shades in the decor of the room (textiles, dishes, furniture).
The mirror finish of the kitchen apron will allow you to visually expand the room and change the boundaries of the space. When decorating, you can use not only ready-made elements, but also fragments of the service left over from other slab works.
How to choose a mosaic for a kitchen backsplash and stay within your budget?
What does the cost of a mosaic consist of?
- material,
- design,
- brand,
- production or processing technology.
Material and technology.
Glass mosaic from different manufacturers can vary greatly in price. This is due to production technologies and the raw materials used (rare and expensive sand, oxides of various metals).
Golden mosaic. If it is an imitation, then the price is the same. And if it’s natural 24-karat gold, then it’s clearly not a budget solution.
Natural stone is always more expensive than glass. The cost is influenced by the type of stone, its rarity, as well as processing technology. Carved figured elements will cost more due to the complexity of production and transportation.
Design.
There are standard factory collections, and there are personalized ones, created by factories in collaboration with designers. This also affects the cost. This mosaic stands out against the backdrop of the mass assortment.
Brand.
It is traditionally believed that the most cost-effective solutions are offered by China, and the most expensive by the United States. Between them are factories in Turkey, Spain, Portugal, Italy, Germany and domestic manufacturers.
Top critical mistakes when choosing mosaics for a kitchen backsplash
The quantity was not taken into account.
Count back to back without reserve. Do not take into account that you need to lay the mosaic for trimming, corners and other points during installation.
You must understand that batches of monochrome glass mosaics always differ slightly in tone. There is a slight difference from batch to batch. This is not a defect, not a marriage, but a production feature of any factory. Therefore, if you want to purchase additional mosaic, you may not get the tone and it will be visually noticeable.
When calculating a mosaic, up to +10% of the total area of the apron is always included.
Wrong choice of glue
There are 3 types of glue:
- white cement-based: Litoplus K55, Adeselix P10, Kerabond T, Tenaflex H40 Eco, etc.,
- white on a dispersion basis: Ultramastic, Litoacryl Plus, Litoacril Fix,
- white on an epoxy-polyurethane basis (two-component): Litoelastic, Superflex Eco, Keralastic T, Starlike C.470/270, etc.
Basically, white cement-based adhesive is used for laying glass, ceramic and stone mosaics. He is the most accessible.
But if you bought a mosaic with gold, a foil backing, or a metal one for your apron, then you cannot use cement glue. Choose only two-component.
It is important to understand (!)
, Gray cement adhesive can only be used for ceramic mosaic tiles. But, it is better not to complicate the subsequent work with cleaning the seams, grouting and laying the ceramic mosaic also with white glue.
Why is white glue used to install translucent glass mosaics? Because, unlike gray, it will not change its color.
We chose the wrong grout.
The main characteristic mistake: when grouting with epoxy grout, they forget to treat the ends and surface of the stone mosaic chips with a specialized protective compound. Therefore, the ideal option for stone is still cement grout, which avoids problems with changing the color of the stone. A professional master, regardless of the grout, will offer to make samples to show live how the color of the grout will combine with the color of your mosaic. This pattern can be viewed in different lighting conditions.
We made a mistake when choosing a master.
The mosaic should be laid by a master mosaicist, and not by a tiler who has never worked with mosaics. The principles of working with mosaics and tiles are very different. The tile cannot be placed on curved or radius surfaces. Mosaic solves this issue, but requires special skills from the master.
There are two approaches to installing a backsplash in the kitchen. First lay the apron, and then install the kitchen, or vice versa, first the kitchen is installed, and then the apron is laid out. Each master has his own opinion on this matter. Let the choice be his, the main thing is that he really knows how to work with mosaics.
One of the main and important points in working with mosaics is surface preparation. It takes about 80% of the time.
The surface must be perfectly smooth, otherwise all its defects after laying the mosaic will appear in the form of protruding or sinking chips.
After all, the minimum thickness of the adhesive layer for tiles is from 5 to 10 mm. The thick thickness of the glue hides all the irregularities. But the thickness of the layer of mosaic glue is only 2-3 mm. Therefore, you have no room for mistakes.
And in conclusion.
A good master should be able to work with epoxy compounds from different manufacturers: Litokol, Mapei, Kerakoll, PCI, A-Crystal, etc.
Which mesh meets the standards?
Of course, you should not lose sight of this point. In addition to the base, it must be securely glued to the mesh and mosaic.
This can be checked quite simply. Take the net in your hand and move it easily. The mosaic should not fall off the mesh. Even in the sagging mode, the tesserae should remain on the mesh and should not fall off.
If the mosaic falls off the mesh, this means that the adhesive composition has dried out and become unusable, or the material itself has been subjected to an impact that has torn it from the mesh, for example, in case of improper storage.
If the tesserae fall off the mesh, the material should be replaced by the supplier, or asked to be re-glued and brought into compliance. If you use such material, then most likely the craftsmen will have difficulties during installation and your interior may begin to ripple. In manual mode, laying the material exactly is quite problematic and not many mosaicists can do this. Even an artistic panel needs to be able to be properly prepared for transportation and transfer for installation. You can see in the photo how to put the mosaic on the grid into the packaging. The two parts of the panel are laid through the gasket with their front sides facing each other and then rigidly fixed in the package. Many studios make this a blunder, although it is very important for the entire styling process.
| It is better to cover non-standard mosaics with bubble wrap | In this case, you do not need to lay too many rows so that the mosaic does not crack |
| Provide the panel with a printout that shows how it should look when assembled | The packaging must be rigid and transported only in a horizontal position |
Small mosaics on mesh are produced quite rarely, this is due to the fact that attaching them to the mesh is too difficult.
Please note that now marble mosaics on mesh are often counterfeited and instead of natural stone, porcelain stoneware with a marbled surface is used; this material is cheaper than real marble. To protect yourself, ask the seller for a certificate for the material and make purchases in specialized stores.
Interesting options in interior design
The interior of a classic white kitchen can be complemented with an apron in bright colors. A decorative element can combine the colors of furniture, lamps, dishes, and textiles. It is possible to create an artistic image from glass or mother-of-pearl, which will become a bright accent of the interior.
For a retro-style room, a kitchen apron made from ceramic elements in natural shades with scuffed effects and custom-made finishes is optimal.
For a kitchen in the Provence style or with an Italian design, the apron should be made in the same color scheme as the decoration of the room, furniture, and textile decor. It is optimal to use ceramic mosaics with glazing or mother-of-pearl elements, which will visually expand the room. Mosaic will emphasize the elegance of style solutions.
Kitchens decorated in high-tech style are complemented by an apron decorated with metal elements. A mosaic of silver, gold, bronze shades can be used.
The decor of the apron should match the tone of the fittings, hoods, and household appliances.
The decoration of the kitchen area can be the central piece in the room.
An effective and practical design option for a kitchen apron in a modern interior is a selection of glass mosaics in brown tones (chocolate, sand, milk, mustard). The warm shimmer of small decorative elements will highlight functional modular furniture.
It is recommended to complement the interior with spotlights in the kitchen work area.