During the renovation of a toilet, the problem of pipes becomes very acute, as they spoil everything with their appearance. The bathroom has vertical pipes (one or two depending on the layout). There is also a sewer pipe going directly to the toilet. It looks quite unsightly. You need to use a plasterboard box in the toilet to hide everything unnecessary, including meters and valves.
Since we are talking about a small room, you can handle this work yourself, using a minimum number of gypsum boards and profiles.
Selection of material and necessary tools
For any installation work, you cannot do without tools.
To build the box we will need:
- container for mixing the solution;
- spatula;
- drill or screwdriver;
- perforator;
- construction corner;
- iron scissors;
- pencil and tape measure;
- laser level and plumb line;
- hammer;
- pliers;
- stationery knife;
- whisk attachment;
- rollers;
- bath.
Once the necessary tools have been assembled, we proceed to purchasing the material.
You will need:
- Green plasterboard – moisture resistant;
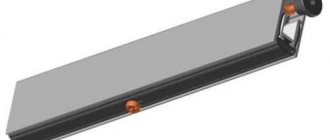
- rack and guide profile;
- metal screws;
- dowels;
- fasteners and hangers;
- putty;
- serpyanka;
- deep impregnation primer.
An approximate step-by-step plan for creating a box in the toilet
Regardless of the material you choose, the initial stage will be to create a structure from wooden beams or metal profiles.
- It is necessary to make markings, taking into account that the walls of the box should be located at a distance of 5-10 centimeters from the pipes.
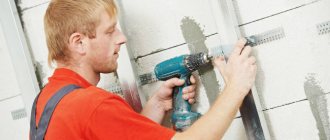
- The profile is attached to the walls with dowel nails, using a hammer drill for this purpose.
- After this, levels are laid off from them on the ceiling and floor, attaching them in a similar way.
- The creation of the frame is completed by attaching a corner profile, which is attached with fleas to the top and bottom, and then connected to the wall profiles using additional pieces.
- The plasterboard box is installed in the toilet using self-tapping screws or plastic panels are screwed on.
In the first case, the drywall must be marked and cut into pieces that will be used to sew up the frame. The process uses 27 mm self-tapping screws, which are screwed every 30 centimeters. Excess parts at the joints can be trimmed with a paint knife or hacksaw.
Before you make a plasterboard box in the toilet, you need to take into account that it will cost more than with panels. But its advantage is that you can choose any finishing option, including paints, wallpaper and tiles.
Prices
The final cost of the job greatly depends on the amount of drywall required, which, in turn, depends on the location of the pipes and the chosen configuration.
The average price of a custom-made plasterboard box is close to 3,000 rubles without finishing.
The cost of cladding will depend on the material and area: for example, when choosing tiles - from 600 rubles per sq. m.
The option with plasterboard is also more labor-intensive than a box in a toilet made of PVC panels. The sheathing process is quite simple - the panels are attached with fleas to horizontal profiles with self-tapping screws, as is the case with drywall. The cost of such cladding from specialists is close to 500 rubles per square meter.
Box made of PVC panels with a sanitary hatch
There is another option that is perfect for owners of small and cramped bathrooms - you can hide the pipes using blinds, which are sold in almost any store. The indisputable advantage of the method is that access to pipes and meters remains free. Another option is to install roller shutters. The price for special plumbing roller shutters is approximately 3,000 – 3,500 rubles.
Price issue
Here are the approximate prices for the main materials for the box:
- sheet of drywall: about 70 rub. per sq. m;
- PVC panels: RUB 120/sq. m;
- metal profile for installation of gypsum boards: guide (3 m) – 52 rubles, rack-mount (3 m) – 68 rubles;
- putty: about 50 rubles/kg (per 1 sq. m of gypsum board surface usually requires 1.3 kg).
Materials for a plasterboard partition with dimensions of 1.5x2.5 m will cost 1,300 rubles.
If you hire a master, you will have to pay an additional 416 rubles. (125 rubles per sq. m).
The task of re-arranging pipes in the bathroom is quite troublesome, but such work can be done independently. Laying out pipes in the bathroom with your own hands - a detailed description of the stages of work.
We will look at which filter for water purification is better to choose in this material.
The second way to hide in a box
Often the option of decorating pipes is simply not suitable - there are too many pipes and they are not located in the most convenient way. Here another method of camouflage will come to the rescue - arranging a box, inside of which all the pipes will be located.
Stage #1. Choosing the shape and size of the structure
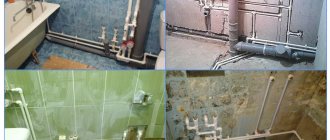
The shape and size of the future box, behind which the pipes in the toilet will be hidden, completely depends on the characteristics of the pipeline. Each specific case will have its own nuances.
The number of pipes in each bathroom is individual. As well as their location - the placement of the box completely depends on this factor
The same applies to the size of the box - the fewer pipes, the easier it will be to disguise them.
The most basic condition is to maintain a distance of 3 cm from the outermost point of the most protruding pipe or water meter, if one is installed in the toilet room.
A convenient option is when all communications are located along one wall of the toilet - this way you only have to work with this part of the room
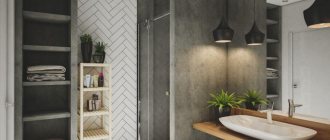
Placing the pipeline along one of the walls of the toilet is the most convenient option. If desired, it will be convenient to disguise all communications by installing a false wall made of plasterboard. And the top can be decorated with the same finishing material as the rest of the walls in the room.
In addition to the false wall, the shape of the box for masking pipes can be:
- rectangular or square, extending from top to bottom or from left to right;
- angular or complex in shape in the form of a polygon to maximize the usable space of the toilet room;
- stepped, when several boxes of different heights are installed in one room;
- round.
The most difficult thing is to implement a multi-level stepped design - you first have to make a sketch on paper and calculate the length of each of the boxes. Then calculate the amount of materials required and, having purchased everything you need, begin installation work.
Image gallery Photos from Rectangular box shape Complex pipe box shape Multi-level box option Round box shape
Stage #2. Making a box
You can make a structure for masking the pipeline in the toilet room yourself or invite craftsmen.
If the premises are undergoing a full-scale renovation with the involvement of a construction team, then you should immediately discuss with them the issue of constructing a box behind which the pipes will hide.
Regardless of the type of material chosen for arranging the box, one should not forget about the inspection window - access to the pipes should be as simple as possible
Among the materials used in the manufacture of boxes, the most often are the following:
- plastic panels;
- moisture-resistant drywall;
- moisture-resistant MDF panels or plywood;
- sanitary roller blinds, roller blinds, blinds.
If drywall requires additional finishing with tiles, wallpaper or other material, then all other options are used as a finishing coating.
Image gallery Photos from Colors of plastic panels Drywall for the box MDF panels for the box Plumbing blinds for the toilet room
To install panels or blinds, you need to build a frame. To do this, use a metal profile or a wooden block. Self-tapping screws, construction mesh and putty will also be useful for leveling joints. Tools: level, tape measure, screwdriver, grinder, pencil
Before you start installing the walls of the box, it is better to cut out the parts from cardboard and check if everything is as planned
When the material is selected, you need to build a frame by securing metal profiles or wooden blocks with self-tapping screws. Panels or sheets of drywall will have to be mounted on this base.
If the box is lined with plasterboard sheets, then it will have to be tiled on top, mosaic or wallpaper glued - the same material as on the walls of the toilet room
Installation technology
The box itself can be made by making two or three sides. Two edges are used to hide the riser pipes. This technology is called corner technology. The second method is applicable for completely covering the wall under a frame made of profiles and plasterboard.
The advantages of installing such structures in small rooms:
- provided that a stretch ceiling or proper lighting is used, they can visually increase the height of the room and divide it into zones;
- add neat, strict geometric lines to the interior;
- level the wall;
- provide access to valves, meters, manifolds for adjustment, repair and replacement;
- installation of the box hides the pipes and their connections.
Combination of vertical and horizontal boxes
Marking
It is performed directly on the ceiling, floor and walls of the toilet.
Accurate markings are the key to a strong and durable structure
It is done this way:
- there is the most protruding point on the communications, from which they retreat 3-5 cm and mark a line with a pencil;
- then take a laser level and draw a straight line between the ceiling and floor, passing along this mark. If you don’t have a level at hand, you can use a plumb line with a dye thread;
- the same actions are performed on the opposite wall;
- markings around the installation are made with a distance of 5 cm from the frame;
- then the horizontal surfaces are marked, for this we need a corner;
- we place a corner to the wall at the intersection with the floor and draw a line perpendicular to the vertical mark at an angle of 90 degrees;
- We perform the same actions on the other side;
- on the ceiling we do the same;
- draw a parallel line above the installation, level with a deviation of 4 cm.
The marking can be considered completed. We begin to install the metal frame.
Markings applied to walls, floors and ceilings
Useful tips
If water pipes are hidden, some nuances should be taken into account. The frame is assembled using the method described above, but in this case we take into account the fact that condensation from the temperature difference collects on the pipes.
We will describe additional measures to protect materials from the harmful effects of water.
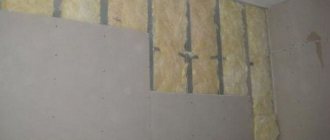
- First, we use only moisture-resistant drywall.
- We maintain the required distance at the joints between the drywall and the floor and can be coated with additional putty and adhesive solution.
- The inner surface of the sheets can be treated with a waterproofing compound.
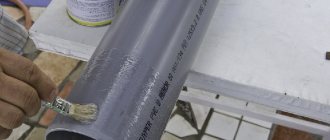
- Coat the pipes with waterproofing and insulate them.
- The sheet should not touch the pipe and the distance between us should be at least 3 cm.
Auxiliary techniques will create additional protection for the material from exposure to water and increase the service life of your structure. Moisture-resistant drywall is a suitable material for use in damp rooms, is easy to use, and has a lot of positive reviews. It is widely used in all types of construction, in any premises and, if installed correctly, has no negative aspects.
Installation of profiles
To properly install a metal structure, you need to take the following steps:
First of all, you need to install the 26x27 guide profile on the floor. To do this, use metal scissors to cut the profile exactly to the size of the line on the floor;
- We screw the 27 x 60 rack profile to the wall, inserting it at the top and bottom into the guide sections. The pitch of the screws should be 15-20 cm, so the structure will be more stable;
- The second profile is screwed in the same way;
Screwed rack profiles to the walls
- Next, we fix the segment exactly along the line with dowels and nails to the floor, try to ensure that the segment does not shift during drilling, this can affect the quality and evenness of the box as a whole;
- Fasten the second section in the same way; if the edges of the profile get in the way, they can be bent with pliers;
To install the profile evenly to the floor, you need to set the level at an angle of 90 degrees. The base of the frame must be attached exactly according to the drawn markings so that one guide profile is tightly and evenly attached to the other
- The same steps need to be done on the ceiling;
- Now you can install the corner profile; it is secured at the top and bottom with small “seed” self-tapping screws;
Installed and fixed with self-tapping screws corner profile
Once this structure is ready, it needs to be strengthened with cross members. The jumpers should be 30 cm apart.;
It is necessary to use a building level to install a level metal frame. Screw the jumpers strictly parallel to the floor, this will help form a reinforced frame and secure the drywall well in the future.
At the same time, it is necessary to design reinforcement for the future installation of a technical hatch.
Pay attention to the video: how to make a frame from a metal profile
Fastening drywall sheets
When the frame is ready, you need to measure it well and transfer the dimensions to the gypsum board sheet.
Next, the cutting of the material begins. This is easy to do - cut the top layer of cardboard on one side, going a little deeper into the plaster. Next, the sheet is simply folded over and the cardboard is cut on the other side.
Then the cut strips are placed on the box and screwed with black metal screws.
If it turns out that the fragment does not fit, it can be trimmed with a construction knife.
When the drywall has been secured to one side, we begin to screw the sheet to the other side, after which the drywall box can be considered ready.
This is what the finished plasterboard structure looks like in the toilet
We recommend you watch: how to make a plasterboard box in a toilet.
How to arrange a box for pipes in a toilet; an overview of the best options for disguising the pipeline
Are you planning to renovate your toilet and don't know what to do with the water pipes? Agree, a camouflaged pipeline looks much more aesthetically pleasing.
Various tricks and materials are used for this purpose. Often specialists from a construction organization are invited to work. Especially when you need to build a box for pipes in a plasterboard toilet. If the budget is limited and the pipes do not fit into the interior at all, then you can fix everything yourself by choosing a simpler option.
This article will discuss ways to camouflage a pipeline. We will tell you what tools and materials are required for this purpose. The material is accompanied by thematic photographs and videos that clearly demonstrate how you can disguise the pipeline in the toilet with your own hands.
Preparatory work
It’s worth noting right away that if the sewer riser is old, then it is advisable to change it before installing the duct. If a pipe ruptures, you will have to break the box to replace them. So, before starting installation work you need:
- prepare the walls in the toilet;
- draw up a work plan;
Designing a plasterboard box to hide a waste pipe in a toilet
- draw a marking;
- prepare the necessary material;
- assemble the tool.
It is worth noting that if you do everything correctly at the preparatory stage, then there will be no problems with installing a plasterboard box in the toilet.
Features of the box structure
The option of installing a box to mask all pipes passing through the toilet room is the most popular among users. This is not only an aesthetic, but also a practical solution - once you install the structure, you can forget about the pipes, at least until the next major overhaul.
Option 1. Solid wall box
Boxes with a solid wall consist of a frame, walls and, if necessary, facing material. They must also be equipped with a hatch for carrying out an inspection - inspecting the external condition of the pipeline and shutting off the valve of the water supply to the house/apartment.
All the pipes are hidden inside this design, and also the cistern of a wall-hung toilet and bidet, a boiler and other unsightly communication elements can be hidden there.
Boxes come in a variety of shapes and sizes. Often a box the full height of a room is called a false wall. This solution is used for vertically running pipelines.
If the pipes run vertically, then you can build a false wall with your own hands by placing a profile and attaching drywall to it
Plastic panels are especially popular - they are easy to install and remove if necessary. And the price of this material is more than affordable.
However, even when making a plastic box, you should provide a hole that can easily open in the place where the valve is located to shut off the water supply.
If the false wall is made of plasterboard and tiled on top, then the presence of an inspection window is a necessity - in case of any problems with the pipeline there should be convenient access to the pipes.
The inspection window can be disguised by covering it, like the entire wall, with the same tiles. The main thing is that the door has a reliable mechanism designed for the weight of tiles + tile adhesive
Option #2. When the wall opens
The second type of boxes is with an opening outer wall. Moreover, the wall can open completely or a certain part of it. The structure of these structures is similar to the structure of a box with a solid wall, but differs in the presence of shelves inside - the free space next to the pipes is often used as a cabinet.
Image gallery Photos from Wardrobe with sliding doors Full-width blinds on the wall behind the toilet Wooden wardrobe with hinged doors Plumbing cabinet from the inside
Also, often with vertically located pipes, the outer wall is assembled from different materials - for example, at the bottom there is a plastic panel, and on top there are sanitary blinds or a roller blind, behind which a cabinet with shelves is hidden.
Roller blinds as the outer wall of the box are more often used in America and European countries - they are not so popular here, because they look quite simple
Owners prefer to construct capital multi-level boxes from plasterboard or install plastic panels in their toilet rooms. Moreover, the choice of colors of the latter can please with its variety and low cost.
Image gallery Photos from Making a multi-level complex box Hole in a plasterboard box Plastic panels are conveniently attached to each other Panels can be glued
An opening wall is an extremely successful solution, especially when behind it there are not only pipes, but also other communication elements - a boiler, water meters, etc.
Roller blinds undoubtedly win here, having the main advantage - they rise, revealing the entire internal space of the box. And if necessary, they can be completely dismantled in a couple of seconds.
For lovers of original solutions, manufacturers offer unusual blinds - these are models with 3D images of animals, nature or birds
Types of designs
There are many ways to disguise unsightly communications. Making a box that simultaneously performs a protective and decorative function is the most sound solution. The task is implemented in different ways; The most common configurations are:
- In the form of a cabinet. It is chosen if it is necessary to hide a riser or other vertical system and leave free access to communications. Shelves help to rationally use the interior space.
- In the form of a partition. A convenient option for a large bathroom, all communications of which are located on one wall; Also suitable for wall-hung toilets. The pipes are separated by a wall-sized partition; The area of the room is slightly reduced. The bathroom looks neat, and behind the partition there is enough space to organize the storage of a variety of things.
- In a compact design. The box is constructed directly around the pipes. This option is used more often than others, as it does not clutter up the space, looks neat and is quickly made. Suitable for all types of systems, including those adjacent to the ceiling (floor).
Corner design with inspection hatch Source cleanipedia.com
We design the door for the box in the bathroom
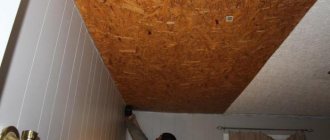
Access to the main plumbing facilities must be free. That's why we provided reinforcement for the technical hatch. Once the box is ready, you need to cut a hole for the hatch and install it. It is also worth thinking about ventilation so that there is no condensation inside the box.
Step-by-step process for installing a hatch in a plasterboard surface
If you want to install an invisible hatch, you should secure it before finishing, inserting it and securing it to the frame with self-tapping screws.
Simple plastic doors are installed on the tiles after the box has been lined.
Plastic hatch installed in a plasterboard box
Important! It is advisable to build structures based on the size of the finishing material: tiles, panels. It is advisable to adjust it so that you do not have to cut the tiles
Options for utility access doors
It is imperative to leave yourself the opportunity to access meters, pipe connections and taps. To do this, you will need a door or several opposite these elements. You can buy it (hatch, blinds, built-in door) or make it. If you make the door yourself, make it from the same material as the rest of the structure. It should be decorated in the same way as the box itself. To make it convenient to use, glue or screw a small furniture handle (these are usually installed on kitchen units). To prevent the door from opening spontaneously, it must be equipped with magnets. You can make an invisible door. How it is mounted is shown in the video below.