Hello everyone, dear friends! The topic of my story today will be decorating the ceiling: to diversify the interior, I made a semicircle of plasterboard on the ceiling. I installed the lamps so that the rays came from inside, and the room began to look more interesting. But there were a lot of difficulties: I couldn’t get an even semicircle, no matter how much I puttyed or sanded the surface. Overall it turned out acceptable, but if you took a closer look, you could immediately notice the shortcomings. I spent a lot of time to achieve the desired result. Let's figure out together how to install a plasterboard semicircle so that we don't have to correct our own mistakes later.
Types of drywall for a semicircle
To create a semicircle from gypsum board with your own hands, you should know that not every sheet is suitable for such purposes. Sheet thickness matters. If the radius is large (the sheet is not very curved), you can take 12 mm, but if the radius decreases, 9 mm.
Types of drywall for a semicircle:
- Plasterboard intended for the ceiling.
- GKL for leveling walls, as well as for creating partitions.
- Sheets intended for the production of arches. These sheets are slightly different in composition because there is fiberglass inside.
- Moisture-resistant green plasterboard.
An unusual solution for installing a bathroom
Many people are remodeling their apartments. Often this does not bypass the bathrooms either. Sometimes all the partitions are completely dismantled, and after that something new, completely unexpected, appears. You can dream too.
For example, you are planning to install a corner acrylic bathtub in the bathroom, which has a semicircular shape. Typically, such bathtubs are installed in a corner, and the front part protrudes in the shape of a semicircle.
But an interesting option is to install the semicircular part against the wall, and the front part will be straight.
It’s not clear where to get a round wall? So we are talking about redevelopment! So plan so that one wall in your bathroom is semicircular! Do you have a question about how to lay tiles on a semicircular wall? For such ideas, there is just a mosaic that can be glued even to a round wall!
Methods for creating a semicircle from plasterboard
If a semicircle with a radius of about 1 meter, then it is simply cut out and fixed to the frame with self-tapping screws. If the radius is smaller, then there are other methods to create a curved structure.
How to cut gypsum board? There is nothing simpler, just take a knife and make a cut along a straight line, then lightly tap along the edge of the cut to break the drywall.
A semicircle made of plasterboard can hide communications
When working with this material, it is important to remember that this is a fragile material. It may burst. Therefore, you should handle it very carefully. When bending, you need to control your strength.
Profile mode for drywall at home
Due to the fact that plasterboard sheets are used to assemble structures of a wide variety of complexity, metal profiles need to be cut, bent and connected. All these manipulations must be done correctly so as not to damage the material and create a durable structure. In this article we will look at everything related to the issue of cutting profiles.
As mentioned above, you can cut a drywall profile in different ways. They vary depending on what tool is used. Let's look at each method in more detail:
Each of these tools has its own advantages and disadvantages. Therefore, choose the one that seems most convenient to you. The main thing to remember is that after trimming the profile must remain in working condition.
Note! Before cutting the profile, you need to know exactly the dimensions of the required pieces so as not to spoil the material. Here, the rule “measure seven times, cut once” is more relevant than ever.
Not all tools that can be found in a closet fall under such requirements. Therefore, before starting work, make sure that you have at least one tool that meets these requirements in your house (we will discuss which tools we will discuss below). Only with its help can you cut the profile correctly.
Dry method of creating a semicircle from plasterboard
Firstly, there must be a template for this design with dimensions.
Secondly, you should have drywall screws.
Even a novice master can make a semicircle from drywall
One end of the plasterboard sheet is fixed to the template. After this you should bend
sheet according to the template itself and secure the second end with self-tapping screws.
Bending gypsum board using cuts
But what to do if the drywall sheet is moisture resistant? Now let’s find out how to bend moisture-resistant drywall at home. This is the way to make a radius of plasterboard less than a meter, when even with the wet method the material cannot bend into the desired shape.
A sheet of any thickness is suitable for this technique.
Step-by-step instruction:
- Cuts are made on the material perpendicular to the bend with a construction knife. The distance and frequency of cuts depends on the radius of curvature. The greater the bend, the more frequent the cuts;
- The cutting depth should not reach 1–3 mm to the back side;
- Afterwards, the finished element is placed on the frame;
- The gaps are filled with gypsum mixture;
- It remains to let the parts stand until completely dry.
Cuts made with a cutter, V-shaped and U-shaped, allow you to make the bend stronger and give unusual shapes. The steeper the bend, the more frequent the cuts.
To summarize: drywall can be bent into various semicircular shapes, by yourself or with a partner. But this is just a delicate job; It is necessary to follow clear rules and instructions to avoid breaking the material. The right method will help you achieve good results.
Wet method of creating a semicircle from plasterboard
For this method you will need water, a sponge, and a special roller. Basically, gypsum boards are prepared in this way to create an arch or built-in niche. Often a semicircle is prepared for a multi-level ceiling.
- first you need to make a frame with the required bend radius;
- use a special needle roller to go over one side of the sheet;
- using a sponge, wet the plasterboard;
- Allow 10 minutes for soaking. Drywall should not get wet through;
- wet drywall should be bent and secured to the template with tape;
- The wetted structure should be left overnight to dry.
Prepare in advance the tools necessary to make a semicircle from drywall.
After drying, the drywall will take the shape of a template.
Types of profiles for drywall
It would seem that there is nothing complicated in the formation of arcs, but in reality this is not the case. Although experienced specialists can handle all this with ease.
For the convenience of working with plasterboard sheets, special tools are used to create structures with the required parameters, and the work is performed more easily and quickly, and the amount of waste is minimized.
But with the help of beacon elements, different planes are aligned. For example, when plastering walls/ceilings. The length of such profiles is 300 centimeters. If you plan to create a smooth plane, then you simply cannot do without such an element (for example, to create slopes). As for the arched types of plasterboard profiles, they have holes and cuts necessary to give the profiles flexibility.
If we talk about the dimensions, they are the same as those of conventional elements, while the rigidity indicator is much higher. Arched profiles are used to obtain arcs. And the representative of each group must perform their specific function. The elements described in the article are marked using Knauf technology, all of them are manufactured in standard sizes:
How to bend drywall in a semicircle: the third method
The third method is to make a semicircle from gypsum board. You will need a knife, a ruler, and a pencil.
- On one side you need to draw lines (across) every 5 cm.
- Make cuts on one side of the fold.
- The notches should be made from the convex side.
- The depth of the serif should be slightly greater than the middle of the sheet.
- The serif side is straightened out.
- To secure the structure, the notches are filled with putty.
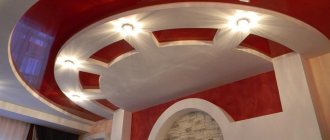
The semicircle made of plasterboard on the ceiling looks beautiful and fashionable. If you add lighting, it becomes individual and has a cozy feel.
Surface marking is a critical step
Making a circle of plasterboard on the ceiling yourself, especially when you have no experience working with rounded elements of ceiling structures, can only be done after making the correct markings.
They start with an analysis of the room. If the ceiling and wall meet with a small curve that imitates a cornice, it is removed with a hammer drill.
Only in this case will it be possible to fix the UD profile as close to the ceiling surface as possible.
At the next stage, the contours of the frame of the first level of the structure are outlined. This must be done, taking into account that a circle or semicircle of plasterboard will be attached at the second level. Start from marking the lowest point of the ceiling covering. Having dropped 25 mm from it, place a mark on the surface of the wall, repeating the steps in each corner of the room (you will need a level to control the measurements).
The marked points are connected by a line (chockline). They are guided by it when attaching the UD profile.
The next stage is marking the ceiling surface directly. Taking into account the direction of installation of plasterboard sheets, marks are placed on opposite walls in increments of 50 cm. Lines are drawn between the marks on the ceiling using a chockline.
Plasterboard wall in a semicircle
To create such a wall with your own hands, you need to put in a little effort and have a little knowledge.
A plasterboard wall installed in a semicircle will add originality to the room
To make an even line of a semicircle, you need to use a thread and a pencil (a kind of compass).
Which is better: heated floors or radiators?
Warm floorBatteries
- for the durability of the plasterboard structure, a galvanized profile is required;
- to bend the gypsum board to the required radius, you need a template;
- with a small bending radius, water will be required for the wet method;
- the height of the wall to the ceiling will be easier for installing the structure.
To create a semicircular plasterboard wall, you should collect a set of tools and materials:
- Drywall. It is desirable that it be 9 mm thick (ceiling gypsum plasterboard).
- Galvanized profiles.
- Fasteners - self-tapping screws, dowels.
- “Finish” – putty.
- Primer for interior work.
- Electric drill.
- Scissors for cutting metal.
- Set of spatulas.
- Roller and brush.
- Knife.
- The hammer is ordinary.
- Plumb lines and level.
- Screwdriver Set.
- Meter, pencil.
- Thread, marker.
Living room 51 photos
Which putty is better to putty on drywall, starting or finishing? Which putty to choose for drywall?
An ordinary boring living room ceiling, which may be uneven due to displacement of the slabs, can be corrected by using drywall. The design of plasterboard ceilings in the living room can be of various types:
- use of a single-level design;
- creating a multi-level ceiling;
- combination with tension.
Using the latter option will give a unique look to the living room and surprise visitors with a bright and original design. The main thing here is not to overdo it, since the living room is intended for receiving guests and relaxing. The flashy colors of the ceiling design in the hall can spoil the impression of the entire room. To see options for a successful design of plasterboard ceilings in the living room, take a look at the photo above.
Installation work: how to make a wall in a semicircle
To create a semicircular wall, you should follow a step-by-step algorithm:
- A line is drawn on the floor with a compass made of thread and a pencil, along which the wall will be mounted.
- Next, cuts are made on the U-profile for bending.
- The profile must be fixed with dowels and screws on the drawn line.
- The same actions must be carried out on the ceiling. Plumb lines are used for this.
- Now you need to insert the C-profile into the U-profiles and secure with self-tapping screws. The C-profile must be clearly vertical; the service life of the entire wall depends on this. C-profiles are installed every 25 cm.
- In the middle, jumpers should be made that will maintain the rigidity of the structure.
- The width of the wall is determined independently.
- The wall is sheathed first on the convex side.
- The fasteners of the drywall sheet should be 16 cm apart.
- After this, the wires are hidden in the wall, if necessary, soundproofing material is laid and the other side of the wall is sheathed.
- The structure is sheathed from the center to the edges. First, whole sheets are fixed, then sections.
- The ends of the plasterboard structure are sealed with reinforced corners.
- Serpyanka tape is glued to the joints. A thin layer of putty is applied to all joints after serpyanka. After drying, the surface is sanded and puttied. The final step will be to sand the surface with sandpaper or a special mesh.
- The entire plasterboard semicircular surface should be coated with a primer for further decoration (wallpaper, paint, tiles).
If you still have questions about how to make a semicircular wall from plasterboard, watch the video:
Secrets and nuances of installation
A common question is “How to make a box from plasterboard?” To do this, you need very little - the necessary tools and materials, plus knowledge of installation technology. Installation requires appropriate preparation. This stage involves the following actions:
marking the working surface. It is necessary to draw the contours along which the support bars or profiles will then be attached. Remember that the markings will be somewhat narrower than the plasterboard structure itself;
Marking
When carrying out marking work, be sure to use a level.
Next, you can carry out direct installation of the guide profile and the entire structure. This procedure has the following steps:
- installation of guide bars or profiles;
- securing one/several posts that form the protruding front edge of the box;
- if the width of the contraction is 25 cm and the height is 1.5 m, jumpers must be installed between the support posts.
- The jumpers are installed at a distance of one meter from each other.
Finished box frame
Thanks to this, the box will not creak due to possible thermal deformations of the structure. Once everything has been installed, you can begin attaching the plasterboard sheets. To do this you need to do the following:
- cut the sheets so that the box consists of single strips. You should not assemble strips from individual pieces;
- First you should cut the sheets for the side edges. Their width should be the same as the width of the support posts. The stripes should not protrude beyond the supporting elements;
- The sheets are fastened with self-tapping screws 35-45 cm long. The sheets must be installed to the edges every 20-25 mm. In this case, there is no need to carry out additional fastening between the racks using jumpers. Since at such a width this will not play a significant role;
Attaching sheets to the frame
then we measure out the remaining edges and cut them. The stripes should be on the side edges of the already attached edges.
Once all the plasterboard sheets have been installed, you can begin puttying work. Using putty, you should first form the corners of the box in the places where it adjoins the wall. A perforated plastic corner will help you do this carefully and quickly. Its fastening is carried out with starting putty. After this, we apply a finishing layer of putty to the surface of the structure. Then, after drying, you can begin to prepare the surface for final finishing work. Adhering to all installation technology, you can easily and very quickly assemble a plasterboard box of any design. It will become both an effective method of hiding unwanted elements and will bring novelty and originality to your interior.
Making plasterboard ceiling boxes Applying putty to plasterboard ceilings correctly
Circle and semicircle from gypsum plasterboard: what materials are needed
In order to create semicircular structures using gypsum plasterboard, you need to carefully read the rules for bending the material. In addition, it can be made to mask a cornice or some other structure on the ceiling. If you have experience working with plasterboard sheets, you can easily verify their ability to bend to almost any radius, although at first glance they seem inelastic.
Before creating semicircular structures, it is necessary to apply markings to the ceiling.
- First you need to make markings on the ceiling. You can use a rope with a length equal to the radius of the circle of the structure being manufactured. Then we tie a pencil to it and outline a semicircle, holding the other end of the rope in the corner of the wall for a corner structure or at one of the points on the opposite side of the circle for “installation” in the center of the ceiling. Next, you need to outline 2 semicircles, one of which is larger in diameter, the other smaller.
- We attach pieces of gypsum plasterboard profiles, cut to the required size, strictly along the lines of the outlined circles on the ceiling (tools required: a utility knife with a thin blade, a tape measure, a screwdriver, self-tapping screws).
- The next step is to “target” the vertical guides that provide structural rigidity to the upper profile using a riveter. On each side you need to mount bent gypsum board 27x28 mm of the required diameter.
- Then, using a drill, hem with self-tapping screws a pre-cut semicircular plasterboard strip corresponding to the width of the box (the following tools are required: drill, self-tapping screws, a stationery knife with a thin blade, a level, a tape measure).
- Then we move on to gypsum board putty. A separate problem is the correct technique for bending sheets. Let's look at the available methods.
Preparing for work
A shaped partition for its installation requires preliminary preparatory work. At this stage you need to do the following:
- remove from the surface of the wall to which the partition will adjoin all irregularities, pieces of falling plaster, etc.;
- pull out nails and other elements protruding from the wall;
- prime the work surface;
- draw markings on the wall, floor and ceiling for attaching guide profiles to it;
Necessary tools
Now everything is ready to begin the construction of the metal frame.
Dry method of bending drywall: making a semicircle
There are wet and dry methods of bending drywall.
It is applicable in cases where it is necessary to make a structure with a large radius and is not suitable for thick gypsum boards. For example, for 9.5 mm drywall the bending radius will be 0.5 m, and with a thickness of 12.5 mm it will be 1 m. First, we assemble the arch frame using metal profiles with a section of 60x27 mm. Bending of the guides is required, but for this it is necessary to cut the sides with metal scissors and subsequently give the desired bend. We fasten each of the profiles together with self-tapping screws. After this, we apply the gypsum board to the frame on the ceiling and slowly, fixing it with self-tapping screws, bend the sheets lengthwise along the structure. Great care and caution is required as drywall may be damaged. So, you will need tools: 8 mm long screws, metal scissors, drill, level, tape measure.
When bending sheets of gypsum along a small radius, you can resort to other methods. We make parallel cuts on one side of the gypsum board. In this case, the distance between them is from 1 to 5 cm. A smaller gap makes it possible to bend the sheets to a larger radius. You need to cut with a knife or cutter so that about 2-3 mm remains to the opposite surface of the sheet. We screw the resulting sheets to the frame on the ceiling, taking into account that the cuts should be on the convex side. Then, using gypsum putty, we fill the slots.
Installation of frame elements
First, parts of the profile or bars are fixed to the wall.
Drawing of the frame of a plasterboard box. Then the racks are installed in front to the side of the box that protrudes.
In large boxes, barriers are built between the support posts at intervals of 1 m. The sawn wooden blocks at the ends must be treated with a special product - mastic. This is done for strength and sound insulation purposes, as well as to avoid the model squeaking when temperature changes. The metal profile is fixed with dowels, the supports must be made of rack material, they are secured with self-tapping screws on the guide. In a small box, jumpers are placed at a distance of 30 cm; they will add strength to the structure.
Wet method of bending drywall for a semicircle
You will need a special tool - a roller with metal spikes and a long handle, as well as self-tapping screws, a drill, and putty solution. For small jobs ahead, you can get by with a shoe awl. Using a roller, we roll without much pressure the side of the sheet that, according to plan, will be concave. When using an awl for work, you need to pierce the sheets in such a way that only the cardboard paper is touched. After this, it is necessary to wet the gypsum board sheets from the perforated surface.
For these purposes, it is assumed to use ordinary, non-moisture resistant drywall, since it is undoubtedly easier and faster to be saturated with moisture. You can use regular warm tap water for wetting. We apply it to the plaster using a brush or roller until the sheets stop absorbing moisture. But the main task here is not to overdo it, and also to monitor the process, since the drywall profile can soften too much.
Make sure that the back side of the paper remains dry. Optimal soaking of sheets with warm water should last no more than 8-10 minutes. The next step is to carefully fix the plasterboard with self-tapping screws to the structure on the ceiling using a drill, and then leave it to dry for 1 day. Then we finish the job with putty. If desired, the manufactured structure can be painted.
Work production technology
It consists of performing the following actions:
The base of the frame is made from a U-profile, cutting it and bending it to the desired diameter.
- A line is drawn on the floor along which the wall will be made. To do this you need a rope and a marker (pencil). One end of the cord (the starting point) is pressed to the floor, and the other is pulled to a length equal to the radius of the future structure. At this point, fix the marker and, holding the rope taut, draw a semicircle along the floor.
- For the next operation you need a metal U-profile from the kit for installing drywall. Cuts are made in it using metal scissors. Many types of these profiles have cutouts made by the manufacturer, so they can be extended to the desired level.
- The finished element must be secured to the floor using long screws or metal dowels.
- Now we need to make a projection of the starting point onto the ceiling. To do this, use a plumb line or a long, even rod. Having marked the obtained coordinate with a marker, draw a semicircle on the ceiling using a rope and a pencil (as in the first point).
- To install vertical supports, another type of metal profile for plasterboard is used, namely its C-modification, which must be connected to the U-rail laid on the floor with screws. To check the correct position of the vertical stand, use a plumb line or a 90-degree metal square.
- Prepare the U-profile for the ceiling by cutting it in the right places. It is attached with screws to a vertical stand, but is not fixed to the ceiling, connecting its other end with a wedge. Using a similar scheme, you need to secure another U-rail in the middle of the vertical post.
- Drill a hole in the semicircular profile on the ceiling and screw it to it with a metal dowel.
- Using C-profiles, you need to mount the vertical posts in a semicircle. The pitch is selected within 18-25 cm. They are connected with screws to all U-shaped planks on the floor, ceiling and in the middle of the structure.
- The resulting frame is used as a basis for attaching sheets of material. The work must be done from the convex side of the semicircle. The screw screw pitch should be within 12-16 cm.
- After this, the sheets can be attached to the wall from the inside. If it is necessary that it does not conduct noise, then mineral wool or any other sound absorber can be fixed between the layers of material on the profiles. When installing the inner part, work begins from the center of the semicircle to its edges.
- All protruding parts are cut and sanded.
- The end part of the structure is sealed with gypsum board strips.
- The joints on the sheathing must be taped with a special mesh tape.
- Putty is applied to all corner parts of the structure and a perforated corner is installed. After this, everything is leveled with an angle spatula. The same work is done under the ceiling, at the junction. The putty composition is applied to the constructed wall, and after it dries, everything is sanded with zero-grade sandpaper.
- The last stage is to prime the surface of the structure and paint it in the desired color.
Required materials and tools: make a semicircle
The design of the future ceiling is determined in order to calculate the required amount of materials. Regardless of the chosen design, prepare:
- Sheets of plasterboard (GKL) of different thicknesses (from 6 mm to 12.5 mm), it depends on the chosen design. It is recommended to purchase with a reserve, since making accurate calculations is not easy;
- Ceiling profiles CD and guide profiles UD;
- Self-tapping screws and self-tapping screws;
- Profile extensions;
- Putty and primer;
- Connectors;
- Dowel nails;
- Special crab mounts.
To correctly draw a semicircle on the ceiling, you need the following set of tools:
- Rule and level or tape measure and pencil;
- Metal scissors;
- Drill with drills or screwdriver;
- Hammer;
- GKL knife;
- Spatulas;
- Grinding device.
Construction of the circle and second level: stages
In order for a three-dimensional circle to appear on the ceiling, you need to draw it. A simple wire screwed into the surface of the drywall with a screw with a pencil at the end will help. An improvised compass will allow you to carefully draw a circle of the desired diameter. If the final goal is not a circle, but an oval on the surface, then to obtain it it will be enough to connect two circles with an intersection equal to the width of the oval.
Which is better: heated floors or radiators?
Warm floorBatteries
To install the UD profile along the contours of a circle, small notches are made on it every 5-7 cm, thus increasing flexibility. The notched profile easily bends in the desired direction. In this position, it is attached to the frame of the upper tier, screwing screws directly into the surface of the sheet.
You can work using this algorithm not only with the UD profile, but also with the UW profile, the width of which ranges from 50 to 100 mm, which means it allows you to fix the second level with greater depth.
The next step is a line on the wall level with the circle. The UD profile is attached to it. Connect the circle to the wall profile using CD elements and self-tapping screws if the circle was assembled on the basis of UD, hangers if UW was involved in the process.
Both round and oval ceilings are sheathed with plasterboard sheets, similar to conventional multi-tiered structures. Be sure to take into account that the vertical plane of the sheets will be deformable, so they are cut into strips of optimal width and trimmed in increments of 5-7 cm on the convex side of the bend. The blanks are filled into the cavity of the circle, removing excess material with a mounting knife. This option allows you to make a semicircle or circle with a large radius using the dry method.
The wet method involves generously wetting the drywall sheets with a roller or brush and making small holes in the top layer of the coating (use an awl). Wetted sheets become more flexible and do not break during installation of curved figures.
The finished structure is sheathed with gypsum board, the joints are treated, primed, puttied and painted, according to the design project.
Marking the ceiling for a semicircle of plasterboard
It is important to pay attention to proper preparation of the work area. Using a spatula, thoroughly clean the surface of old wallpaper or tiles, and then prime it. Next, dismantle the chandelier and do the electrical wiring, and then start marking.
To perform it, take a rope and a pencil, which is tied to it. The length of the rope is equal to the radius of the full circle of the desired “installation”. Then everything depends on the location of the suspended ceiling. If it is corner, then the second end of the rope is held in the corner of the wall and then a semicircle is drawn. If it is located in the center of the ceiling, then the other end of the rope is held near one of the points of the circle. Then draw two semicircles, one of which is larger in diameter and the other is smaller. Make markings of the places where the frame is attached. It is better to separate the transverse ribs at a distance of 1 m, and fasten the longitudinal ribs 50-60 cm from each other.
In addition, there are other options for applying markings. On thick cardboard or thin plywood, draw a semicircle in natural size, and then cut it out with a jigsaw.
First tier frame - assembly
The finished marking will be a signal to move on to the next stage of work. The lines marked on the wall surface are used as a guide for installing the UD profile, fixing it with the lower edge. It is more convenient at this stage to use a profile with ready-made holes. If they are not there, use a drill, keeping a step of 40-50 cm, to take over the device.
For fastening, dowels with a diameter of 6 mm and screws with a slightly smaller diameter are suitable for reliable fixation.
The preparatory stage for installing the CD profile according to the markings on the ceiling should be U-shaped suspensions. They are fastened at a distance of no more than 60 cm from each other, using flared dowels, most suitable for working in rooms with concrete floors.
As soon as the hangers are screwed, cut the CD profiles and fix them in the previously mounted UD profile. The length of the profile should be 5 mm less than the distance between the walls. To achieve a perfectly flat surface of the future round ceiling, a leveling thread is pulled under the frame, tightening the CD profiles with the help of hangers bent under them.
Using a thread as a guide, the profiles are aligned (each individually), fixed on hangers, adding self-tapping screws on the sides to prevent the formation of backlash. The joints of the profiles are also reinforced with self-tapping screws - this is the final step towards creating the first level frame.
Next, a two-level ceiling with a circle on the surface is mounted, proceeding directly to creating a circle.
Installation procedure: install a semicircle of plasterboard
Having completed the markings, proceed to install the semicircle. To begin, mount the frame, for which you need:
- Guide profile 27 x 28 mm, attached to the wall;
- Ceiling profile 60 x 27 mm;
- Special “rivets” – crabs;
- Straight (or U-shaped) suspensions or strings. Direct hangers are used if the distance from the main ceiling to the suspended structure is no more than 11 cm, and string hangers are used when this distance is exceeded.
Now cut the UD profile to a length slightly larger than the circumference. It is necessary that there are two such parts - for the floor and the ceiling. Using dowels, mount guides through the holes in them approximately 10 cm from the ceiling. If there are no such holes, make them yourself with a distance of 50-60 cm. Then vertical guides from the profile are installed between them, which are fastened with crabs at the joints of the profiles. The distance between them is one meter. Be sure to secure the crabs with self-tapping screws on all sides. Pay attention to the rigidity of the suspended structure.
The last thing to do is distribute the wiring inside the frame. After this, proceed to installing drywall on the horizontal surface of the ceiling structure.
Installation procedure
You know how blanks for the frame and cladding are made, all that remains is to tell you how to make a circle of plasterboard inside and out. Or any other voluminous figure with smooth shapes.
For example, let's take a ring in the center of which a chandelier will hang.
- First make a drawing on paper or in a computer program with all dimensions.
- Transfer its horizontal projection to the drywall and use a jigsaw or hacksaw to make the main workpiece.
- Attach the cut out piece to the ceiling and trace around it. This will give you lines along which you will need to secure the guide profile.
- Measure the length of each line, cut the corresponding segment from the PN profile. If the length of one profile is not enough, then the whole plus a segment.
- The guide must be attached to the ceiling in such a way that sections of the rack PS profile can be vertically inserted into it. This means that the bend should go along the side. We make cuts to it, as described above.
- Fix the profile along the line on the ceiling. Fasteners are selected depending on the base material. If it's a concrete slab, use dowel nails.
- In the same way, make two more curved profiles and screw a ring cut out of plasterboard to them.
- Cut sections from the PS profile equal to the desired thickness of the plasterboard structure. They need to be screwed to the ceiling guides every 30-40 cm. The back of the profiles on the outer circle should look outward, on the inner one - to the center of the circle.
- Lift the plasterboard ring, slide it with guides onto the free ends of the vertical profiles and screw it in place.
- All that remains is to cut strips from the plasterboard for lining the vertical part of the frame, bend them using any of the methods described above, and screw them on.
Installing a semicircle of plasterboard
Now the structure is neatly sheathed with plasterboard. When performing work, pay attention to the following:
- To prevent the installation joints of the sheets from being noticeable, install the gypsum board along the window;
- Hide the screw heads in the material; it is unacceptable for them to be visible on the surface.
Next, bend the drywall into a semicircle.
You can see in detail how to make a semicircle on the ceiling yourself using the following video as an example:
You can bend drywall into a semicircle using one of two methods of bending gypsum board sheets: dry or wet. But remember that you need to work carefully, as there is a danger of damaging the material.
The dry method is suitable for structures with large radii. One side of the sheet is attached to a pre-made frame, and the other is pressed against it. This gives the sheet the required shape. Finally, the sheet is fixed to the frame.
To bend a sheet using a wet method, take a roller (or brush) and an awl. Drywall is pierced in several places, but only the top cardboard covering. Then, using a roller, the material is moistened with warm water until moisture stops being absorbed into the sheet. Thus, drywall saturated with moisture bends well into a semicircle.
When the structure is completely covered with plasterboard, cover with putty all the places where screws are screwed in and joints, and finally prime with a deep penetration primer and paint the ceiling. The work is finished.
Stroyobzor.info
Stroyobzor.info - the site provides a complete description of building materials used in both low-rise and industrial construction
- home
- Site Map
- Materials Zero cycle Piles
- Brick, stone, blocks
- Concrete, mortar, cement, additives
- Bulk materials
- Concrete products
- Construction fittings
- Foundation
- Window
- Facade materials
- Insulation materials
- Roof
Other drywall elements: don't limit yourself to a semicircle
The first thing that comes to mind when you think about what elements you can make from drywall with your own hands is partitions of various types and purposes. It's no secret that the layout of our apartments quite often does not suit the owners at all. But in order to seal an unnecessary opening or build an internal wall, according to the rules, you need an architect's permission. Otherwise, the load on the floor slab may be undesigned and lead to extremely unpleasant consequences - from cracks in load-bearing walls to collapse of internal walls. In this regard, plasterboard figures are simply beyond competition.
Why choose drywall for products:
- This material is very light and will not have a deforming effect on the structure of the building.
- No permit is required to work with drywall.
- Structures are erected very quickly, without dirt and practically without noise, which allows you to work with the material even in the evenings and on weekends.
- And the result is almost the same as when laying bricks, only it is achieved more quickly and easily: the extra entrance is closed, the too large room is divided into two smaller ones.
- A variety of designs: partitions can be made solid - from floor to ceiling, or they can separate the sleeping area from the play area in a child's room. Or you can use lattice ones, dividing the uncomfortable space into the personal territories of family members. At the same time, plasterboard products are as easy to install as they are to subsequently dismantle - not like, for example, brick or block options. And if you get tired of the existing layout of the rooms (not immediately, say, after a certain number of years), then you can quickly disassemble everything and rebuild it according to the project you have planned.
What is a plaster ceiling
Despite the banality of such a question, we will still start with the basics, because not everyone grew up on a construction site.
So, there are two main options for creating a ceiling plane.
The first one has been known to us since the times of the Soviet of Deputies and it consists of plastering the floors, in the hope of giving them the appearance of a smooth horizontal canvas. If the reinforced concrete products were laid with straight hands, the layer was not so large, and the ceiling was quite flat.
Of course, he was like a beggar in the skies for design perfection, but in those days, no one really bothered about beauty. Put up patterned wallpaper and let the neighbors be jealous
The revolution occurred with the breakthrough into the domestic market of technologies that create false ceilings on a frame or tension basis. And the first one here was just drywall. The metal frame was installed at some distance from the real ceiling and sheathed with sheet material. Moreover, the structure did not have to be located only in one plane. The technology included both the creation of volumetric ceiling patterns and multi-level figured vaults.
And they could be installed in an ordinary apartment!
Plasterboard arches in a semicircle
All kinds of arches are no less valuable in apartment design. They are best suited for small apartments: arches visually enlarge the space, adding space and air. Such plasterboard products are very interesting when decorating enfilade rooms, and apartments with a “train” layout are very common on the secondary housing market.
They can be very different:
- solid, framing the opening;
- openwork, combining through shelves for small items;
- blind ones protruding from the wall - a modification of a niche that focuses attention on what is placed in it - the same little things pleasing to the eye: souvenirs, figurines, CDs or books.
Very often, such arches are used when creating a studio apartment or at transitions from the corridor to the kitchen.
Niche: functional, stylish and original
Some homeowners complain that GLK products take up living space in already small apartments. However, these losses become invisible if you approach the issue wisely and integrate niches and shelves into the design.
- There will be no need for a bookcase in the office if you equip the paneling with shallow shelves.
- In the living room, a niche can comfortably accommodate a TV along with other equipment. It will fit the equipment into the overall design, and you will not need to buy a table or stand for it.
- Instead of frames for paintings and photographs, small recesses in the wall are perfect. In addition to their original purpose, they will also break a dull wall into separate zones, adding liveliness and showiness.
- Fans of comfort can equip a niche for a fireplace. Even its electric version will look more natural, especially if faced with decorative stone.
The main thing when equipping niches is to have a sense of proportion. The abundance of such recesses, instead of expanding the space, begins to overload it, overwhelming it with the amount of detail. If you plan to build several niches in the wall, you need to think about their relative placement so that they do not compete with each other and do not contradict each other.
How to prepare a profile
As for the profile size, I mainly have to deal with 27/28mm. This is the so-called “guide”. This is perhaps the most commonly used material in combination with 60/27 (used for jumpers).
In order for the guide profile to be able to repeat the radius you drew on the sheet of plaster, you need to perform a simple action with it. You will need a small grinder that can be easily held with one hand when in disrepair, and safety glasses.
We install a metal cutting disc on the grinder, cut notches on the profiles every 5cm. Here we need to clarify; the steeper the radius of the arch, the more frequent and smaller the distance between cuts on the iron.
Pay attention to the photo above, I am preparing several workpieces at once, about one meter long; if you try to screw a long workpiece alone, then most likely the result will not be quite even and accurate.
Profile for ceiling radius
What this technique ultimately gives, I think you can guess for yourself, the notched profile 27/28 turns into a kind of rope, you can easily screw it with self-tapping screws to the drywall, gradually bending it and directing it along a given radius.
We’ve probably sorted this out, if anything is not clear, I’ll be happy to answer you in the comments below the article, don’t be shy and ask questions!
Columns and figures made of plasterboard
Columns are rarely found in city apartments due to the small living spaces. Most often they are installed when equipping arches as load-bearing supports when dismantling partitions. In this case, they are made from strong materials (in particular, from rails) and sheathed with plasterboard to give an attractive appearance. They are often finished with decorative stone, wood or stone wallpaper, and artistic mosaics.
In the past, after renovation, the top floor slab would shine with a new whitewash/paint, but remain rather dull and unattractive. With the advent of GLK, this custom was irretrievably forgotten. Of course, you can simply cover the ceiling with material and calm down, but there are more tempting offers.
- First of all, these are, of course, multi-level structures. They are most widespread due to the ability to mount hidden diffused lighting and additionally zone the room.
- A lesser-known design move that is gradually gaining popularity is plasterboard patterns on the ceiling, which add individuality and expressiveness to the room. They are often equipped with lighting for greater effect, but they look very good just in different finishes.
Smooth lines, usually chosen when sketching, soften the overall look of the rest of the room. Designers rarely stop at right angles, since making a semicircle from plasterboard is absolutely not difficult; it can be easily cut both straight and curved. The same applies to the profile - it can be curved in any desired direction. And the squares and rectangles of a multi-level ceiling roughen the appearance and are only appropriate when decorating a room in a techno or high-tech style.
In general, if desired, you can make from drywall not only a semicircle, but also various products for any, as they say, tastes and fantasies, and do it yourself. Would you like to decorate your apartment artistically with this wonderful material?
How to treat the surface → Room decoration → How to choose the right paint → Surface treatment technologies → Leveling and finishing the walls → Selecting and applying a primer → Removal from the surface → Stretch ceilings and technologies → Reviews and testimonials
Types of solid partitions
How to make plasterboard patterns on the ceiling
Solid plasterboard partitions are suitable for closed zoning. That is, such a bulkhead plays the role of an additional wall - monolithic, with a door or arched opening.
When, during delimitation, there are no windows in one of the resulting zones, to allow natural light to penetrate, window-type openings are made in the partition element and filled with light-transmitting material.
If it is possible to zone one large room into two adjacent rooms, the delimiting structure must be equipped with an entrance opening. Its dimensions and configuration may vary, as well as the size of the plasterboard bulkhead itself.
Let's take a step-by-step look at how to mount a basic rectangular wall up to the ceiling:
- Mark the wall, ceiling and floor surfaces using a level and plumb line. Next, straight lines required for the subsequent assembly of the metal frame are drawn along the marks. The guide profiles must be installed level to avoid distortion of the structural element.
- To avoid the hassle of connecting frame parts in the corners, cut the ribs of the guide so that it can be shaped into a right angle. Then the profile can be placed on the floor, and then move to the wall at an angle of 90 degrees. In the same way, you can mount parts at ceiling-wall joints.
- The guides are secured with dowel nails. If installation is carried out on a concrete base, use a hammer drill. The result is a rectangular structure, which is the basis of the metal frame.
- Frame corners are fastened to each other to avoid bending of the profiles. For this purpose, two or three notches are made in each corner on both sides of the guides using special pliers (notcher). In the absence of such a tool, fasten the corners using small metal screws with a press washer.
- To strengthen the frame base, rack profiles are installed into it in increments of 0.6 m. To increase rigidity, two profiles are inserted into each other, creating a single rack. This will strengthen the frame and make it easier to attach drywall to the stud on both sides.
- Horizontal jumpers are mounted to give reliability to the structural element, securing them between the rack profiles with special pliers or small self-tapping screws. Horizontal profiles must be trimmed for easy installation between posts.
If small openings are needed in the delimiting element, they are installed during the construction of the frame. Several additional jumpers are installed for further lining with plasterboard from the inside.
A similar effect is achieved by using a wooden block with such a thickness that it fits tightly into the recess of the profile. Or they install two reinforced profile elements connected together.
If the design of the false wall involves the installation of sliding doors similar to a sliding wardrobe, after assembling the base, the rail system is secured. This type of doorway design is preferable to swing doors. Drywall, due to its fragility, cracks due to constant impact loads. To strengthen the frame, a transverse bar is installed at the level of installation of the guide rail.
A rather interesting option is sliding cassette doors that move not along the partition, but inside it. And it is precisely the gypsum plasterboard bulkhead on a metal frame that allows you to easily arrange a parking “pencil case” in which the door leaves will be hidden.
Where are curved surfaces used?
Naturally, you don’t have to bother and make ordinary rectilinear shapes of your own making. Even when creating a multi-level ceiling, you can assemble the system while maintaining an angle of 90 degrees.
There are a huge number of structures where semicircular plasterboard is used: arches, multi-level ceilings, partitions.
But ceilings that have a two-tier structure, and also with smooth contours, make the exterior design much better. Smooth lines create a feeling of lightness and completeness.
Arches in doorways will visually expand the space, creating a feeling of spaciousness even in small rooms.
Curved shapes are unsurpassed in the design of both living rooms and bedrooms. And thanks to the arches and semicircular curves in the gaps, it’s easy to make a smooth transition, for example, from the kitchen to the living room.
In any case, light semicircular curves will improve the design of the rooms.