People always strive to make their home unique and beautiful. And no matter how difficult it is to achieve originality in a typical apartment, there is always a way out. One of the most non-trivial and elegant solutions is to create a bas-relief. Many novice craftsmen think that this is too difficult work, but this is not at all true. To sculpt a wall panel, you don’t have to be an artist or sculptor. After watching a video with a master class on creating a bas-relief on a wall with your own hands for beginners, and getting acquainted with the step-by-step instructions given below, you will easily cope with the task.
The use of decorative non-standard wall design: bas-relief and its relevance
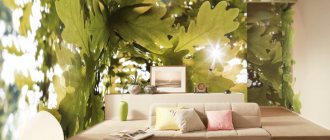
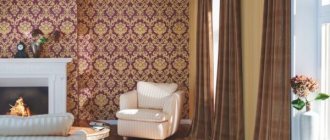
The use of bas-relief drawing techniques in wall decoration makes the space original and gives the room an atmosphere of sophistication.
Bas-relief is a stucco molding known and used in the decoration of houses since ancient times. It also has practical significance: it visually hides communications or cables, wall defects. The volumetric figure above the bed looks especially impressive. Today, designers are again thinking about combining luxury interior design with inexpensive materials. Therefore, this option for wall decor will not only be interesting, but also a fairly economical way to renovate.
The plaster pattern goes well with both a classic style in the interior and a very creative one; it can be re-painted when changing the overall color scheme in the apartment.
general characteristics
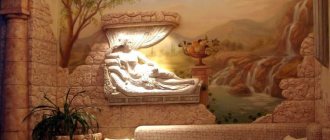
The monument is a structure with a wide staircase and a colonnade, under which there is a long panoramic relief. It depicts separate groups of people, animals and giants engaged in battle. Relief is classified into four types:
- Bas-relief. The sculptures protrude less than half above the flat background.
- High relief. The sculptures greatly extend beyond the background and are sometimes even partially separated from it.
- Counter-relief. It is a negative, that is, the composition is not convex, but concave.
- Ankre, or koylanaglyph. Only the outline of the image is cut out on a plane (usually a wall), that is, the composition is as concave as the counter-relief, but its depth is the same everywhere. This type is considered more primitive. It became widespread only in Ancient Egypt.
Bas-relief was rarely used in the interior of simple houses. Only very wealthy people who had real palaces at their disposal could afford it. More often, bas-reliefs were used to decorate the exteriors of Gothic-style houses and the interiors of cathedrals and churches. In modern interiors, decorating with such sculptural compositions has become accessible. You can even create a bas-relief yourself. We’ll talk further about the features of such sophisticated decor and how to make it yourself.
Techniques for making plaster drawings
Below are some styles of bas-relief.
| style decision | description |
| empire style | gives the room fundamentality and status thanks to massive elements. Especially relevant are arches made in this style or columns. Empire style is often used in certain areas. |
| Roman | characterized by the repetition of similar elements, the so-called rapport. The ornament of the details should be worked out, since it is this that will emphasize the overall effect. |
| baroque, rococo | characterized by rather light and curvy shapes. Baroque symbolizes the volume of design and asymmetry. Rococo focuses on military action, people or animals. |
| Art Deco | a rather abstract direction, bright, colorful and creative, but when used skillfully it makes the room very elegant and chic. Art Deco style often uses gilding and chic |
| classic | classic motifs are widely used when decorating a room in restrained or light colors, with a minimal set of colors in the interior |
It is necessary to think through every detail or element, and, while maintaining symmetry, choose harmonious colors and shades.
What material is stucco made from?
To create three-dimensional drawings, any materials that can be carved or those that can be poured into a mold are used.
List of materials for creating a bas-relief:
- plastic;
- gypsum mixtures;
- stone;
- clay, including decorative clay;
- decorative plaster;
- wood, including bamboo;
- metal.
Plastic elements are lightweight, inexpensive, and easy to install. Stone or metal bas-reliefs are more expensive, but they look incredibly luxurious. Gypsum is considered an environmentally friendly material, non-flammable and does not support combustion.
Sketches and stencils for beginners: figures, plaster patterns
Decorating walls is a very labor-intensive task. But even if there is no art education, with time and patience, everyone can realize their ideas for decorating an apartment.
For beginner sculptors or people who want to start creating stucco for the first time, simple patterns are suitable:
- tree stems;
- simple flower;
- You can try to sculpt simple geometric shapes along the contour of the mirror.
It is better to cut out the image along the contour from the wallpaper or buy ready-made sketches and stencils in specialized stores. There you can also select additional finishing materials that complement the stucco molding.
Wall mount
The problem of attaching the bas-relief to the base can be avoided if you sculpt it directly on the wall. In other cases, the composition is placed on liquid silicone or a special adhesive. If the relief was modular, then after fixing the joints, they are carefully rubbed down with putty. It is not recommended to decorate “flimsy” plasterboard walls with this decor. The base material must be reliable and strong. The joints between the bas-relief and the wall are also carefully masked. It is important to know. By the way, the modular composition is convenient for beginners. If unsuccessful, any of the relief components can be replaced without harm to it.
Do-it-yourself artistic plaster modeling in an apartment: step-by-step guide
It is better to start the first steps in creating a bas-relief using simple tools and materials.
Tools
List of necessary tools for creating a bas-relief with your own hands:
- cardboard, if you plan to cut out a stencil yourself or a finished stencil;
- sandpaper for grouting;
- masking tape;
- knife, spatula and plaster or sculpture stack;
- brush;
- spray bottle with clean filtered water;
- an oil felt-tip pen if you plan to highlight the contours with color;
- scraper;
- household gloves.
Relief patterns will turn out especially clear if you use a special form to create them.
Materials
It is better to use putty as materials. The main condition is that it must be plaster, otherwise the created figure will easily collapse. You can buy this putty ready-made or mix it yourself.
List of materials for bas-relief:
- gypsum putty in a volume of about 3 kg;
- primer of similar weight;
- acrylic paint;
Polyurethane stucco molding is highly durable, its texture resembles plaster. The material can withstand temperature changes, humidity, and minor mechanical damage. The surface of the figure can be painted in any shade; it is easy to create an antique effect.
Blanks for future plaster modeling
Surface preparation for the application of volumetric forms is very important. The surface must be flat, otherwise the pattern will be distorted and its adhesion to the surface will not be reliable.
When constructing the model, special forms are used.
Preparation of plaster or plaster mortar
The most suitable plaster compositions are products from the Knauf line, for example, Rotband Knauf. This mixture, ready for application to the wall, must be diluted with water strictly in accordance with the operating conditions specified on the packaging by the manufacturer.
The use of other plaster mixtures is allowed. The main condition is that the material must be of high quality from a trusted manufacturer, plastic, and its structure must not form lumps.
When to use wire
For thin and curved lines, wire must be used. It will give strength to fragile elements, create a kind of frame for refined parts, protecting them from deformation.
How to lay out a relief design on a wall
The prepared stencil must be fixed to the wall with masking tape. To do this, you need to attach it to the surface and press tightly, leaving the holes free. The mixture is poured into these holes.
Fastening and drying
After some time, the mixture will begin to harden. At this moment, seven grabs the wall.
Further process of modeling the bas-relief on the wall:
- the stencil must be carefully removed;
- it is necessary to fill the voids with plaster stack;
- sprinkle the elements with water;
- model each curve of the design with a brush;
Leave until completely dry, then scrub with a scraper.
Toning
Before tinting, it is necessary to sand the model.
To do this, you need to take fine sandpaper and rub it evenly over the convex and concave places over the entire surface of the figure in a circular motion. Next, use a brush to remove gypsum dust, carefully cleaning it from narrow concave areas. After which, the figure is coated with a thin layer of primer, for example, a special primer varnish to protect it from the damaging effects of sunlight or the adhesion of dust. If the walls are to be painted, then apply the paint in two layers, allowing each layer to dry.
Stage No. 1. Working with a sketch
At this stage, a sketch of the bas-relief is created and transferred to the wall.
- First, the picture is transferred to paper, which is then covered with film on top and the outline is redrawn on it. The drawing can be traced with a pen, marker or felt-tip pen. The most important thing is that it does not wear off. The image is ready.
- Now the base is prepared. A layer of acrylic putty or Marseilles wax is applied to the wall. After this, you can treat the wall with fine-grained gypsum (satengypsum), then it will not be perfectly smooth, and the putty will stick to it better. This will be the basis of the future bas-relief. The putty is leveled with a spatula, then the layer is allowed to dry a little.
- When the material begins to set, after about 15–20 minutes, you can transfer your design onto it. The film is fixed to the wall using masking tape. In this case, one edge must be left free so that you can lift it when needed. Then the stencil on polyethylene is outlined with a pencil or other suitable object, such as the back of a brush or stylus. The image is imprinted on the wall.
Examples of plaster modeling in apartment design
The most popular among bas-reliefs are figures in the form of a tree, flowers, especially roses or birds.
Gypsum tree
The tree represents life. Spring begins with the appearance of the first leaves on the branches, and everyone knows the “tree of life” or “tree of desire”, “family tree”. The tree looks as if it is growing from the wall, creating a special futuristic effect.
To form the trunk, the plaster is applied in short strokes in a checkerboard pattern.
To form branches and stems, it is recommended to use wire for strength as a frame.
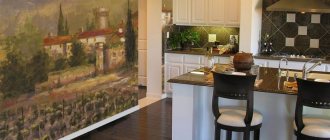
Drawings in apartments
In an apartment, it is appropriate to highlight the work area or the space above the bed with a thematic pattern. If the apartment is small, you can build a canvas stand for the drawing and move it to different rooms as needed.
Roses and other flowers made of plaster
To create flowers from gypsum, it is better to mix it with PVA glue in a small proportion. And when creating the shape of the petals, to make them smooth, you need to moisten the working tools with water.
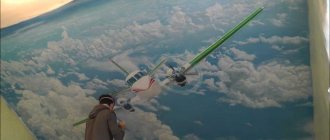
Bird painting
Birds in bas-relief are quite difficult to process. The bird has feathers, which means painstaking drawing of each feather is required. You can only create the outlines of birds, but the effect of a “bird of paradise” will not be achieved.
Result
As a result, only after the fourth layer of paint was it possible to achieve a uniform color. I liked the paint after it dried, it looked like it was rubberized, perfect for the kitchen, it can be washed.
Of course, the tree turned out to be simple. This is the first time such an idea has been born, I think it turned out quite well for a beginner. The children are delighted, and my miracle apple tree immediately attracts the attention of the guests!
In general, I'm pleased with the result. And the cost was economical. I wanted to make a kitchen in gray, white and lilac tones, but now the color seems dark.
What do you think, is the color good? I think it would look better in white or gray. Or even paint the tree like a real one: green leaves and red apples?
Tips for beginners on how to do it right
Having little experience in interior design, it is easy to make mistakes.
Typical mistakes when creating a bas-relief:
- It is not recommended to use stucco as decoration in small rooms and with ceiling heights of less than 3 meters. Volumetric figures look massive and the space will seem even smaller, and to see the pattern on the stream you will have to lift your head;
- when decorating the kitchen with three-dimensional figures, you need to calculate their sizes so that they do not block the hood or ventilation;
- all elements in the room should have the same style, texture or range.
In a narrow hallway, it is also inappropriate to decorate the interior with a three-dimensional pattern, but you can decorate the doorway and ceiling with moldings.
What are stencils for decorative plaster
You can create a beautiful pattern using special forms with removed parts that form the outline of the future bas-relief.
The use of stencils allows you to create almost any decorative pattern on a flat or slightly curved surface.
And the simplicity of this method allows you to not involve either designers or plasterers in the work.
The advantage of using stencils
- You can either buy stencils or make your own.
- If template solutions are not suitable, then you can come up with a design yourself.
- Despite the fact that many patterns seem difficult to make, they can be made using the stencil method by a person who has no experience in this matter.
- Stencils allow you to create almost any ornament.
- Bas-relief can be created on almost any surface.
- This method will help hide imperfections on the surface.
The bas-relief can be made even more beautiful if you choose the right lighting. This will also provide the ornament with elegant spatial depth.
Restoration and care
Sometimes troubles occur in the form of breaking parts of the bas-relief, or over time it begins to lose its original appearance, for example, forming gaps at the points of attachment to the wall.
Broken parts are restored with a similar composition of the solution in its exact consistency, and the gaps can simply be covered up.
Drawings with plaster or other materials allow you to highlight part of the wall or become the central element of the rest of the space, cause surprise and admiration of friends, relatives or guests, and make the room truly luxurious.
Stage No. 2. Main part
Now we proceed directly to the formation of the bas-relief. This is the longest stage, during which the image gradually becomes embossed.
- The putty is applied layer by layer to the wall along the drawn contour.
- Each layer is allowed to dry, and only then the next one is applied.
The putty should be moderately thick, flexible and harden gradually.
- All details of the bas-relief are drawn with palette knives, and sculptural loops are used in difficult places.
If the parts are very convex, then it is advisable to screw self-tapping screws into the wall, which will reinforce the structure. This will allow the bas-relief to maintain its shape and not crumble.