What if you take and paint freshly plastered walls? Or put wallpaper on them? That's right - everything will fly off completely or hang in ugly clumps. It seems that we forgot to do something - the home handyman will think. Of course they forgot! Who will prime the walls and ceiling? In this article I would like to show how this happens. How to apply primer to walls and ceilings, how to avoid getting yourself wet from head to toe and not getting the floor just covered with laminate all over it. Why you shouldn’t use a sprayer and how to avoid getting into a puddle in the truest sense of the word. In a word, meet: Notes of an “old painter” 
Why do you need to prime walls and ceilings?
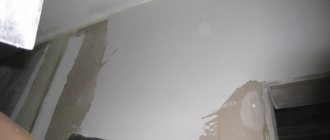
If you walk up to a freshly plastered wall and run your palm over it, you will immediately realize how unstable the surface is. It's not like she's missing out. It’s just that no self-respecting wallpaper will stick to such a dusty base. And if they stick, they will very soon begin to fall off with contempt and roll back into rolls :).
Why? It’s just that particles of glue, which we used to spread the wallpaper with our usual economy, got caught on the dusty outer layer of the wall. Dust is a rather “windy” thing. She is not obliged to hold on to the surface with all her might and leaves it at every opportunity. All you have to do is blow harder and the smallest particles of plaster form a whole cloud. Then it is deposited on furnishings with a beautiful white coating.
If we glue wallpaper to such an unreliable surface, the result will not be long in coming. Moreover. Already at the gluing stage, we suddenly notice: “something clearly went wrong.” Of course, we can say that the wallpaper is “stupid” and the glue is some kind of “Chinese”, and they themselves have little experience in such matters.
But, believe me! Once you prime the walls, everything will immediately fall into place. The primer is a liquid slightly similar in color and concentration to milk. It binds dust and increases the adhesion of surfaces, that is, its ability to hold wallpaper or paint applied.
If, after priming, you run your palm over the same wall, you will be pleased to find that your hand remains clean. No dust! Even if in the near future you will not be decorating the walls in some utility rooms, for example, in the boiler room, it is still worth applying a primer. There will just be much less dust.
What you need to apply primer to walls and ceilings
If we take the classic method, which gives a fairly quick and high-quality result, then you will need to buy this “beginner primer” kit:
As you can see, we will use a roller, since working with a brush takes longer and is less convenient. When you buy a roller, tell the seller that it is for primer, that is, for a very liquid substance. Let's say paint requires a different roller. Personally, I used the telescopic handle. It can be extended, which will allow you to comfortably work on the surface of the wall near the ceiling and the ceiling itself.
Next we have the liquid itself. I chose the Olympus primer, although I can’t say that it’s the best choice. At least for internal work this liquid was quite suitable.
It's a good idea to have an idea of how much primer you'll need right away. The larger the container's capacity, the cheaper a liter of liquid is. The label indicates the approximate consumption - 10 kg per 80 square meters of surface. Just in case, I’ll say: we’re talking about the area of the walls, not the living space of your apartment.
So before going to the store, it is advisable to have at least a rough idea of the surface area of all walls and ceilings, if they will also be processed. A good assistant for this would be a tape measure with a calculator or a laser range finder with an area calculation function.
In addition, as a friend, I recommend buying a painting tray. It costs a penny, but working with him is a pleasure. And why weren't they made before?
And finally, you should take care to protect the floor covering, if you already have one. In general, it is best to carry out all this liquid work before laying the floors. But situations are different. For example, I first laid laminate on the floor, and only then began working on the walls.
It is best to buy a thin film and stick it with masking tape around the perimeter of the room. It's better to use a painter - a regular adhesive layer may remain on the laminate.
Of course, somewhere inside each of us there lives the confidence that if we act carefully, then protection may not be needed. However, “miracles” happen even to the most seasoned professionals. What can we say about us, mere mortals, who last held a brush in our hands back in kindergarten?
So, all the preparations have been made, the room is ready, you can start:
Setting up the spray gun
The option process is of fundamental importance for high-quality priming of a wall or other surface. The apparatus must be adjusted so that the torch cone is of the correct size and shape.
- The shape of the torch is adjusted with a special screw.
- The volume of sprayed soil is controlled using a control head. It is recommended to apply a small amount of compound to the sample first before applying to the finished surface. This will help estimate the volume of material released.
- The pressure level is set using the bore adjustment head. The recommended pressure is 3-5 bar. Also, using the head, you can change the shape of the torch cone.
The nozzle is critical for high quality priming. The larger the grain size of the primer, the larger the diameter of the nozzle should be.
How to apply primer to walls
Next, it’s easier to show the process in pictures. In principle, there is nothing complicated there, but there are little things that it is advisable to know about before starting work.
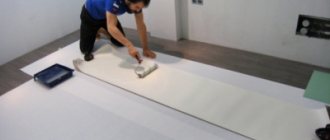
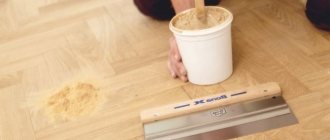
Step 1. Pour the liquid into the tray
At this moment, you will most likely be glad for the first time that you covered the floor with film. Even the most careful novice painters can spill some of the primer when it begins to gurgle and splatter when poured into the tray from the canister.
Step 2. Dip the roller in liquid
Funny? And this is an important step. Especially when we are dipping a completely new roller. You need to give it the opportunity to soak in the primer.
Next, we begin to “roll” it along the ribbed surface of the painting tray, as if squeezing it. In this case, some of the liquid flows from the roller back into the tray:
I think you will definitely appreciate the ease of use of the tray. This is much more convenient than dipping the roller into a bucket, then trying to squeeze it off the edges, and then spilling half the liquid on the floor while you carry the tool to the wall.
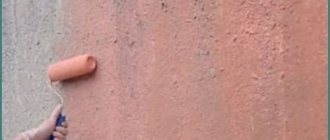
Step 3. Start painting
At first, it is better to start moving the roller approximately from the middle of the wall towards the ceiling. At first, do not press the roller, otherwise the excess liquid in it will flow down the wall. We'll have to catch it. Just place the roller on the surface and roll it up:
If at this time you look at the rolling roller from above, you can see that it is “driving” a wave of liquid in front of it. This is a primer that is squeezed out of the surface of the roller:
The further we roll the roller, the less liquid remains in it. At some point, you need to lightly press the tool to squeeze out the remaining primer. However, everything in the world comes to an end. When you see that after passing the roller the wall is not wet enough, you need to dip the tool in the liquid again. Then everything is repeated from the beginning.
Primer spray guns
Every painter should have in his arsenal not only ordinary painting tools, but also primer paint sprayers. Without a special high-tech device it is impossible to achieve an ideal result. It is recommended not to save on purchasing a device, since by paying 1 time more, the client avoids premature breakdown of the device and failure. Primer paint sprayers from Volex are the best option, guaranteeing a combination of quality and savings.
Craftsmen who purchase cheap and low-quality goods will end up with poorly placed primer and quick failure of the device. Accordingly, the purchase will be many times more expensive than the initial purchase of a product with excellent characteristics.
The main task
Primer spray guns are used for painting any surfaces, but most often when working with cars. To carry out body painting, it is recommended to have several devices:
Primer spray with a diameter of 1.9-2.2 millimeters. These are universal models of paint sprayer, but it is strongly recommended to use them as a device for painting the body.
For more delicate and local work, you need to purchase a primer spray gun from Volex with a nozzle size of 1.2–1.4 mm. The small diameter will provide greater savings in primer for painting and minimal fog formation. This option is perfect for use with partial or spot painting.
Volex primer paint sprayers are very economical due to the balanced supply of air and consumption of the paint mixture. This allows the use of low-capacity compressors, and the needle nozzle is made of bronze. The tanks are made of aluminum or nylon, the spray head and body are made of nickel-plated bronze, and the spring is made of steel. The company's products are distinguished by their quality and durability.
Excellent quality allows you to quickly clean high-tech tools from the consequences of previous work. The best air seals minimize the cost of servicing the device. Primer paint sprayers can be purchased at the most affordable prices in almost any construction tools store.
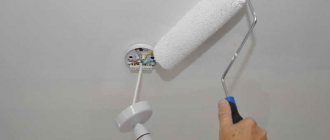
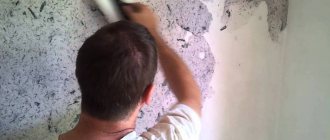
Features of the ceiling primer
This is a very similar process, only now you need to roll the roller towards yourself, gradually retreating back. This way you will see a “wave” from the liquid and will be able to decide at what moment you need to press harder on the tool. After just a couple of passes over the surface, you will learn to choose the speed of its movement so as not to spill excess primer on the floor. You may even find the situation interesting when the liquid, which seemed inevitable to spill on the floor, again “wraps around” the roller. It's very difficult to explain. You will see everything for yourself.
At first, two troubles may await you:
1. You will pour primer on yourself.
If you roll the roller along the ceiling directly above you, there is a high probability that excess liquid will “pouring out” onto your head if you press it incorrectly. More precisely - in the eyes. You're looking at the roller. If this happens, you should immediately rinse your eyes with water. And you shouldn’t leave the primer on the skin for a long time.
To avoid this situation, start applying primer from the far edge of the ceiling, holding the stick from the roller at an angle of approximately 45-60 degrees. If something spills out, it certainly won’t be on you.
2. You'll trip over a paint tray.
When you roll the roller, you won’t even notice how you start moving backwards. This is completely normal and natural. The main thing is that nothing significant gets in your way, for example, a paint tray or even a whole canister of primer.
Since an ordinary person does not have back eyes on the back of his head, and the front ones will be focused on the movement of the roller along the ceiling, it is not difficult to imagine what could happen. I think the very first acrobatic sketch that you perform, stepping into a tray with primer or tripping over a canister, will work on you much better than any admonitions.
If you're lucky, you'll just end up in a puddle. In the worst case, trying to maintain your balance, you will throw your working tool out the window and break something you need.
Until this happens, learn to prepare “escape routes.” Remove everything in advance from the part of the floor where you will back away, applying primer to the ceiling. It is clear that the creative process is drawn out, but if you have your head in the clouds near the ceiling, do not forget about the troubles that await you on the sinful floor.
Should I spray primer?
The answer is yes, you can. But it's not necessary. The idea of using a spray gun or a simple “spray gun” was not invented by me. Every now and then “useful” advice from folk craftsmen appears on the Internet, showing how they quickly and efficiently treat walls with primer.
A novice painter uninitiated in the intricacies of the process can easily succumb to provocation. After all, everything really looks great in the video. Just a couple of minutes and the whole wall is ready.
Taking this opportunity, I decided to test the advice of the painter who performs so picturesquely in front of the camera. This required the following things:
You still need the “magic liquid” itself, a regular sprayer for plants (it was with its help that miracles were shown in the video on YouTube), and a jug to pour the soil into the bottle. You can use a funnel instead. The set is completed with a respirator and goggles to protect the respiratory tract and eyes.
In the video I watched from the Internet, the craftsman did not use protective equipment. However, all experienced painters who care about their health know how this can turn out. It's one thing to just spray primer for a couple of minutes to film a demonstration. Real work in a small and, God forbid, unventilated room is a completely different matter.
The smallest droplets of soil that inevitably form in the air during spraying will enter the lungs and eyes for quite a long time. I think there is no need to describe for a long time the harmfulness of such inhalation. Therefore, before starting the experiment, it is worth putting on protective equipment.
A hat is also included in the set of protective equipment. You can use something else instead, but in any case it is better to cover your hair. This liquid looks so harmless. But when it “gets”...
At first everything went very well. By setting the “sprinkler” to the “jet” position instead of the “spray” position, I actually began to treat the surface of the wall quite quickly.
There were only a couple of moments that spoiled the idyll: I had to add liquid quite often and change hands, giving them a little rest in turn. And so, in principle, the work was almost in full swing.
In the midst of working on the first wall, I had to pause to answer the phone. And, it seems, I spoke for only a short time—three or four minutes. But when I returned to the room and looked at the wall, I realized that “I have problems.” The area I had already sprayed was dry and looked exactly the same as the untreated surface.
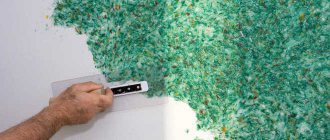
It was completely unclear where processing should continue from. Deciding to check the wall with my palm, I was horrified to discover that even the already sprayed surface continued to “paint”, that is, it left a white mark on the palm. Of course, not the same as before processing, but it shouldn’t exist at all!
Alas! Applying primer using a sprayer did not pay off. The degree of surface wetting turned out to be clearly insufficient. Here and there there were completely untreated areas, although it seemed that the wall was sprayed fairly evenly. I had to pick up a good old roller and re-process the freshly sprayed surface. I agree, it takes longer and more soil is required, but the result is beyond doubt.
It’s not for nothing that experts do not recommend using sprayers for priming walls. It may indeed be faster and more economical, but in no way better.
How long does it take for primer to dry on walls?
This is not an idle question. I would like to start performing the next stage of processing as soon as possible. This is especially important for hired teams that work on the principle of “go ahead!”
Of course, it all depends on the characteristics of the surface. On the canister with primer it is written that subsequent coating (paint, wallpaper, decorative plaster, etc.) can be applied no earlier than after 8 hours. The same instructions say that the room temperature at the time of applying the primer and for 48 hours thereafter should not be less than +5 degrees.
What does it mean? Can you guess?
I don’t know how you will proceed, but I, who did it “for myself,” moved on to wallpapering just two days later. It happened somehow by itself. The fact is that it took me just 48 hours to prime all the surfaces in the new house. By the time I applied the final “smear” in the last room, the first one was already completely dry and ready for further processing.
You can determine the readiness of the walls after priming by their appearance. The primed wall should look completely dry. In summer, with open windows, the soil dries out faster than in winter, and even in a damp room. There the process may take a day or more.
Therefore, no matter how much you would like to “get rid of” the disgusting repair as quickly as possible, there is no need to rush. Let the walls dry completely. Then there will be fewer problems.
Tikkurila OTEX alkyd-based primer-paint AR 2.7
Tikkurila OTEX alkyd-based primer-paint C 0.9l
Tikkurila Otex tartuntapohjamaali (AP Base) - Adhesive primer (matte). Adhesive.
| Color | White (AR Base) |
| Size | 2.7 l |
| Brand | Tikkurila |
Before adding an item to your cart, select the size and color.
3310.00 rub for 1 piece
sales in pcs
less than 10 pcs in stock
Tikkurila Otex tartuntapohjamaali (AR Base)
— Adhesive primer (matte).
Fast-drying adhesive alkyd-based primer. Used as a primer and intermediate primer for new and previously painted surfaces. Otex also has good adhesion to problematic surfaces such as glass, tiles, fiberglass, PVC plastic, aluminum, galvanized steel, as well as surfaces painted with alkyd or acid-curing paint. For priming interior surfaces that require particularly good adhesion, as well as for exterior window frames previously painted with acid-curing paint or polyurethane-based paint. CHARACTERISTICS:
Base - AP Colors - Can be tinted in 2436 colors from the Tikkuril Symphony range.
Shades may have slight deviations from the reference color. AP base can be used as white paint or for tinting. Basis C is intended for tinting only. Level of gloss - Deep matte Consumption - 8 - 10 m2/l. Thinner - Spray Thinner 1032 and White Spirit 1050 Application Method - Apply by brush, roller or spray. When spraying under high pressure, use a nozzle of 0.011 - 0.015, i.e. 0.280 - 0.380 mm. Allowed to be diluted up to 10%. Drying time at +23oC and relative humidity 50% From dust - 1 hour. Sanding or coating can be done within 24 hours. Dry residue - About 48%. Density - 1.4 kg/l. Storage - Withstands storage and transportation at low temperatures. The primer does not withstand long-term storage in a loosely closed or incomplete container. APPLICATION:
The surface to be painted must be dry, the air temperature is not lower than +5? C and the relative humidity is not higher than 80%.
Preliminary preparation Unpainted surface:
Clean the surface from dirt and dust.
Treat the knots with Oxalakka insulating varnish for knots. Surfaces that require good adhesion should be washed with Maalipesu solution, then rinsed thoroughly with water. Sand until matt, remove sanding dust. Previously painted surface:
Wash the surface with Maalipesu solution, then rinse thoroughly with water.
Sand until matt, remove sanding dust. Priming Mix the primer thoroughly before use. If necessary, thin with White Spirit 1050 for brushing and Thinner 1032 for spraying. Apply primer by brush, roller or spray. The Otex adhesive primer is perfectly leveled, so sanding is often not necessary. If you wish to obtain a particularly smooth surface, you can sand it with fine sandpaper. Cleaning of tools - Wash working tools with White Spirit 1050 or Pensselipesu detergent. Care - Avoid the use of detergents and strong cleaning of the freshly varnished surface, since the fresh coating reaches its final hardness and durability within one month after painting. If necessary, light cleaning with a damp soft cloth can be used to clean the coating during this period. About a month after painting, the finished coating can be cleaned with neutral (pH 6-8) detergents using a soft cloth or sponge, following the detergent manufacturer's instructions. Clean especially dirty surfaces with a cloth or sponge soaked in a weak alkaline solution (pH8-10). After this, rinse the surface thoroughly with clean water. OCCUPATIONAL SAFETY:
Contains industrial gasoline (naphtha), desulfurized heavy (soda aromatic, approx. 17%) FLAMMABLE. HARMFUL TO AQUATIC ORGANISMS AND MAY CAUSE LONG-TERM DAMAGE TO THE AQUATIC ENVIRONMENT. Avoid inhalation of solvent vapors and spray mist. Ensure effective ventilation. Do not pour into the sewer. If swallowed, consult a doctor immediately and show this label or packaging. Keep out of the reach of children. Contains methyl ethyl ketoxime. May cause an allergic reaction. The product has a safety data sheet.
What is the average primer consumption per square meter
You understand that no one will give you an exact answer. Much depends on the absorbent characteristics of the surface, the degree of wetting of the plaster, which only you choose. Well, don’t forget that you will simply spill some of the product on the floor :).
In my particular case, the plastered walls consumed approximately 23 liters of soil (the total area of the premises is about 100 square meters). Thus, the soil consumption was about 1 liter per 4.3 square meters of room area (not walls!). How much you will get will be clear only when the work is finished. However, based on my indicator, you can at least roughly estimate the number of canisters that you should buy.
Just keep this in mind. This primer was enough for me for walls 3 meters high and for all ceilings. If your rooms are lower and the ceiling does not need to be primed, then, accordingly, less material is needed.
CVES®-SP
Two-pack ethyl silicate zinc-containing shop-floor primer TsVES®-SP is applied directly to the metal, providing anti-corrosion protection to the surfaces of steel workpieces, parts, and assembly units for the period of storage in all macroclimatic regions, types of atmosphere and placement categories according to GOST 15150 or for all categories of atmospheric corrosivity according to ISO 12944 -2.
CHARACTERISTICS
- Provides anti-corrosion protection of structures for up to 1 year in an open industrial atmosphere for the period of storage between manufacturing and installation operations.
- Can be used on an automatic painting line.
- Can be overcoated with paints and varnishes of various natures: epoxy, polyurethane, vinyl, chlorinated rubber, acrylic after secondary surface preparation.
AREAS OF APPLICATION
The CVES-SP composition is applied directly to the metal, in an open industrial atmosphere, for the storage period between manufacturing and installation operations. Can be used on an automatic painting line.
Conclusion
Priming the walls and ceiling before painting or wallpapering is not just a desirable step. It is necessary to increase the adhesion of the surface to the subsequent applied coating (it is called the funny word “adhesion”). Of course it takes time. But nerves are more expensive. If you start gluing wallpaper directly onto a dusty plastered surface, you will very soon receive another confirmation of the famous proverb: a miser pays twice (and works twice as hard for the same result).
Text author: Viktor Chernov
- Back
- Forward