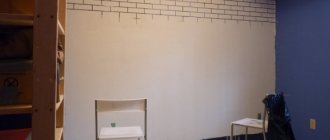
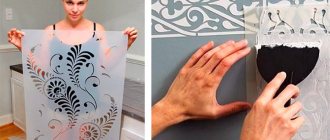
Wall decor is not particularly varied: painting or wallpaper. But you can add some zest to the interior of your home with the help of an elegant pattern, ornament, image of an animal, bird, etc. However, you don’t have to be a professional artist. Stencils for walls are a simple solution for realizing creative ideas. You can purchase ready-made blanks, or you can make a layout yourself. The main thing is to follow the basic rules of drawing, choose color combinations and style.
What are stencils for plaster and why are they needed?
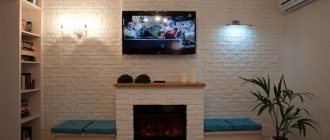
The stencil is used to decorate walls with plaster on any surface. The decoration turns out to be original, sophisticated, and the room is transformed into a comfortable place with an unusual style.
A stencil is an artificial masonry that creates a decorative pattern that protrudes above the main surface. Drawings can be different, with single or repeating elements. The template can be made with your own hands or purchased in a store. It is permissible to decorate the walls in different styles.
DIY stencil templates for decorative plaster have the following advantages:
- The images attract attention because they have a catchy look.
- The template pattern emphasizes the color and image of the main decor.
- To get a complete picture, the ornament can be duplicated on furniture and other elements. Identical patterns are applied to the desired surfaces with gentle movements.
- In a children's room, you can use a stencil to display cartoon characters on the walls. It also produces interesting landscapes.
- The stencil design has a rich personality. It is difficult to repeat without a template.
Attention!
The thickness of the matrix material affects the appearance of the decorative coating. To obtain a three-dimensional image, use a thick plaster mixture. Raised decorative patterns can be painted on a vertical, horizontal or sloping surface.
Popular designs and patterns
In style and color scheme, the drawing should be in harmony with the overall interior of the room. He often repeats images on curtains, furniture, and other decorative elements. Particularly popular are:
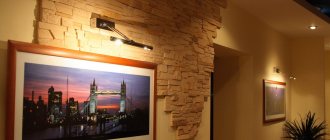
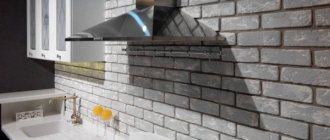
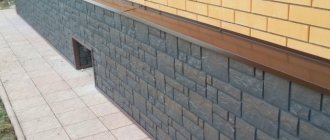
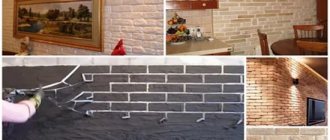
Brick or stone masonry . Often chosen to decorate the kitchen and hallway. Making a template is very easy, you just need to draw bricks on a suitable sheet of paper with a marker and cut them out.
Hard stencil for brick.
This roll is enough for the entire wall.
This is interesting! Plastering under brick and other ways to imitate brickwork.
Nature (trees, leaves, flowers) . Small repeating motifs are a classic option for decorating spacious and small rooms. Often, elements of such decor are highlighted on a plain surface using a carved frame.
Leaves
Flowers
Rose
Fern
Animals, birds . Single pictures of large animals or birds look impressive.
Bullfinch
Birds on a tree
Cat with patterns
Fish
Geometric designs and patterns . A repeating pattern is applied in even stripes along the walls or along the perimeter of the ceiling.
Crocodile skin . Not flashy, but an original pattern is used to cover the entire area of the walls.
Plastic stencil “crocodile skin”
And this is what finished decorative plaster looks like.
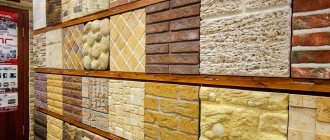
Types of stencils
A ready-made stencil can be purchased at a building materials store. But it’s cheaper to do it yourself. The matrix can be ordered at a printing workshop. Specialists will print it on a plotter and laser cut it.
The following types of stencils are distinguished:
- Paper - you can make them yourself from paper or cardboard. Pictures are often taken from the Internet or cut out from magazines. The cost of the products is minimal. But they are disposable and do not provide the opportunity to display three-dimensional images on the walls.
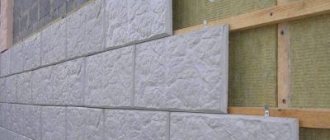
- Plastic products are considered reusable. Their thickness is on average up to 5 mm. Can be purchased at any hardware store.
- Silicone or rubber templates are durable and easy to attach to the wall. They allow you to make a complex design with different carved details.
It is better to use transparent templates that allow you to control the application of plaster during work.
How to do it yourself?
Made from silicone
Silicone stencil molds are used in many areas of life. They are easy to make. The universal material consists of nitric acid, which is added to nitrogen chips for rapid dissolution. The finished solution with dissolved particles is added to the catalyst. The mixture resembles rubber both in appearance and consistency.
Attention
Silicone material is safe, does not contain harmful chemicals, and does not release anything toxic into the atmosphere. The material is insensitive to acids and alkalis that may get on its surface.
The finished stencil is plastic, resistant to mechanical stress, tolerant of moisture, and safe. There is also no expiration date: the forms can last for decades in complete safety without losing their original appearance and shape.
If you additionally add paste and a hardener to the silicone mixture, then such templates can be used not only for wall painting. They can be used as coating, filling and other forms.
Special catalysts that can be added to the silicone composition are tin or platinum. They ensure the material's immunity to temperature changes. The silicone stencil gains strength and resistance to long-term use.
The production of a silicone stencil goes through the following stages:
- The working surface is treated with starch to prevent the material from sticking.
- A few drops of sealant are squeezed onto the center of the table.
- Sprinkle it with talc on top and mix thoroughly at high speed to properly distribute the components.
- The result is a small cake of high strength and density. Before the sealant has time to set, a template figure is squeezed into the mass.
- After a day, the silicone will harden. The stencil is pulled out of the mass and the mold is lubricated with talcum powder. Fill the voids with clay and dry in the oven for about an hour.
Plastic
The plastic for the stencil can be colored or transparent . The material is sold in sheets or rolls, sometimes with an adhesive backing. It is better to go for plastic with a matte finish as it is suitable for ink and pencil. There is another option: repurpose old x-rays. These old plastic films can be used as stencil material.
Important
It is important to sketch or copy the stencil onto plastic. The clearer the drawing or copy of the stencil is made, the easier it will be to follow the template when it comes to forming the stencil base. You can use a permanent marker with a pointed end.
The lines should be clear, without interruptions or thickening . If this is not observed, then you can get significant flaws when redrawing the drawing through the base. Then you can start cutting out the template with a sharp blade in contact with a hard surface. Movements should be slow, smooth, careful.
It is necessary to smooth out all sharp corners by passing fine sandpaper along the sections of the stencil. After finishing sanding, remove plastic dust with a piece of gauze or cotton cloth.
Papers
The basis for a paper stencil can be any more or less dense cardboard. Thin plastic is also suitable for these purposes. Drawings are selected from any sources. An example is a pattern on wallpaper that remains from a previous renovation .
There are many interesting and fresh options on the Internet. By printing the picture, you can use it to make a template for wall painting. For beginners, it is best to try your hand at cutting a simple stencil, such as a butterfly. It is necessary to create a uniform surface to make it easier to apply to the base. The drawing is applied to a paper base with a pencil. Carefully cut out the pattern along the lines without damaging the internal jumpers, which are sometimes provided, but may not be included in the stencil blank.
To master the technique of this type of decoration, you need to practice creating test elements on an unnecessary piece of drywall or in an inconspicuous place.
A drawing from the Internet is printed on a printer and placed under a PVC sheet. Circle with a marker. Carefully cutting along the lines with a knife will give you a finished stencil. If the details of the picture are very large, it can be divided into several parts . For each of them, an individual template is constructed along the contours according to the original diagram.
What to make a stencil for plaster from
Impressions on slightly dried plaster can be made using a special shaped roller. Thanks to the templates, three-dimensional pictures, protruding patterns, and unique layers are drawn on the walls.
A stencil for plaster can be made from paper, plastic or silicone.
The paper version is printed on a printer or drawn by hand, cut out according to ready-made patterns. Such templates are attached to the walls with tape and plaster is applied. They have a minimal cost, but are disposable.
Plastic stencils can be cut from bottles or other packaging. The selected picture is transferred to plastic and cut out with a stationery knife. Such templates are attached to the walls with special glue.
The simplest and most reliable stencil is the silicone version. The picture is poured onto a sheet of paper with silicone glue. After complete drying, the paper is removed, and the resulting reusable product is used to decorate the walls.
A mold for gypsum plaster will allow you to decorate in a short time
Instructions for carrying out work
To achieve not only decorative beauty, but also high-quality coating, no special knowledge or skills are required. The process of applying ornamental plaster consists of several stages that must be carried out sequentially, in compliance with certain rules.
To ensure that textured images look harmonious in the interior and do not look bulky and awkward, in small rooms it is better to decorate small sections of the wall or make a framed panel. Complex volumetric bas-reliefs look great in spacious rooms.
Surface preparation
The surface for the templates needs to be flat, dry, and free of dust and dirt. Decorative plaster must be applied through a stencil onto a putty surface with a finished finish. The room temperature should be between +5 and +32 C, which corresponds to the standards when carrying out work using building mixtures.
The first step is to apply markings. If the drawing is single, use a meter and level to mark its exact location. Particular care should be taken if the pattern is strictly in the center. When repeat (patterns with repetitions) is conceived, when marking, it is important to control the indents - they must be adjusted to the millimeter so that there is no displacement of individual elements.
Fixing a template
You can fix the stencil in different ways; when fixing, it is important to take into account the material and thickness of the print:
- Using glue. First you need to make sure that the glue does not leave stains or marks - apply a little of the composition to the hidden part, and then wait until it dries completely. It is recommended to glue large, volumetric stencils.
- Double sided tape. Plastic and silicone templates must be fixed in this way. Small pieces of tape should be glued to the edges of the print and pressed down lightly. After use, the remaining adhesive tape must be carefully removed with a spatula or the blunt side of a knife.
- Masking tape. With its help, it is easy to attach paper stencils or small plastic and silicone options. The template is attached with strips of tape along the markings so that they do not affect the slots of the patterns.
The print must be held securely on the surface so that there are no distortions or shifts during the work. Otherwise, the decoration will lose its clear contours and the effect will be ruined.
Applying a layer
For plastering walls, you need to choose special mixtures with gypsum composition or fine-grained sand. The solution should be elastic and homogeneous, without lumps. The correct thickness is important - so that the mixture can be easily spread on the surface without spreading. To avoid premature hardening, the plaster should be diluted in small portions.
Apply correctly this way: apply the mixture onto a spatula with a wide blade or a trowel using a small spatula, and from there scoop up the mortar mass in small parts. Make sure strokes, with pressure. The plaster should be placed tightly on the surface, filling all areas of the stencil.
Pre-priming before applying the plaster will ensure better adhesion. It is better to spread a generous layer and then dry.
Creating the desired relief
Volumetric relief is achieved when the plaster mass is applied in several layers. To obtain a large texture, the first layer should not be smoothed too much - large, bold strokes will only adhere better to the plane. The second and subsequent layers should be thinner and more accurate. Plaster can be applied randomly, in any direction.
The main condition is that the empty sections of the template are filled completely, without gaps. In the process, you need to take into account the rule - the thicker the stencil and the more voluminous the decor, the more viscous and thick the plaster mixture should be. Delicate, barely protruding patterns should also be applied in 2 layers, but make them thin.
Removing the stencil
After the desired volume is achieved, you need to let the plaster dry slightly. Remove the plate with impressions carefully so as not to accidentally move it to the side and damage the relief. If, after removing the stencil, the edges of the pattern are uneven in places or slightly damaged, these defects are not critical. In this case, you should wait until it dries completely, then use sandpaper to clean out the resulting flaws and round off the jagged edges.
On a thick multi-layer texture, rough mortar overlays or errors when removing the stencil can be cut off with a sharp stationery knife. Fill small voids immediately using a palette knife or small spatula.
Formation of a textured surface
In addition to the bas-reliefs that are created by the plaster solution, visual volume and texture are achieved by the play of colors of various shades. The effect is especially evident in contrasts - on a darkened background, light or bright drawings, patterns, and vice versa, on a pale plane, individual details and images in rich colors stand out.
When performing in color, various devices are used, for example:
- light shades can be applied with a sponge or a simple kitchen sponge (using both sides);
- a hard brush is useful for making artificial scratches and visually aging the composition;
- with a thin brush you can draw small details;
- Using a teaspoon or tablespoon you can easily achieve the effect of fish scales (you need to press down the dried coating, then use a brush to emphasize the indentations);
- Using cans of paint you can give it a silver or bronze tint.
The beauty of decorating with a hand-made stencil is that there are no conditions or restrictions in execution - you can safely realize your fantasies.
How to use a stencil correctly
Having made it yourself or bought a ready-made stencil, it is used to decorate the walls. The templates are used as follows:
- Decorative plaster and one side of the stencil are covered with aerosol glue. The template is applied to the wall until it fully adheres to it.
- As soon as the stencil adheres to the wall, a layer of decorative plaster is applied with a spatula. The strokes are made strong to create a “bas-relief” and give the plaster density.
- The template is completely hidden under decorative plaster.
- Once the solution is completely dry, carefully remove the stencil.
- To create a three-dimensional effect, several layers of plaster are applied.
- If the picture is destroyed after removing the stencil, it is corrected with sandpaper.
To give the design shine or the desired shade, it is coated with a decorative color.
Important! When working with glue, it is important to hold your breath or use a mask to prevent sprayed chemicals from entering your respiratory tract.
Technology of applying a three-dimensional pattern
After choosing a drawing, you need to stock up on materials and tools for further work.
Materials needed:
Plaster for decorative works
Spatulas of different widths
Sandpaper, masking tape
Acrylic or latex paint
The template is attached to the surface using masking tape. Then they begin to create the pattern itself, the sequence is as follows:
- Applying plaster. Use a narrow staple to grab a convenient amount of finished plaster, and use a smaller staple to distribute it over the entire pattern on the template. The strokes are made with pressure, this allows you to make the structure of the plaster more dense. The direction of the strokes does not matter, the main thing is to fill the entire stencil.
The slits are filled with the solution. - Removing the template. Immediately after applying the plaster, the stencil is carefully removed and washed in water if it is no longer to be used.
Remove and leave to dry for 24 hours. - You can correct the drawing while the solution has not hardened; for this you will need a small tool, for example, a palette knife. All unnecessary errors on the surface are removed with sandpaper after the mixture has dried.
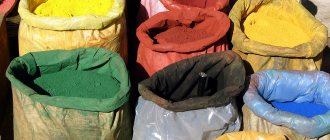
- Coloring. For the interior I use regular acrylic and latex paints. Carefully apply aerosols from the can. To cover the bas-relief, I take a small foam roller.
The plaster finally hardens after a few hours, during which time a texture can be applied to a three-dimensional image with a hard brush. Paints highlight individual elements, “age” them, and visually increase their volume. Finishing with varnish makes the surface glossy and shiny.
This may be useful to you:
- How to prepare decorative plaster from ordinary putty.
- Tinting plaster.
- DIY wax for decorative plaster.
Recommendations and common mistakes
When decorating a room, it is important to avoid mistakes, so you need to familiarize yourself with some tips. Recommendations for using stencils for decorative plaster:
- The working tool must be held perpendicular to the wall.
- To prevent lint from getting into the picture, apply the plaster in a circular motion.
- For volumetric drawings, take a sufficient amount of plaster. It is recommended to remove its remains immediately.
- Immediately after completing decorative work, reusable templates are washed well with warm water.
- To protect the ornament from the influence of external factors, after drying it is coated with varnish.
The layout is usually a printed picture, which is transferred to the material for making stencils
In order for the image on the wall to be of high quality, it is important to observe the following points:
- The surface must be clean and free of grease.
- Using a building level and a pencil, it is important to mark the location of the image on the wall.
- In order not to spoil the wall with an incorrectly applied mixture, it is recommended to first display the drawings according to the template on ordinary Whatman paper.
- To ensure good bonding of the stencil to the wall, you need to use a special stencil adhesive.
- It is better to apply drawings on walls using acrylic paints; plaster is used to display three-dimensional patterns.
If you follow the tips listed above, you will be able to avoid mistakes when decorating walls.
Photos of stencils for decorative plaster will help with choosing a design:
- Simple curls will decorate a living room or bedroom.
- A geometric pattern will allow you to separate part of the wall.
- The honeycomb pattern is suitable for the kitchen, living room.
- An ornate ornament will make the room worthy of admiration.
- Using a stone stencil you can successfully transform your kitchen space.
Tools and materials
For plastering through a stencil, with a flat or pronounced texture, the following materials are needed:
- primer;
- decorative plaster (ready-made solution or dry mixture);
- latex or acrylic paint (spray paint is perfect for finishing shades);
- glossy or matte varnish for the final coating (this stage is optional, but the decor looks more impressive and retains the structure and richness of colors longer).
During the work process, the following tools and devices should be on hand:
- containers for mixtures and paints;
- spatulas of various sizes - select according to the area for decoration;
- brushes;
- roller, if you need to create a background on the wall;
- sponge for creating contrasts, shades or antique painting;
- a stationery knife and sandpaper (will help remove errors in work);
- templates
If during the work you will use cans of paint or varnish, you need to stock up on safety glasses and a mask to avoid droplets getting into your eyes and skin when spraying.
Recommendations for choosing stencils for wall decor
There are certain requirements that apply to the selection of stencils. They must be followed when going to buy templates:
- You should not give preference to a large number of elements. As a result, the lines of the drawing will merge and it will lose its attractiveness. Laconic, clear lines are the main requirement when drawing a picture;
- Only one type of ornament is used for one room. It is not advisable to mix color and geometric prints together;
- Templates with very small and frequent elements should be avoided. Instead of an interesting solution, you can end up with one continuous blurred spot on the wall. Ornaments with a large number of large lines and jumpers look beautiful and interesting.
In order for the drawings to look concise, it is necessary to select them according to the design style of the room
The main points of creating decor using a stencil
Geometric patterns are considered the basis for creating a template. This is due to the presence of clear boundaries. Such patterns are best suited for beginners in this business. After the final decision on decorating the surface has been made, you need to buy a template in the store. The second option is to do it yourself.
The resulting template is fixed to the selected surface. To apply the design, various paints are used - water-based, acrylic or enamel. A small roller or foam sponge is best suited for this; aerosols are sometimes used. It is better not to use a brush when working with stencils; this is due to paint flowing over the edges of the template. As a result, the drawing turns out spoiled and unclear.
Using a stencil is an economical option for replacing standard wallpaper
The model is removed only when the drawing is completely dry.
Helpful advice! For application you should take a small amount of paint. This will prevent drips from forming. If the area turns out to be poorly painted, it must be carefully touched up with a brush. If the design involves the use of several colors, then the next tone is applied only after the previous one has completely dried.
Flower stencil templates for DIY decor
When choosing a design, they most often choose floral arrangements, which is due to the versatility of this image. The colored ornament looks great in the home and office, and various color solutions are suitable for painting. You can easily make stencils of flowers on the wall with your own hands. This ornament is best for beginners to try out.
Flowers can be drawn in a classic design, or you can give them the appearance of a surreal vision. Whatever style the room is designed in, branches and buds will look great in it. This type of ornament in a colorful and monochromatic design is perfect for all rooms in the apartment - living room, bedroom, nursery, kitchen, corridor and bathroom.
Images of flowers are a very popular way to decorate a bedroom interior.
Using a butterfly stencil on a wall
Another popular ornament for decorating rooms are butterflies. They will look great on the wall in the bedroom, and multi-colored butterflies will also delight a child. To add some zest to your kitchen design, place an image of a winged beauty there. It’s very easy to make butterfly stencils for the wall with your own hands.
Interesting compositions are obtained by combining color patterns with butterflies. In this case, it is better and more appropriate to use a combination of several colors. When choosing butterfly stencils for decoration, it is better to focus on simple shapes with a minimum number of lines.
Images of butterflies are suitable for both a children's room and a living room, as they can enliven the interior of the room
Picture of a cat on the wall
A picture of a cat on the wall can set the tone for the entire room. And it doesn’t matter where this fluffy animal is painted: on the wall, shelf or door.
Cat stencil templates for DIY decor are quite easy to make. You can decorate a child's room with an image of this animal. Quite often, a cat is drawn in a secluded corner, creating the effect of surprise. This decor does not set the tone for the entire room, but gives it an unusual twist. The entire animal is not always drawn; quite often only the silhouette or its funny face is applied to the surface.
Helpful advice! The image of a cat requires appropriate decoration of the room. It is best to use it in a children's room or bedroom.
With the help of small drawings made using stencil technique, you can highlight such details of the room as sockets, switches or slopes
Oriental motifs and geometric patterns
Stencil templates for walls with geometric patterns allow you to create an unusual room design. They are great for both apartments and offices. The interweaving of simple lines will hide the imperfections of the walls, visually expand or narrow the space. Greek and Byzantine motifs are very popular. They can completely cover the entire surface of the walls, replacing wallpaper.
The interweaving of simple lines creates complex patterns, and the resulting effect is striking in its severity and at the same time intricacy. Geometric paper cutting stencils are best for decorating beginners.
Related article:
Stencils for walls for painting: a creative way to decorate the interior
Existing types of stencils, their purpose and application. How to use stencils correctly. Choosing paint for decoration.
Templates for volumetric decor
An unusual effect can be obtained using volumetric decor. To create it, mixtures based on gypsum and plaster are used. The resulting result will look rich and beautiful. However, creating it requires time, patience and some skills in working with plaster.
An example of beautiful application of decorative putty using a stencil
To obtain a three-dimensional composition, it is not necessary to buy ready-made templates; making stencils for wall decor with your own hands is easier and cheaper.
The process of creating a volumetric composition comes down to the following points:
- choosing a stencil with the appropriate design. Quite often, the material for such a template is thick cardboard. It is fixed to the wall using self-tapping screws;
- The prepared mixture is applied to the stencil with a spatula. It is necessary to carefully coat the pattern to obtain a uniform surface, without voids and irregularities;
- when the solution has hardened, it is necessary to remove the stencil. Now you should begin to form the required thickness. This is done by gradually applying the solution with shaped spatulas;
- when the finished relief has completely frozen, it is necessary to round the edges of the surface. To do this, the bas-relief is processed with sandpaper;
- The final step is painting the finished decor. To avoid staining the surface around it, it is recommended to use the same stencil. If the bas-relief is made on a colored surface, it can be left white.
Unlike painting, volumetric decor requires time and patience to create, but the resulting effect is worth the effort.
To apply decorative plaster or putty, it is better to use stencils made of plastic or thick cardboard
Stencils for furniture and mirrors
Today it is popular to decorate the surfaces of furniture, household appliances or mirrors with various images. This makes the item unusual and immediately sets it apart from others. The paints used allow you to apply decor to any surface: brick, concrete, glass, wood, fabric, etc.
When choosing templates, for example, flower stencils for decoration, for decorating a mirror, you should give preference to those that have a self-adhesive backing. This will avoid shifting the pattern and make it possible to obtain clear and beautiful contours. Stencils are used to decorate the corner of a mirror or its entire perimeter. After applying the image to the surface of the furniture, to preserve it, it is recommended to apply a protective layer of varnish on top.
Imagination and patience allow you to create real works of art, giving ordinary things an unusual appearance.
Using stencils and acrylic paint you can give old furniture a new look
Border templates
Quite often, a border is used in the design of a bathroom or other rooms. It consists of a repeating section of the ornament. The result is a continuous pattern that encircles the room. Images of flowers, plants, and dolphins are great for these purposes. The resulting drawing is laconic and restrained. Photos of stencils for wall decor will help you decide on the choice of pattern for the bathroom. If you want to save time and effort, you can simply buy a ready-made template at the nearest finishing materials store.
Types and how they differ
There are expensive and cheap plasters for interior decoration. Types of decorative plaster differ from each other in the type of base. In your nearest hardware store you will definitely find 4 types of plaster:
- mineral;
- silicone;
- acrylic;
- silicate.
There are 5 most famous ways to qualify decorative plasters: textured (structural), textured, flock, with marble chips, Venetian. Types of finishes differ in their appearance and properties.
Texture . It differs in that thanks to this plaster we have a rough texture that allows us to correct any imperfections in the walls of the bathroom, walls in the kitchen, or in the bedroom. Great popularity can be explained by its low cost and simplicity - it is possible to do textured decorative plaster on walls with your own hands. The most popular type is decorative bark beetle plaster, which resembles bark pitted by insects. Suitable for both indoor and outdoor use.
Textured decorative plaster . It is environmentally friendly, can easily hide all the imperfections of the wall, no preliminary preparatory work is needed. It can give any wall the look of wood or porcelain tiles, silk or velvet.
Flock plaster . Its second name is silk. The composition includes cellulose, silk fiber, dyes. One of the most expensive plasters, flock decorative plaster allows the wall to “breathe” and improves sound insulation.
Venetian plaster . This is the most expensive plaster of all. In terms of beauty and properties, it is an undoubted leader. Venetian plaster can be smooth or textured. Have a matte surface with silk tints. Expensive marble, “veins” of stone, play of different shades - this is what is called Venetian plaster.
Tools you will need for work
Almost everyone has most of the tools that may be needed in their work in their home. However, the missing part will still have to be purchased. Fortunately, you only need the simplest tool, which is sold in any hardware store and is usually not very expensive. Tools you will need:
- A spatula, or preferably two different sizes.
- Roller.
- Palette knife.
- Office scalpel.
- Brush.
- Sandpaper.
- Any empty, clean container of sufficient volume.
- Marker or felt-tip pen.
- Stencils.
As already mentioned, stencils can either be bought, for example, in the same hardware store where the rest of the tools are, or you can make them yourself.
Variations of beautiful designs
Stencil images can be made in completely different themes. The choice depends on the interior style, available colors, and the purpose of the rooms (residential or non-residential premises). You can choose templates with cats, wild animals, butterflies, flowers, landscapes (plains, mountains, sand, forest, lake, sea, sunrise or sunset, lunar eclipse, etc.).
Examples of design depending on the purpose of the rooms:
- For the hallway . Due to the small space inside this room, airy design options are suitable for it, which visually expand the space. For example, a panel with a plant theme (flowers, trees, herbs). The drawing should be monochromatic, since the abundance of color overlay and its dark elements narrow the already small space.
- For the bathroom . Marine themes are very popular. The flora and fauna of reservoirs will add large scale and volume to the colors. In this case, we are not talking about completely filling the space with elements: it is enough to depict one of the elements on the side or in the middle, for example, apply plain elements (tree branches, or a small composition of flower buds) to it.
- Bathroom . The best option would be a floral ornament, made in a monochromatic style, with a small compositional content.
- Kitchen . Plant collages or images of funny animals would look ideal.
- Children's room . There are many decoration options. It is worth relying on the baby’s preferences. Children who are too impulsive do not need to create bright and multi-layered compositions. It is advisable to choose muted tones and depict cartoon characters from good fairy tales.
- Bedroom . Calm shades in pastel colors are suitable for this living space. The best images for a relaxation room would be images of natural objects - plants, birds and animals in calm poses.
- Living room . All color and paint combinations are suitable. It could be an original red flower, a fiery firebird, or a huge forest with waterfalls covering the entire wall. You can use calm tones that will emphasize the peace and tranquility of this spatial zone.