Drywall firmly occupies the position of one of the most popular among construction and finishing materials, and this is easily explained by its many advantages. These include its environmental friendliness, ease of installation, the ability to be used in a wide variety of rooms, relatively low weight and affordable cost.
Wall finishing with plasterboard without frame and profile
Plasterboard sheets are used for leveling walls and for constructing partitions, and working with them is accessible not only to an experienced builder, but also to a novice craftsman. Finishing walls with plasterboard without a frame and profile is possible using different adhesive compositions and on surfaces made of various materials. The advantages of such fastening compared to the frame method are that the reduction in the area of the room is not so noticeable, a decent amount of money is saved on the sheathing elements, and the installation work itself proceeds quite quickly and can easily be done on its own.
Drywall without frame on the wall
Page navigation
Leveling the surface with plasterboard is the most popular type of repair work, characterized by speed and quality. There are 2 methods of fixing gypsum boards: framed and frameless.
Drywall without a frame on the wall is a quick, budget option that has its advantages. Methods for gluing plasterboard to the surface, as well as fixing sheets with self-tapping screws, are discussed below.
When is it possible to level walls with plasterboard without a frame?
To level the surface of gypsum boards, the following methods are applicable:
- Frame - the use of profiles and components to create lathing for GC sheets.
- Frameless - gluing or directly fixing the sheet to the rough surface.
Fixation of material without a profile is performed in the following cases:
- If the walls are crooked by no more than 5 cm.
- There is no need to hide wires and communications.
- In a small room (toilet, bathroom), where it is not possible to allocate centimeters for the construction of sheathing.
The lathing takes up at least 12 cm of free space in the room.
The frameless method has its disadvantages:
- There is no way to hide communications.
- There is no way to insulate the rough surface.
- In some cases, additional fixation with self-tapping screws or dowel nails is necessary.
- The plasterboard sheet becomes heavy with the glue applied, making it difficult for one person to lift it. We need to call a neighbor for help.
For relatively flat walls, it is advisable to install gypsum boards using a frameless method.
Tool preparation
Such simple equipment must be prepared before starting work:
- Impact drill or hammer drill with attachment.
- Spatula 100 mm wide.
- Hammer.
- Roulette 3 and 10 meters.
- Construction pencil.
- Stationery knife with a set of blades.
- The rule is 2.5–3 meters.
- Level 80 cm.
- Plumb.
- Plastic bucket 10 l.
- Mack brush.
- Flat strip 0.5 meters long.
- Rubber mallet hammer.
- Chop cord.
Finishing material must be purchased after all measurements have been completed, since only after taking measurements will the required quantity be known exactly.
Existing installation techniques
To fix gypsum boards without lathing, you can use the following methods:
- Gluing the material to the rough base using mastic or glue. To do this, a solution is applied at the place of curvature, and it is also applied in a checkerboard pattern to the sheet. The plasterboard is applied to the wall, aligned and pressed, additionally installing a holder. There should be 10-12 mm from the floor to the gypsum board. To do this, you can put a small piece of sheathing material.
- The use of self-tapping screws and foam rubber. This method is used for large curvatures. Fixation is carried out as follows:
- make markings for the material;
- 9-12 holes are drilled on the gypsum board. Their location is transferred to the rough base;
- pieces of foam rubber are glued near these holes on the back side;
- The sleeve from the dowel-nail (plastic part) is inserted into the base according to the marks;
- The sheet is screwed to the wall with self-tapping screws.
- Combined method. Beacons are installed from below and above. The middle is filled with glue.
All methods of fixing a sheet to a rough base are applicable for various surface unevennesses.
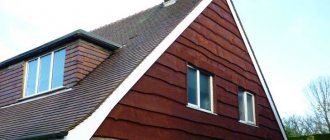
Finishing rules
Inside the house, wooden walls can be protected with fire-resistant gypsum board sheathing. Finishing the walls with plasterboard in a wooden house will even out the unevenness of the log or paving stones and give it an ideal look. Heat and waterproofing materials are placed between the wall and the sheathing, and electrical wiring is located.
But before we start covering a log or cobblestone wall, we need to take into account several nuances.
The first nuance
Wood, unlike brick or concrete, is a living, organic material. The tree breathes. In conditions of high humidity, it is able to absorb moisture, and in conditions of low humidity, it releases water into the atmosphere.
Poor people buy raw wood in the hope of drying it themselves. It costs less than dry. Building a house from raw wood creates some problems, since during the drying process the wood decreases in size and sometimes warps. As a result, cracks form in the wooden wall.
Pre-purchased material should not be placed on damp ground. It is necessary to place unnecessary boards, beams, and pallets under it. Provide a canopy. Between the logs (beams) you should lay bars 4–5 cm high so that air circulates between them. This way you will ensure ventilation and natural drying.
Ideally, construction of a house will begin in late spring - early summer. Warm air and sunlight will speed up the drying of the wood. Do not rush to caulk and cover the walls with plasterboard. The building should be open for at least another month to dry out a little. After this time has passed after the walls have been erected, all cracks should be caulked, that is, soft plastic material should be hammered into the cracks between the logs. It could be:
- Dry moss - in Rus', walls have long been caulked with dry moss;
- Tow is a fibrous material used by plumbers for waterproofing;
- Jute is a material made from jute wood;
- Sealant is a synthetic foam material.
All these materials do not allow moisture to pass through or accumulate and fill cracks well.
Second nuance
Wood is a flammable material. And dry wood - even more so. And in order to make it more difficult to ignite, it is necessary to treat the masonry inside and outside with fire retardants - anti-flammable agents. But this is not enough.
To protect your home from fire, it is important to install the electrical wiring correctly. After all, there may be a short circuit in it
Finally, overheating of contacts under high load on the electrical network can also cause a fire. Electrical wiring is laid in plastic (metal) boxes from the outside. In this case, the boxes must be of high quality and non-flammable. It is possible to lay wires between the wall and plasterboard sheathing. The best option for protecting wires in this case is to lay them in metal sleeves. We install the electrical wiring at the same time as installing the frame under the drywall.
Protection against fungi and other microorganisms is necessary. After fire retardants, the walls are treated with antiseptics.
The third nuance
This point is directly related to covering walls with plasterboard in a wooden house. The fact is that fresh wood, especially if poorly dried for some time, will shrink. It's connected:
- with loss of moisture from the tree;
- With the landing of logs or beams in place, their compaction among themselves under the influence of the weight of overlying logs and the roofing superstructure.
The landing of the house can be 10–15 cm per floor.
It was mentioned above that wood breathes, either absorbing moisture or losing it. This factor also affects the unstable behavior of the walls. Some tree species are prone to warping, especially with high humidity or sudden temperature changes. And if plasterboard sheets are firmly attached to such a wall, they will quickly begin to crack, change their location, and become deformed. To avoid this, a so-called sliding or floating frame was developed. Its essence lies in the fact that it does not move along with the load-bearing walls of the house. Plasterboard sheets are attached to this frame.
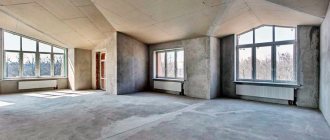
How to cover a wall with plasterboard without a frame or profile with your own hands
Covering the base without a profile is permissible only with unevenness of no more than 2 cm. To apply this method you need materials and tools:
- a set of spatulas with various blades;
- level, rule;
- container for adhesive solution;
- glue mixture;
- primer, roller, brush;
- reinforcing tape;
- putty for gypsum board joints.
After collecting all materials and tools, preparatory work must be carried out.
To do this, the walls must be cleaned of the previous coating - paint, wallpaper, decorative plaster. The entire surface is cleaned of dust and primed.
A plumb line is suspended from the ceiling to determine the overall curvature vertically.
Next comes the preparation of drywall. If the installation is carried out alone, then the sheet of drywall should be cut for convenience. Holes for sockets and switches are cut out in the prepared material. The cut end parts of the material are chamfered using a plane or milling cutter.
On which walls can GVL be installed without a profile?
Installing gypsum boards without a profile is possible using glue if the differences are no more than 2 cm.
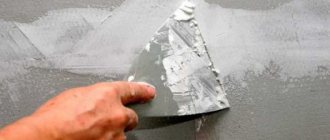
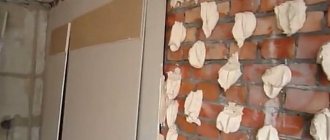
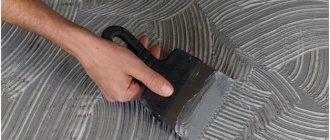
It is better to apply the glue in “blobs”. They are distributed evenly over the sheet, after which the material with the adhesive composition is leaned against the rough base. It is necessary to align the sheet - it must stand strictly vertically. After this, lightly tapping the plasterboard, the unevenness of the rough base is filled with glue, the excess goes beyond the boundaries. They are removed with a spatula. The sheet must be fixed with a holder for setting the glue. Only after the composition has hardened do they begin to install the next sheet.
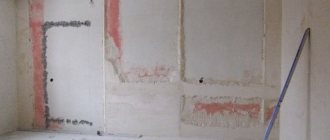
When is it necessary to partially finish walls with wooden slats?
If the base has an unevenness of more than 2 cm, then use a different adhesive method. A grid of wooden slats is mounted on the rough surface. If there are none, then cut the gypsum board sheet into strips 10 cm wide. The strips are glued to the wall using an adhesive composition. We must wait until it dries completely. The gypsum board joints should have strips 16 cm wide - 8 for each sheet. All pasted beacons must be strictly vertical. Leveled.
The evenness of the glued beacons must also be checked using the diagonal rule.
Further:
- A continuous strip of glue is applied to the gypsum board sheet. It must be located in the place where the beacons will pass.
- Drywall swears by beacons glued to the base.
Using wooden beacon slats, the rough wall is leveled and the gypsum board is sewn up.
How to install directly on self-tapping screws: how to screw the sheets
There is another option to fasten the finishing material to the rough surface without a frame.
This is wall cladding using self-tapping screws. However, this method is applicable when the surface is flat and there are no differences. There are nuances here:
- before fastening the gypsum board with self-tapping screws, you need to check how easily the fasteners fit into the rough base;
- drywall is attached to the wall to improve sound and heat insulation;
- It is not necessary to clean the surface before fastening.
It is not difficult to screw a self-tapping screw into brickwork. Here the drywall serves as dry plaster for the base.
It is difficult to screw a self-tapping screw into concrete slabs, so dowels and nails are used. They do it like this:
- Apply gypsum board to concrete.
- They make holes in the material so that there is a hole in the base.
- The gypsum board is removed.
- The plastic part of the dowel-nail is driven into the concrete.
- Place the sheet again and screw in the self-tapping screw, which falls into the plastic sleeve.
The gypsum board is fixed on the wall. For strength, additional holes are created in the sheet and polyurethane foam is introduced through them, serving as glue.
After fixing the drywall to the surface, the joints are reinforced and puttyed.
Do I need to install an additional wall mount?
After fixing the first HA sheet to the rough surface, the adhesive composition should set. To do this, you need to secure the sheet additionally. In order not to keep the sheet near the wall for an hour or more, additional fastening is used:
- A homemade wooden device similar to a mop. To do this, the vertical stick must be at least 1.5 m, the horizontal one must be equal to the width of the sheet. The horizontal strip should be smooth so as not to damage the material. It is placed against the fixed material. Moreover, the vertical rail is fixed on the floor (so that there is a stop).
- A homemade device made from profiles is the same mop only made from profiles for sheathing under gypsum boards.
- Purchased support. It is assembled from several parts, which are made of metal pipes. The same device serves as a lifter for the sheet to the ceiling.
If you do not use a support for the material while the adhesive composition is curing, then the gypsum board may not stick or may not be fixed properly and will fall off over time.
Security measures
Working with drywall involves the formation of a large amount of fine dust, and adhesive solutions can provoke intoxication. Therefore, always follow these rules:
- Carry out work on preparing walls and installing sheets wearing a respirator and goggles.
- The doorway in the room where work is being done should be covered with thick fabric to prevent dust from spreading to other rooms.
- After each completed process, it is recommended to ventilate the room and wash the floor to reduce the concentration of dust in the air.
If your condition worsens when working with materials, shortness of breath or headache appears, then it is better to take a break and rest. Avoid stale indoor air and ventilate as often as possible.
Brick wall cladding: features
Brickwork has a number of features that must be taken into account when fixing gypsum boards.
- When attaching a sheet with self-tapping screws without glue, they will not last long if they get into the solution. The building has its own movements, the fasteners will be unreliable.
- When applied to cement mortar, gypsum adhesive will not have good adhesion due to the difference in composition. Eventually the glue will peel off.
- A brick wall can collect condensation if it is thin and is affected by street temperature changes. Moisture has a negative effect on gypsum boards. In this case, you need to use polyurethane foam and self-tapping screws.
There are two ways to solve the problem of installing gypsum on brick:
- In the first case, polyurethane foam is poured into the small space between the gypsum board and the base.
- In the second, foam is applied to the surface of the sheet, and then it is fixed to the surface. This case is more acceptable, since it is possible to control the amount of foam applied to the surface of the facing material.
Use foam that has the lowest expansion coefficient - for expanded polystyrene.
Installation of facing material with screws and foam:
- One sheet is drilled in 9-12 places.
- These points are transferred to the surface.
- Pieces of foam rubber are fixed with glue near the drilled holes. It serves as shock absorbers during fastening.
- Dowels are driven into the wall at the marked places.
- The sheet is fixed with screws with wide heads, and washers are placed under them. During installation, the evenness must be measured using a level and a rule.
- Stepping 1-2 cm to the side from the fasteners, holes are drilled into the gypsum board for foam insertion.
- Foam is injected into the hole in small doses. Don't forget - foam expands.
After the foam has dried (about a day), the screws are removed along with the washers. Instead, screw in regular self-tapping screws, “drowning” the caps a little.
Doors in plasterboard partitions
How to reduce the size of the passage
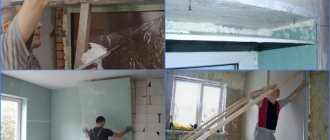
When remodeling an apartment, we quite often encounter a situation where the width of the doorway is excessive and needs to be reduced. This operation can be performed using drywall, and below are instructions that allow you to do it yourself and with minimal time, effort and money.
Reducing door dimensions
Note! It is very important that on the wall next to the entrance there is a layer of plaster, the thickness of which is equal to or greater than the thickness of the gypsum board sheet. In this case, the new opening will be as smooth as possible!
We reduce the size as follows:
We reduce the size as follows:
We reduce the size as follows:
- First, remove the plaster from one side of the doorway 10-15 cm from the edge.
- Then we apply markings to the walls and floor of the room, outlining the contours of our future drywall frame.
- We attach fragments of the starting profile to the floor and ceiling according to the markings.
- We insert rack profiles into the starting profile and connect them with self-tapping screws or pliers for galvanized metal.
Advice! To provide the frame with greater rigidity, wooden beams can be placed in the profile - the so-called “mortgages”. The length of the beams must be equal to the length of the profiles.
- When the frame is ready, we cut out the pieces of drywall we need.
- Apply drywall adhesive to the areas of the wall that have been cleared of plaster. We attach the resulting sheets to the base, and after polymerization of the glue, we fix the edges of the sheets to the frame using self-tapping screws.
Reducing the width of the passage using plasterboard
We sew up the slope of the new opening with a gypsum board strip, after which we putty all the joints and prepare the surfaces for finishing.
This technology is the simplest. It is much more difficult to figure out how to make a door in a wall made of plasterboard, i.e. in a hollow gypsum wall.
Door in frame partition
Doors in a partition made of gypsum plasterboards should be designed at the stage of construction of the partition itself.
In order for the doorway to have mechanical characteristics sufficient for effective operation, it is necessary to adhere to the following recommendations:
Scheme of a door frame in a partition
- At the stage of marking in the lower part, we mark the planned location of the future doorway. Its dimensions should be slightly larger than we need, since part of the width will inevitably be “eaten up” by the finishing.
- According to the markings, we attach two sections of the starting profile to the floor, which will act as the basis for the vertical posts.
- We insert the vertical rack profiles into the starting profile and securely fasten them, after which we attach them to the same profile on the ceiling.
- As in the case of changing the dimensions of the passage, we place wooden beams in the rack profile. To ensure sufficient rigidity, we attach the beams to the profile with self-tapping screws in increments of 30-40 cm. The price of wooden beams on the market is low, so the increase in the cost of the structure will be insignificant - but the mechanical properties of the frame will seriously improve!
- We continue to assemble the door frame, connecting the vertical posts with horizontal profiles. The sequence of assembling the frame for plasterboard structures is shown in the instructions posted on the portal.
Joint of sheets when covering a door
The finished frame must be covered with plasterboard. When sawing gypsum plasterboard, try to ensure that the junction of the two sheets is located above the doorway - this way there is less risk of cracks.
Covering the frame with gypsum sheets and subsequent finishing is carried out in the same way as in the previous case.
Advice! If the door leaf planned for installation in this partition is of significant weight, then before sheathing the doorway with plasterboard inside, you can install additional wooden spacers. Covering the frame with plasterboard in two layers also gives a good result.
Is it possible to attach GVL directly to a concrete wall without profiles?
The concrete wall does not have large differences, so the gypsum boards are fixed with glue.
Gypsum compositions are not used for concrete due to the incompatibility of the included elements. It is better to use acrylic glue.
Before gluing the material, the surface is prepared. Namely:
- notches are made on the concrete for greater adhesion;
- The entire wall is covered with primer.
After that:
- The gypsum board sheet is laid on flat wooden slats in front of the fixation point.
- Glue is applied to it with a notched trowel.
- The sheet is lifted, a piece of drywall is placed under it so that there is a gap from the floor and it is leveled.
- Press it to the base and secure it with a “mop” until the glue dries.
- The second sheet is fixed after the first has dried.
If the wall has a curvature, beacons made of wooden slats or cut strips of plasterboard are used.
Making the finishing touches
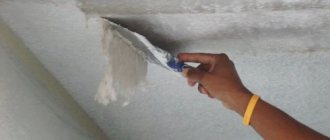
When the work is completed and the wall is leveled, you need to wait for the mixtures used to dry completely. This will take 2-3 days. Then you should putty all the joints. All places where gypsum from plasterboard protrudes must be covered with putty or acrylic sealant. This is done so that moisture does not penetrate into the sheet and it does not swell in the future.
Since no self-tapping screws were used, there is no need to putty them, which is a definite plus. Everyone will decide for themselves what to do next with a flat and smooth surface. The choice should depend on what finish will be used.
Tips and tricks
Before installing drywall on the walls, you should familiarize yourself with the tips and recommendations of the experts:
- fixation of the finishing material begins after all the electrical wiring has been done and the floor has been laid;
- To install gypsum boards, the room must be moderately damp and the temperature must be at least 10 0C;
- the walls must be cleaned of finishing and coated with primer;
- For wet rooms we use moisture-resistant plasterboard;
- the sheet of glue is heavy, so you need to invite one person to help;
- Any glue that comes out must be removed immediately.
Having performed the installation technique correctly, as well as applying the recommendations of the craftsmen, the wall surface will be smooth and ready for further finishing. A plasterboard structure will last 10-15 years if there are no sudden changes in temperature and constantly high humidity in the room.
Preparatory work
When it comes to the frameless method of attaching drywall, we consider the option with a special adhesive mixture. This mixture is applied to a sheet, which is attached to the wall with its help. Therefore, the wall surface must be carefully prepared.
The first step is to remove the old finish (paint, wallpaper, etc.).- All loose plaster is removed if the walls were previously plastered.
- If there are chips or areas where a lot of plaster has fallen off, they need to be puttied to level the wall. The same goes for cracks.
- The surface is cleaned of dust, dirt and grease stains.
- The wall is primed twice (a new layer is applied if the previous one has already dried). Typically a primer with an antiseptic is used.
These four steps will ensure that wall cladding with plasterboard without a frame will be as effective as possible. Further work should be started only after the primer has completely dried.