Corners play a bigger role in the interior than it might seem at first glance. It is enough to look at their uneven or “erased” surfaces to immediately become clear: no one would call such a finish neat. Decorative corners on the corners of walls, slopes of door and window openings began to be used everywhere during repairs only in recent years. Until then, the materials used to cover the joints simply changed more often than the rest of the finish.
You can appreciate the transformative effect of a decorative element even in an empty room without furniture. Based on the type of location, they are classified into two types:
| Exterior | They are used to decorate the exterior facades of houses. |
| Interior | Used in rooms of city apartments and private houses. |
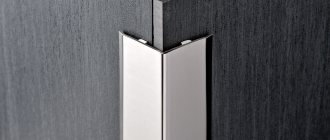
Elements are also classified into those that are placed on the outer sides of the corners and those that are inserted into the internal ones. The latter can have semicircular shapes that “soften” the finish. You can make a corner with your own hands, or purchase it at a specialized store. Products are made mainly from plastic, MDF, but there are also more durable metal and stone options. Polyurethane effectively imitates various natural materials: wood, marble, sandstone, brick. Plastic corners are used not only as decoration, but also as a durable finishing element that will “outlast” wallpaper or other less durable wall surface coating. There is also a “mystical” component to the question. According to Feng Shui, the places where the “joints” of the walls are considered energy breaks, which create an imbalance and negatively affect the perception of the situation, so their edges are decorated with corners, “smoothing out” the sharpness.
- What are decorative corners for?
- When to apply
- Plastic corner size
- Types of decorative corners on walls Arched
- For ceramic tiles
- For external and internal corners
- Textured corners
- Wooden
- Corners for ceilings and baseboards
- Natural stone corners
- Artificial stone corners
- Finishing door and window slopes
What are decorative corners for?
Corners are most often “touched” by people passing by with their shoulders, elbows and carried objects. Accordingly, it is this part of the wall that is erased and scratched more than the remaining ones. To protect the joint from mechanical stress, a decorative corner is attached to it - a special type of finishing materials, a special “overlay”. It is designed to perform two functions:
- Decorate the finish;
- Protect the sensitive area.
In addition, finishing using these elements looks neater and the interior seems complete. Using the material, color and size, you can emphasize the features of the style used in the design of the room.
When to apply
The corner part of the wall is covered with decorative elements in several cases:
- If the corner has visually noticeable defects: curvature, “dimples” or protrusions that were not corrected with plaster;
- When the protruding part obstructs the passage or is located next to the “pedestrian” area. Accordingly, it will constantly be touched, erased, scratched. Over time, mechanical damage will become noticeable and negatively affect the sensitive wall finish and its appearance;
- If without them the interior does not look complete;
- To prevent the destruction of the outer corner of the building and give the exterior a neat appearance.
The installation of elements usually completes the renovation: they literally become the finishing touch in the design.
Plastic corner size
The standard range of sizes for PVC corners starts with 10x10 mm and ends with 50x50 mm. Between them, gradations with a difference of 5 mm are used. Parts of non-traditional sizes are made to order. An angle of 90 degrees is maintained between the two guides of the decorative element, at which all planes of the apartment must intersect. If you have a home with “crooked” walls, then you need to take appropriate measurements and contact a specialist with a request to make individual parts.
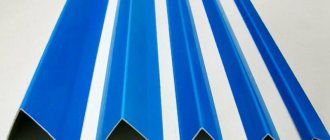
Types of decorative corners on walls
Corners are universal finishing elements. They are pasted in bathrooms, kitchens, bedrooms, balconies, offices and living rooms. Decoration is carried out using several types of elements:
- Arched, for plasterboard partitions;
- For ceramic tiles. The same category includes profile strips for the bathroom;
- Corners made of natural and artificial stone;
- Options made of wood;
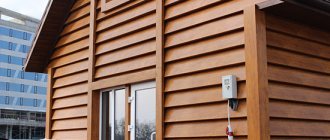
- Special guides for siding (exterior decoration);
- Corners for ceiling and floor “joints”;
- Textured options;
- For external and internal corners;
- Corners for door and window openings.
Each type is combined with a specific wall decoration and organically blends into specific styles. Corners are used to decorate not only walls, but also fireplaces, stoves, furniture, and “boxes” for masking communications and pipes.
Arched
Arched corners are used under plaster or glued on top of an already finished surface. “Internal” elements provide smooth straight lines. Corners for semicircular partitions are characterized by increased flexibility, which allows them to be tightly bent to curved surfaces of the base. If the decorative wall has a strict rectangular or square shape, then the decorative elements can be selected from standard plastic options designed for simple walls.
For ceramic tiles
Ceramic tiles are used to finish walls and floors in kitchens and bathrooms. At the corners, the tile seams are tightly sealed, they do not allow water to pass through, but they collect dust, dirt and grease (in the food preparation area). Also, these places are usually used by bacteria and fungi to organize their “breeding ground”. Microorganisms will not get under properly treated seams, but they can easily make a comfortable “home” on their surface. When cleaning tiles, it is recommended to pay special attention to these areas. Overlaying the corners allows you to reduce the scope of work and make the place where the walls meet reliably protected from the adhesion of dirt particles. In addition, the decorative element will competently disguise uneven tile cuts, and options that contrast with the color of the tile will add chic to the room. Corners are divided into two types:
- Internal. They are used to decorate joints between walls and ceilings, floors, showers, that is, “pressed-in” corners. Usually have a convex or concave shape (fillet);
- External. Used when processing protrusions.
Popular plastic is not used for decorating tiles, since the main coating can compete with polyurethane in durability and strength. We need all the finishing elements to “age” approximately equally, otherwise, due to a corner that has become unusable, the tile will have to be “disturbed” once again. Metal and ceramics are used to decorate tiled surfaces.
There are so-called “ribbon” corners. They are made of flexible plastic, produced in “reels”, are highly flexible, and can be easily replaced if necessary. This option is ideal for quick repairs.
For external and internal corners
Separately, elements are classified into external and internal. The former are used to decorate protruding joints of surfaces. The latter are used less frequently in “concave” corners. The latter are not in such dire need of protection, so overlays are only needed to decorate the finish. Inner corners usually have a semicircular concave or convex shape.
Textured corners
Textured options differ in color and pattern. They are usually made of plastic. Often the corners imitate a specific material: bricks, marble or granite surfaces, porous stone, wood (wenge, cork, oak, cherry). A variety of shades allows you to choose a contrasting or background option for a specific interior.
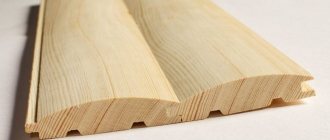
Wooden
Wooden corners are usually made from thin MDF plates, bamboo, cork or veneer. The materials are as light as plastic. MDF is flexible, and a decorative layer with a protective film from damage is applied to the surface of the compressed sawdust. In veneer versions, the element is made from thin wood slices, that is, it is more natural and has a natural pattern. Solid wood corners are denser. Glued to the surface, they will protrude slightly on it.
It is not recommended to use natural wood in bathrooms and kitchens. Before attaching the material, it should be coated with a layer of varnish. Wooden elements are most often made independently. Unfortunately, a cracked corner can become deformed and crack under a strong impact. You will have to “pay” for the natural beauty of the decorated surface with a lower service life.
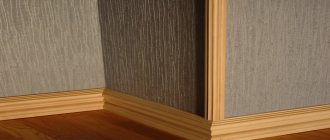
Corners for ceilings and baseboards
Ceiling and floor plinths at the junctions of individual modules have a very unsightly appearance. No matter how carefully the cuts are processed, they will slightly undermine the aesthetic picture of the interior. Decorative corners are used to disguise them. In appearance, they differ from wall-mounted options: they look like small overlays that are designed to decorate a small area. For ceiling plinths with stucco molding in classical styles, special corners with monograms are purchased, repeating each bend of the connected straight lines. The use of elements on ceilings is not mandatory, which cannot be said about floors. Here, the baseboards are constantly in contact with the feet of guests and household members. Their “joints” can become loose, frayed and become completely unusable. The corners will save the baseboards from rapid wear.
In design compositions, the lower decorative elements sometimes echo the upper ones. This solution ensures the integrity of the composition, so ceiling and floor plinths often have the same outlines, and accordingly, identical corners are selected for their decoration.
Natural stone corners
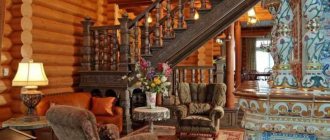
Decorative elements made of natural stone are usually used to decorate the facades of houses. Due to the strength of the material, they serve as excellent protection against building destruction. However, with the popularization of the industrial loft, brick and stone masonry have become an organic addition not only to the exterior, but also to the interior of the house. Such corners will definitely “protrude” slightly above the surface. You should choose flat stones that will ensure a neat appearance of the entire structure. They are fastened with cement mortar, that is, the corner will be monumental and installed for ten years. Elements are combined with plasterboard walls, relief plaster and wooden lining.
Artificial stone corners
Corners made of artificial stone are considered cheaper and more practical options. As a rule, imitation is made of plastic. It repeats not only the color, but also the “rough” texture of the surface. PVC is flexible, often goes beyond the “borders” of the corner and creeps onto the wall itself. This solution is used to create the illusion of naturalness of the decoration, because real stonework usually does not fit the line. Combine the corner with wallpaper and the same plastic panels. It is important to know. Thick wallpaper is considered the most budget-friendly imitation of stone at the corners. Curly pieces are cut out of them along the contours of the pebbles and glued to the joint. Such an element will not protect the surface from scratches and damage, but it will cope with the decorative task.
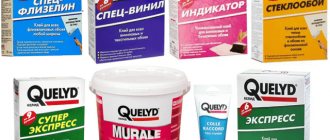
Glue selection
Before gluing corners to slopes or other architectural elements, it is necessary to select the correct installation composition. Today there are 4 solutions to the problem. Let's look at each of them in more detail.
Liquid nails and sealant
In modern construction markets, sealants with liquid nails are presented in gun tubes or tubes. Moreover, they have the same volume. Buyers often get confused in this variety.
For installing lightweight plastic, only 2 options are suitable: liquid nails or adhesive-sealant
Here it is necessary to pay attention to the fact that the composition also exhibits good adhesion to the base. So, for absorbent surfaces you can use acrylic-based glue or neutral
They practically do not emit odor, can be wet cleaned before drying, and dry quickly. If work is carried out on concrete, plastic, metal or glass, you will have to make a choice in favor of universal compounds.
Universal compositionSource stpulscen.ru
Sealants are often used to install corner profiles. This is justified by additional waterproofing. However, this approach is incorrect due to the weak adhesive ability of the material, and the dry residue can only fill the voids. A corner fixed with sealant does not always last for a year.
Liquid plastic
Liquid plastic is sold in the same containers as liquid nails. But the cost of the composition differs significantly from them in a larger direction. This is justified by high performance and technical characteristics. So, among the advantages the following are highlighted:
quality indicators and shape remain unchanged 10 years after installation of the fittings;
color change under the influence of ultraviolet rays, oxidation does not occur over time;
Due to minimal shrinkage during the drying process and good adhesion, a monolithic structure is formed, which additionally protects the base from moisture penetration.
Liquid plasticSource pvcwindow.ru
Liquid plastic belongs to the group of universal building materials. They can be used for gluing corners on slopes and filling/sealing joints between the window frame and adjacent planes. In addition, the composition is characterized by high mechanical stability, which allows it to be used for fastening window sills and sheet finishing of the opening. The only drawback against the background of numerous advantages is that the use is limited to PVC bases.
Polyurethane glue
Before gluing the plastic corner to the plastic panel, you should find out in advance about the color of the synthetic glue from light beige to dark brown. If the work surfaces are white, then the excess will be visible here. It can only be removed using organic or special solvents until it dries. Before using the material, you also need to find out about the working time of the glue in the open state.
Classic version of polyurethane glueSource sdelais.ru
The main advantages of polyurethane adhesive are as follows:
- resistance to biological damage and corrosion, which is important for areas with variable humidity;
- low thermal expansion allows the glue to be used in conditions from -60 to +150℃, which is not typical for the listed analogues;
- resistance to oils and organic solvents allows the composition to be used for finishing in laboratories and industrial enterprises;
- plasticity helps maintain the characteristics of the dry residue under vibration load;
- high adhesive ability determines the versatility of the glue to work with any substrate.
They also note the uniqueness of the polyurethane composition regarding the drying process. The higher the relative humidity, the more active it is. This allows you to install decorative corners for slopes in the bathroom without prior ventilation.
Options for using corner profiles for finishing corners
The corner profile is used to decorate the following elements:
- “Natural” joints between walls that are in a vertical plane;
- Door and window slopes;
- Places of “convergence” of ceilings, floors and walls in horizontal planes with a concave shape;
- Corners of decorative partitions, including arched openings;
- Joints between shower cabins, fireplaces and other “monumental” (not involving movement) interior objects and walls and floors.
A decorative element can be used to “smooth out” any “seam” at the junction of finishing materials. If previously it was necessary to carefully process the cuts so that they retained a beautiful aesthetic appearance, now they are allowed to have irregularities and chips, which will be masked by the corner.
Finishing door and window slopes
Double-glazed windows usually come with special corners that complete the installation of the window. Door sets also often include trims and trims. If the corners are left without additional protection, then you will have to select and glue it yourself. The element will protect the slopes from damage and smooth out the junction of two different materials. For example, the end of the wallpaper will begin to wear off and peel off over time. No matter how smoothly you cut the finishing material on the slope, it will look untidy without additional coating. Slopes in doorways can be scratched by furniture carried through them.
The best option would be to use polyvinyl chloride corners. If necessary, it is easy to replace, and the surface texture can imitate any natural materials. By choosing a special shade, you can create an illusory transitional border between the color of the wallpaper and the window frame or doorway. Corners made of veneer or bamboo are less commonly used.
Arched doorways
Arched openings, as a rule, have one of the classic shapes: with a semicircle on top. Not every material can replicate its contours. For example, solid wood corners can only be used to decorate straight lines. Smooth transitions are decorated with elements made of flexible plastic, MDF, veneer or bamboo. All of the above options will easily follow the contours of the arch and complete the design of the doorway.
Flashings for doors and windows
These products have two sides. One of them is narrow. The structure fits tightly in those places where the frame meets the wall. If the corner is made of MDF, it is better to place it outside.
A good solution would be to use them for doors, windows, loggias and balconies. The strips are able to reliably cover the mounting foam, protecting it from moisture and sunlight. Their decorative qualities are excellent. When facing slopes, they are not a mandatory component. You can use putty with further painting and sealant.
How to glue a plastic corner yourself
In addition to decorative corners, you will also need a fastening compound. For narrow elements it is not recommended to use glue, the excess of which cannot be removed from the surface without leaving a trace. Before carrying out the procedure, the joint must first be cleaned of dirt and remnants of wallpaper or protruding pieces of finishing material. No corners will save an excessively uneven and bumpy surface. Then the wall is measured. The measurements are exactly transferred to a piece of corner. It is better to cut the material with a hacksaw with fine teeth. Do not forget about the joints between the corners themselves (in doorways, windows): two straight lines should end with cuts at an angle of 45 degrees. The “wrong” side of the prepared material is coated with glue and applied to the wall. Using your hands, firmly press the corner to the surface and hold it until the fastening composition “seizes”
Tips for pinning
The algorithm for fixing a plastic corner on the wall surface is as follows:
- Angle deviations are measured using a building level.
- Mix the solution based on the dry putty mixture to the required consistency.
- Apply the finished mixture with a regular spatula and level it using an angle tool so that the corner takes on a rectangular shape.
- As soon as the corner is completely dry, apply a perforated PVC corner and cover it with a layer of finishing putty.
- After the material has completely dried, the surface is sanded using an abrasive mesh.
PVC corners are always installed on a previously prepared surface. If necessary, remove old wallpaper with a drywall knife and remove the paint layer.
Further algorithm of actions:
- Apply glue to the inner surface of the corner at a distance of 30 to 50 mm. This should be done as if drawing a dotted line.
- After some time, the glue acquires optimal viscosity. You can read about the desired consistency in this case in the instructions for the glue. These indicators are individual, depending on the manufacturer.
- Apply a plastic profile to the surface of the corner and secure it on top with masking tape.
- To fix the corners, you can use liquid nails or colorless silicone.