- November 4, 2018
- Construction
- Lyudmila Storozhenko
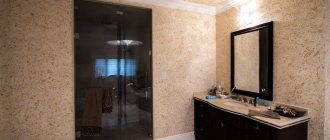
One of the latest innovations in the construction market is liquid wallpaper. This is an interesting decor option that looks great in both residential, office and retail spaces. To work with this material you need to have certain theoretical knowledge. This is a unique type of finish. Is it possible to apply liquid wallpaper to wallpaper and how to use this material will be discussed in detail below.
Peculiarities
To figure out how to properly apply liquid wallpaper to a wall, you need to understand what kind of material it is. Expert advice will help with this. This type of finishing is something between ordinary wallpaper and plaster. The consistency of the mixture resembles plasticine. It is because of this feature that it is mistakenly confused with plaster. However, these are completely different materials.
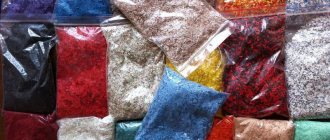
The main component of liquid wallpaper is cellulose. In addition to it, various decorative additives can be added here, for example, glitter, dyes, etc.
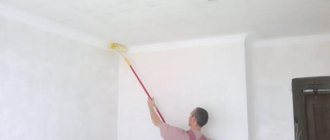
Some owners of private houses and apartments have many questions regarding the specifics of the application, for example, whether liquid wallpaper is applied to the ceiling. The answer is clearly yes. Liquid wallpaper is a rather undemanding material. They can be applied not only to walls and ceilings, but also to bases made of quite specific materials. For example, you can decorate doors or window slopes with liquid wallpaper.
There are several varieties of this type of finish:
- silk;
- cotton;
- cellulose
The most durable and expensive are silk-based wallpapers. They look impressive and are not subject to fading in direct sunlight. The cheapest wallpaper is made from cellulose. However, their service life is much shorter.
Based on the type of application, there are wallpapers that are ready to be applied to the base and those that require preliminary preparation. For the first category of materials you just need to add water. After this, they are immediately applied to the surface. The second category of wallpaper requires the preliminary application of special additives. These are decorative components that you can choose according to your own taste.
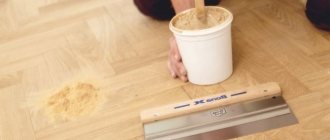
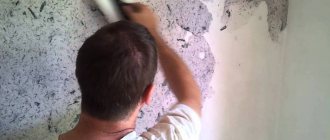
Ways to remove old paint
Old paint can be removed with an abrasive wheel
. There are several ways. Let's reflect this in the table:
Burning with an open flame is carried out using a gas torch or blowtorch.
The old cladding is washed off with a brush dipped in solvent. The abrasive wheel is installed in the drill chuck. To learn how to remove old paint from a wall, watch this useful video:
Such work involves the use of open fire and the release of harmful fumes, so it is necessary to use personal protective equipment. There should be no unnecessary objects in the room that could catch fire, and ventilation of the entire interior space of the room should be provided.
Advantages
How to apply liquid wallpaper at home? This is a simple procedure that almost anyone can handle. In addition, liquid wallpaper has a number of other advantages:
- Aesthetic appearance. You can experiment with the design and shape of the finish yourself. You can cover the entire surface with a monotonous layer. However, it is quite possible to make individual decorative elements from liquid wallpaper, for example, geometric shapes or patterns. You can also combine different colors in compositions. Knowing the simple technology of how to apply liquid wallpaper, you can experiment with the design. These can be real paintings on the walls or ceiling.
- High-quality thermal insulation. The material has a porous structure. This allows it to keep heat out of the room.
- Soundproofing. Due to its unique structure, such wallpaper does not allow sounds to enter the room.
- Environmentally friendly material. The composition includes components that are safe for the environment and humans. Therefore, such wallpaper can be used in the bedroom, children's room and other living spaces where people visit. The heterogeneous structure allows the walls to “breathe”. Therefore, fungus does not form under the finish. This also helps to improve the quality of the indoor microclimate.
- Plastic. Even if the house is new and in the process of shrinking, the coating on the walls will not deform or tear.
Applying this finish to walls is quite simple. Even a master without special training can cope with this work.
How to glue wallpaper correctly: advice from experts
So, you've decided to hang wallpaper. What is the cost of work if you hire specialists? From 100 rubles – this is the price per square meter. You can hang wallpaper yourself. It's not as difficult as it seems at first glance.
How to make glue yourself to hang wallpaper: recipe and video
There is a specialized glue for each type of wallpaper. For simple paper, glue marked “light” or homemade paste is suitable. For non-woven or vinyl-based coatings, compositions containing PVA are used. The fabric is glued to Bustilat or wallpaper Moment. Fashionable cork coverings are easily attached with ordinary glue.
When purchasing wallpaper, the seller will recommend the optimal composition for you.
Expert's point of view
Dmitry Kholodok
Technical director of repair and construction
Ask a Question
“Before work, check the color strength of the old layer of wallpaper. If the glue dissolves the paint, colored spots may appear on the fresh surface.”
Homemade glue can be prepared using 1st grade baking flour. The procedure is very simple: pour 2 glasses of flour with a couple of glasses of cold water and stir thoroughly so that there are no lumps. You can use a mixer. Pour the resulting solution in a thin stream into a liter of boiling water. This should be done directly on the stove, constantly stirring the boiling water while pouring. The glue will immediately thicken. You need to remove the mixture from the heat and cool. This glue is not stored for a long time; it must be used immediately after cooling. Using exactly the same method, you can prepare a paste from potato starch, you just need 1 cup of starch.
Video on preparing starch glue:
How to properly glue wallpaper in the corners of a room
| Image | Description of work |
| If the corner is internal, glue the canvas so that there is a slight overlap. Cut this overlap, pressing it with a spatula, using a construction knife with a sharp blade. | |
| After trimming, a thin strip of coating can be easily removed. | |
| Remove any remaining adhesive on the ceiling with a dry cloth. | |
| The same procedure is carried out on vertical corners. | |
| To cover an outside corner, first coat the wall thoroughly, paying particular attention to the outside edge. | |
| Glue the canvas onto a vertical base with an overlap on the ceiling and corner. Remove the overlap using the method described above. | |
| Stretch the fabric and press it against the second part of the outer corner. | |
| Carefully level the material, avoiding the formation of bubbles. Under no circumstances should the outer corners be cut; they only need to be tightened. |
How to hang wallpaper on the ceiling yourself without outside help
The main problem in pasting the ceiling is that the canvas tends to fall down under its own weight. They should be glued in stages.
| Image | Description of work |
| To work, you need to build such a supporting device. It should be light enough to be moved easily. The top bar should not reach the ceiling by 10 centimeters. | |
| Hang the wallpaper on a stand and apply glue to the ceiling in the corner. | |
| Press the edge of the canvas to the ceiling and smooth it out carefully so that there are no bubbles. | |
| Coat the next section of the ceiling with glue. Use a roller to apply the composition. | |
| Carefully move the stand to its new location. | |
| Press and level the next section of wallpaper. Repeat this procedure along the entire length of the canvas. |
Advice! If you don’t know how to choose wallpaper for the ceiling, pay attention to the following nuances: embossed canvases will hide small unevenness in the plaster, light colors will visually raise the ceiling, and products made from natural materials are resistant to fading.
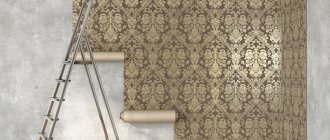
How to properly glue wide panels
Wide panels with a directional pattern are not easy to glue on alone. We offer you a small master class on how to glue meter-long wallpaper on a non-woven base:
| Image | Description of work |
| Before you begin, take accurate height measurements. | |
| Measure out the first piece of fabric in the roll. | |
| Professionals do not use scissors to cut the canvas, but a sharpened spatula. The wide blade cuts the non-woven base easily and evenly. | |
| A large pattern needs to be joined evenly, so when cutting the panels you will have scraps left over. | |
| Apply glue to a section of the wall. Coat the corners especially carefully. | |
| Apply the first panel and level it vertically. When aligning, do not focus on the corner - corners are rarely even. | |
| Trim the overlap in the corner, pressing the canvas with a spatula. | |
| Align the second panel according to the pattern and repeat this algorithm on the entire wall. |
Flaws
When understanding how to lay liquid wallpaper, it is worth paying attention to some of the features of this material. It, like other types of finishing, has its drawbacks. You need to find out about them before purchasing liquid wallpaper.
One of the main disadvantages is instability to moisture. Therefore, this type of finish is not suitable for creating a decorative coating in the bathroom or kitchen. Also, you should not choose this type of decoration for the hallway. But during dismantling the master does not have any difficulties.
To extend the life of liquid wallpaper, it is recommended to apply colorless varnish to it. This allows you to maintain the appearance of the finish. In this case, it will be possible to carry out wet cleaning of the coating. However, when applying varnish, the effect of the “breathable” material will be lost.
In addition, the material is high in cost. Therefore, not all owners decide to purchase liquid wallpaper. However, a large number of positive qualities still make this type of finishing attractive to buyers.
How to prepare walls for wallpapering on the old layer
The task of the preparatory work is to ensure high-quality fixation of the new decorative coating. In addition, during the preparation process, it is necessary to eliminate fungus on the walls, if any, and insect breeding sites. Doing this without removing the old layer is problematic. Can you imagine how many bedbugs, ants and cockroaches can form colonies in places where wallpaper is loose? If there is any hint that the previous layer has moved away from the wall, ruthlessly remove it.
The resulting bald spots need to be treated with a primer and lightly rubbed with a plaster mixture.
After processing, it is necessary to sand the treated areas with fine sandpaper. In places where mold spots have appeared, you need to carry out the same procedure, additionally treating the wall with an anti-fungal compound.
Advice! For priming, use a universal primer; it will ensure high-quality adhesion of the wallpaper.”
Before finishing the processing, conduct one small experiment: in one place, spread the glue with which you will glue the new layer and leave it until it dries; if the base does not bubble or fall off, you can start working.
Why do you need to prime the walls before wallpapering?
A primer is necessary for better adhesion to the new layer. In construction stores you can find a large selection of primers for various purposes.
For wallpaper you should choose universal compositions
The primer is applied only to a clean surface, so old coatings should be wiped off or wiped with a rag. In case of gluing the second layer of wallpaper, a specialized primer can be replaced with a layer of PVA glue. This will not affect the quality of adhesion.
Surface type
How to apply liquid wallpaper correctly? You need to familiarize yourself with the list of surfaces on which the manufacturer allows this type of material to be applied:
- Concrete. It can also be cement-sand plaster, clay surfaces. To ensure good adhesion, before applying liquid wallpaper, such surfaces are coated with a primer. It can be transparent or white. You can also apply liquid wallpaper over the starting plaster putty.
- Drywall. Before applying the decorative coating, gypsum board sheets are treated with putty. An acrylic primer is applied to it. After this, you can finish the surface with liquid wallpaper.
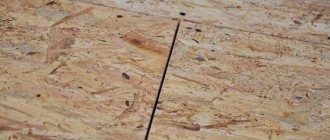
- Solid wood, chipboard, MDF, fiberboard. Before applying such a finish to the surface, the base is coated with alkyd enamel (PF-115). Only after it has dried can you begin to apply the decorative layer.
- Metal. Often such surfaces are found in the form of metal pipes and other steel structures protruding from the walls. They appear on various surfaces. This can also be steel reinforcement if the surface is a reinforced concrete structure. Before applying liquid wallpaper to such surfaces, they are coated with PF-115 enamel.
We assess the degree of risk
Before gluing wallpaper over the old coating, take into account the possible risks and disadvantages of this method:
- the quality of the adhesion of the canvases is reduced, as well as the service life of the new coating;
- under several layers of material the likelihood of mold development increases;
- there is a high risk of defects appearing on the surface, such as “bubbles” and partial peeling;
- the old coating, soaked after applying the adhesive, can stain the new canvas.
Considering these points, it is worth considering whether it makes sense to glue such expensive types of wallpaper as silk-screen printing or non-woven fabric onto an unprepared wall.
Other surfaces
Owners of houses and apartments have a question about whether liquid wallpaper can be applied to other surfaces. After all, it is not always possible or willing to completely remove old materials from the base. It is worth noting that experienced builders do not prohibit applying new liquid wallpaper to old ones. Of course, there should be no greasy stains or dirt on the first layer. In this case, the surface is considered ideally prepared for applying another layer of liquid wallpaper.
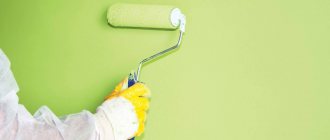
Also, some novice craftsmen are interested in whether they can apply liquid wallpaper to paint. If the layer is well preserved, this is not prohibited. However, before this you need to paint the surface white. Otherwise, a different shade will show through the liquid wallpaper.
If the color of the previous paint was saturated or there were contrasting patterns or transitions, you should first putty the surface with a gypsum mixture. It is pre-primed, and then the wallpaper is applied. This is also true when performing work on surfaces covered with plaster. This material strongly absorbs moisture, so it will be extremely difficult to work with. To prevent this from happening, you need to cover the plaster with gypsum finishing putty. Then a primer is also applied.
If the paint has defects or chips, it must be removed. Very soon it will begin to crumble along with the new decorative finish. It is worth considering that if there are uneven surfaces, the material consumption increases. This leads to additional expenses.
On drywall
You should not glue wallpaper directly onto unprepared drywall.
There are a number of reasons for this:
- The glue is absorbed very quickly into the cardboard and it is unlikely that it will be possible to distribute the wallpaper evenly over the surface.
- Light-colored wallpaper (especially non-woven wallpaper) can show through the dark color of drywall.
- In the future, when the need arises to replace the wallpaper, it will be almost impossible to dismantle the old ones from the plasterboard wall without compromising its integrity.
Therefore, it would be most advisable to carry out activities that include:
- drywall primer;
- sealing drywall joints using a special mesh tape to secure the seam;
- treating the screw fastening area with putty mixture;
- applying putty to the entire wall (2-3 layers);
- grinding the surface using, first, a coarse-grained mesh, and then a fine-grained one, for a smoother surface;
- primer for wallpaper.
Old wallpaper
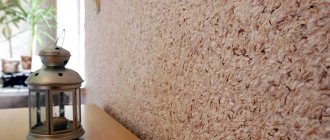
Is it possible to apply liquid wallpaper to old regular wallpaper? The answer from experts in this case is clearly negative. They claim that such a coating is unacceptable for this type of finish. Only in the rarest cases can you leave the old coating by applying a layer of liquid wallpaper on it.
The fact is that old decorative coatings become covered with dust and dirt over time. They gradually begin to lag behind the walls. Therefore, it is not advisable to apply liquid wallpaper to wallpaper. The result will look ugly. Over time, there will be places where the wallpaper will begin to completely lag behind the walls. This can happen during the process of applying liquid wallpaper to the surface. They contain water, which additionally dissolves old glue.
Another reason why you shouldn’t apply a new finish to old wallpaper is the ability of liquid wallpaper to show through. If there was some kind of pattern on the walls, it will be visible through any type of new coating. This will ruin the appearance of the interior. Therefore, you can leave the old wallpaper only if it was completely white, without texture, and completely smooth.
Considering the technology of how to lay liquid wallpaper, it is worth noting that manufacturers allow you to leave old wallpaper and only if it is not possible to remove it from the walls after the material gets wet. Before applying the new finish, you need to wet the old wallpaper. They are usually easily removed from the walls. In this case, the old materials are definitely completely removed.
But if after soaking the wallpaper does not come off the wall, it cannot be removed even with a spatula or other tools, you can leave it. But first you need to try to remove the old wallpaper as much as possible. If, even after treatment with special chemical compounds, there are still places with old material, their boundaries are cleaned with sandpaper. Then the surface is primed. When the layer has dried, you need to paint the walls with white water-based emulsion. Only after this can you begin to apply new liquid wallpaper.
New wallpaper on vinyl flooring: is it possible or not?
You cannot attach new wallpaper directly to vinyl sheets. Regardless of the type of adhesive you choose, most likely it will simply not work, since the synthetic coating has water-repellent properties. This is especially true for washable wallpaper. Additionally, most vinyl materials have a textured pattern that will show through a fresh coat of finish.
However, there is still a chance to avoid complete elimination of such coverage. If, after removing the vinyl wallpaper, it was possible to remove the top polyvinyl chloride film, and the remaining paper or non-woven layer does not want to come off and adheres firmly to the wall, you can also glue a new sheet onto it.
USEFUL INFORMATION: How to glue vinyl wallpaper on non-woven and paper backing to the ceiling
Base surface requirements
To understand why professional repairmen are so categorical in their reviews regarding old wall decoration, you need to read the manufacturers' instructions. They clearly stipulate on what surface the liquid wallpaper is applied.
The base must have a uniform, but minimal ability to absorb moisture. It must be uniform. The surface where it is planned to create a new finish must be free of old materials, for example, wallpaper, glue, paint, etc. The old coating cannot boast a high degree of adhesion. It is most likely already beginning to collapse, even if it is not yet visible.
There should be no screws, dowels, nails, etc. sticking out from the base. Liquid wallpaper should be applied to a white surface. Moreover, the shade of the base should be the same everywhere. This is another good reason why we do not apply liquid wallpaper to old wallpaper. Any off-color will show through the new finish.
Also, there should be no differences in height of more than 3 mm on the surface. The base must be strong. It is unacceptable for some of its parts to exhibit peeling. If there are small defects or irregularities, they can be left. Liquid wallpaper will hide them. But if there are multiple potholes or differences in height, they need to be sealed with putty. Otherwise, the material consumption will be much greater.
For whitewashing
Whitewashing itself is the worst base for wallpaper. It has a porous structure, due to which the glue is quickly absorbed into the wall, and the wallpaper simply will not stick. Or the whitewash will get wet and fall off along with the wallpaper.
It is necessary to remove the whitewash:
- Using a construction spray bottle, apply a layer of water to the surface and wait until the surface gets wet and swells;
- Using a spatula, scrape the whitewash down to the base;
- Wash the surface with a rag or sponge;
- After drying, the walls must be treated with a primer;
- Fill all uneven areas with putty and sand these places;
- Prime the walls for wallpapering.
Preparation for use
So, professionals do not recommend applying liquid wallpaper to wallpaper. There are a number of justified reasons why this should not be done. In order for the home master to understand how walls are decorated with this material, you need to consider this process step by step.
Having prepared the base appropriately, removing uneven surfaces, priming or even puttingtying it, you can begin preparing the decorative material. You need to prepare a clean, dry container. This could be a bucket or basin. Dry material is poured into the container.
Next you need to heat the water to 40-50ºС. Wallpaper is filled with it. Only in warm water can the adhesive composition dissolve well without forming lumps. Next, the substance in the container must be mixed manually. A few light movements are enough. This is necessary so that there are no dry areas left. If you mix the composition too vigorously using a construction mixer, this will lead to fragmentation of the decorative fraction. In this case, the texture and color of the wallpaper declared by the manufacturer will be violated.
After mixing, the composition must be tightly covered with a lid or cellophane. Moisture should not evaporate during soaking of dry material. The material is left in this form for 8 hours. In this form, liquid wallpaper can be stored for up to 5 days (at room temperature). The adhesive properties remain unchanged during this time. Before application, you need to lightly mix the composition again. This will cause the liquid from the bottom of the container to rise up.
Tools for work
Prepare in advance all the necessary tools for applying liquid wallpaper. You may need:
- Plastic trowel, 3-4 mm thick pile roller or spray. Choose one thing from the list.
- Large spatula.
- Ironing iron.
- Notched spatula, paper tape or sickle tape (if there are seams on the wall).
- A large container in which you can dilute dry powder.
- Putty and deep penetration primer or white paint.
- Gloves. The composition of the powder is not hazardous to health, but for convenience you can mix it with gloves.
Instagram @zhidkie.oboi.novorossiisk
Instagram @std_sks_spb
- Decoration Materials
How to remove liquid wallpaper from a wall manually and mechanically
Application procedure
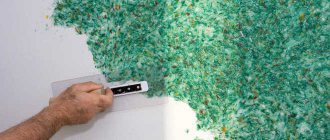
How to apply liquid wallpaper at home? The master does not require any special skills or abilities. After soaking, the material looks like a viscous mass. It is plastic and pliable. When soaked and finished, the material is completely safe for health.
The master’s task is reduced to smoothing the viscous mass over the surface of the base. For this, different tools are used. The most convenient, according to reviews from professionals, is a plastic grater. This tool is called by different names. This is also a “plastic trowel”, “plastic trowel”, etc. It is a rectangular board, the size of which is 27x13 cm. It has a handle in the shape of the letter “L”.
To smooth the material, you need to move the grater in a straight line in any convenient direction. At the end of the movement, the tool must be completely torn off the surface. It is recommended to avoid constantly moving the grater in a circle.
The layer thickness should be approximately 2 mm. In this case, the consumption declared by the manufacturer will coincide with the actual level. When the liquid wallpaper dries, the layer will be 1-1.5 mm. If you lay the material even thinner, tears may appear. If a similar picture is observed, you need to run the grater in the opposite direction.
If the master applies a layer of more than 2 mm, this will only affect the consumption. The drying time will also increase. The quality of the finished layer will not be affected. Professionals say that you need to maintain the same layer thickness over the entire surface. This is necessary for a uniform coating texture.
Pasting two types of wallpaper: photo gallery
There are situations when it is possible to carry out partial repairs. For example, there is a need to repair only one wall that has smudges or stains. In this case, it is permissible to combine canvases with different patterns. Basic rules you should know:
- select coatings of the same thickness and material;
- do not use more than two ornaments on one wall;
- neutral shades can be combined with bright colors;
- Make sure that the surface to be pasted has no defects.
Using successful combinations, you can literally make cosmetic repairs and wallpaper your room in just one day. The price of such work is pennies, and it is quite possible to postpone major repairs for another couple of years. See what it might look like:
Related article:
Combined wallpaper for the living room. In the publication you will find criteria for the correct choice of canvases, rules for combining colors, basic nuances and rules for gluing when combining, and advice from experts.
Removing liquid wallpaper
If varnish or other paint and varnish product was applied on top of the wallpaper, you will have to resort to either a sanding machine or a drill. The tool is pressed against the surface and slowly moved along it. The work will take a long time. You first need to prepare the room, because there will be a lot of dirt, you also need to protect the master, wear protective clothing, goggles and a respirator. If there was no additional coating, then the wall is moistened with warm water with a roller or sponge, wetting is carried out in several layers, waiting 20-25 minutes between them, until a paste-like surface structure is obtained. Next, the mixture is removed using a spatula. You can also use an iron for this purpose. Take a wet rag, apply it to the wall and iron it with an iron heated to maximum temperature several times. Wallpaper can also be removed with a spatula. Only wallpaper that has not been treated with varnish or paint can be removed from drywall. You need to use MK glue, which is diluted more thinly than indicated in the instructions. Wait half an hour and remove the coating with a spatula.
Wallpaper is removed with a spatula.