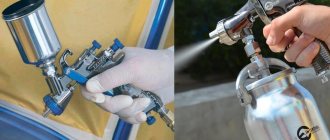
The spray gun is capable of applying paint and varnish material at a fast pace, while the layer will be even and aesthetically attractive. However, during operation, even a high-quality spray gun may experience malfunctions that will interfere with the normal supply of dye to the surface. This does not always mean the need to purchase a new tool; you can often repair the spray gun yourself. But to do this, you need to know the cause of the breakdown, how to disassemble the spray gun and how to solve the problem. This will be discussed in detail below.
Design and principle of operation
Before you start repairing an electric or pneumatic spray gun yourself, you need to understand how it works. Then it will be possible to disassemble the spray gun much easier, and the work process will not become a big problem.
Pneumatic and electric types of tools are considered the most popular for household and professional painting. They are similar in structure, but there are significant differences that affect how the composition is sprayed over the surface.
Electric type includes the following parts:
- An electromagnetic element that is responsible for the attraction of the bar;
- An oscillating bar, which is attracted by a magnetic part so that it pushes the piston further;
- The ink supply regulator helps limit the movement of the previous part;
- An airless or air-type spray nozzle is needed to spray solutions onto the substrate;
- The cylinder is the body part of the pump where the piston moves;
- It closes the valve and opens the paint supply;
- The suction tube, required to suck up the paint, can be supplemented at the tip with a filter;
- Piston spring. After moving the piston forward, it helps it return to the reverse position;
- The piston is responsible for sucking and releasing the dye from the spray gun;
- Start button;
- A fitting for connecting the tank to the device.
Coloring works as follows: when the button is pressed, an electromagnet operates and current begins to flow. At this time, the electromagnetic part pulls the bar and pushes it away. The bar movement parameter is controlled by a screw. The bar, pressing on the piston rod, starts its movement. Subject to the movement of the piston, paint is sucked out of the container, which is pushed into the valve area; when the piston moves forward, the valve opens and the paint and varnish material passes to the nozzle. From there the composition is sprayed.
The opposite movement created by the spring causes the valve to close and the solution is sucked from the container to the tube. This process is constantly repeated during operation of the device.
Remote compressors are also considered electric; their operation is excellent and more similar to pneumatic types.
Before you start repairing an electric or pneumatic spray gun yourself, you need to understand how it works.
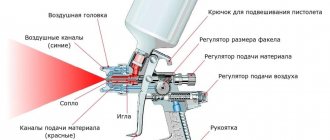
The pneumatic type operates on compressed air and is designed as follows:
- Spray head that goes together with the nozzle. A nozzle for a spray gun, what is it, is the second name for the nozzle in which air and paint combine, which leads to the formation of small particles of the composition. Considered a nozzle, it is replaced to obtain an excellent size for more viscous solutions;
- You can make a tank for paint and varnish material, a tank for a spray gun yourself if there is an urgent need;
- The body where all the parts are connected;
- The locking screw is responsible for adjusting the paint supply level using the movement of the needle; there may also be an air supply regulator;
- A handle that allows you to comfortably hold the tool;
- The gasket serves as a seal in the device that moves the needle;
- Trigger, activates the needle;
- A locking needle, with the help of which the nozzle opening is opened and closed.
When the trigger is pulled, a valve opens to allow air to flow through a special channel to the air cap. Increased pressure moves the needle, the nozzle opens, and the paintwork is applied. The soil or other solution combines with air and a torch is formed, which is sprayed over the surface.
There is a holder for the spray gun, which makes it convenient to use the tool. In addition, many professionals use a spray gun stand.
The pneumatic type operates on compressed air.
Types of spray guns
To deal with these issues, you need to decide on the types of devices. There are two types of spray guns.
Manual (mechanical)
Powered by compressed air. Air is pumped into the paint gun manually using a piston pump.
- with an upper location of the tank, when the dye enters the nozzle under the influence of gravity and its supply is regulated by changing the air pressure;
- with a bottom tank, when the container is attached from below, the solution is forced into the nozzle using compressed air.
Airless
Also called electric. Sprays the dye using a built-in pump.
Both of these varieties are very different from each other, and with outwardly identical faults, repairing a manual spray gun will be very different from repairing an electric spray gun.
Major breakdowns
When the essence of the structure of the tool is understood, you should understand the malfunctions that may arise during operation. There is a repair kit for the spray gun on sale, which is convenient to keep in stock to quickly solve the problem. Some parts wear out, and their replacement is only a matter of time.
There is a repair kit for the spray gun on sale, which is convenient to keep in stock to quickly solve the problem.
The gun doesn't paint
It happens that when you want to apply paint and varnish material to the base, the spray gun does not supply paint. A turning point in the operating principle of the tool can occur for the following reasons:
- The compressor may create too low air flow pressure; to fix the problem, it is worth adjusting the compressor;
- Whitewash and other solutions may remain on the needle or nozzle, and their excess may make it difficult for the substance to come out. After disassembling the device manually, the parts are cleaned;
- The needle or nozzle breaks; in this case, it is only possible to install a new part that matches the size.
The needle or nozzle breaks; in this case, only installing a new part is possible.
Air supply
The spray gun for the compressor turns on the trigger; if it is damaged, the flow of air masses may be disrupted. Then, when pressed, no fixation occurs and the channel closes. To apply paintwork, you have to not release the trigger all the time. The problem occurs in the following cases:
- The piston has moved from its original place, this is the result of the sealing rubber part drying out, a new seal must be installed;
- The movable elements of the device, made of metal material, are covered with rust and need to be replaced;
- The spring is worn out and does not perform its function; a working version is replaced;
- The piston on the feed needle has fallen. In this case, you should clean the device after disassembly, reassemble it and test the operation of the spray gun after.
You can use a spray gun extension to move the tool over a large area.
The spray gun for the compressor turns on the trigger; if it is damaged, the flow of air masses may be disrupted.
Adjusting the torch size
In order for the layer to be even and the base to be covered with paint well, it is required that the torch be uniform in size. A change in spray flow may occur for the following reasons:
- The presence of foreign particles in the paint container, all elements must be removed from the solution;
- The nozzle has become dirty and cannot be avoided without thorough cleaning;
- The bolt responsible for adjusting the nozzle shape has broken. This part is replaced with a new one.
If the spray is created in the shape of an oval, then there are the options described below:
- The sealing rubber in the control unit is outdated, the part needs to be replaced;
- The side holes in the nozzle are clogged with dirt; cleaning is in progress;
- The shut-off valve, which is located in the control unit, has failed. A new part is being installed.
A repair kit for remote controls with silicone glue can be used in a number of breakdowns.
In order for the layer to be even and the base to be covered with paint well, it is required that the torch be uniform in size.
Spray gun spits
Why the spray gun spits is a common question; the tool may hiss during the painting process. Damage may occur:
- The air cap was not tightened properly; the tension needs to be adjusted;
- The viscous characteristic of the coloring agent is not suitable for the device, it is necessary to add a solvent;
- The level of viscous property is not acceptable with the adjusted pressure;
- The breather on the container for paintwork materials is dirty, the element is cleaned;
- Another option why the spray gun spits paint is that the pressure in the receiver has become too low; by adjusting the tool, the problem is solved.
There is a special moisture separator for the spray gun, which dries the air so that the composition is applied without defects, which is important for car coating.
There is a special dehumidifier for the spray gun, which dries the air so that the composition is applied without defects.
The torch moves to the side
Displacement of the torch from the gun occurs when the side holes are clogged with dirt; cleaning the head solves the problem. Also, the holes may break, then there is no other option but to replace them.
Displacement of the torch from the gun occurs when the side holes are clogged with dirt; cleaning the head solves the problem.
Asymmetry of the torch spot
An uneven layer of paint may result from a clogged or broken nozzle. Accordingly, the parts are either cleaned or replaced. Other reasons include:
- The hole in the air cap in the center is dirty;
- Either this hole is broken.
An uneven layer of paint may result from a clogged or broken nozzle.
Paint supply
There are several options for such a failure, and the causes of problems also differ. When only air flow exits the nozzle, the following points are possible:
- The solution is diluted;
- Large elements caught in the paint are removed;
- The needle has stopped moving due to breakage and should be replaced.
When the composition flows out with the nozzle closed:
- The needle cannot move due to an obstruction;
- The trigger cannot move freely also due to a foreign object;
- The spring is not capable of pressing the needle;
- The nozzle does not close with the needle; a new needle needs to be installed.
If the solution is applied unevenly:
- The presence of particles that are too large for the needle;
- The nozzle holes are dirty;
- Condensation collects in the air hoses; you need to pour the liquid along the entire length of the hose;
- Excessively thick composition.
Large elements that get into the paint are removed.
Spray gun malfunctions
p, blockquote 1,0,0,0,0 –>
Welcome to the kuzov.info blog!
p, blockquote 2,0,0,0,0 –>
In this article we will look at the malfunctions of the spray gun. Let's figure out what causes an irregularly shaped torch and why leaks occur in the spray gun.
p, blockquote 3,0,0,0,0 –>
More than 90% of problems arise due to contamination of the spray gun and its incorrect settings. The most common cause of irregular spray patterns and poor paint distribution is a poor balance between the blown air and the paint gun's paint flow. The second most likely reason is contamination and damage to the air cap and nozzle of the spray gun.
p, blockquote 4,0,0,0,0 –>
Learn how to properly wash your paint gun. It would be a good idea to study how the spray gun is designed and understand where and what part is located. It is necessary that all connections are tight and all parts are adjusted.
p, blockquote 5,0,0,0,0 –>
Setting up the spray gun
It is necessary to adjust the spray gun every time you use it to achieve optimal paint atomization. The settings must correspond to the viscosity of the material being sprayed, the size and shape of the surface to be painted, the temperature and humidity of the air.
p, blockquote 6,0,1,0,0 –>
You need to do a test spray and adjust the spray gun to the paint material used. You need to spray paint for 0.5–1 second, without moving the spray gun and holding it level, onto a piece of masking material or cardboard (50 by 50 cm), from a distance of 20–30 cm. If the drops are too large, then you need to reduce the flow of paint (and /or increase air pressure). It is necessary to achieve a balance when there are the smallest drops on the torch imprint and at the same time good coverage (painting). You can also read in detail about setting up a spray gun in the article “Setting up a spray gun for painting a car.”
p, blockquote 7,0,0,0,0 –>
The shape of the torch imprint is important. No matter how experienced the painter is, if the spray gun produces the wrong torch, then it will not be possible to achieve high quality painting. The torch print should be in the form of a symmetrical elongated oval of the correct height and width with full coloring in the center and smoothly blurred edges.
p, blockquote 8,0,0,0,0 –>
Having tested the vertical imprint of the torch for uniformity of shape and size, now do a static test. Rotate the air cap 90 degrees and spray paint without moving the gun. Spray longer than in the first test. This test will show how well the paint is distributed across the entire width of the spray pattern. If there are more smudges in the center or at the edges, then this indicates a problem.
p, blockquote 9,0,0,0,0 –>
Static flame test
Next, we will consider the reasons and ways to eliminate an incorrectly shaped torch, as well as other malfunctions of the spray gun.
p, blockquote 10,0,0,0,0 –>
The spray gun sprays more abundantly in the middle of the torch
p, blockquote 11,0,0,0,0 –>
- The cause may simply be insufficient air pressure. You need to set the pressure correctly.
- The air holes in the air cap may be clogged and the paint is not spraying properly when it comes out of the nozzle. A similar effect can be observed when the torch control valve is fully tightened. To solve the problem, clean the air cap.
- The nozzle may be too large for the paint being used. Thus, the air cap cannot properly atomize the excess amount of paint coming out.
- The paint flow setting is too high for the air pressure. It is necessary to increase the air pressure and reduce the paint supply. If the paint is too thick, it needs to be thinned.
Torch print with a lot of paint in one of the parts (top, bottom)
p, blockquote 12,1,0,0,0 –>
- You need to check whether this is due to the air cap or the nozzle. This can be done by doing a test spray on cardboard. Then turn the air cap half a turn.
- If the defect in the torch has changed position, then the problem is in the air cap. Most often this happens due to blockages (holes on the protrusions). Cleaning the air cap thoroughly will solve the problem.
- If the defect remains unchanged after rotating the air cap, then the problem is in the paint head (nozzle). If this is the case, then the first thing to check is a small burr on the edge of the nozzle. It can be removed by sanding with P600 sanding paper wet or dry. If there is no such burr, then, most likely, dried paint could have accumulated at the outlet of the nozzle. It can be cleaned by soaking the paint head in solvent and cleaning with a special soft brush.
- Incorrect fan setting, too low pressure or too viscous paint can also cause overspray of paint in the center of the fan.
- The air holes on the air cap protrusions are partially clogged. There is a blockage on the left or right side of the paint head. The seat of the air cap or paint head is dirty.
- Paint build-up on the air cap, partially clogged holes on the air cap protrusions, clogged center holes or nozzles. Paint build-up on the paint head or a partially clogged paint head.
Torch print with a lot of paint on the left or right side (crescent torch)
p, blockquote 13,0,0,0,0 –>
- The cause may be partially clogged (on one side) air holes on the protrusions of the air cap. There is a blockage on one side of the paint head.
- To determine more specifically where the clog is located, rotate the air cap 180 degrees and do a test spray. If the torch imprint has not changed, then the blockage is in the paint head. If the pattern of the torch has changed, then the problem is in the air cap.
- The air cap lug holes on one side are clogged or the front air holes are clogged. The problem is solved by cleaning.
Split Torch
p, blockquote 14,0,0,0,0 –>
- A split (forked) torch is obtained due to an imbalance in air pressure and paint supply.
- The air pressure of the spray gun is too high. Adjust the pressure according to the viscosity of the paint.
- Paint viscosity too low.
Torch shape is not big enough
Intermittent Spray
p, blockquote 15,0,0,0,0 –>
- Insufficient amount of paint in the tank.
- The paint head is not screwed on tightly.
- The needle clamp nut is loose.
- The vent on the reservoir cap is clogged.
- Intermittent spraying may occur due to paint that is too viscous.
- The paint is not filtered and is not uniform.
- Also, the cause may be clogged air holes in the air cap or a damaged seal between the paint head and the gun body.
The spray gun does not spray
The spray gun is leaking
p, blockquote 16,0,0,0,0 –>
- The needle clamp nut may be worn or not tightened tightly.
- The needle clamp nut may be tightened too tightly, because of this the seal through which the needle passes may be compressed and prevent the free passage (sliding) of the needle, which will, in turn, prevent the needle from fitting tightly into the nozzle. Due to a loose fit between the needle and nozzle, paint may flow out in a stream.
- If the cause of the leak is the needle clamp nut, then there are two options for eliminating the leak. If paint flows from the nozzle, then you need to slightly loosen the needle sealing nut by turning it counterclockwise. If the paint drips in the area of the needle clamping nut, then it needs to be tightened a little by turning clockwise. You need to turn the nut little by little. If you imagine that a full turn is an hour, then you need to turn the nut 1 minute at a time and check for leakage. Read more about adjusting the needle clamp nut below.
Adjusting the needle clamp nut:
p, blockquote 17,0,0,0,0 –>
- Disconnect the air hose from the spray gun and remove the air cap.
- Press the trigger fully and hold it there.
- Tighten the clamp nut until the needle remains retracted into the nozzle when the trigger is fully released.
- Loosen the clamping nut gradually until the needle fits freely back into the nozzle.
- After adjusting the pressure nut, attach the air hose and screw the air cap into place.
- Pull the trigger to check if the leak has stopped.
- If not, the clamp nut can be tightened more tightly, but the needle should move (slide) freely when the trigger is pulled.
- If adjusting the clamping nut did not help stop the leak, then it must be replaced along with the seal.
- It must be remembered that the clamping nut does not need to be removed when washing the spray gun. It can only be removed if it requires replacement.
Air leakage from air cap when gun trigger is not pulled
The air cap often becomes dirty with paint
The spray gun “spits out” paint when the trigger is pressed and released.
The trigger is pressed hard
It is impossible to turn the torch regulator
Unable to turn air pressure regulator
Air bubbles in the paint, in the spray gun tank
Spray head is not properly tightened.
p, blockquote 18,0,0,1,0 –>
Air pressure regulator turns too easily
The internal seal is damaged.
p, blockquote 19,0,0,0,0 –>
Excessive pollination when painting
Dry, rough paint finish after spraying
Excessive fog during painting
Washing the spray gun after use
The spray gun must be washed immediately after use. To clean the air cap, you need to soak it in solvent. The air holes can also be cleaned with a toothpick. Do not use wire or other sharp metal objects, as they may damage the spray gun part.
p, blockquote 20,0,0,0,0 –>
p, blockquote 21,0,0,0,0 –>
Do not immerse the entire spray gun in solvent, as the lubricant from the seals of the spray gun will dissolve, which will impair its further operation. You can read more about washing the spray gun in the article “cleaning the spray gun after painting.”
p, blockquote 22,0,0,0,0 –>
Spray gun lubrication
It is necessary to periodically lubricate the places indicated in the figure. You can renew the lubricant every time after thoroughly washing the spray gun. Do not use lubricant containing silicone. Silicone can cause problems with some paints.
p, blockquote 23,0,0,0,0 –>
p, blockquote 24,0,0,0,0 –> p, blockquote 25,0,0,0,1 –>
Step-by-step troubleshooting instructions
The drawing of the spray gun allows you to understand how it works and when setting it up for the first time, you need to study the instructions. The process consists of a number of steps, which is repeated in most cases; it is important to configure the device correctly during assembly:
- The required pressure is set;
- Fully open the adjustment screw;
- The size and shape of the torch are adjusted;
- The trigger is pulled to start the air;
- The pressure screw is turned to the required level.
The drawing of the spray gun allows you to understand how it works and when setting it up for the first time, you need to study the instructions.
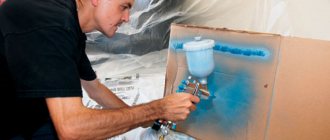
Care and maintenance
To extend the life of the spray gun, it is necessary to promptly clean the containers from frozen paint. For this purpose, thinners suitable for the material are used. Most breakdowns are due to contamination of parts, so regular cleaning is essential.
To extend the life of the spray gun, it is necessary to promptly clean the containers from frozen paint.
Expert advice
Professionals note features of the work that should not be forgotten in order to get the best result and extend the life of the spray gun:
- The device must be cleaned with a suitable paint thinner; cleaning should be done before the composition dries;
- Incompatible thinners must not be used;
- Until the solvent has evaporated, it is not worth assembling the device entirely;
- When painting is stopped, the tank with the solution is closed tightly, or the paint is poured out;
- The compressor is periodically purged.
When you stop painting, close the tank with the solution tightly, or the paint spills out.
You can repair the spray gun yourself if you correctly determine the type of damage. But it is better to carry out proper maintenance to avoid rapid failure of the device.
What is needed for repairs
Regardless of the operating principle of the inking mechanism, before you begin diagnosing and troubleshooting, you need to prepare the following tools and spare parts:
- a set of wrenches of various sizes;
- pliers;
- screwdriver;
- repair kit and other sets of spare parts.
A spare parts store for repair and construction equipment will be able to offer several options for repair kits to troubleshoot problems with spray guns. It could be:
- A standard repair kit consisting of several bolts and rubber seals (it is better to stock up on such repair kits in advance due to the fact that seals quickly become unusable when exposed to dyes).
- Specialized repair kit. The set includes spare parts for spray guns necessary to fix a specific problem or replace a failed part.
Read also: Soviet radio components containing precious metals photo