Hello, as promised, I will try to talk about the design and principle of operation of a spray gun for pneumatic application of paint and varnish; we will look at guns for airless or, in other words, hydrodynamic application later. I’ll start with the basics and apologize to those who are already in the know, but I hope this article will be read not only by professionals, but also by those who are just starting their journey as a painter... And one more thing, we are only talking about pistols that have an international certificate, the presence of which is indicated on the body of the pistol with the letters "CE"
And so let's start the design of the pistol:
Almost all pistols have the same design, which differs little in shape - there is a body, in the body there are valves or regulators that regulate 3 parameters: 1. The amount of air entering the gun. 2.The amount of material coming out of the gun. 3. Torch width. There are no other adjustments on the pistol, and they are not needed. I won’t pour further water, I’ll just say that, for example, there is no difference between automatic and manual spray guns except for the absence of a handle for holding this so to speak gun and tank. So let's look at the principle of operation of the pistol. The gun works on the principle that air under a certain pressure blows a stream of flowing material and crushes it, transferring it in a stream to the surface of the material being painted. I will not give all kinds of formulas, I think that they are not needed, I will just say that I will be more based on the logic of thinking so that it is clear to you and the article does not resemble a boring scientific treatise. And so, in order to evenly transfer the material to the surface, we need to crush it, stretch it into a torch. I also hope that everyone understands this simple thing: the higher the pressure, the smaller the drop will be, and the smaller the drop, the more uniform the application will be. The origins of the company, organized in 1888, were the inventor of the pneumatic spraying method, Dr. Allen de Vilbiss. Then, more than 120 years ago, he used the first “atomizer” to apply liquid medicine to open wounds. In 1907, the son of the founder of the DeVilbiss company, Thomas, made the first hand-held spray gun, which was successfully used for applying paint and varnish materials in the (then) new industry - the automotive industry, significantly increasing labor productivity and the efficiency of painting automobile bodies. Later, these guns began to be used in a variety of industries, including for painting furniture. So, we are not particularly interested in the body of the pistol; it may, of course, differ in ergonomics, placement of valves and regulators (for all people or only for right-handers), it doesn’t really matter to us; in this article we are talking about the principle of operation. All pistols are divided into three groups:
1. guns for working with materials whose working viscosity is 14-20 sec. in viscometer No. 4 2. guns for working with materials whose working viscosity is 20-30 sec. in viscometer No. 4 3. guns for working with high-viscosity materials whose working viscosity is 30
Only in this way do we obtain the pressure that is provided by the manufacturer in the head of the pistol. The channels of the gun are designed in such a way that they allow a strictly defined amount of air and a strictly defined pressure to pass through; a change in the input operating pressure will lead to a violation of the pressure in the head and incorrect operation of the gun. With the increase in production volumes, the issue arose with the emission of harmful substances into the atmosphere and the consumption of paints and varnishes. The HPLP system (low pressure with high air flow) was invented, which was characterized by a consumption of 400-450 l/min and a head pressure of 0.7 bar; the working pressure was 4.5 bar. Let's take a closer look at how these pistols worked. Due to the decrease in pressure, the material was broken into fairly large drops; due to the increase in size, the initial speed of the drop was low at high flight energy and, accordingly, a lot of air was needed to form a torch from these drops. Drops no longer bounced off the surface, losses decreased and the application speed increased. The transfer of material was 65-70% Everything would be fine, many countries have passed laws that when applying paintwork materials only HVLP guns should henceforth be used. Everyone was happy, but then someone sat down and calculated how much it costs to produce such an amount of air, many stations had to change pneumatic lines, compressors, etc., which incur significant costs, among other things, the increase in droplets had a negative impact on the finishing coatings, the varnish pattern changed, shagreen has increased. And then the engineers returned to the old conventional system and made tuning, so to speak. The result was a pistol with the following parameters: air consumption 270 - 350 l/min, air pressure in the head 1.2 - 1.7 bar and operating pressure 1 -2.0 atm. The system did not receive one name, and different companies received different names, but the essence of the LVLP system is low pressure with low air flow. The result was a medium-sized drop and it no longer required a large amount of air because... had no greater flight energy and, accordingly, it was easier to control this drop than a large one as in the HVLP system. The low flight speed did not lead to the droplet being repelled from the surface, which also led to a high material transfer that reaches 70%. Today, almost all pistols, even those that belong to the HVLP system, can be classified as a modern LVLP system, with the difference that the pressure in the head remains 0.7 bar according to the requirements of some countries. Let’s pay a little more attention to these two systems, how they differ and why they are good or, on the contrary, bad. HVLP systems create a large droplet that is quite wet and this system is good for metallic paints or stains allowing for fairly even application. In the first case, the grain in the wet drop has time to orient itself and the result is a uniform color without apples or clouds. In the case of stain, the drop is large enough for stain, but the high porosity of the material leads to the fact that the material is quickly absorbed and dries out as a result of banding, the solution in this matter remains to reduce the size of the drop while the drop remains wet, namely, reducing the size of the nozzle, for example to 1.2 mm . If you look at these models of pistols, you will visually see the difference in the heads of the pistol.
If you look, you will see that conventional pistols have small hole diameters, which leads to high pressure with such air consumption. HVLP guns have large hole diameters, which leads to a decrease in pressure, but at the same time a large volume of air controls the formation of the torch. Well, LVLP has average hole sizes - the golden mean, so to speak. So why and how do guns for different viscosities differ? The more viscous the material, the more pressure is needed to create ejection to remove it from the nozzle hole and break it into droplets. But the drops are heavy and have high flight energy and require quite a lot of air and high enough pressure to control this drop. This is what distinguishes, so to speak, “priming” guns, or rather guns for more viscous materials. Increasing the nozzle will lead to an increase in the supply of material; in order to maintain the application parameters and solvent content in a drop of material, it is necessary to increase the application distance or speed. If you take a regular gun and increase the nozzle, this will not lead to the fact that this gun will become a gun for thicker material, this is also due, among other things, to the evaporation of the solvent, the thing is that a certain material must have a certain amount of solvent already on the surface application so that the material spills and the reaction begins at a certain speed. This regulates the use of a particular gun for a particular material. A little video about the principle of operation of the pistol. The principle of operation of the pistol, part 1 [url]
How does a pneumatic spray gun work?
An overview of the advantages and disadvantages of a particular tank location will become more meaningful and clear if you understand the operating principle of the spray gun itself. A general idea of the structure of the spray gun, together with the features of using various containers, will help you form your own opinion and make the best choice for any individual situation.
The main and only driving force that forces the spray gun to spray paint and varnish mixtures is the air coming from the compressor receiver. Coming out of the blower and passing through a sealed hose, the driving flow enters the spray gun through an opening in the handle. Next, the air rests against the damper, which is moved back by pressing the trigger, and passes further into the channels associated with the supply of paint and varnish material.
Pump water sprayer: principle of operation and DIY production
Every owner of home plants or garden plots, one way or another, is faced with the need to care for seedlings, which is largely associated with spraying. To perform this task efficiently, there is a special device - a spray gun that can provide effective spraying of liquids without connecting to a network or compressor. Over the years of its existence, this simple device has received many different modifications and designs. In this topic, we will tell you how a hand sprayer works, where it is used and which models are trustworthy. At the end of the article, we will give detailed instructions on how to make a water sprayer with your own hands from the most popular household appliances.
Features of the models
As you know, numerous tool manufacturers today delight us with more and more diverse products, and paint sprayers occupy a decent share of this market. Constant improvement, changes in design, materials and functions have given rise to many unique models with their own characteristics. In this topic, we will find out for which work the lower or upper tank of the spray gun is more suitable, and we will touch on a couple of specific variations of its design.
Spray gun with top tank
As mentioned above, a paint sprayer with an upper tank works on the principle of attraction, where the sprayed mixture itself flows into the material supply channel. The tank is installed using a threaded connection, which can be either internal or external (depending on the model). A “soldier” filter must be installed at the connection point.
The design of a spray gun with an upper tank, the diagram of which is shown above, does not differ from the bottom feed, however, the tank itself has its own characteristics. The container consists of a body with a lid and a ventilation hole to allow air to enter as the volume of paint decreases. The manufacturing material can be metal or plastic. The first one is more reliable and resistant to deformation, but has a decent weight. The plastic tank is light, translucent (the paint level is visible), but with prolonged contact, it can react with solvents and become deformed, losing its seal. This is especially true for the threads on the lid. The average volume of overhead tanks is 600 ml.
The properties of a spray gun with top paint supply allow it to spray thicker mixtures than with a bottom tank. The paint is of the same consistency, sprays more efficiently, applying a thicker layer. Due to their high dispersion, spray guns with an upper tank are used mainly in professional activities, when painting cars, furniture and various structures.
Spray gun with bottom tank
An equally popular design of a pneumatic spray gun, which has great success in certain areas of application, which we will discuss further. The principle of operation of a spray gun with a lower tank is based on the pressure drop in the container due to the passing air flow over its tube. A strong pressure, flying over the outlet of the tank, pushes out the mixture and picks it up and sprays it out of the nozzle. This effect was discovered in the early 19th century and named after the physicist John Venturi.
The design of the lower tank of the spray gun consists of a main container and a lid with a tube. The connection of 2 elements occurs using threads or special lugs installed on the lid. The tube fixed in the lid is bent in the center at an obtuse angle so that its suction end is directed to the side of the bottom of the container. This solution allows you to use the tool in an inclined position and paint horizontal surfaces from above or below. The design of a spray gun with a lower tank requires changing the position of the tube depending on the position of the tool during operation: the tube is forward if the nozzle looks down and back if you want to direct the torch upward.
Almost all models of lower containers are made of polished metal and on average hold 1 liter of mixture. Such devices are convenient to use for performing large volumes of work, but with weak muscles, the hand may periodically get tired.
An undoubted advantage of the work is the open view, which is provided by the special design of the spray gun with a lower tank. The diagram presented below clearly demonstrates the principle of using a pneumatic spray gun with a pressure tank installed in place of a standard container. This approach allows you to significantly increase the ease and productivity of work, without being distracted by constantly adding paint.
Sprayers with a lower tank are effective in finishing work, when painting rooms, gates, facades and other elements. Less often, but no less successfully, they are used in car services and various industries. They are considered less professional than top-mount devices, but still provide very decent coverage.
With side tank
A relatively new type of container arrangement for painting, which appeared not so long ago, but is rapidly gaining popularity. Spray guns with a side tank, called “adjustable” or “rotary”, operate on the same principle as with the top one. The mixture enters the nozzle under the influence of gravity, but not from the top, but from the side of the gun.
The side tank of the spray gun is made primarily of metal and is connected to the body using a threaded connection that is tightened by hand. Like the standard top tank, the rotary lid has a small vent to allow air to flow in while painting. The capacity of the container is not large and averages 300 ml. The compact size is due to the need to rotate the tank 360° so as not to touch it with paint even when tilted towards the nozzle.
A spray gun with an adjustable tank is classified as professional and is used primarily for painting cars or decorating furniture.
Application area
The main purpose and reason for the appearance of classic pump sprayers has always been and is caring for plants. Numerous models on sale can have completely different shapes and sizes (from liter bottles to serious backpacks), which are used to perform various volumes of work. Pump-type hand sprayers can be divided into 3 simple groups:
Little ones
. With a tank volume from 500 ml to 2 liters. A similar flower sprayer is used to spray water and chemicals over a small area. The price tag is in the region of 250-1500 rubles.
Average
. They start with a volume of 3 liters and reach approximately 8-12. They have a more impressive design with a hose and extension. Usually carried on a special shoulder strap. They are already used for more impressive areas and cost from 800 to 7500 rubles.
Large
. They are shoulder backpacks that can hold from 10 to 20 liters of liquid. Unlike previous models, this type of sprayer has side levers for pumping air into the cylinder, which significantly increases speed and ease of use. Used in large farms as a manual alternative to battery and gasoline sprayers.
In addition to its main use, the pump sprayer can be used as a cordless, self-contained high-pressure washer for your car. Of course, you can’t compete with the pressure of the famous Karcher, but the dirt flakes off very well (especially if you moisten it slightly in advance). For such purposes, the best option would be an inexpensive, middle-class sprayer. The backpack one is too expensive and bulky for such purposes, and the small one does not have a hose, and the volume is not the same.
Vacuum tanks for paint sprayers
A modern type of container for a pneumatic spray gun, which allows you to spray paint in any position of the tool (even upside down). It is installed mainly in the upper mounts using an adapter. The vacuum tank consists of a durable body without a bottom, inside of which a soft container is inserted, on top of which a lid with a filter is installed.
The principle of operation of a tank of this type is a deformable container, completely filled with paint and varnish composition. If, when pouring, there is air left in the container, it is released by turning the spray gun upside down and pressing the trigger until all the empty space is gone and only the sprayed mixture remains. The vacuum created in the tank will ensure the supply of paint to the nozzle in any position of the spray gun. The volume of these containers starts from 90 ml and reaches 850 ml. In theory, the soft tank is positioned as a consumable material for one-time use. In practice, it can be carefully washed and reused several times.
The most optimal area for using vacuum tanks is car painting, where the painter is forced to frequently change the position of the tool. Can also be used for other objects with complex surfaces and small areas.
DIY water sprayer
The main task of the entire manufacturing process is to connect the valve to the bottle without violating its sealed properties. To do this, we make a small hole in the upper part of the container by drilling or burning and insert a valve into it, with the thread facing outward. This should be done from the inside of the bottle using a flexible, slightly rounded wire. It is important that the hole is smaller than the bottom of the valve, so that when the latter is pulled out, the rubber rests tightly against the edges. For more reliable fixation, you can cover the joint with polyurethane glue.
Tips and possible tank malfunctions
The operation of a spray gun with a tank is quite simple and intuitive, but has certain nuances. In this topic, we will not analyze all the subtleties and tricks of using a pneumatic spray gun, but will focus only on its paint container. Let's start with some advice.
Cleaning the tank after work.
Should be done as soon as possible. Preferably before the paint has had time to dry. It is recommended to use a comfortable brush with nylon bristles. It is not advisable to use metal brushes, sandpaper or pick at the dried mixture with a knife. This aggressive cleaning method scratches the surface of the container, making subsequent cleaning more difficult.
Leak in the lid area.
If the connection between the lid and the tank is not tight enough and allows drops of the mixture to pass through, the best option would be to install a new gasket. If one is not available, you can put a piece of fabric or a nylon stocking between the container and the lid, which can also serve as a filter for the mixture being poured.
The air goes into the spray gun tank.
A fairly common problem associated with insufficient tightening of the air cap or its deformation. Also, this phenomenon may be a consequence of a torn gasket between the nozzle and the head of the tool. The problem is eliminated by replacing the damaged head, gasket or nozzle.
To uniformly spray various paints and varnishes, primers, liquid putties, protective compounds and impregnations, painting devices called spray guns are used. This equipment may differ from each other not only in design, but also in its operating principle, which affects the quality of the applied coating.
Manufacturing companies
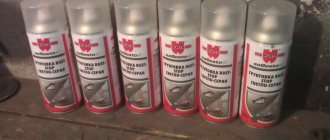
Construction stores and hypermarkets have many models from dozens of manufacturers of electric spray guns.
The most popular are Wagner spray guns. This company produces many models from professional tools to budget spray guns for home work.
The main advantage of products from this company is the pressure regulation function. This function allows you to quickly apply the first coat of paint and carefully complete the final painting, avoiding smudges and streaks.
Bosch has proven itself well, producing easy-to-use, compact and inexpensive electric spray guns.
STURM does not have particularly high levels of performance or quality, but they are a very high-quality budget option when purchasing.
The spray guns of this company have the function of adjusting the paint supply, which allows you to spray not only paints, but also varnish and primers.
Design and principle of operation of the spray gun
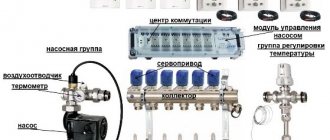
Most often, both in the domestic and professional spheres, electric and pneumatic paint sprayers with different tank arrangements are used. Also, these devices may have a pressure gauge built into the handle or connected to it.
Electric paint sprayer
An electric spray gun consists of a plastic or aluminum housing that contains the following elements (see figure below).
- Electromagnet. Works in pulse mode, attracting the bar.
- Oscillating bar. It is attracted by a magnet and pushes the piston forward.
- Paint supply regulator. Limits the mobility of the oscillating bar.
- Nozzle. Sprays paintwork materials or other compounds.
- Cylinder. It is the pump body in which the piston moves.
- Valve. Opens and closes the paint supply.
- Suction tube. Designed for suction of paintwork materials. A filter may be installed at the end of the tube.
- Piston spring. After the piston moves forward, it returns it (together with the bar) to its original position.
- Piston. Sucks in and pushes paintwork materials out of the paint sprayer.
The device also has a power button and a fitting for connecting the tank.
The spray gun works on the following principle. After pressing the start button, current is supplied to the electromagnet (1) in short pulses. At the same time, the electromagnet either attracts the bar (2) or releases it. The range of movement of the bar, and therefore the piston, is adjusted by screw (3). The bar, pressing on the piston rod (9), sets it in motion. The reciprocating movements of the piston suck the paintwork material from the tank and push the composition towards the valve (6). When the piston moves forward, the valve opens and allows paint to flow to the nozzle (4), through which it is sprayed. When the piston moves back, which is ensured by the expanding spring (8), the valve closes and the paintwork material is sucked out of the tank through the tube (7). Next, the process is repeated.
Important! Electric spray guns also include models with a remote compressor. In this case, the design of the spray gun is slightly different, and the principle of operation of the paint gun is similar to the operation of a pneumatic paint sprayer.
Pneumatic spray gun
The tool runs on compressed air supplied by a compressor. Below is a diagram (sectional view) in which you can see the design of the device.
The pneumatic spray gun has the following elements in its design (see diagram above).
- Spray head together with nozzle (nozzle). The nozzle in the spray gun and the air cap are removable elements. They can have different outlet diameters, which are selected in accordance with the viscosity of the composition intended for spraying.
- Paint tank. It is made of either plastic or metal, and can be installed either on the top or bottom of the tool.
- Spray gun body. Serves as the basis in which all elements of the device are installed.
- Locking screw. Regulates the intensity of paint supply by limiting or increasing the mobility of the locking needle. Some models of paint sprayers have an air supply regulator.
- Lever. Designed to comfortably hold the tool in your hand.
- Pad. Acts as a seal in the mechanism that moves the needle.
- Trigger. Moves the locking needle.
- Locking needle. Opens or closes the nozzle opening.
The operation of a pneumatic spray gun is as follows. When you lightly press the trigger, the air valve opens and air begins to flow through a separate channel into the air cap. As you press the lever further, the needle moves back, revealing a nozzle through which paint begins to flow. The paint, mixing with the air flow in the air cap, is crushed into small particles, forming an aerosol plume.
For convenient work with the paint sprayer, use a special wall holder.
Also, painters widely use a stand for a spray gun, which you can easily make with your own hands.
Design nuances of paint sprayers with different types of tank
The design of a spray gun with an upper tank, as well as the principle of its operation, was discussed above. The only thing worth clarifying is the method of feeding paintwork into the tool body. Since the paint tank is located at the top of the device, it flows to the shut-off needle naturally, due to the force of attraction.
The design of a spray gun with a lower tank differs only in the location of the latter. Paint is drawn from it due to the vacuum created by the air flow inside the device. In the future, the operation of the paint sprayer does not differ from the operation of a device with an upper container.
In addition, not so long ago vacuum tanks appeared on the market of equipment for applying paints and varnishes. They are successfully used instead of standard paint spray tanks. The vacuum tank is a hard glass flask with a hole at the bottom into which a soft glass with a lid is inserted. There is a scale on the flask, which is convenient for determining the amount of paint.
The advantage of vacuum tanks is that they allow the spray gun to work in any position. Regardless of how the device is turned, upside down or upside down, the dye still flows into the gun thanks to the vacuum formed in the soft glass. In this case, the glass is deformed and the paint is completely squeezed out of it.
The best pneumatic spray gun using spray technology
What equipment is best to choose for coloring will be described now. Above we talked about the features of LVLP and HVLP type spray guns. There is also their predecessor, which was also mentioned by HP.
The last option can be purchased if a beginner is working, it will be easier for him to handle, but in this case more coloring matter will be spent and the quality of the dispersion will be low. For this reason it will be necessary to carry out polishing
If the quality of the coating is not so important, then HP is the best option
LVLP is popular among professionals due to its ability to significantly save colorant and work at close range. And the third type is an intermediate option among these two types.
LVLP is popular among professionals due to its ability to significantly save colorant and work at close range.
Main malfunctions of the spray gun
Despite its simple design, the spray gun is still susceptible to breakdowns. Frequent malfunctions of the spray gun can be counted on one hand.
The gun doesn't paint
This happens in the following situations.
- The air pressure in the system is extremely low. To correct the problem, the compressor must be adjusted.
- The paint supply is interrupted due to the needle and nozzle being clogged. It is necessary to disassemble the spray gun and clean the listed elements.
- The needle or nozzle is damaged. Parts need to be replaced.
Spray gun spits
The reason that the spray gun spits can be due to several malfunctions.
- The air cap is not tightened properly. The part needs to be screwed on well.
- The viscosity of the paint does not match the air pressure. It is necessary to achieve an acceptable pressure-viscosity ratio.
- The paint is too thick. It is necessary to prepare paint of less thickness.
- The breather on the dye tank is clogged. It is necessary to remove the plug and clean the hole in it.
- The pressure in the receiver has dropped below normal. It is necessary to set a lower pressure threshold in the compressor settings that corresponds to the operating characteristics of the spray gun.
The torch moves to the side
If the torch of sprayed paint moves away from the gun, then the reasons for this may be the following.
- Air cap side holes are clogged. You need to remove the head and clean it.
- Damage to the side air cap holes. The damaged part should be replaced.
Asymmetry of the torch spot
In this case, the problem may be caused by the following faults.
- Nozzle clogged. Repairing the spray gun in this case involves removing the nozzle and cleaning its hole.
- Nozzle damage. A part needs to be replaced.
- The air cap is clogged, namely its central hole. The air cap should be removed, washed and cleaned.
- Damage to the center hole of the air cap. This part requires replacement.
What should the torch size be?
To achieve maximum efficiency when painting, experts recommend applying the paint layer using a torch of the maximum size. The larger the width of the torch, the more uniform the layer of paint applied to the surface is. To achieve the maximum width of the torch, it is necessary to unscrew the adjusting screw to the maximum in the “+” direction.
If you need to paint a small part or part of a car body, then you should reduce the size of the torch. It is important to remember that the position of the adjusting screw at “—” ensures the application of a paint layer in the shape of a circle. When the regulator is turned to “+”, an oval shape of application of the paint layer with an increased width is obtained.