We deliver goods directly from partners from all over Russia. These products are not presented in stores and are only available for ordering on the website.
In shopping list In shopping list In comparison In comparison
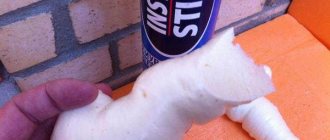
The handle for carrying plasterboard slabs allows you to easily move bulky sheets of this finishing material to any distance. The convenient grip and optimal dimensions of the product make it possible to place the sheet exactly in the middle and carefully carry it, holding it from above with the other hand.
- optimal design for convenient arrangement of sheets;
- small dimensions and weight allow the product to be stored in a closet;
- Durable plastic can withstand calculated loads.
At Leroy Merlin you can find many useful products to make renovation and construction work easier, more efficient and more interesting! The harmonious combination of high quality and affordable prices makes our products especially attractive to customers!
Handle for carrying plasterboard slabs in Moscow
A handle for carrying plasterboard boards and other products in this category are available in the catalog of the Leroy Merlin online store in Moscow at low prices. Check out the detailed characteristics of this product, which will help you make the right choice and order the product online. If necessary, our specialists in retail stores will provide you with detailed advice.
Buy products such as a handle for carrying plasterboard boards in the online store or Leroy Merlin hypermarket, having first checked their availability.
You can always place an order and pay for it online on the official website of Leroy Merlin in Russia. For residents of the Moscow region, we not only have low prices for products such as “Handle for carrying plasterboard slabs,” but also fast delivery to cities such as Moscow, Balashikha, Podolsk, Khimki, Korolev, Mytishchi, Lyubertsy, Krasnogorsk, Elektrostal, Kolomna, Odintsovo, Domodedovo, Serpukhov, Shchelkovo, Orekhovo-Zuevo, Ramenskoye, Dolgoprudny, Pushkino, Reutov, Sergiev Posad, Voskresensk, Lobnya, Klin, Ivanteevka, Dubna, Yegoryevsk, Chekhov, Dmitrov, Vidnoye, Stupino, Pavlovsky Posad, Nar- Fominsk, Fryazino, Lytkarino, Dzerzhinsky and Solnechnogorsk.
Everyone enjoys the popular finishing material plasterboard, easy to use, practical and versatile, suitable for walls, ceilings, various structures and partitions, if not for one “but”. Produced in the form of heavy, large-sized sheets, it is inconvenient to deliver and transport. And installing or raising such panels to the required height alone is not an easy task. To simplify the use of gypsum boards, a device for carrying drywall will help, the choice of which depends on the characteristics of the work being carried out.
Types of drywall
First of all, drywall is classified according to its resistance to moisture and fire:
- GKL (KNAUF sheet). This is a simple sheet, without modifications or enhancements. Suitable for finishing walls, erecting partitions, and decorating ceilings. Gray sheet paper.
- GKLV (moisture-resistant drywall). Suitable for bathrooms, kitchens, and any rooms with high humidity. Green leaf paper. It is recommended for use in damp rooms and extensions with thin walls, but even simple gypsum plasterboard can be impregnated with special agents and thus increase moisture resistance.
- GKLO (fire-resistant plasterboard). Used in areas with increased fire hazard.
- GKLVO (moisture-resistant and fire-resistant).
If you are working in a simple living space without special requirements, gypsum board sheets will be enough; you shouldn’t spend money on other types. When choosing drywall, pay attention to three more nuances.
Firstly, if you are going to bend plasterboard, choose thin sheets up to 9 mm. Second, take a close look at the drywall you buy. There should not be a single defect or damage on it; they can greatly deteriorate the integrity and strength of the material. Thirdly, sometimes sellers offer packing sheets for sale that cannot be installed. The fact is that during transportation, the first sheet from the bottom in the stack breaks badly, and it is the packaging sheet. You can identify the packing list by the absence of markings.
Carrying handle
Handles for carrying sheet materials are of two types:
- To move gypsum boards alone.
- Model designed for two people.
The first modification allows you to handle carrying drywall without assistants. The durable plastic case ensures reliable fixation of the plate in the desired position, and a convenient grip allows you to carefully move the bulky sheet, holding it with your free hand.
The second, two-handed model, usually sold in a set of two pieces, allows you to carry 1 or 2 sheets. The plate is positioned vertically between a pair of “rogulins” at a convenient height, the free part of the gypsum board is supported by hand.
How to move drywall?
Of course, it is better to do this together so that the side edge of the sheet faces the ground. If no one is helping you, it is possible to do this alone, but you will need a special device - a pick-up, which can be found in hardware stores. You can replace the grab with a simple rope. You need to make loops on both sides of the rope and pass it around the sheet. Be careful: if you drop a sheet, there is no point in mounting it; you can safely throw it away. In the machine, under no circumstances should the sheets be placed vertically to save space; only lay them flat on the backing.
We do the carrying ourselves
The simplest device for moving gypsum boards alone can be made from scrap materials. A small master class - a convenient homemade carrying in 5 minutes:
- Four cuttings of metal profile guides are selected, which always remain when installing plasterboard structures.
- The elements are fastened together with self-tapping screws in the form of a square. For rigidity, it is recommended to attach 2 pieces in each corner.
- In order for the gypsum board to be installed freely, one of the corners of the profile is unbent.
That's it, the handle for self-carrying is ready. Details are in the video.
Note! The length of the bottom guide on which the sheet is placed must be at least 40 cm in order to withstand the heavy weight of the drywall.
How to install drywall?
There is no need to prepare it before installing drywall on the wall. So, here is the sequence of actions for the correct installation of drywall:
- Marking the wall. The profile is fixed at a distance of 60 cm from each other. The width of a standard plasterboard sheet is 120 cm, the joint between the sheets should be in the middle of the profile. We attach the guide profiles.
- We fix the hangers and the profile with self-tapping screws, and before doing this we adjust them to the level.
- We fasten the sheets to the profile vertically with drywall screws.
- After installing the sheets, use joint putty to seal all joints and screw spots, removing excess. Before puttying, it is advisable to stick a special self-adhesive tape or sickle tape on the seams so that the putty does not crack.
- Use a sanding mesh to rub over the putty areas.
- Apply another thin layer of putty.
Carrying strap
Two people can move the gypsum board using a belt. A pair of belts (it is convenient to use V-belts, 1500 mm long) grabs the lower corners of the panel, the weight is distributed on the shoulders of the craftsmen, and the sheet is supported in a comfortable position with the free hand.
You can also make a device for self-transportation. To do this, a wooden plate with two reliable hooks/hangers, made, for example, from aluminum gutters, is attached to a belt (approximately 175 cm long). This design rests on the shoulder and makes it easier to move multiple sheets.
Note! The models shown are used when carrying a limited amount of material, 1–2 slabs at a time. For a large volume of work or installation of ceiling elements, it is worth using professional devices.
Installation of drywall - simple secrets
Drywall is installed on the sheathing, which in turn is fixed to the wall or ceiling, resulting in a false ceiling or false wall. If you install a sheathing between the floor and the ceiling and cover it with plasterboard on both sides, you will get an interior partition. These installation technologies are known and described in detail. But some important nuances of working with drywall are often forgotten, without which it is difficult to do this, and the structures will not be functional.
Installation of drywall is best done with an assistant
A sheet of plasterboard has a very decent mass - one square meter of sheet with a thickness of 12.5 mm will pull almost 10 kg. Standard size – 1.2 x 2.5 m – almost 30 kg. Therefore, it is still difficult to carry it and install it alone, or it will not work at all. For such work, it is better to also involve an assistant who can lift weights. On your own, you will most likely have to cut the sheets into smaller pieces at some stage to cope with their weight. For installation on the ceiling, you also need to think about support on the stepladders of each installed sheet, clamps for fastening...
Low strength needs to be dealt with in advance
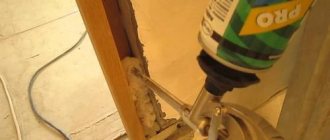
Only after making a lintel from drywall, many are faced with such a surprise as its too low strength - it is difficult to attach anything weighty to such a wall if you do not have access to the back side of the sheet. There is only one way out - you need to think in advance about where and what will be attached, and on the back side of the sheet, attach a 15-20 mm thick board to it with screws and glue. Then you can attach a screw to it, and it will distribute the weight over a large area of the sheet. For significant loads, such as kitchen furniture, the board should rest on the floor...
Do not push drywall between the ceiling and floor
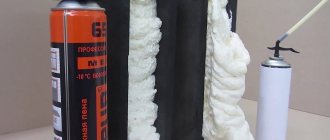
All lintels made of gypsum board are not load-bearing and are not intended to absorb or transmit vertical loads. There must be a thermal gap of at least 10 mm thick between the sheets and the ceiling, which is filled with pliable insulation. The same goes for the walls - a thermal gap is left between them and the end of the sheets, which can foam.
No soundproofing - what to do about it
Another surprise for users may be the almost complete lack of sound insulation on the plasterboard lintel. The metal frame, sheathed on both sides with thin mineral sheets, is a continuous bridge for sound transmission.
If you need to make a soundproofing jumper, then a number of measures are taken. The profiles rest on the floor or wall through a layer of felt (vibration damper) at least 1 cm thick. Double lathing is used, in which plasterboard on different sides is attached only to its metal profiles. The racks are arranged in a checkerboard pattern, between them there is a layer of soft sound insulation (eco-friendly mineral wool) 30 - 50 mm thick. Such a partition soundproofs better than a brick one.
Video about installing drywall on the ceiling.
Destruction of drywall
Drywall is destroyed by users themselves when they subsequently try to remove wallpaper from it that was not glued correctly. Wallpaper with cardboard sets firmly, so soaking causes the sheet to delaminate... It is better to immediately prime the sheet, then completely cover it with putty at least 1 mm thick. Once again, be sure to prime, after which you can paint or wallpaper without fear that you will not be able to remove the finishing layer later...
Consider little things when installing drywall
- Bending drywall can be done without moisture. Cuts are made in the material on one side, after which the sheet is broken along them and bent to the required radius. Then the opened cracks are tightly filled with gypsum plaster...
- Various tools will help you work with drywall. Stands to press and hold a large sheet in this position will greatly facilitate the work. The stands to lift and press the sheet to the ceiling are almost irreplaceable...
- A special metal fastener (butterfly) allows you to secure fairly weighty things to the sheet. This fastener compresses the sheet of drywall in the area of the hole and redistributes the load over a larger area.
- Screws are installed only with recessed heads, then they are puttied on top.
- The joints of the sheets and their edges must be puttied using a serpyanka mesh. This simple technique helps prevent sheets from cracking at corners and joints...
How to make a partition from plasterboard - simple video advice...
Cart
As an alternative to hand carrying, a three-wheeled cart is used. It can carry several plates installed obliquely at a small angle.
Note! The larger the diameter of the wheel, the easier it is to transport a loaded cart over a floor covered with construction waste.
For a high volume of repair work, it is advisable to use trolley tables that can withstand moving up to 12 standard plasterboard slabs at a time. Also, such models are convenient to use when cutting and cutting finishing materials.
Frame lift on wheels
For complex work, such as installing ceiling elements or ventilation ducts, a mobile frame lift is used. This device allows you to move heavy and bulky gypsum boards both vertically and horizontally, and also securely fix them on the frame for subsequent fastening. The upper holder of some modifications is equipped with an adjuster for the angle of inclination of the sheet being held.
Technical parameters and characteristics of lifts may vary depending on the manufacturer. The load capacity, as a rule, is 50–60 kg, the lifting height is 3–4.5 m. Such devices are made of steel or aluminum.
You can read more about the characteristics and use of the device, as well as how to make it yourself, here.
Important nuances
Some points to consider:
- Regardless of the material, it is metal or wood, racks and other parts that experience serious loads must be equipped with “kerchiefs” or other elements that impart rigidity and strength.
- The folding design of the lift is preferable: this makes it easier to transport, and it will take up much less storage space.
- In addition to the locking device available on the winch or rack and pinion, it is imperative to provide an additional device that reliably fixes the work table in the raised position. Otherwise, there is a risk of the device collapsing under load, which could result in serious injury. What you definitely shouldn’t skimp on is your own safety.
Sources
- https://EFanera.ru/instrumenty/podemnik-dlya-gkl.html
- https://mr-build.ru/vidi-instrumenta/spets-instrument/podemnik-dlya-gipsokartona.html
- https://mebelclubspb.ru/remont/samodel-nyy-pod-emnik-dlya-montazha-gipsokartona.html
- https://sdelairukami.ru/kak-obshit-potolok-gipsokartonom-v-odinochku-delaem-podemnik-dlya-gkl-2/
- https://ltruck-service.ru/prisposobleniya/teleskopicheskij-podemnik-svoimi-rukami.html
- https://remontcap.ru/montazh-gipsokartona-na-potolok-v-odinochku.html
What to choose?
To summarize, we can draw the following conclusion:
- for professional installation, you should choose reliable and load-lifting devices - a trolley on wheels, a frame lift;
- For home repairs, a carrying handle, belt, and mounting support are suitable.
Some of these devices can be made independently from scrap materials, saving money and improving your skills as a craftsman.
Everyone enjoys the popular finishing material plasterboard, easy to use, practical and versatile, suitable for walls, ceilings, various structures and partitions, if not for one “but”. Produced in the form of heavy, large-sized sheets, it is inconvenient to deliver and transport. And installing or raising such panels to the required height alone is not an easy task. To simplify the use of gypsum boards, a device for carrying drywall will help, the choice of which depends on the characteristics of the work being carried out.
Where is it used?
The range of applications of the standard Premos drywall lift is quite wide:
- in a normal room;
- in small corridors;
- on balcony surfaces;
- on large areas for industrial and public purposes.
Even if the repairs are carried out by a team of specialists, it is very convenient to use this structure, especially if the ceiling height is more than three meters.
Carrying handle
Handles for carrying sheet materials are of two types:
- To move gypsum boards alone.
- Model designed for two people.
The first modification allows you to handle carrying drywall without assistants. The durable plastic case ensures reliable fixation of the plate in the desired position, and a convenient grip allows you to carefully move the bulky sheet, holding it with your free hand.
The second, two-handed model, usually sold in a set of two pieces, allows you to carry 1 or 2 sheets. The plate is positioned vertically between a pair of “rogulins” at a convenient height, the free part of the gypsum board is supported by hand.
What is the easiest and fastest way to move drywall?
When carrying out repair and construction work, plasterboard is often used, a material that can be called universal. It is used to construct partitions, when leveling walls and ceilings, and, if necessary, to create an unusual, very attractive ceiling structure of one or several tiers. But gypsum board sheets are quite heavy; lifting them alone and installing them correctly is often difficult. That is why it is recommended to use special lifts for drywall or a carrying handle, which greatly simplifies the work and makes it faster.
Diagram of the installation of a plasterboard sheet.
These portable slab tools perform the following functions:
- Lifting to the required height and fixing plasterboard sheets in the required position. The most popular are lifts that lift slabs in a horizontal position to the required height when installing suspended ceilings.
- Carrying drywall to the work site using simple and very comfortable handles.
- Holding the free edge during installation, quickly moving the sheet and lifting it.
We do the carrying ourselves
The simplest device for moving gypsum boards alone can be made from scrap materials. A small master class - a convenient homemade carrying in 5 minutes:
- Four cuttings of metal profile guides are selected, which always remain when installing plasterboard structures.
- The elements are fastened together with self-tapping screws in the form of a square. For rigidity, it is recommended to attach 2 pieces in each corner.
- In order for the gypsum board to be installed freely, one of the corners of the profile is unbent.
Carrying strap
Two people can move the gypsum board using a belt. A pair of belts (it is convenient to use V-belts, 1500 mm long) grabs the lower corners of the panel, the weight is distributed on the shoulders of the craftsmen, and the sheet is supported in a comfortable position with the free hand.
You can also make a device for self-transportation. To do this, a wooden plate with two reliable hooks/hangers, made, for example, from aluminum gutters, is attached to a belt (approximately 175 cm long). This design rests on the shoulder and makes it easier to move multiple sheets.
Note! The models shown are used when carrying a limited amount of material, 1–2 slabs at a time. For a large volume of work or installation of ceiling elements, it is worth using professional devices.
Cart
As an alternative to hand carrying, a three-wheeled cart is used. It can carry several plates installed obliquely at a small angle.
Note! The larger the diameter of the wheel, the easier it is to transport a loaded cart over a floor covered with construction waste.
For a high volume of repair work, it is advisable to use trolley tables that can withstand moving up to 12 standard plasterboard slabs at a time. Also, such models are convenient to use when cutting and cutting finishing materials.
Mounting support
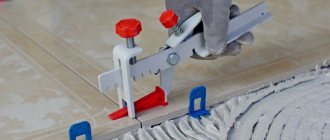
A suitable device for working with gypsum board layers is a mounting support. It consists of a metal lever on a stand, equipped with a movable stop-lock. The device is indispensable when creating walls, niches, partitions and similar surfaces, as it allows you to raise the slab to the required height (50–80 cm) and keep it in a vertical position. With its help, a sheet of drywall is securely fixed to the profile and secured with self-tapping screws.
The design of the support can be equipped with a pedal for lifting the material, which makes it easier to adjust the height, but limits the movement of the master, which means he cannot do without a partner.
Drywall Tips
Drywall is of great importance in modern renovation - a universal building material that is perfect for the following purposes:
- Alignment of walls. This is what drywall is most often used for. It is very convenient to mount it on walls; almost anyone can do it, and the surface does not require further processing.
- Construction of partitions and other structures. Another significant advantage of drywall is that it is flexible when wet.
In classic renovations, interior or dividing partitions made of this material are very often found. They are erected in a matter of hours, while partitions made from other materials will require much more effort and time.
- Finishing of ceilings, including multi-level ones.
- Creation of decorative structures. Due to its elasticity, plasterboard allows you to create beautiful decorative compositions.
Thanks to its excellent physical properties, drywall can be used for other purposes, it all depends on your imagination.
Frame lift on wheels
For complex work, such as installing ceiling elements or ventilation ducts, a mobile frame lift is used. This device allows you to move heavy and bulky gypsum boards both vertically and horizontally, and also securely fix them on the frame for subsequent fastening. The upper holder of some modifications is equipped with an adjuster for the angle of inclination of the sheet being held.
Technical parameters and characteristics of lifts may vary depending on the manufacturer. The load capacity, as a rule, is 50–60 kg, the lifting height is 3–4.5 m. Such devices are made of steel or aluminum.
You can read more about the characteristics and use of the device, as well as how to make it yourself, here.
How to store drywall?
The first step is to prepare the substrate or frame. Wooden beams will do. The sheets are laid horizontally in the same way as they were transported: “facing” in different directions to prevent sagging. Even if the drywall is packed, cover it with another layer of film. To save space, you can place the sheets on edge, but not vertically, but at an angle. Drywall can only be stored outside for a few days, subject to optimal weather conditions. Avoid getting wet or freezing (below +10 degrees). Protect sheets from mechanical damage. As long as the cardboard and plaster are not damaged, the material has maximum strength. If the paper layer is damaged, it can be restored using putty. But if the gypsum base is damaged, the sheet cannot be installed.