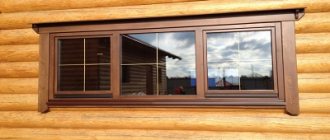
Any home renovation work must be carried out with extreme care. It is worth carefully choosing materials for construction and monitoring the quality of the work performed. The final result will directly depend on these factors. Currently, many brick houses are in unsatisfactory condition, which brings inconvenience to their residents. It is often necessary to replace window units, as well as to carry out work on home insulation. Facade work can be difficult, but insulating the walls of a house inside under drywall can be done independently. The method is effective and anyone can handle it.
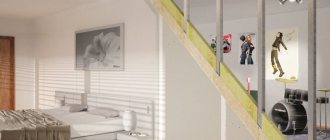
A situation often arises when walls require not only insulation, but also a change in geometry, simply put, alignment. An excellent universal solution can be the use of plasterboard sheets. They themselves are initially an excellent sound absorber and heat insulator. If the installation is carried out using a frame method, then there remains free space between the drywall and the wall surface, into which an additional insulating layer can be placed. This method very effectively retains heat in a living space and does not require hired force, since it is quite simple to implement. All that is required is to make calculations on the amount of consumables and study the insulation technology.
The plasterboard slab is attached to the wall in one of the following ways:
- Adhesive - direct installation is only suitable for walls with minor defects.
- Frame - recommended by experts. The metal base can retain its shape for many years and better retains heat indoors.
Not only the heating system, but also the thermal insulation properties of the materials that were used in the construction and finishing of the wall surfaces are responsible for maintaining a favorable temperature regime in the home. The low thermal conductivity coefficient helps maintain a comfortable temperature in the room. If there are gaps in the windows and walls, they will release warm air from the room during the cold period and the owners will be faced with the question of insulating the walls in order to trap warm air inside the living space.
Expert opinion
Konstantin Alexandrovich
The thermal conductivity index of gypsum plasterboard is 10 times lower than the same parameter usually used in the construction of a concrete slab and amounts to 0.15. Based on this, a sheet of drywall, even on its own, will be a good way to conserve heat. If you install insulation under a layer of drywall, the thermal insulation properties of the walls will significantly improve. For these purposes, a frame is mounted, creating an additional layer of air.
Stages of thermal insulation of a wall
In order for the work process to proceed quickly and properly, you should prepare the necessary tools.
This will significantly speed up the work on protecting the walls with insulation. The following materials will be required:
- plasterboard sheets;
- self-adhesive tape;
- insulation;
- membrane to ensure maximum vapor barrier;
- screws, nails;
- hammer, screwdriver, hacksaw;
- yardstick;
- metal profiles or wooden slats for constructing the frame;
- fastening materials.
For 1 sheet you need approximately 30 pieces of self-tapping screws. It is best to buy screws 20 mm long.
As for the manufacture of the frame, the profile must be taken of 2 types: marked CD and UD. The length is selected based on the size of the room.
Frame design
It consists of drawing the perimeter and thinking through how the frame will be positioned on the wall. A simple pencil and a building level are enough.
Preparation:
- surface cleaning;
- smooth out all the unevenness and fill up the cracks and depressions;
- drying with a heater or blow dryer;
- getting rid of mold and mildew.
Sometimes it is necessary to treat the walls with a special waterproofing putty to prevent the occurrence of dampness. First, the layer is applied vertically, then horizontally.
Frame construction
Installation of a frame from profiles for plasterboard
You need to mount the frame according to pre-made marks. To avoid contact of the metal structure with the wall, a tape prepared in advance is glued to the base of the profile. The frame parts are fastened to the wall using self-tapping screws and dowels.
Before laying the insulator, the surface is prepared in advance. Weak areas of plaster are removed or restored. To eliminate the possibility of the formation of fungus and mold, it is necessary to treat with a primer and an antiseptic.
Sheets of plasterboard are installed on a frame made of metal or wood. A metal frame will last significantly longer than one made of timber.
In the area where batteries are located, where installing thermal insulation is difficult, penofol can be used.
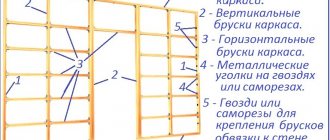
You can make a frame from bars under drywall
Assembling the frame begins with the installation of guides created from the UD profile. The slats are mounted on the ceiling and floor with a distance of 50-60 mm from the walls. A section of the rack profile is inserted into the guides. The ends are fixed using small self-tapping screws (“fleas”). The edges of the hangers are folded from the sides and connected to the slats. The pitch between the profiles must be observed so that there are 3-4 slats per sheet.
To improve the rigidity of the structure, it is necessary to make transverse bridges from the CD profile. The profile is cut so that its length overlaps the adjacent slats by half. Use metal scissors to cut off the shelves. Then the blanks are fixed with fleas onto the frame.
Vapor barrier device
Penofol is often used as a vapor barrier. Before attaching it, you need to make sure that the side of the material with foil is facing inside the room.
As for the vapor barrier material, which has a rough surface, its uneven side should also be directed into the room.
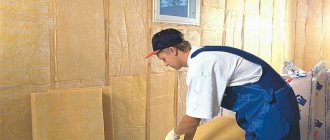
Insulation
The insulation should be cut using a special knife.
The insulation should be cut into pieces, the size of which should match the parameters of the frame cells.
If you use foam plastic as a thermal insulation material, then it should be attached with special glue prepared with the addition of water. Each piece should fit tightly to the surface. If gaps appear between the parts, they are filled with polyurethane foam. After the glue has dried, the foam is fixed with dowel umbrellas. Dowels should be placed in the corners of the sheet and one in the center.
After laying the internal thermal insulation, they begin to sheathe the frame with sheets of plasterboard.
When the screw is screwed in, its head should sink slightly, by 1-1.5 mm, but without tearing the cardboard. To make fixing easier, it is better to buy bits with a limiter.
After the walls are completely covered with plasterboard sheets, the surface is finished in any usual way. Insulated walls can also be covered with wallpaper or painted.
Characteristics of drywall
Drywall is a sheet finishing material consisting of gypsum and paper. Designed for covering wall and ceiling surfaces on rigid wooden or metal frames.
Depending on the type, the thickness of the panel varies from 6 to 12 mm. At the same time, the average thermal conductivity of the product is 0.35 W/m°C (for brickwork 0.64-0.81 W/m°C) which, of course, is not bad for finishing, but is too low for a heat insulator.
For example, the heat transfer resistance of a twelve-millimeter sheet is only 0.0042 m2 °C/W out of 3.28 m2 °C/W, which is recommended by SNiP for walls in the Moscow region. It turns out that plasterboard is useless as a wall insulation, it is even less suitable for thermal protection of the ceiling, and yet it invariably participates in the composition of the thermal insulation cake.
The fact is that although it won’t be possible to insulate a wall with plasterboard, you can easily use it as a container for mineral wool or expanded polystyrene, you just need to mount the frame at the required distance from the wall and fill the entire resulting space with insulation.
At first glance it’s not difficult, right? But this matter also has its own nuances. Read more about this further.
Summarizing
Polystyrene foam is used as insulation between walls, as you already understood, on any side of the building. In addition to the options listed here, you may come across others that you like better. This is fine. Thanks to the fact that people have a choice, technological progress is observed in the world.
I would like to draw your attention to the fact that the options for performing these works are taken from many years of personal practice and have so far proven themselves to be quite good. The insulation installed in this way performs its functions perfectly.
The video published on this page will also help you understand what wall insulation with foam plastic is. Watch, read and do! In addition to the video, we also recommend taking as a basis the photos that are posted on this page of the site. As they say, it is better to see once than to hear a hundred times.
Technology of thermal insulation of walls with plasterboard from the inside
The technology of insulating the walls of a room with plasterboard from the inside does not require special training of workers or expensive equipment. General construction skills and a universal tool are enough.
Tools and materials
During the work you will need:
- guides (metal profiles or wooden bars);
- gypsum boards;
- insulation in slabs or rolls;
- double sided tape;
- vapor barrier membrane;
- screws, dowels and other fasteners;
- anti-mold agents;
- putty;
- drill;
- screwdriver;
- hand tool.
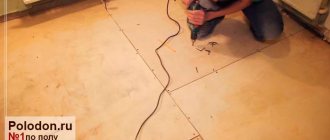
The floor in the room must be cleared of debris and foreign objects.
Design
At this stage, the type of insulation, gypsum board and guides is selected.
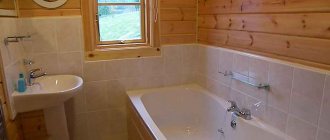
If you are insulating a kitchen or bathroom, you should choose moisture-resistant plasterboard. For the boiler room, it is recommended to use fire-resistant.
Wooden guides are cheaper, but they are at risk of drying out and deforming in the event of temperature changes. The metal profile does not have such disadvantages. The number of guides is calculated based on a standard step of 60 cm.
When calculating the volume of materials purchased, a 5% reserve should be made in case of damage to gypsum boards and for cutting complex elements of walls and ceilings.
Stages of work execution
At the first stage, it is necessary to perform a number of preparatory work:
- clean the walls from dirt and mortar drips;
- dismantle all protruding objects: fasteners, remnants of fittings, sockets, lamps, etc.;
- fill all cracks and irregularities;
- treat with a composition against fungus and mold;
- dry the surface.
Next, marking work begins. Use a plumb line or a laser rangefinder and a chop cord
special attention should be paid to:
- parallelism of the marking of the mounting points of the guides;
- marking in corners and junctions of building structures: arches, window and door openings, columns, bay windows, ceiling beams.
After marking, they proceed to the installation of frame guides.
- The starting profile is glued to the floor using double-sided tape; the adhesive tape will improve sound insulation and protect against drafts;
- vertical profiles are attached to the starting strip with metal screws, and to the wall with screws on dowels.
The process of insulating walls with plasterboard
A very important stage is laying insulation into the guides. The quality of insulation will directly depend on the accuracy of the work:
- insulation sheets are placed in the guides from bottom to top;
- they should fit between the profiles without gaps, with some effort;
- the sheets are additionally attached to the wall with adhesive or disc-shaped dowels;
- All cracks and gaps must be tightly filled with scraps of material or sealed with foam.
Now it's time to install a vapor barrier:
- penofol is mounted with foil inside the room;
- The vapor barrier membrane is attached with the rough side inward; double-sided tape is used for installation.
And the final stage is the installation of drywall sheets. They are mounted horizontally, from bottom to top. Before screwing the sheet to the guides, you need to use markings and a level to make sure that it is positioned strictly horizontally. After the first layer is secured along all the guides, the next one is installed on top of it. Here you also need to ensure that the position is horizontal and that the gaps between the sheets are minimal.
As a rule, the size of the room does not allow installing only whole sheets of drywall. Pieces have to be mounted in corners and under the ceiling. Drywall should be cut on the floor, in a horizontal position, on a flat surface. It is enough to cut through the top layer of paper with a mounting knife. Now the cut piece can be broken off along the cut line.
Upon completion of installation, all joints between the sheets should be thoroughly puttied. After the composition has dried, it is leveled with fine sandpaper, achieving a completely flat surface of the wall or ceiling.
Now the surface of the insulated wall is ready for final finishing. Two main types are used:
- wallpaper;
- water-based paint.
When insulating rooms with high humidity with plasterboard, moisture-resistant types of plasterboard with special hydrophobic and antifungal impregnations are used. These panels are easy to distinguish: they are painted green. In wet rooms it is also necessary to arrange supply and exhaust ventilation to prevent air stagnation and mold formation.
How to sheathe insulation under gypsum boards inside a house with your own hands
Internal insulation of walls under drywall can be done independently. It is only important to carry out all stages of work correctly, follow technologies and recommendations.
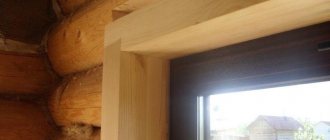
- Preparing the walls. To avoid having to quickly dismantle the drywall and re-do the repairs, you need to take care in advance that the walls are dry, clean, free of fungal areas, cracks and holes. If there are even small spots of mold, they must be completely removed, and then the walls must be treated with a special antiseptic, antifungal composition. All cracks and crevices must be filled with putty to avoid heat leakage and moisture penetration from the outside. The applied layer of plaster will be an additional protection against dampness, but an antiseptic must also be used. Because in the future, insufficient ventilation under the insulation layer, in the absence of a protective coating, can cause the formation of mold.
- Fastening the sheathing. To create fastenings for drywall, a sheathing is made of metal profiles or wooden slats. The advantages of a metal profile are that it does not deform over time. Wooden slats have good thermal insulation properties, but are susceptible to drying out, which can affect the quality of the cladding. To create the sheathing, metal or wooden slats are fastened with flat cutters along the perimeter of the wall, and then vertical slats are installed at a distance of about 60 cm (you need to take into account the width of the insulation boards so that it fits tightly into the space between the slats).
- Installation of insulation. Methods of attaching insulation depend on the type of material. Foam boards are attached to the wall with glue and special dowels. All joints between them are additionally sealed with construction tape, and the gaps between the slabs and the ceiling (floor) are sealed with silicone sealant. Mineral wool is attached with a special foam adhesive, which is applied around the perimeter of the slab and a couple of strips in the middle.
- Finishing the insulation surface. To ensure good vapor barrier, it is necessary to apply a protective layer of construction foil or plastic film on top of the insulation. Only after this can finishing be done with plasterboard.
- Installation of drywall. Drywall sheets are attached to the sheathing with self-tapping screws. Then all the cracks are puttied, cleaned with emery cloth, and covered with a special tape or paint compound to prevent cracking at the seams.
Popular thermal insulators for interior work
Nowadays, internal insulation of brick walls can be carried out using different methods, which is why it is so important to correctly choose the most suitable material for these purposes, taking into account the characteristics of the given structure. The material is selected taking into account its fire resistance, thermal conductivity and density
These indicators affect the weight of the material and the thickness of the insulation. And the service life largely depends on the strength of the material.
The material is selected taking into account its fire resistance, thermal conductivity and density. These indicators affect the weight of the material and the thickness of the insulation. And the duration of operation largely depends on the strength of the material.
The most popular insulation materials include:
- Expanded clay. This insulation is added to the base, after which a monolithic frame is formed from it;
- Mineral wool. This insulation has good moisture absorption, so it allows you to insulate the house from the inside. Glass wool, which is also used as insulation, is one of the varieties of mineral wool;
- Warm plaster. This material is a universal insulation material because it can be used both inside the house and for facade work. The insulation retains heat well, but it is a heavy material, so it is used only in houses with a reinforced foundation;
- Cellulose wool. This material retains heat well, has excellent absorbency, but is subject to mechanical stress; experts recommend this insulation for interior work;
- Cork insulation. The positive characteristics of the material include its ability to retain heat well, however, it is flammable;
- Styrofoam. The reasonable price and the ability to use this material for both interior and facade work have made it popular. However, this insulation has disadvantages: it does not “breathe” and releases harmful compounds during the ignition process.
Less popular insulation materials are: extruded polystyrene foam, penofol, penoplex, polyurethane foam and penoizol.
Criteria for choosing material, requirements for insulation, which is better
When choosing insulation of walls inside a brick house, first of all, it is necessary to take into account the thermal insulation properties of the material. In addition, the most significant characteristic of the material is vapor permeability.
The following actions will help prevent contact of freezing brick wall surfaces with steam:
- Wall cladding with a polymer heat insulator such as extruded polystyrene foam, sprayed polyurethane foam, high-density foam or penofol.
- Use of mineral wool insulation material.
- Applying a thick layer of heat-insulating plaster.
When planning to insulate your home, you should also consider the method of installing the heat insulator.
When choosing insulation of walls inside a brick house, first of all, it is necessary to take into account the thermal insulation properties of the material.
What not to do
Often, when trying to limit themselves from noise, many people use materials that are not the most suitable for this. First of all, this applies to polyurethane foam.
Not only does it provide poor protection from noise, but it is also not fire safe. The foam melts perfectly and releases a suffocating gas. The same can be said about polystyrene foam.
By creating a simple partition made of gypsum sheets to protect against noise, and not filling it with a noise absorber, they thereby turn it into a large resonator, which only worsens the situation.
Insulation from sound penetrating through technological openings - sockets, air ducts and the like - is required. If nothing special is done with the air ducts and ventilation ducts, then the outlet can be treated from the inside even with a simple sealant, which, although slightly, will reduce the amount of incoming noise.
When using roll sound insulators and membranes, you must not leave joints or gaps between the parts of the coating. It is necessary to glue them overlapping.
Isolation stages
First you need to clean the wall. At the same time, do not just listen to the advice: cleaning-drying-washing. This, of course, is hassle-free, but, unfortunately, not everything. The more thoroughly the work surface is prepared, the better the result will be.
Related article: Wild grapes on the balcony: growing them correctly
You need to make sure that no moisture gets on the wall. It is this factor that will allow you not to worry about the condition of the base under the insulation for quite a decent time.
After cleaning, saturate the walls with antiseptics or fire retardants - special impregnating solutions. (This kind of work must be done with wood!)
The wall needs to be leveled if it has significant bumps, and also pay attention to ensure that there are no gaps or cracks. Because all this will allow heat to pass through, preventing the insulation from performing its task
Frame construction
Many thermal insulation materials can be glued directly on site. However, do not forget that you still need to mount the outer sheets. Therefore, to do this, you need to make a supporting frame, on the slats of which the drywall itself can then be fixed.
Traditionally, the frame is mounted from wood, however, in my opinion, there are two significant disadvantages:
- The weight of the constructed frame can be quite decent. Provided that the walls are made of cellular concrete, serious difficulties with fastening may arise.
- The frame is made taking into account the technical characteristics of the selected insulation. The design again turns out to be extremely heavy and only adds to the problem.
Therefore, experts advise buying profiles specifically for laying under drywall; this will save time and effort. The best option is galvanizing. Profiles made of this material can even be cut with scissors.
When attaching profiles, you need to look at the dimensions of the drywall sheets. The profiles themselves can be mounted both horizontally and vertically. Before laying the profiles, you need to stick a special tape on the frame. This will have a good effect on sealing the joints, reduce heat transfer and can help avoid deformation of the slats.
You need to control the alignment vertically and horizontally, this will guarantee a flat surface.
Laying insulation
When you already have a frame, you can lay the material in the resulting “cells”. Installation details depend on the type of insulation you have chosen. If you are working with foam plastic, then do not forget about fixing it with dowels.
At this stage, I advise you to watch a video that will provide specifics specifically for your material.
Related article: Curtains for a high-tech kitchen: rules for creating an image
Laying vapor barrier material
Vapor barrier material protects against moisture accumulation in unnecessary places. Typically, a vapor barrier is a film coated with foil. The shiny side should be facing the interior wall of the apartment. The vapor barrier sheets must be overlapped. For greater guarantee, seal the joints with metallized tape.
Sheathing with plasterboard
After the stage of laying the vapor barrier is completed, you can begin covering with plasterboard. It is made with self-tapping screws. The joints of the sheets must be puttied, then treated with sandpaper and covered with some kind of paint and varnish composition or glued with tape. This will help prevent the putty from cracking.
A few recommendations so that you have an idea of some of the nuances.
When choosing insulation materials for drywall, be sure to pay attention to their dimensions so as not to waste time cutting and adjusting something again. There should be as few joints as possible. This will keep the apartment warm. If communication lines pass along the wall, please note that the insulation must be under them. To ensure that the natural air circulation in the room is not disrupted, leave a small gap between the frame slats and the insulation.
In conclusion, I will say that insulating walls with plasterboard has many advantages. This is not only preservation of heat in your home, but also good sound insulation, which is important if you live near a railway, noisy street or tram line. Anyone can carry out such insulation on their own; it is important to be patient and attentive.
In conclusion, I will say that insulating walls with plasterboard has many advantages.
This not only preserves heat in your home, but also good sound insulation, which is important if you live near a railway, noisy street or tram line
Anyone can carry out such insulation on their own; it is important to be patient and attentive.
Materials used for internal insulation
Materials used in the internal insulation of a house must meet certain requirements:
- Firstly, they must have low thermal conductivity in order to fulfill their main function - insulation.
- Secondly, these materials must meet fire safety requirements for premises.
- Thirdly, the material, alone or in combination with the mounting structure, must provide the required mechanical strength.
- And finally, all materials used indoors must be environmentally friendly and not release any chemicals into the surrounding air that adversely affect the health of living beings.
Insulating walls from the inside using putty
Using “fungi” the insulation is attached to the wall
This type of insulation, together with other work, will be more difficult than insulation under drywall, but nevertheless it can be done. In general, insulating walls with foam plastic with your own hands, without the help of professionals, is quite affordable if it is carried out according to the given instructions. When insulating with foam plastic under putty, two options are possible. We will look at them without video.
Option one
The wall needs to be plastered according to the beacons. This means that it will be absolutely flat. We attach foam sheets to the dried and primed plaster. To do this, either tile adhesive or mounting adhesive for drywall is applied to the sheet at five points (in the corners and in the center), and the sheet is carefully glued to the wall.
Mounting foam to the wall
After this, the material is fixed with screws for fastening. We use 5 fungi for one sheet of foam plastic, with the same arrangement as the glue - in the corners and in the center. With this insulation option, the rules and requirements for installation are almost the same as for tiles. Sheets should be placed on the wall, keeping them as flat as possible. We cover the joints with putty. If it's not clear what we're talking about, watch the video showing how to install tiles on a wall.
After the putty has dried, apply a layer of primer and also let it dry. Now we need to putty the wall. This is where all the mistakes that we made when aligning the foam sheets on a plane will be reflected. It was not for nothing that we said that the requirements for installing insulation in this case are almost the same as for tiles. This determines how smooth the wall on which the insulation is attached will be.
Putty is done as usual. First, the starting putty, then, after the starting putty has dried, the finishing putty and, finally, painting the wall.
Option two
This time there is no need to plaster the wall. You need to apply a layer of primer on it. The installation procedure is similar to the first option. Apply mounting tile or plasterboard adhesive to a sheet of foam plastic in five places and apply the sheet to the primed wall. We fix this sheet at five points (along the edges and in the center) with fastening mushrooms. We cover the joints with putty. What is the difference with the first method? The fact is that now we do not need to maintain a strict plane.
We prime the insulation laid on the wall and install lighthouse perforated profiles on it. To install the lighthouse perforated profile, we apply a putty path to the wall along a vertical line. The path can be made either continuous or with frequent dots. We glue the lighthouse profile onto it. We set it by level.
The final touches of insulation
In order to level the profile, you need to press the beacon with the same level. Therefore, the level should be used as long as possible so that the beacon profile does not bend when pressed. If there is no level of the required length, use a rule with a short level attached to it. The distance between the beacons should be slightly less than the length of your rule so that you can pull the putty.
Further work on putty is carried out as usual.
Advantages and disadvantages
The undoubted advantage of insulation under plasterboard is the geometrically ideal surface of the walls and fairly high thermal insulation efficiency. The disadvantage is that the thickness of the frame for attaching drywall “eats up” part of the area of the room, which is very important or simply unacceptable for a small room. It should also be noted that plasterboard has a low load-bearing capacity: heavy shelves and other interior elements cannot be hung on it. This problem can be solved by installing additional vertical frame profiles or anchors attached to the wall through sheets of drywall.
Another inconvenience of use is the fact that drywall is not characterized by mechanical strength. If hit, it may break. Untreated sheets, when subjected to force, emit dust that negatively affects the human condition.
Which basalt wool is better to choose?
The effectiveness of wall insulation with basalt depends on the correctly selected insulation and compliance with insulation technology. Among the criteria by which it is necessary to choose insulation: the thickness and density of the mats, as well as the manufacturer.
Thickness. The thickness of stone wool for wall insulation depends on the climatic zone in which the house (the apartment is located) is built and on the type of walls: concrete, brick, wood or frame.
For central Russia, an indoor insulating layer of basalt 50 mm thick copes with its function perfectly. For a facade, a thickness of 100 mm is needed, for a frame house - 150-200 mm.
If you wish, you can use an online calculator to more accurately calculate the thickness of the insulation.
Density. The thermal conductivity of the material (the lowest for insulation with a density of 60-80 kg/m3) and the rigidity of the slabs depend on the density indicator. The rigidity indicator is very important when insulating a frame house, where a lot of pressure is applied to the bottom row and when finishing work is carried out directly on the insulation (decorative plaster).
The density of basalt wool for wall insulation should be within:
- 50-75 kg/m3 for frame houses;
- 80-130 kg/m3 for walls with a gap for ventilation;
- 130-160 kg/m3 with the “wet” method of insulation;
- 150-175 kg/m3 for a concrete facade.
It is better to buy basalt fiber wool from reputable manufacturers on the market. At the same time, it is not necessary to strive to purchase mats with the brand “PAROC” or “Rockwool”. They have high quality, but the price is also very high.
Other manufacturers' quality fully complies with European and Russian standards, and the cost is an order of magnitude lower. Therefore, why overpay for a trademark if there are products from TechnoNikol, Isover, URSA, and Beltep (Belarus).
Installation of gypsum boards
To attach drywall, you need to purchase self-tapping screws. Their number is calculated based on the fact that about 30 pieces are required per sheet. Self-tapping screws need to be chosen a little longer, approximately 20 mm. Of course, you can buy 16 mm screws, but when fixing, it is possible that when screwing in, the tip will bend the surface of the profile without drilling into it. Longer screws eliminate this possibility.
This is how drywall should be attached to the profile
You will also need a screwdriver and quality bits.
Installation of drywall sheets is carried out according to this algorithm. The material is laid on the frame and the lower corner is secured. Next, screw the screws in order to the opposite end of the sheet (not all corners at once!).
When the lower and upper sections are fixed, fasten them to the main frame slats. In this case, the pitch between the screws should not exceed 250-300 mm.
When a screw is screwed in, its head should be slightly recessed by 1-1.5 mm. Just don't tear through the cardboard! To simplify the fixing task, it is better to purchase bits with a limiter.
Upon completion of the cladding, the surfaces are prepared for final finishing.
How to install mineral wool correctly
Before laying mineral wool, you need to have a respirator, construction gloves, and a hat.
When the frame is completely assembled, the mineral wool is cut into strips of certain sizes using a drywall knife. The cut strips are laid tightly along the frame posts. If the ends are joined, it is better to overlap from 10 to 15 cm.
Coconut cork and combination board
If it is important to achieve maximum sound insulation of a plasterboard partition, you can use balsa wood and coconut fiber boards. You can combine these soundproofing materials
Then you can achieve the maximum permissible sound insulation effect.
Expanded polystyrene boards are perhaps one of the best thermal insulation materials used in insulating plasterboard partitions. Expanded polystyrene boards come in different sizes and densities. Usually these are 120x60 and 100x50 cm with a thickness of 2 to 5 cm. They differ in density into soft, semi-rigid and hard. They are connected using grooves.
They also speak well of polystyrene foam as an insulating material. High heat transfer, a wide range of sizes and shapes, allows you to insulate any wall made of plasterboard construction.
If a decision is made to carry out insulation exclusively with the help of mineral wool, then Rockwool will be an indispensable insulation. After all, it is no worse than the same polystyrene foam. As an advantage, it is worth emphasizing the fact that Rockwool can have a heat reflector. It should be remembered that ROCKWOOL mineral wool comes in both slabs and rolls. If it is a roll, then it can have a thickness of 30,40, 50 cm; length 5, 8, 10 m, standard width 1 m. If it is a slab, then dimensions: 100x60 cm with a thickness from 5 to 20 cm. This insulation is able to withstand large temperature differences and has good water-repellent and fire-resistant characteristics.
Polymer heat reflectors are used to maintain temperature in a particular room. They are usually sold in rolls with dimensions: 2-5 mm thick. width - 1 m. length - 30 m. The thickness of the heat reflector foil itself can also be different.
Application of new developments
Competition in the construction market forces manufacturers to look for ways to improve product quality. To achieve this, work is being done in the following directions:
- creation of acoustic drywall;
- use of special filler with noise-absorbing properties for partitions;
- elastic pads under the frame, reducing the sound of impacts;
- filling partitions and creating false walls;
- spraying cellulose fibers inside partitions.
Acoustic drywall
and Aku-Line have mastered the production of acoustic plasterboard, which reduces the noise level when finishing interior partitions and when covering walls. Increased sound insulation of the partition is achieved due to a large number of holes, creating a reflection of a passing sound wave directed at the wall surface. In addition, a non-woven fabric is glued to the cardboard on the reverse side, which absorbs sound.
Acoustic plasterboard "Knauf"
Sound-absorbing filler inside partitions
Sound insulation of plasterboard partitions also requires the presence of a sound-absorbing filler between them. The same companies are developing it. Expanded polystyrene is widely used - a foamed thermoplastic made from fused granules with air cavities. The material also successfully copes with the function of thermal insulation. The addition of a fire retardant can increase the fire resistance of polystyrene foam. Judging by customer reviews, domestic polystyrene foam is a very poor thermal insulator.
Mineral wool slabs have high protective properties against sound propagation. produces a wide range of acoustic stone wool slabs, among which 4 cm thick products are often used for soundproofing walls. For effective dispersion of sound waves, the homogeneity of the slabs, which acoustic mats have, is of great importance.
Acoustic mats "Rockwool"
Partition materials with improved soundproofing properties are more expensive than usual, but with their help they achieve complete sound insulation. In addition, you can use filler of a smaller thickness, which will reduce costs and loss of room volume.
Membranes made of thin fabric with a fleecy coating are a high-quality sound absorber. The layer can be from 2.5 to 12 mm thick.
Polyester or polyurethane foam panels are used for internal filling and to create false walls. Some of them may be a fire hazard due to the content of flammable substances.
The cheapest filler for plasterboard walls is polystyrene foam. It reduces noise to some extent, but its efficiency is low.
Spraying sound-absorbing coatings
Spraying cellulose fibers with an adhesive composition is often used due to its low cost and the possibility of mechanizing the process. The method is used to correct acoustics indoors for entertainment and public purposes.
How does cellulose spraying occur?
Ready-made Sonaspray coatings have a texture like fur coat plaster. It can be coarse or uniform, depending on the size of the cellulose flakes. Since the coatings look impressive, dyes of a wide variety of shades are added to the solution. The coating can be painted after it has been applied.
The ability to spray a foamed cellulose solution on the surface of walls and ceilings made of building materials eliminates the need to create a frame that is used to hold gypsum board cladding. The manufacturability and cost-effectiveness of the process allows the team of specialists to ensure a productivity of 300 m² per day.
If you have the necessary equipment, the sound insulation of a plasterboard interior partition can be improved by applying cellulose from the inside.
Selection of thermal insulation filler
Experts believe that insulating external walls is more effective. But in multi-storey residential buildings it will be almost impossible to carry out work independently. But the use of plasterboard as insulation allows you to significantly save on hired labor and achieve high thermal insulation properties. At this stage, the most important issue will be the choice of insulation. Currently used:
- Styrofoam;
- glass wool;
- isolon;
- basalt (stone) wool.
Foam plastic remains relevant in the insulation market. However, in residential premises it is better to avoid insulating walls with this material. Firstly, rodents love it, so over time the insulation layer will lose its properties, and warm air will begin to leave the room through the holes that appear. And to replace the foam, you will have to open the trim, i.e. go through the renovation again. Secondly, foam plastic has low sound insulation and does not “breathe”. A residential apartment will require additional ventilation. If you still choose it, then you will be pleased that it is a very simple and easy material to work with.
Glass wool also has low thermal conductivity, but this is a specific material that attracts only its low price. Its main disadvantage for internal wall insulation with plasterboard is the presence of glass fibers, which, if they come into contact with the skin, cause itching and burning. When working with glass wool, it is necessary to wear gloves, protective clothing and a respirator only. Such inconveniences, as a rule, repel buyers, so they are practically not used in residential premises.
Isolon is much more in demand. This material has a number of advantages. It not only retains heat, but also does not allow noise to pass through, which allows you to save on sound insulation. Do-it-yourself work on insulating walls from the inside takes up not only time, but also the usable area of the room. Izolon has a small thickness, which allows owners not to worry about meters “eaten” by the insulation.
Basalt wool is often used in the thermal insulation of walls. In terms of its properties, it is most similar to glass wool, but differs in composition. Rocks are used in its production, which makes it fire-resistant and hypoallergenic. But its disadvantage is the price; it is more expensive than glass wool and polystyrene foam.
Each apartment owner must answer the question of how to insulate walls with plasterboard. You need to build on your financial capabilities and your preferences. I would like to give only one piece of advice: if possible, purchase insulation in the form of slabs, not rolls. This will make the work easier and faster. The slab insulation has a standard width of 60 cm, which corresponds to the mounting step of the frame profile.
Types of insulation
It is better to insulate the surface under drywall using mineral wool or polystyrene foam. You can also use isolon or penoplex. These insulators differ in installation methods, cost, and strength.
According to research, polystyrene foam, like polystyrene, is harmful to health. It is rarely used in residential premises. Another disadvantage is that some types of foam are eaten by rodents. But it has a low cost and is also available in many densities and sizes.
Example of insulation with plasterboard and mineral wool
*
Article on the topic - which is better, polystyrene foam or mineral wool?
As for mineral wool, the advantages include low weight (especially important for insulating old buildings), as well as low thermal conductivity. There is only one significant disadvantage of mineral wool - hygroscopicity. Therefore, when thermally insulating partitions and walls, it is necessary to prevent the accumulation of condensation. For this purpose, vapor insulation should be used.
There are several types of mineral wool. They all differ in the production method, composition and technical indicators. Among the types of wool that are on the market, the most popular is fiberglass-based basalt wool. Like other types of insulation, they have both advantages and disadvantages.
The main negative aspects of glass wool:
- The thermal conductivity indicator is greater than that of stone, and therefore heat disappears faster.
- At elevated temperatures it forms a solid glass mass.
- Inconvenient to work with (glass wool fibers can cause itching; requires the use of protective glasses, gloves, a respirator, and wearing a thick suit).
Important! For greater efficiency, it is necessary to lay mineral wool in 2-3 layers.
When working with lukewarm wool, you only need to wear a suit and a respirator.
Despite their external similarities, basalt and glass wool are significantly different. Glass wool is made from very thin glass fibers, and basalt wool is made from volcanic rock. They also differ in the indicator of thermal conductivity, which is lower in basalt, and, therefore, it retains heat better.
Cost of materials for insulation:
- The cheapest way would be to insulate the walls of the house with polystyrene foam, the price of which ranges from 70-90 rubles. for 1 sq. m.
- As for mineral wool, it costs a little more - 90-150 rubles. The price of the material depends on its density, thickness and manufacturer.
- Penoplex, which is extruded foam plastic, but with increased strength and density, costs 1 sq. meter approximately 200 rubles.
Isolon (foamed polyethylene) can also serve as an insulator. Its cost will be 280-300 rubles per 1 square meter.
Insulation of an unheated room
Many novice builders are interested in the issue of installing gypsum board in an unheated room. We warn you right away: most professionals are against such installation. The fact is that even moisture-resistant material cannot withstand strong changes in temperature and humidity. If you decide to install plasterboard structures in such a room, but do not want to install additional thermal insulation, it is enough to attach the sheets to a frame made of metal profiles. The air between the structure and the main wall will provide some thermal insulation.
Insulate an unheated room, such as a loggia or balcony. possible only under certain conditions. Firstly, it must be glazed. We are not talking about simple wooden frames, but at least double-glazed windows. They provide reliable protection from moisture and cold. In addition to the walls, you will need to insulate the floor and ceiling, which are covered with high-quality moisture-resistant plasterboard.
GCR can be used in loggias that are connected to a living room with a normal microclimate. Think carefully before you start installing drywall in such rooms, because the structure “eats up” at least 6-7 cm of space. Thermal insulation in the loggia is carried out in the same way as in ordinary rooms, but with some features. First, the wall is covered with waterproofing material.
If you approach wall insulation responsibly, you can create an atmosphere of comfort in any apartment. We hope that our simple instructions will help you implement this plan. Good luck.