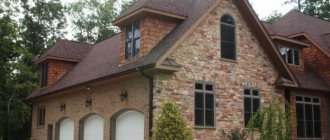
Paving slabs look great and serve not only outside the premises, but also inside. After looking at a photo or video, you can see that this material is often found in service stations and warehouses, so why not put it in your own garage? Moreover, doing it yourself does not require a large investment of money or time. Practicality, aesthetics, durability – these are the qualities that the material meets. You only need a standard set of tools: a level, construction threads, a hammer with a rubber nozzle and a grinder.
Which garage floors are better?
In general, there are three types of floors made in garages:
Earthen ones. The cheapest option, but with a lot of disadvantages
It’s just compacted soil – “native” or imported – it doesn’t matter. No other coverage
Concrete
It is very durable and reliable, but requires significant costs and a significant amount of time for its arrangement: sand and gravel backfill, waterproofing, and, if desired, insulation, reinforcement, and a rough screed are required, on top of which a finishing coating is applied. It can be different: finishing screed; floor tiles or porcelain stoneware; self-leveling floors, including polymer ones; rubber floors (rolls, slabs or crumbs);
wooden (stationary or ladders).
Wooden. This option is good because it regulates humidity; a garage with wooden floors is warmer than one with concrete or earthen floors. Disadvantages: fragility, tendency to rot, high absorbency. Paving slabs. As one of the options for a “cold” floor. Paving slab floors in a garage are durable, easy to repair, neat and practical.
As you can see, there aren't many options. Let's look at their advantages and disadvantages in more detail.
Advantages and disadvantages
Earthen floors in a garage are very simple to install, require virtually no material investment, and you can replace a damaged section of the earthen floor at any time. These are, perhaps, all the advantages. The downsides are more serious:
- in dry weather they get dusty, in rainy weather they get wet;
- spills can only be removed by replacing part of the coating;
- cold, no possibility of insulation;
A dirt floor in a garage can be made as a temporary option or as a base for wood. Such floors can be found in garages at dachas, where the car is located for a very short period of time. In major garages, they still make a more solid foundation.
Garage floor made of paving slabs
A garage floor made of paving slabs can be considered as one of the earthen floor options. It's just more practical. There are more layers when constructing it, as well as more money is required for its installation - more crushed stone and sand are poured onto the ground, into which the tiles are laid. But the functionality of this option is much higher. Disadvantages - possible increased humidity, and if the sand and gravel cushion is insufficiently compacted, the floor may “sag” in places of greatest stress, and if the quality of the tiles is low, it can be destroyed under the influence of aggressive substances, of which there is more than enough in the garage. Another minus is that dirt gets stuck in the seams, it’s not easy to clean, and the problem of absorption remains: paving slabs are hygroscopic.
Not everyone is happy with a wooden garage floor because it is a fire hazard and prone to rot. Although, if the groundwater is low and the floor is made correctly, it will not rot. Fire hazards can be combated by impregnating the boards with fire retardants - agents that reduce the flammability of wood. But these are not all shortcomings. It’s also not very pleasing that the boards absorb dirt and spilled liquids, which do not have the most pleasant smell. A wooden garage floor looks very untidy, and there is no way to remove all of the wood fibers.
Wooden floor with expanded clay backfill
The advantages of wooden floors include the fact that they are warmer than the other two options. In addition, when installing a plank floor in a garage on joists, the gap between them can be filled/filled with thermal insulation materials, which will make it even warmer. It’s difficult to talk about the price: in some regions, boards, even thick ones, are inexpensive, in others they cost a lot of money.
Concrete garage floors are the most common and popular. It is durable and can be insulated. Moreover, in recent years, concrete flooring has not been left so often - many materials have appeared for finishing the floor in the garage, which make its operation much more comfortable.
The finishing coating can then be laid on the concrete floor.
The disadvantages of a concrete floor in a garage have already been mentioned: it is a large amount of work, a long period of time required to install it, and a fairly high price, even if you make a concrete floor in the garage with your own hands. If the final coating is the same as concrete, then it also adds absorption of liquids and odors, which are also impossible to remove. The unpleasant thing is that concrete absorbs moisture from both the soil and the air. This is not good for concrete - it only becomes stronger, but for a car it is not good. So, if the groundwater level is high, it is necessary to do good waterproofing, and, possibly, a finishing coating that does not allow moisture to pass through. An excellent option is polymer self-leveling floors or rubber coating for the garage.
Price
Let's calculate how many paving slabs are needed for a standard garage with an area of 18 sq.m. We will take prices from a popular construction hypermarket in Moscow.
| Price per m2 | Price for the whole garage | |
| Paving slabs 12 bricks 500x500x50 mm | 620 rub. | RUR 11,160 |
| Paving slabs brick 100x200x40 mm | 675 RUR | RUR 12,150 |
| Paving slabs California 300x300x30 mm | 545 RUR | RUR 9,810 |
| Clinker tiles 200x100x50 mm | 1400 rub. | RUR 25,200 |
In a word, there is no point in choosing the most expensive tile. As well as the cheapest one - the thinner it is, the greater the chance of cracks appearing.
To save money, you should take care of searching for substandard tiles. It often happens that the defects turn out to be very minor, which has an extremely positive effect on the price. We've decided on the budget - let's move on.
Basic qualities
Mechanical properties:
- Porcelain stoneware slabs can withstand heavy loads (with a thickness of 3mm up to 200 kg/cm²). They surpass natural granite and ceramics in bending strength.
- Quite hard (7-8 points on the Mohs scale), but not at all plastic, as a result of which they are fragile.
- The material does not retain heat well. This means that heating costs will increase in a heated box.
- Based on their ability to resist abrasion, porcelain tiles are divided into five classes. Class V with a high degree of wear resistance is suitable for installation on garage floors.
Temperature conditions:
Resistant to sudden temperature changes. Frost resistance of the material is down to -50 C. This is facilitated by the low porosity of the structure. The same property ensures poor adhesion to adhesives.
Environmental friendliness, safety:
- The tiles are non-flammable and moisture resistant. High density prevents moisture penetration and destruction from the inside. Porcelain tiles do not accumulate static electricity. It is considered non-conducting, since all its constituent parts are dielectrics. There is still a possibility of a “breakdown”, but it is negligible. The coating is well suited for use in electrically heated systems (warm floors).
- Porcelain tiles are hygienic: they do not collect dust or dirt. Under the influence of aggressive chemicals, it does not change its properties (class - EAA). Easy to clean, no stains or streaks remain on the slabs.
- The marking R -X (where x is a numerical coefficient from 9-13) indicates the degree of sliding of the tile. R-value -10 is suitable for installation in areas with heavy traffic. Practical in damp, unheated boxes.
Decorative qualities and appearance
An example of a porcelain stoneware floor.
In its texture, porcelain stoneware is similar to natural stone. Imitation can be made not only for granite or marble, but also for rare types of slate. The surface repeats the patterns of aged wood, leather or frozen volcanic lava. The service life of a properly laid coating is more than 50 years.
A stone that has not received any processing after manufacturing is called technical. It is used in production workshops and premises. It is also suitable for the garage. But a polished or glazed coating will quickly lose its appearance due to studded wheels.
Caring for tiles during use
tile care
Maintenance of tile flooring involves regularly cleaning it from dirt, dust and sand. The abrasives they contain lead to accelerated abrasion of the surface. If oil or fuel gets on the floor, it should be immediately removed with a rag, followed by degreasing with special means. Cracked fragments are removed, the hole is cleared and replacement tiles are placed in it in accordance with the installation technology. Chips and cracks are filled with glue and small screenings.
How to make a base screed in a garage with expanded clay
Garage screed with expanded clay has good heat-insulating properties. A 10 centimeter expanded clay layer is enough to make the floor warmer than a 30 centimeter thick wooden floor and a 100 centimeter thick brick wall.
Expanded clay is very well suited for making a warm base. To properly make such a floor, you can watch the video.
The advantages of the material are:
- Environmentally friendly.
- Durability of the structure.
- Good thermal insulation of the base.
- Soundproofing.
- High strength.
The disadvantage of an expanded clay garage floor is its low susceptibility to moisture, which significantly limits the use of the material.
Based on density, expanded clay is divided into three types:
- Expanded clay crushed stone. The dimensions of the material are 10-14 millimeters, it is most often used for preparing concrete mixtures.
- Expanded clay gravel. Used when installing durable and fairly light floors.
- Expanded clay sand. It is used for making thin ties, its size is no more than five millimeters.
The choice of fraction type is influenced by the room in which the screed using expanded clay will be performed and the technology for its production. There are three options for making screeds using expanded clay.
Tips for choosing material
When choosing flooring, you should consider the following factors:
- You should not focus on the low price of products. A quality product cannot be cheap. Counterfeit products have a limited lifespan.
- It is not recommended to purchase brightly colored stones. Firstly, the abundance of dyes affects the strength of the material. Secondly, loud tones have a stimulating effect on the nervous system and lead to rapid eye fatigue.
- You need to take tiles from the same batch. In this case, there is a guarantee that they will be the same size, density and color shade.
- It is recommended to purchase material in quantities 10-15% higher than calculated. Some of the material will be used for scraps; some may be damaged during loading and transportation. In addition, you need to have a reserve to replace damaged fragments.
When purchasing, you should require a quality certificate. This will allow you to avoid purchasing substandard goods of questionable quality.
Features of making a concrete base in a garage
The floor covering in such a room must meet certain requirements.
These include:
- High strength. This is due to the fact that the floor is often subjected to shock and abrasive influences.
- Wear resistance. The surface of the garage floor is heavily used.
- Moisture resistance. Very often, liquids leak from the car, and condensation may appear inside the room.
- Chemical independence from the action of various types of fuel, engine oils and auto chemicals.
How to prepare the base for a screed
The first stage of building a garage involves solving the question of how to make a screed in the garage?
The concrete structure is laid on a specific base in the following sequence:
- A layer of gravel or sand is poured and compacted well, its minimum thickness is 15 centimeters.
- The floor is waterproofed with a layer of roofing felt, preferably two layers of thick polyethylene film or hydroglass insulation.
The insulation can be taken, for example, polystyrene foam. And install it only in the case of a heated garage (see Do-it-yourself garage heating: which is better).
The stage of preparing the floor for the screed is completed by laying a reinforcing metal mesh. This garage brace will strengthen the concrete structure of the floor and prevent it from cracking.
How to prepare the mixture for pouring the base
Before you make a screed under the garage, you should prepare a solution. The proportions in which sand and cement are taken depend on the brand of cement chosen.
Moreover, they can be: 3:1, 4:1 and 5:1. Dry special building mixtures, such as M150 sand concrete, are very popular when arranging floors. When obtaining them, the most modern technologies are used.
Fiber fibers and plasticizers are added to the mixture recipe, which makes it possible to obtain a fairly strong and completely smooth screed. For the front surface, the thickness of the screed in the garage is usually two to three centimeters.
When installing a concrete floor in a garage, an important factor such as slope must be taken into account. Its value should be in the range from 1.5 to 2%, which is approximately 1.5 - 2 centimeters per meter of length.
The slope of the screed should be directed towards the gate or drain grate.
Compensation gaps should also be taken into account; they need to be made near all walls and protruding elements inside the garage, which can be pipes or pillars. This is especially true when the garage area is up to 50 square meters.
It is more convenient to leave gaps when making screeds. In this case, you can use dilatation tape, a plastic dilatation profile and a 0.5 centimeter thick polystyrene foam strip.
How to pour a concrete base in a garage
Before pouring the floor with your own hands in the garage, the work area is marked.
Further instructions for carrying out work include:
- The posts are hammered around the perimeter. To make them, it is better to use metal reinforcement that is clearly visible and easy to drive into the ground.
- A zero mark is marked on the posts and the height to which the future screed will be carried out is drawn from it.
- Using a building level, additional markings are made.
- The previously prepared solution is poured into the base and distributed evenly over the entire floor.
- After pouring, the screed should be moistened to avoid further cracking. This usually needs to be done every 10 hours.
- It will take up to seven days for the concrete mixture to completely harden.
- When using a special self-leveling mixture for the face screed, its hardening period usually ranges from 12 to 24 hours.
The photo shows the process of leveling the floor in a concrete garage.
- After the screed has completely hardened, additional coating can be done on the garage floor using epoxy or polyurethane mixtures and special paint used for concrete coatings.
- You can lay PVC or ceramic tiles on the concrete.
This flooring option can last quite a long time. It has excellent performance characteristics and a low price, which are the main criteria when choosing such a coating.
Difficulties that may arise
When laying a coating in a garage, it is necessary to take into account the nature of the use of the room. If you plan to wash a car inside the structure, it is recommended to make the floor with a slight slope towards the gate. Laying is allowed to begin from any corner opposite the exit. When performing work, you need to focus on the goal line.
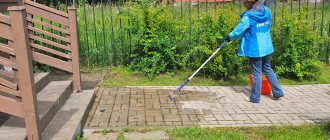
Difficulties in the process of laying in a garage rarely arise. When leveling paving stones, it is important not to hit too hard. Otherwise, the material will go too deep into the sand mixture, and in the future the remaining slabs will have to be laid in the same way.
The meaning of a garage entrance
It is known that our weather conditions are unfavorable most of the year. As a result, due to precipitation and temperature changes, puddles, ice, and dirt form in front of the garage. On an icy entrance, the car begins to slide, and the load on the suspension increases. In mud and water, slipping may occur. Ultimately, there is a risk of emergency situations occurring. In general, entering and leaving the garage often turns into a real problem.
Another negative factor is the accumulation of moisture at the threshold. There is an increased likelihood that water will penetrate into the room and materials will begin to dampen. The best solution is to make a garage entrance. You can install a screed or ramp, or a blind area.
A good solution is a blind area. It is this that will allow you to get rid of the main problems, but at the same time do everything quickly, with minimal investment. The blind area is a strip of asphalt or concrete. At the same time, it is performed with a slope in the direction from the building in order to divert accumulating water from the garage space.
Be sure to ensure that the appropriate angle of inclination is maintained, otherwise the blind area loses its meaning. Experts write: it is advisable to adhere to an angle of 15-20 degrees, which is 20-30 mm per 1 meter of length. Thus, the end result should be a platform in front of the garage with a slope. You can determine the width yourself, but most often car enthusiasts prefer to make a platform of 1 meter.
From a design point of view, the tiled blind area looks great.
A good convenient entry into the garage can be made if you build a ramp. The construction is simple and does not require large expenditures. Remember that it is easier to drive up a gentle ramp, but it will require more space.
You can choose a specific type of ramp, depending on the availability of free space, the location of the garage and house, gates, and driveway. For example, you can make a straight ramp or an entrance with a turn. Sometimes ramps are made not with an ascent, but with a descent. This is true if the garage is located in a basement or semi-basement.
The ramp parameters are as follows. The optimal length is 5 meters. The normal width is 30 cm larger than the size of the garage door.
Don't forget that you also need to think about the drainage system. So, immediately in front of the threshold there should be a collector for removing moisture, which must be closed with a grill.
Choose the material for your ramp.
- Metal. It is reliable and durable, but provokes strong slipping in the cold.
- Tree. The material is convenient to process, but is short-lived. Keep in mind that in a couple of years you will have to replace it.
- Concrete. It is advisable to choose this option. The material is more reliable and durable, and has a good price-quality ratio.
Craftsmen advise making a ramp from concrete. The main thing is to do everything correctly. Then it will last for many years.
Pay attention to the approved standards for the slope of the ramp in accordance with SNiP 21-02-99 clause 5.28: it should be no more than 10%
For example, if the height difference is 10 cm, the ramp at the bottom should be one meter long, that is, one in ten.
It is the screed that car enthusiasts use most often. This is a layer of asphalt concrete or cement-sand mixture. As a result, after laying the screed, you should have a solid, level area in front of the garage. Concreting areas in front of garages is widespread and enjoys great confidence among motorists.
It is necessary to make such an entry, especially if the soil itself is not sufficiently rigid.
Please note: even if the levels of the entrance and the floor in the garage coincide, you will always be able to raise the threshold and protect the garage from moisture. It’s good to make a ramp with a slope of 25 degrees, and raise the threshold by 20 cm
Masonry on a cement-sand base
The preparation of such a base and subsequent laying is usually done in newly built garages, where ordinary soil is used as a floor covering. In this case, the building itself must be erected on a strip, and not on a slab foundation.
Schematic representation of the structure of the base for laying paving slabs.
Work begins with soil excavation. It is removed to a depth of 28-30 cm, where 8 cm is the thickness, 10 cm is the cement-sand layer and 10 cm is the crushed stone cushion. If your car weighs less than 1.2 tons, then the thickness of the pillow can be reduced to 7-8 cm.
After removing the soil, the bottom should be sprinkled with sand and compacted well. This is best done with a manual tamping machine. After this, it is necessary to pour a layer of crushed stone of the middle fraction, sprinkle it with a little sand and compact it again.
If your garage was recently built, then you need to lay a woven or non-woven geotextile fabric on top of the pillow. The cement-sand layer is filled with 6 cm of clean sand, spilled with water and compacted.
A dry cement-sand mixture is laid on clean sand in a ratio of 1:4 - 1:6, depending on the brand of cement, and also compacted
To prepare a cement-sand mixture, it is very important to use sifted sand and only dry cement
Laying paving slabs in the garage begins directly on the compacted cement-sand mixture from the farthest corner. Initially, 1 m2 of area is laid out, maintaining a seam thickness of 3-5 mm.
To maintain the thickness of the seam, purchased plastic crosses are used. Adjustment in height is carried out with a rubber mallet.
Further progress occurs along the wall, by laying meter-long sections with exact adherence to the pattern. After laying the entire floor, the cement mixture is scattered over it and rubbed into the seams between the tiles, and excess material is removed with a broom or brush. You cannot use water for wiping, as cement stains will remain.
Making a wooden floor in the garage with your own hands
And in the case of a wooden floor in a garage, there will be no differences at the first stage: you need to remove the fertile soil, level and compact the bottom of the resulting pit. Then it is fashionable to lay a layer of waterproofing (roofing felt, waterproofing, film, membrane) on the bottom, followed by a layer of sand or gravel
Sand and gravel need to be compacted, but the density is no longer so critical, but bringing the bedding “to the horizon” is important - check how evenly the “cushion” lies using a level, but not small, but no less than a meter
With insulation
Logs are installed on this bedding - large cross-section timber. The step is no more than a meter. It is advisable to arrange it so that the car wheels are above the joist or not far from it, and the rest can be distributed as it turns out.
Before laying, the logs are impregnated with a protective impregnation against rotting (for wood in direct contact with the ground), and then treated with fire retardants (reducing flammability). To prevent rotting, logs can be impregnated with mining, but their flammability will only increase. So this is not a very good option, although it is cheap. You can also use sleepers. They are already impregnated, but have a persistent characteristic odor.
Logs are laid on compacted crushed stone. In this case they were laid lengthwise, but more often they are laid across
Next, the space between the joists can be filled with insulation. The best option is polystyrene foam. If your budget allows, take extruded with a density of 35 kg/m3. It does not rot, fungi and microorganisms do not multiply on it, and mice do not eat it. In addition, it does not allow or absorb water. Insulation and waterproofing in one fell swoop. Layer thickness is at least 5 cm, but preferably 10 or more. If there is still space, you can fill in broken bricks and expanded clay. These materials are not the best solution, as they are hygroscopic (absorb moisture). Instead, you can use a new material - granulated foam glass. It is many times “warmer” than expanded clay, does not absorb water, and is not so expensive. In principle, you can only fill foam glass (in granules or broken glass) between the joists. It will be good too. But in any case, you don’t need to fill the entire space, right under the boards. A ventilation gap of at least 5 cm is required. Then the boards will not rot.
Finished wood floor
Boards are laid across the installed joists. This is a regular edged board with a thickness of 40-50 mm. When laying, do not try to pack them very tightly. It is better if there is a gap of 3-5 mm between the boards. That's all, the insulated wooden floor in the garage with your own hands is finished.
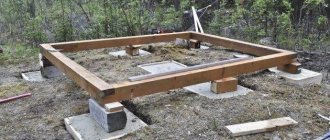
Logs on posts
There is an option for a “cold” wooden floor in the garage - on posts. A layer of gravel is poured onto the leveled soil and compacted. Brick columns are placed on the gravel with the expectation that logs can then be laid on them. The distance between the posts is about 1 m. That is, if the width of the garage is 4 m, then there are two posts at the edges and two in the middle. Since the distance between the logs is also 1 m, such rows of columns are located every meter. After two weeks, the solution will set and logs can be laid on the posts.
One of the options for installing columns
Ruberoid is laid on each column in two layers. It can be replaced by coating with bitumen mastic (twice). If the height of the posts is not the same, pieces of wood, plywood and other similar materials can be laid between the joists and posts
It is important that they are held tightly and that the logs are level. Next - laying the floor boards
Waterproofing the base
After the drainage has been installed, it is waterproofed. This event is intended to create protection for subsequent levels from ground moisture. It is advisable to use one continuous piece of material, since over time the joints diverge and begin to let water through. If the base for the platform is being prepared, the strips are sewn together on a sewing machine and covered with aluminum tape on both sides.
The best choice for waterproofing is thick cellophane, sold in rolls. The material is durable, flexible and elastic. It is not subject to rotting and decomposition. At the same time, the polymer does not release harmful substances into the environment.
To increase strength, it is advisable to fold it in half. The edges are brought out to ensure a complete seal. Immediately after laying the polyethylene, it should be sprinkled with sand to prevent it from being blown away by the wind and damaged by sharp objects.
Recommendations
Technology for laying paving slabs on a concrete base
If you have decided which garage floor tiles will find a place in the space of your “home” for a car, then it’s time for step-by-step coordinated actions:
Choose a tile of suitable quality; View options with the desired pricing policy; Choose a color scheme that is most pleasing to your eye; It is also important to hire highly qualified specialists who will help resolve the issue of laying the purchased material; After completing the work, it is important to let the coating “take root” in the space.
Important! Regardless of how much money is spent on the purchase and work, 5,000 rubles, 6,200 rubles or 20,000 rubles, the main thing is that the result fully satisfies your ideas and makes your old dreams come true