9414 0 8
Icer November 7, 2016Specialization: master in the construction of plasterboard structures, finishing work and laying floor coverings. Installation of door and window units, finishing of facades, installation of electrical, plumbing and heating - I can give detailed advice on all types of work.
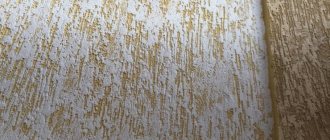
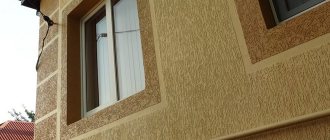
In the photo: the bark beetle looks great in a variety of settings
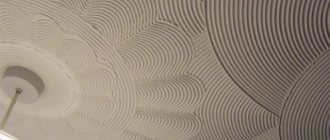
Bark beetle putty is one of the most popular solutions for interior and exterior wall decoration, and if desired, the composition can also be applied to the ceiling. Today we will figure out how to properly organize the work process in order to achieve a high-quality result. The technology is not complicated and anyone can understand it; believe me, you can carry out the work without outside help, the main thing is to follow all the recommendations outlined below.
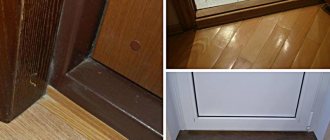
The bark beetle goes well with other finishing materials
Purpose and application
Where can you apply bark beetle putty? The range of applications of this material is wide. This can be the facades of a wooden house or its interior (walls and even ceiling). It has proven itself well in the restoration of old buildings. The most important thing is that the putty is applied to the material with which it will adhere well. These include brick, stone, concrete or drywall.
Attention!!! It is important! Putty should not be applied to glass or iron; it does not adhere to such material.
How to apply bark beetle
Ease of work is one of the main advantages of bark beetle, because such plaster is easy to apply yourself. But first you will have to prepare the surfaces: remove old paint, sand, clean. Prime the walls or treat them with special antiseptics to prevent fungus.
Patch up large defects on the surface with ordinary gypsum putty. You don’t have to strain yourself too much here, because the bark beetle will hide minor flaws. If the difference in height along the wall is too large, it is better to level it, otherwise the textured coating will only emphasize it.
Apply an acrylic primer as the first layer for strong adhesion and elimination of excess moisture. The recommended thickness of the bark beetle layer corresponds to the filler fraction. During the process, this can be seen visually as soon as the first furrows begin to appear. Use a special grater or spatula at an angle of 60 degrees.
For façade finishing, the preparation is slightly different, so first you need to lay a reinforcing mesh on the insulation. Wait a day for it to stick firmly, and only then proceed to priming and plastering.
Remember that textured plaster sets quickly, so you need to work quickly and without interruptions. Do not apply the mixture to any old coating - it is not durable. And don’t do finishing if the temperature is below 5 degrees.
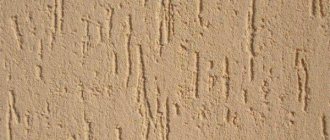
Depending on how you distribute the plaster, you will get different patterns. These can be vertical or horizontal stripes, chess, frost, cork and others. The bark beetle takes up to 3 days to dry, depending on humidity and temperature.
If you want to paint the top of the plaster, you need a textured roller with fine pile, for example, made of velor. It will get into all the furrows well, so you don't even need to press hard. And with multiple shades, you can create a vibrant two-tone paint job just by varying the roller pressure.
MDF: what is it? Types and features of material
Composition and technical characteristics
The name “bark beetle” itself speaks of the unique texture of this material. A similar effect is achieved thanks to a special composition.
Composition of bark beetle:
- The basis of plaster is a binder material. Its role is played by cement and added polymer resins (acrylic, latex or silicone). It is the type of binder material that determines the technical characteristics of bark beetle plaster.
- A mandatory addition is grain (size 1.5-3.5 mm). This is usually marble chips. The main parameter of such an addition is the size of the fractions. The larger the size of the fractions, the deeper the grooves will be (different relief), but at the same time the consumption of the material itself will increase, since the thickness of the applied layer will increase.
- Mineral fillers.
- Various additives.
Attention!!! It is important! Plaster with the same name “bark beetle” can differ significantly not only in appearance, but also in technical characteristics. Therefore, before purchasing this material, experts recommend familiarizing yourself with all types of existing bark beetle plaster, as well as their features.
Consumption per 1 m2
One of the important points during repairs is the issue of consumption of building materials (in our case, bark beetle plaster) per square meter. meter of area. Several factors influence consumption:
- release form;
- size of granules added;
- mixture density;
- application technique;
- features of preparation of the surface layer.
The size of the granules in the bark beetle plaster themselves determines the consumption per square meter. meter, since they will be proportional to the thickness of the applied layer. When coating, the solution should be stretched to the thickness of the crumbs. If the thickness is less, then when the pattern is formed, the granules will begin to crumble, and if it is more, they will simply sink, leaving no relief.
So, bark beetle consumption per sq. The meter is determined primarily by the size of its fractions. On the other hand, if you calculate in volume units, you can use a simple algorithm.
For example, plaster has a grain size of 3 mm. This means that the layer thickness will also be 3 mm (0.003 m). Hence the volume is 1 sq. meters is equal to 1m x 1m x 0.003m = 0.003 m3.
However, to convert such a figure to the usual format - kg/m3, one should operate with the numerical value of the density of the material (density is the mass of a substance per unit volume). But it is not possible to do this, since this indicator is slightly different for each brand, which means it is also unrealistic to derive a general formula for calculation.
Preparing the mixture
The following types of plaster are used to decorate walls using bark beetle technology:
- High-quality silicone containing natural resins;
- The most expensive are silicate ones, based on liquid glass;
- The cheapest and most practical cement-based mineral;
- Acrylic - very convenient to use, but poorly resistant to sunlight.
Bark beetle putty, purchased in the form of a dry powder with the addition of solid particles, is diluted with water before application. To do this, take a large container so that the hand with the tool can fit into it when working. Water temperature 20°–23°. It is better to mix with a construction mixer or a drill turned on at medium speed.
Acrylic bark beetle plaster is sold ready-made, painted in various colors. If it is white, you can add the desired color and stir. Important! All other bark beetle mixtures cannot be tinted . They are poorly and unevenly painted; a large amount of dye can reduce the quality of the material.
Peculiarities
The construction market offers the buyer two forms of plaster - ready-made paste or dry polymer-cement plaster, which should be diluted with water. It is logical to assume that 1 kg of dry composition after dilution with water will give more weight than the same 1 kg of paste mixture purchased.
A huge advantage is that the dry product has an affordable price, which is covered by some inconveniences in its use.
All ready-made solutions are divided into several categories:
- acrylic;
- silicate;
- silicone.
Wall coloring
The final drying times for the mixtures are indicated on the packaging. Usually this process takes two days indoors; outdoors everything happens faster. The completely dry surface should be treated with fine sandpaper. If the walls were finished with colored acrylic compounds, then the work can be considered completed.
Cement, silicone or silicate plaster bark beetles are painted with various compositions. It is better to carry out the work using a construction roller with long pile to paint the grooves. Perform movements in horizontal and vertical directions. If, after drying, you treat the wall with a dye with a less saturated color using a velor roller, you can get tinted grooves. It looks impressive and gives the interior originality.
Using a new method of decorating walls instead of boring wallpaper will require a lot of time and effort. You will have to purchase tools and master the profession of plasterer. The original stylish interior, durability and practical properties of the new coating will justify all the efforts and additional costs.
Advantages and disadvantages
The putty has a large number of useful properties, which indicates its advantages:
- The material contains only natural ingredients, so the putty is durable and (you must agree, this is really important) environmentally friendly.
- The mixture is light. This is achieved by introducing mineral fillers into the composition, which in turn reduces the load on the load-bearing elements of the building structure.
- Heat resistance to weather changes. It tolerates any weather changes well: hot days, severe frosts (from -55⁰С to + 60⁰С), prolonged rains.
- Immunity to ultraviolet radiation. Sunlight does not change its brightness and saturation at all.
- The composition of the material is fireproof.
- She is easy to care for. Simply wash with water and a little detergent.
- Mold or mildew never appears on plaster; biological resistance simply does not allow this.
- Has many color combinations.
- This material cannot be damaged.
- Relatively inexpensive material.
There are also disadvantages:
- If the plaster has received serious mechanical damage, then it is almost impossible to eliminate such damage without any changes to the outer layer.
- The material requires some skills when applying, so if you are new to this matter, it is better to trust a specialist.
The best manufacturers
Of the variety of foreign and domestic brands of plasters with bark beetle effect, it is worth highlighting the highest quality ones:
- Ceresit CT 175 - silicate-silicone plaster for facades and interior use with high vapor permeability;
- Ceresit CT 35 is an inexpensive cement mixture with mineral chips that has high wear resistance;
- Unis “Bark Beetle” - includes cement and marble filler, is not afraid of the sun, moisture;
- Bergauf Dekor - mineral plaster with modifiers, easily withstands the most severe frost;
- Ceresit CT 64 - acrylic plaster for interior work with a beautiful appearance;
- “Osnovit Bark Beetle 2 mm” is a cement mixture with mineral grains, it is quite cheap and easy to apply.
Decorative plaster Bergauf Dekor Fasad
There is a huge selection of decorative plasters, but mixtures that provide a coating of bark beetles are rightfully considered the most popular. They are easy to apply, simple and versatile, which is why they have earned the recognition of plasterers and designers.
Tips and recommendations for use
The technology for applying putty is not complicated, therefore, following the recommendations described below, the putty process will not cause significant difficulties.
Before you get started, you should choose the right mixture. We remind you that when choosing, be sure to look at the type of putty and its grain size. The paste mixture is immediately suitable for use, but its cost is much higher. And the mixture that needs to be prepared will cost less. You should know that properly prepared plaster putty is not inferior in quality to acrylic putty. As for the cooking recipe, the manufacturer, as a rule, always writes it on the packaging itself.
To work you will need a certain set of tools:
- the mixture itself;
- bucket (volume depends on the amount of solution being mixed);
- a drill with an attachment or a construction bowl (needed for mixing so that the resulting mixture is homogeneous, without lumps);
- a set of spatulas (narrow and wide, but always made of stainless steel);
- grater (must be plastic).
Surface preparation
Preparatory work for plastering the surface occurs according to the standard scheme.
- the surface is initially cleaned of dirt, mold, protruding mortar deposits, falling old plaster, etc.;
- if necessary, the surface should be leveled, but the procedure depends not only on the wall itself, but also on its location:
| No. | Wall location | Wall location |
| 1 | Facade wall | The surface is pre-insulated with polystyrene foam (mineral wool), then tightened with glue and then reinforced with plaster mesh. In the case where there is no need for insulation, the surface is leveled with cement mortar (it can be replaced with facade plaster). |
| 2 | Internal walls (brick, blocks) | It should be leveled with plaster. If there are minor irregularities, then you should first set up the beacons, and then just finish and level the base for the bark beetle. |
| 3 | Plastered surface with irregularities | Seal with putty. In the case where work takes place in a damp room, a special composition will be required. |
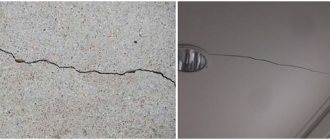
| 4 | Walls – concrete slabs | The seams should be sealed so that a smooth surface is obtained and cracks do not appear in the future due to knocks. |
| 5 | Drywall | You should also start by sealing and strengthening the joints and only after that apply a thin layer of putty to the entire surface area. |
- The next stage is primer. To do this, you will need a special primer paint, which should be tinted only with white.
Attention!!! It is important! If you use colored polymer plaster, then the color of the primer should match the color of this decorative coating.
Priming technology
This procedure depends on the foundation, or more precisely on its condition:
- oil paint (if any) should be sanded or scraped off;
- if there are metal elements on the surface (screws, staples, nails), then they are first treated with waterproofing primer in order to avoid the appearance of rust in the future;
- A porous base that absorbs moisture well will need to be coated with a deep penetration acrylic primer.
Advice. Choose a primer from the same manufacturer as your putty. Materials from one manufacturer will ensure not only quality, but also reliability of finishing.
Preparation and application of the composition
To prepare putty from a dry mixture, you should follow some rules:
- the water temperature should not be less than 15-200C;
- putty is added to water, but in no case vice versa;
- using a construction mixer, mix the mixture thoroughly (use minimum speed);
- after all the lumps have been separated, the mixture should be left for 5 minutes, after which the stirring process is repeated.
Once the solution is prepared, it is recommended to start working immediately and work until it runs out, so you should prepare only the amount you plan to make. When working, take into account the application features:
- Take the solution in small portions and quickly spread it over the surface in a thin, even layer.
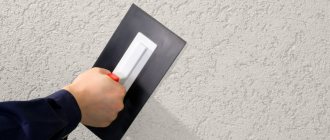
- The composition on the treated surface will thicken in half an hour. After this, it should be processed with a grater with light movements, which will give the surface texture.
- It's better to work together. One applies the composition to the wall, and the other immediately rubs it over.
- Temperature in the working room +10 -+250С.
- It is better to make the surface in 1 pass. If this does not work, it is recommended to seal the edge of the plaster with special masking tape, which will prevent the composition on the edge from hardening and the boundary line will not appear on the finished surface in the future.
Grouting the surface
The simplest and most common patterns created by grouting are:
- Rain - a grater pressed to the surface, drawn diagonally from top to bottom;
- Crosses - with a grater a long continuous movement is made from top to bottom, then small horizontal “strokes”;
- Lambs - use a grater to make circular movements.
DIY bark beetle plaster
Be sure to prepare the mixture strictly according to the recipe on the package so as not to spoil the plaster. To dilute the dry part, slowly add warm running water. To mix without lumps, use a construction mixer or a drill attachment.
Before use, leave the mixture to rest for a quarter of an hour, and then beat again. You will end up with a solution that resembles the consistency of mashed potatoes. It is important not to overdo it with the amount of water, because otherwise the mixture will separate.
DIY decorative plaster: 8 ways to do it
Distinctive qualities of the material
The bark beetle has its own characteristics that distinguish this building material from others:
- The filler is manufactured exclusively in a grain configuration, which guarantees the appearance of the original structure in the finished product.
- Ensuring safety for the environment, absence of harmful emissions after laying on the surface.
- Ability to operate in places with a humid climate, wide range of permissible temperatures.
- It is classified as a fireproof material and does not deform when exposed to high temperatures or open fire.
- Resistance to mechanical influences, and the material does not deform if it is in a humid environment for a long time or comes into contact with aggressive chemicals.
- Colorability.
- Low price when compared with analogues.
DIY application tutorial
To carry out the coating process yourself, there is no need to master additional technologies. complete the task yourself if you have basic skills in working with finishing materials.
Be responsible in preparing the surface in advance, take important tools, and follow the general rules for carrying out work.
To perform your own application, stock up on the following materials:
- Purchase bark beetle plaster in a configuration convenient for you. If you decide to dilute the mixture yourself, prepare a container with a sufficient amount of water so that no difficulties arise in the future.
- A small spatula or set of similar tools. It is desirable that they are made entirely of metal.
- Plastic grater. During the work, it will have to be constantly used, since it will be necessary to grout the already applied plaster.
- Electric drill with a specific attachment. You will need to quickly mix the solution using not improvised objects, but professional tools.
How to properly prepare walls for application?
Pre-clean the surface of debris, remnants of other building materials, as well as elementary dust, which always appears in increased quantities during repairs. Level the walls so that the finishing coat looks perfect.
To check the correct position of the walls, you can use a regular ruler. If it is of sufficient length, it is possible to determine the presence of even minimal deviations from the norm. If different sides of the wall do not meet by more than 2 millimeters, the surface should be leveled using cement mortar.