The main components of the DSP are:
- cement - 65%
- wood shavings - 24%
- water - 8.5%
- mineralizing additives (calcium chloride, aluminum sulfate, aluminum chloride, etc.). - 2.5%.
The chips are processed in a mixer using mineralizing additives along with the chips. Then cement and water are added. During manufacturing, the cement-bonded mortar is formed from three layers:
- the two outer layers contain fine shavings
- The inner layer contains larger chips.
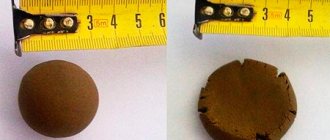
After complete mixing, the solution is pressed. The result is a monolithic structure that does not delaminate. The technology for creating CBPB makes it possible to produce boards with a smooth gray surface, which is completely ready for applying primer and paint. There is no need to additionally putty the slabs.
How to finish a facade from DSP
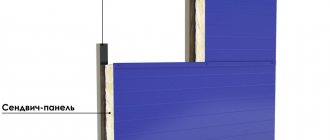
Finishing the facade of a house should not only create an aesthetic appearance but also protect the house from various influences from the external environment. One of these options is finishing facades with DSP slabs, as they give the facade a good look, and also work as waterproofing, thermal insulation and prevent wind from penetrating inside. The façade panels themselves, made from DSP, are a gray sheet with a hard, smooth surface. DSP stands for cement bonded particle board.
Decorating the house with DSP from the outside
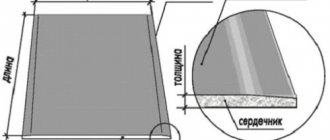
If the house is sheathed with DSP, you will get a flat surface that can be decorated with decor or painted with facade paint. They also produce decorative CBPB panels to look like brick, CBPB to look like stone, and they also produce CBPB with stone chips of various colors. The slabs are made at a special plant for the production of CBPB by pressing a mixture of Portland cement, wood chips, water and a special chemical additive. The slabs are produced in thicknesses from 8 to 36 mm, and for exterior decoration of the house you need to use only slabs with a thickness of 10 to 20 mm. DSP sheets have dimensions from 260 x 125 cm to 320 x 125 cm. Processing of DSP boards is very simple; they are easy to cut, saw, drill, grind and mill. Since the CBPB slab contains cement, the tool used to process the slab will quickly become dull, and therefore, to process these slabs, you need to use special tools for cement.
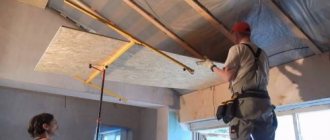
Features of DSP installation
If the facade, which is supposed to be upgraded with cement-coated chipboard, has a significant area, this suggests the presence of problems associated with thermal expansion.
The seams between products that are sealed with cement mixture or putty will become covered with cracks. However, there are some solutions to this problem.
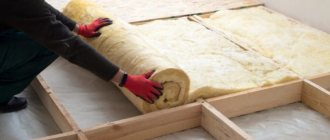
The facade using laminated chipboards, which have a cement coating, is equipped using ventilated system technology. In this case, insulation can be used.
If the installation of chipboards, the middle layer of which is laminated chipboard, involves the use of a heat insulator, then it is worth using products whose thickness is equal to the limit of 16-20 mm.
When using thinner slabs, there is a greater chance of breakage. Their total area will be 15% greater than the area of the facade intended for cladding. Products should be carried exclusively on the edge, and stored in a horizontal position.
Installation of slabs, the inner layer of which is laminated chipboard, must be carried out on a sheathing made of bars with minimum dimensions of 50x50 mm.
Elements of the lathing system can be installed both vertically and horizontally, while ensuring an installation step of no more than 60 cm.
An alternative solution is to use a galvanized profile designed to work with drywall. The work will also require hangers, which are needed to fix the sheathing to the base walls.
A lathing system, devoid of hangers or spacers, can only be used with a façade that does not require the use of insulation.
The space formed by the outer wall of the building and the outer boundary of the sheathing system should allow the location of the insulator and provide the clearance necessary for ventilation.
Facade CBPBs, which include chipboard among their components, can be used in tandem with basalt wool produced in rigid slabs. Their total area should be equivalent to the area of the façade being finished.
The heat insulator must be protected by a wind barrier. Umbrella dowels, represented by fungi, will fasten the heat insulator, and they should be placed at the rate of 5 pieces per 1 m2. To install insulation, you should use mushrooms made entirely of plastic. You will also need self-tapping screws that have an anti-corrosion coating.
What foundation is suitable for a frame frame with DSP cladding?
A frame house with DSP cladding is lightweight compared to a brick or block house (gas, foam and slag concrete). Therefore, the choice of foundations for it is wide.
To avoid making mistakes, you should be guided by:
- the total weight of the house (find it out from the design documentation);
- winter snow load;
- the type of soil on the site where development is planned;
- personal preferences.
Let's decipher the last point. If you want a full-fledged basement, choose a recessed strip foundation; if you want to save money, choose a combined one (bored with a grillage) or a pile. Some unscrupulous developers are trying to say that a pile-screw foundation is not suitable for frame houses sheathed with DSP. Don't believe it - this is an attempt to get more money.
We plaster the frame house and walls
You can plaster the walls of a frame house using one of the two most common technologies - using DSP boards and the method of multilayer reinforced plaster on a metal mesh. The first method is faster, but less durable. After 5-6 years, cracks may appear on the surface of the walls at the joints of the DSP. The second is more labor-intensive and expensive, but also more durable. The trouble-free service life of such plaster reaches 15 years.
Installation technology
A significant disadvantage of the material is its significant weight, so before starting work, the condition of the foundation is assessed. If necessary, it is further strengthened. It is recommended to highlight the basement area against the general background of the façade cladding.
Lathing installation and insulation
To create the frame, timber or profiles are used, the method is selected based on the specific situation. The first type is more suitable for log houses, the second - for brick, concrete or similar surfaces.
To equip ventilated facades, wooden beams or metal profiles are used; perforated hangers and a windproof membrane are also required
Wooden structure
The process begins with the preparation of the racks: they are treated with special protective compounds that prevent rotting and fire.
The parts must be secured in the following order:
- The frame elements are dried and the surface is marked. To do this, the optimal step for placing parts is determined, the standard value is 50–60 cm. This distance allows you to lay thermal insulation.
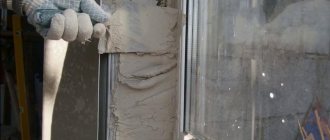
Application of the solution
Plaster mortar based on Portland cement, white cement and sand is reinforced with fiber fibers. The thickness of the main layer of plaster should not be less than 2 cm. There is no need to carefully level the surface - another layer will be applied to it.
The base layer must dry. This lasts for at least 48 hours at a temperature not lower than +180C. If the temperature is lower or there is high humidity outside, then the curing period must be extended by 24 hours or more. The final result directly depends on the strength of the base.
After the preparatory layer has dried, a plastic mesh is mounted on it and a finishing layer of plaster mixture is applied, the same as the preparatory layer, only without fiber additives. If the wall is being prepared for painting, the surface is carefully smoothed and painted. The thickness of the OSB plaster layer should exceed 2.2 cm. In this case, it will be quite strong and will not weigh down the wall structure too much.
Multilayer plaster of frame walls over a metal mesh reliably protects the wall from external influences and enhances the strength of the house, forming a kind of external frame. It is less susceptible to temperature deformation and cracks rarely appear on it.
Is it possible to install ceramic tiles on a cement-bonded particle board?
Very often, those who carry out repairs on their own ask the question whether it is possible to lay tiles on DSP cladding. Of course, it is possible, moreover, it is better to lay tiles using this material, because it differs in the following indicators:
DSP is made from sawdust by pressing. In addition to sawdust, the boards contain cement and other additives, so the result is a high-strength material that will last a long time and will not lose its properties. Due to their excellent characteristics, the slabs are used in frame house construction and as a base for tiles and other floor coverings.
The plate is fixed to the base
Cement particle boards (CPB) are not afraid of exposure to moisture, so the material can be used without additional protection, and since the boards do not get wet and swell during prolonged direct contact with water, such cladding is laid in those rooms where high humidity conditions prevail. Today there are not many wood materials on the market that have the same properties and characteristics as CBPB.
Gypsum plaster
Gypsum plaster is a universal dry mixture based on gypsum binder with special additives responsible for increasing adhesion. This building material is used when plastering ceilings and walls with a solid base in rooms with normal humidity to form a flat, durable and smooth surface for further finishing. Our company's product range includes gypsum plaster (Moscow) from the following manufacturers:
- Vilis
- Eunice
- Knauf
- Prospectors
- Volma
- IVSIL
We sell gypsum plaster wholesale and retail. You can rest assured that the cost of gypsum plaster will pleasantly surprise you!
Advantages of gypsum plaster
Gypsum plaster is a product that no construction project can do without. It is responsible for increasing the speed of plastering work without violating technology, reducing the duration of work without sacrificing quality - smooth and perfectly flat surfaces, corners, no need for subsequent processing, since an excellent final result is immediately obtained. In addition, dry gypsum plaster has the following advantages:
- increased load-bearing capacity and resistance to various mechanical influences;
- Possibility of operation in wet rooms (bathroom or bathroom);
- wall painting - white (opportunity to save on paint during painting work);
- gypsum plaster, the price of which is considered affordable for buyers, is an environmentally friendly material;
- short drying period (two to three days);
- The result of the mechanical application of the plaster plaster mixture is a white, perfectly flat surface, almost immediately ready for wallpapering.
Using gypsum plaster. Features of base preparation
Before you buy gypsum plaster and use it, you must carefully prepare the surface. First of all, you need to clean it from dust, dirt and all kinds of delamination. If you have firmly decided “ I’ll buy gypsum plaster!” ", then keep in mind that elements of form lubricant and protrusions must be removed from the concrete. If any metal elements are present, they should be protected from corrosion. Before universal gypsum plaster , it is important that the working base is strong and dry, with a temperature of at least five degrees. It is recommended to treat surfaces that weakly or strongly absorb moisture with an appropriate primer, which is responsible for preventing uneven drying of the plaster solution. It is necessary to allow the primer to dry and ensure that the primed surface does not become dusty.
Features of preparing the mortar mixture:
- the dry plaster mixture is carefully added to cold clean water (from +16 to +21 degrees), mixed thoroughly until a homogeneous mass is formed and lumps disappear;
- You need to wait approximately five minutes, after which the universal gypsum plaster is mixed, if necessary, add dry mixture or water and mix again.
Work technique
Gypsum plaster of walls involves applying the solution within twenty to thirty minutes after preparation, it must be applied to the surface. The layer thickness can be from 5 to 50 mm. If plaster is applied to the ceiling, the layer of mortar should be no more than 15 mm. Minutes after application, the plaster solution will gradually set; accordingly, during this period it is necessary to level the surface (for example, with a metal spatula), filling the recesses and eliminating excess. If the surface is being created for wallpapering or painting, it is recommended to wait for fifteen minutes, and then moisten the plaster generously with water and rub it in a circular motion with a felt grater or a hard sponge grater to smooth out any existing unevenness. Then the “Prospectors” gypsum plaster is smoothed (with a smoothing iron) until a matte surface is formed. It should be noted that to obtain a glossy surface, it is necessary to thoroughly moisten and smooth the plaster again within 24 hours, but not earlier than two to three hours after mixing water with the dry mixture. Only after this will it be ready for further high-quality painting.
Thermal conductivity and vapor permeability
When using cement-bonded particle boards, the thermal conductivity characteristic is important, since they are often used to insulate structures. The product is porous, so this parameter has small indicators: lower than that of brick and higher than that of drywall.
The vapor permeability of slabs is the same as that of concrete - 0.03 mg/(mchPa). This characteristic should be taken into account if the product is used for the construction of multi-layer walls. Additional cladding of the internal surfaces of the structure allows you to increase its thermal insulation.
Plastering walls from OSB
Don’t know how to plaster external walls made of OSB so as to eliminate rework in the future? Read the instructions OSBplyta.ru, and get results that will last for years!
Oriented - particle boards used as external walls of buildings can accept any finishing material, such as siding, painting, plaster, natural stone or its imitation.
Stone imitation
We will figure out how to plaster OSB walls in a technologically correct manner.
OSB wall plaster
Plastering OSB walls requires preparation, and the preliminary stage can be represented in two ways - with insulation and without insulation.
You should know that an important parameter in frame houses is the vapor permeability of the structure. Steam/moisture from inside the room can enter the wall insulation, BUT does not condense in it, but must necessarily escape outside. For these purposes, all finishing materials are used only with vapor-permeable properties.
How to plaster walls made of OSB - “option without insulation”
This option will cause a lot of problems during operation, and we indicate it rather as an example of how it is NOT recommended to do it.
Using a stapler, we staple Tyvek StuccoWap material to the walls. This is the recommended one, but as an alternative you can attach it in 2 layers of “Grade “D” Building Paper” (it is also vapor permeable).
As a second layer, we install a broaching mesh on the slabs, which will strengthen the structure. We cover the mesh with an adhesive mixture, preferably in two layers until it is completely immersed.
We plaster the resulting surface with the prepared mixture, in accordance with the application requirements from the manufacturer.
In the photo above you can see an example of how to do it is NOT recommended, because without a bottom layer of insulation (foam plastic, polystyrene), the plaster surface has a tendency to crack, despite all the tricks (especially when low-quality flexible (latex) plaster mixtures are used, and they are the majority).
Properties and technical characteristics of the CBPB board
Cement particle board for facade
By choosing DSP boards for cladding the façade, the technical characteristics of which provide many advantages over other sheet materials, you can create all the conditions for long-term operation of the building. Thus, it has been experimentally proven that one hundred freeze-thaw cycles have virtually no effect on the quality and properties of the slabs.
Let's consider the operational and technical characteristics of cement particle board in more detail:
- High strength of the material, including impact resistance. It does not change depending on the direction, i.e. it remains equally high both when fastened in transverse and lobar orientation.
- Fire safety. Refractory and non-flammable material; When heated, it does not emit hazardous substances or smoke.
- Moisture resistance. Does not swell by more than 2% when kept in water for 24 hours. Taking into account that during operation there is only a risk of getting wet from precipitation, it becomes obvious that this is an excellent indicator of resistance to moisture.
- Vapor permeability.
- Good sound insulation.
- High biostability of DSP. Due to the presence of cement in the structure of the slab, and therefore an alkaline environment, the material does not rot and is not susceptible to damage by insects and various microorganisms
- Frost resistance. DSPs are used in any climatic conditions, even the most extreme.
- Absolutely environmentally friendly, no harmful additives.
Possessing a set of such characteristics that are attractive to the developer, cement particle board for the facade becomes the most optimal and reliable method of finishing.
Facade cladding with DSP slabs
Despite the impressive number of advantages, there are also disadvantages. The main one is the large weight of the panels, which makes working with them difficult. Installing DSP boards for a facade, when their height is 3 m and their weight, depending on the size, is from 35 to 87 kg, is quite burdensome, even if you do not do it alone. Work at height will have to be done using mechanization tools, for example, a winch.
While high impact resistance, the material has low bending strength. In other words, the slab may break without being able to support itself under its own weight. Do not lift long panels parallel to the ground, holding them only by the edges. They are transferred only to the edge.
PROCESSING AND FIXING
Fastening:
- nails
- screws
- seams and edges
- seams (execution and placement)
The DSP is attached to the supporting structure using special nails and screws.
All types of connecting elements have a surface with anti-corrosion properties. Fastening with nails
To connect the DSP, screw nails from 2.5 mm are required. The size of galvanized nails is selected so that the length of the part that will be pinched is at least twice the standard thickness of the panel sheet and at least 10 diameters of the nail itself.
Fastening with screws
For screws, holes must be drilled with recesses with a diameter 1.2 times larger than the diameter of the screw itself. To fasten the DSP without test drilling holes, you can use self-tapping screws that have countersunk heads and are equipped with blades to form a recess to fit its dimensions. For the most accurate fastening, it is necessary to use a screwdriver with an electric or pneumatic drive.
Minimum sizes of screws and nails depending on the thickness of the slab and the diameter of the dowel
| Diameter, mm | DSP thickness, mm | ||||||
| 8 mm | 10 mm | 12 mm | 16 mm | 20 mm | 24 mm | 36 mm | |
| 2,5 | 35 | 35 | 40 | 50 | — | — | — |
| 3 | 40 | 40 | 45 | 50 | 60 | — | — |
| 3,5 | — | 45 | 50 | 55 | 60 | 75 | — |
| 4 | — | — | — | 60 | 60 | 75 | 110 |
| 4,5 | — | — | — | 65 | 65 | 75 | 110 |
| 5 | — | — | — | 70 | 70 | 75 | 110 |
| 5,5 | — | — | — | — | 75 | 80 | 110 |
| 6 | — | — | — | — | — | 85 | 110 |
To ensure the technology of ideal fastening of slabs, it is worth observing the step between the fastening elements of the edge of the slabs and the distance between them.
Distance, mm
Connection with frame base
1 - wooden beam; 2 - DSP; 3 — steel stand; 4 - screw; d is the length of the screw.
Placement and execution of seams
TAMAK boards are made of wood, and when the humidity level changes, they undergo a process of stretching and contracting. That is why the number of seams can be in excess, which leads to minimal displacement of the slabs. During testing over many years, a tendency for the slabs to shrink was determined. To prevent cracking in the joint compound, the visible joint width should be 4mm for internal use and 8mm for external use.
Seams and edges
Particular importance when choosing options for creating seams and edges is given to the internal and external climate, and especially the effect of moisture.
Options for seams between slabs
1 - strip of waterproofing material; 2 - elastic mastic.
| 1) Screw fastening with open seam | 2) Nailing with open seam |
| 3) Fastening with a screw with a closed seam | 4) Fastening with a nail with a closed seam |
| 5) Fastening with aluminum strip | 6) Fastening using a strip |
DSP processing
The main advantage of the slabs is their ease of processing. The strength of CBPB is superior to slabs made from wood chips; they can be retouched with a tool of a similar type. To obtain a high-quality machined surface and flawless processing of plates, it is necessary to use tools that cut plates made of hard composition. DSP is cut, drilled, milled and ground.
Cutting
In order for the cut edges to look perfect, the edge of the disk should not protrude from the bottom surface.
| Stationary sawing - horizontal and vertical mode | saw blade Ø 250 – 400 mm |
| number of teeth 48 - 72 | |
| Sawing with a hand saw: | |
| plate thickness 12mm | saw blade Ø 250 mm |
| number of teeth 36 - 60 | |
Drilling
In the factory, in accordance with the client's documentation, it is possible to drill through holes with special recesses for the heads. For manual drilling, it is worth using drills with increased wear resistance.
| Drilling | ||
| For free-standing holes | Drill HS 2.5-3.0 mm | Rotation speed: 1300 rpm |
| For continuous operation | Drill made of hard alloys VK6-VK8 | Rotation speed: 1300 rpm |
Milling
Milling of TAMAK slabs must be carried out only in factory conditions. If you need to mill slabs on site, you should take into account the following information.
| Milling in production conditions is carried out with cutters equipped with carbide brazing. The fixation of which is carried out on a copy milling machine. | Tool rotation speed within 9000-12000 rpm |
| Milling on construction sites is carried out with end mills, which are equipped with hard alloy tips mounted on a manual electric router. | Tool rotation speed within 12000-16000 rpm |
Grinding
TAMAK CBPBs have a smooth and even surface, so they are not polished in the factory. This type of treatment of the slab can disrupt the top layer that covers the slab, increasing its absorption, leading to a deterioration in the mechanical and physical properties of the material. When installing slabs, in practice, irregularities may appear at the joints, which can be removed by grinding the material. For this purpose, special tools are used: a hand-held belt sander, a hand-held vibratory sander.
DSP finishing (Painting)
The optimal surface finishing of DSP is painting with the formation of gaps between the materials.
Painting of facades of DSP TAMAK. Technology with visible expansion seams.
| Primer, 1 layer | Final painting, 2 layers | Manufacturer |
| Disbon 481 | Caparol Thermo San NQG. Facade paint based on silicone resin | Caparol |
| Tiefgrund TB | Amphibolin - Caparol. Acrylic paint | Caparol |
| CapaSol LF | Caparol Acryl - Fassadenfarbe. Acrylic paint | Caparol |
| Caparol Sylitol 111 Konzentra - silicate primer based on liquid glass | Silitol-Fin. Mineral paint | Caparol |
| Malech / Elastocolor Primer | Elastocolor. Elastic acrylic paint | MAPEI |
| VD-AK-18 (Shagreen). Water-dispersed acrylic paint | LNPP, Samara | |
| VD-AK-18 (Shagreen). Water-dispersed acrylic paint | LNPP, Samara | |
| VD-AK-035 | VD-AK-117. Water-dispersed acrylic in two layers | PIGMENT, Tambov |
| Soil Strengthening Bolars | Structure. Textured Bolars based on acrylic dispersion | Bolars, Moscow |
| Primer Facade | Alpha Coat. Textured paint, matte waterborne quartz-containing | Sikkens |
Painting of facades of DSP TAMAK. Closed seam technology.
| Padding | Final painting, 2 layers | Manufacturer |
| Primer Malech / Elastocolor Primer | Elastocolor - elastic paint based on acrylic | MAPEI. |
Plaster TsSP TAKMAK. Technology with closed decorative strips or visible expansion joints.
Open expansion joint design to compensate for linear changes that can be caused by moisture and temperature changes.
| The basis | Primer, 1 layer | Finish plaster | Manufacturer |
| Extra" glue + cement M500D0 Alkali-resistant fiberglass mesh | Textured plaster “Fine” LNPP. | LNPP, Samara | |
| Capillary | Fresque (Fresco) - decorative relief paste with a fibrous texture | Max decor | |
| Optimist G – 103. Group of Companies “Optimist”, LLC “TYAGA” | Finish plaster, elastic plaster, polymer-mineral plaster. | GC Stena, Izhevsk | |
| Optimist G103 | Manna D - 708 | GC "Optimist" TYAGA LLC, Moscow | |
| Acrylit-06 PG | Acrylit 415, elastic plaster | LLC NPO "Oliva" | |
| Primeseal | Stuc-O-Flex | Representative office in Russia - Publishing House "Beautiful Homes Press" | |
| PrimerFacade | ANEROC 80 –TRIMETAL Acrylic decorative plaster with wood bark texture Finish coat with AlphaTopCoat paint (2 layers) | Sikke |
Plastering facades with DSP TAMAK. Technology with closed expansion seams.
Table for the construction of a closed expansion joint.
| Preparation | Base layer | Finish plaster | Manufacturer |
| Malech primer. Puttying with Mapetherm AR2 and MapethermNet mesh (a 33 cm wide mesh strip is applied to the expansion joint) | Mapetherm AR2 over the entire area with MapethermNet mesh reinforcement in the middle layer. | SilancolorTonachino - silicone-based decorative plaster | MAPEI. |
| Capillary | Fresque (Fresco) - decorative relief paste with a fibrous texture | Max decor | |
| Puttying with KerabondT + Isolastic latex and MapethermNet mesh (a 33 cm wide strip is applied to the expansion joint) | Malech primer applying Mapetherm AR2 over the entire area with MapethermNet mesh reinforcement in the middle layer | SilancolorTonachino - silicone-based decorative plaster | MAPEI. |
| To seal an expansion joint at the junction of 12mm thick TAMAK CBPB sheets, a cord of foamed polyethylene (for example Vilaterm), Ø 8mm, is placed in the joint, then elastic putty “JointCompound”. | Primer "Stuc-O-Base" | Stuc-O-Flex | Stuc-O-Flex Representative in R.F. publishing house "Beautiful Homes", Moscow |
| Sealing seams with acrylic sealant Accent 117 | Extra Flex" elastic adhesive + CEMENT M500D0. Alkali-resistant fiberglass mesh, embedded in glue | Sahara Flex - elastic plaster | CJSC PK LAES, Samara |
| Adhesive reinforcing compound KlebeundSpachteImasse 190 grau+ reinforcing mesh 650. | Caparol-Putzgrund with quartz filler | Capatect-Fassadenputz R 30 | Caparol |
| Soil Optimist G – 103, . | Finish plaster, elastic plaster, polymer-mineral plaster. | GC Stena, Izhevsk. | |
| Soil Optimist G – 103, . | Finishing plaster polymer-mineral. "Rain". |
Distinctive features
How did a material such as DSP deserve its popularity? The characteristics that manufacturers describe their product are as follows:
- Absolute safety, both for humans and for nature.
- Resistance to mechanical damage (even with a strong impact it is very difficult to damage the installed slab).
- Low coefficient of absorbed moisture.
- Passes steam well.
- Has excellent soundproofing properties.
- It is not susceptible to rotting even in constant conditions of high humidity.
- Frost resistance.
- This is a material that does not spread flame on its surface and does not emit caustic substances when exposed to high temperatures.
These positive aspects make it possible to perfectly install DSP on the façade.
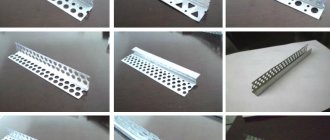
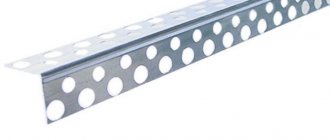
Types of grids
When plastering façade walls, renovation workers use fiberglass or metal reinforcing mesh. Fiberglass (polymer) nets are used in cases where the applied layer of plaster is small and the surface is fairly flat.
They are made from glass threads. Depending on how thick the thread is, such fabrics are used in different areas:
- for painting and finishing indoors, it is customary to use fiberglass with a density of up to 90 g per m2;
- for finishing concrete, aerated concrete, shell rock or installing thermal insulation - 90–220 g per m2;
- to reinforce the foundation or other parts of the building located in the ground, fiberglass mesh with a density higher than 220 g per m2 is used.
As for metal representatives, they are used for applying plaster with a thickness of more than 2 cm. Among them there are also varieties:
- Woven - made from galvanized thin wire by weaving. Quite flexible, but durable. In construction stores it is sold in rolls. To apply plaster with your own hands, repairmen recommend buying such a mesh with a cell size of 1*1 cm. It can be used for finishing external and internal walls.
- Wicker mesh is also called a chain-link mesh. It is usually used in cases where you need to apply a decent layer of plaster to a large area of the wall. The size of the cells used for such finishing work is 2*2 cm, which slightly simplifies the process of applying the solution.
- Welded - made from galvanized or polymer-coated steel wire by welding the rods at the intersection points. The cells are square, their size is from 2 to 3 cm. They are used on those buildings that can experience maximum shrinkage. This method of reinforcement completely protects the plaster from sliding and cracking.
- Expanded metal - manufacturers make such a mesh from a single sheet of metal, cutting out small diamond-shaped cells in a checkerboard pattern under a press and slightly stretching the canvas. It is customary to use this kind of reinforcement where it is necessary to apply a small but neat layer of plaster.
How to install slabs
The DSP facade can be installed as a suspended ventilated facade with or without insulation. But professionals recommend using an insulating layer regardless of the weather conditions of the region. It helps protect not only from severe frosts, but also from sweltering heat.
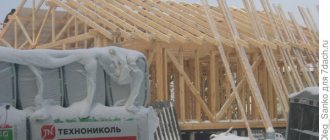
There is also an option for a frame-panel house building system, as in the picture below.
The frame for the ventilation facade is mounted from wooden blocks treated with an antiseptic, or from a metal profile. The second option, of course, is preferable, since it will last a very long time, and manufacturers guarantee that the DSP finish will last no less than 50 years.
The frame strips can be mounted both horizontally and vertically. Here you need to focus on how the façade panels will be installed. If the DSP board is mounted horizontally, then the frame is made vertical and vice versa. The step between the planks is no more than 60 cm. During the fastening process, you should periodically check with a level and plumb line whether all the planks are installed evenly.