A gazebo on the site of a country house or cottage is currently a mandatory attribute. You can relax in it, welcome guests and organize celebrations. Everyone builds a gazebo according to their own taste and financial capabilities.
Selecting the type of coverage depending on the purpose of the gazebo
You can start laying the floor in the gazebo at the dacha immediately after completing the external work on the construction of the structure. There are a lot of materials from which you can make a coating, and each has both advantages and disadvantages.
In order to choose the most correct one, you should pay attention to the purpose of the gazebo. For example, if it is of an open type (in other words, without heat retention and without sealed walls), then the choice will be tiles or concrete - they are easier to sweep, and they are not required to retain heat.
If the gazebo is more like a summer house with dense walls, then the use of wooden boards is recommended.
The boards must be waterproofed - this will not only protect the wood from rotting, but will also make it possible to enter the gazebo in the winter.
The design of the floor depends, among other things, on the shape of the gazebo - which is why it is recommended to pay attention to the drawing before starting construction work. The more accurately you indicate the dimensions and the more accurately you follow them during construction, the fewer inaccuracies there will be.
Wrap the base
It is needed to evenly distribute the load and fasten all the pillars into a monolithic structure.
twoidvor.com
As a rule, a 100 × 100 mm beam is used, which is installed on the pillars through a waterproofing layer. For example, pieces of roofing felt. At the junction points, the timber is sawed down halfway and connected with galvanized (yellow) screws or nails. If there are anchors, the wood is drilled and secured to them using nuts and washers.
For small gazebos, tying around the perimeter is sufficient. If the length of the building is more than 2 meters, one or more beams are additionally installed in the center.
Gazebo floor options
Having such an earthen pillow, you can begin to think about what kind of covering you should choose. Most often, the floor in gazebos at the dacha is made from the following materials:
- tree
- concrete
- stone
- paving slabs
Any raw material has its advantages and disadvantages, and now we will try to figure out which material is best suited for your future gazebo.
Pouring technology
After we have figured out the basic principle of how a concrete screed should be installed on a wooden floor, we can begin pouring. Apply an arbitrary zero level to the walls around the perimeter.
This is easy to do using any building level. It will be more convenient if the zero level is marked within 0.4 - 0.7 m from the floor. From the line we put the same distance down along the entire perimeter and make marks. This will be the height of the screed.
Marking the zero level
When choosing the height of the concrete screed, consider the following parameters:
Thickness of finishing material
This is especially important if you plan to screed under tiles on a wooden floor. In this case, it is worth considering the thickness of the tile itself and the adhesive layer.
A lot of concrete. As a result of screeding with concrete, a heavy structure will be obtained, so it must be taken into account that a 10 mm layer of concrete will give an average weight load of 110 kg/m2
Not every wooden flooring can withstand such a load.
Isolation measures
Any possibility of contact between wood and concrete must be eliminated. To do this, before filling, damper tape is glued around the entire perimeter. The width of the strip should be a couple of centimeters greater than the thickness of the screed.
Damper tape
- After completing the filling and installation of the finishing decorative layer, the protruding excess tape is cut off.
- The resulting technological gap is covered with a plinth.
- After the floor is prepared and the level is set, we lay the film.
If possible, the film should be laid without joining seams
Do not skimp on material for going onto the walls - then you will carefully cut everything off. If joining seams cannot be avoided, their width should be at least 10 cm. The seams must be glued together as firmly as possible. It is very important to lay the film evenly, without folds.
Gaps, punctures, and holes are also unacceptable. All subsequent measures are carried out with the utmost care so as not to damage the integrity of the film. If the film is still torn, apply a patch in the same way as gluing the seams.
There should be no flaws on the film
Reinforcement
At this stage, it is better not to use metal reinforcing mesh.
There are several very good reasons for this:
- Metal reinforcement will most likely tear the polyethylene, which should absolutely not be allowed.
- Steel is a very heavy material, and will further increase the weight load on the wood flooring.
- The middle layer of concrete must be strengthened, which means that ideally pouring should be done in 3 stages: pouring-reinforcement-pouring. This procedure will take exactly 56 days, taking into account the complete drying of all layers.
Taking into account the negative factors, we replace the metal mesh with fiberglass; in the photo below you can see what the process of fiber reinforcement looks like.
Filling fiber fiber into the solution
The fiber should be mixed into the solution before pouring. An arbitrary arrangement of polymer particles will ensure reliable connection in any direction, reduce weight and reduce the time required for work. Fiber characteristics vary depending on the thickness of the thread.
Fiber fiber classification
Pouring the solution
Screed on beams is performed in the same way as any rough screed.
Basic Rules:
- each room is poured separately,
- the layer is poured in 1 stage,
- work is carried out starting from the far corner of the room towards the exit,
- if the area is large, the surface is divided by guides or formwork.
Pouring is done separately in each room
The coating is leveled according to pre-installed beacons.
- Beacon profiles are attached to cement mortar.
- It is unacceptable to use gypsum compounds to install beacons.
- 24 hours later, after the main stages of work have been completed, the beacon profiles should be removed and the unevenness should be repaired. The video in this article will help you become more familiar with the pouring technology.
- Do not allow the coating to dry out quickly; regularly moisten the surface with water. This will help prevent cracks from forming.
- It is best if the screed gains strength while under the plastic film.
Among other things, it is necessary to ensure the stability of the indoor climate: constant temperature and humidity levels.
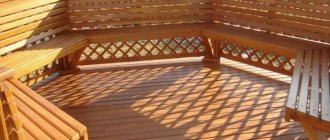
Wooden gazebo floor
This option is considered the most popular in the country due to its relative cheapness and ease of work - even a novice builder can lay such a floor.
At the same time, you should understand that the floor in a wooden gazebo cannot be called durable - you will have to work hard to make it last you a long time. First, let's look at which board to use:
- deck board is the most frequently chosen option. The board is not subject to severe rotting and can withstand both high and low temperatures. She is also not afraid of various mechanical damage;
- decking is also an acceptable option, however, before installation you will have to prepare the wooden joist structure in advance;
- garden parquet - used if the gazebo is designed exclusively for seasonal use. Easy to install - no soil base required.
If you decide to learn how to make a wooden floor in a gazebo with your own hands, then you need to figure out how to properly lay the floorboard.
Required materials and tools: Timber
Antiseptic Hacksaw Nails
Edged board
Bolts and nuts
Roulette
Level
Hammer
Floor board
- First, lay the logs and wooden beams - before that, do not forget to complete the top trim. After laying the timber, you need to secure it. To do this, you will need bolts; you can also use mounting angles.
- As soon as you secure the logs, start laying the boards. Try to choose not too thick boards (maximum thickness -15-20 mm).
When laying boards, take care of small gaps between them - this will ensure air circulation and therefore prevent rotting. However, there is no need to make the gap large, otherwise the board will bend.
- As soon as you finish laying, proceed to processing the boards. They should be treated with an antiseptic, and it is advisable to repeat this procedure at least twice a year. You can coat the boards with paint or varnish if desired.
Variety of wood materials
A wooden floor remains the best option - it is easy to install, can be easily installed on almost all types of foundations, and, unlike gravel or sand, it looks neat and tasteful. In addition, the raw materials are environmentally friendly and without health risks.
Wood is considered a noble material that looks expensive, but requires careful and regular care. In any case, coating with varnish or special substances is required to prevent the appearance and spread of mold and fungi.
Wooden flooring is a good combination of economy and quality
This is useful: how to paint a wooden floor.
Edged board
If you need an economical option for wood, then edged boards are great. She is practical and presentable. Use a board with a thickness of 4 cm.
Spil
This variety is an original solution, has a distinctive appearance and is easy to install. Wood cuts are laid on the surface, filled with mortar and coated with protective varnish.
However, there are a number of nuances here: the tree must be dry and even, installing stumps is a labor-intensive step, and several layers of a protective substance must be applied to the boards.
Garden boards (GDP)
Here are several main types of boards:
- Deck. Moisture-resistant, withstand temperature changes and resistant to mechanical pressure. Considered to be the optimal solution.
- Terraced. They consist of a mixture of plastic and wood, which is why they last a long time, are moisture resistant and withstand negative mechanical stress and temperature. They are easy to install and maintain, but their price is higher. Before installation, it is recommended to assemble the frame and apply a primer.
Create a cozy atmosphere in your area
- Garden parquet. These are tiles that are optimal for summer houses. The advantage of this variety is that no preliminary preparatory work is required, only a flat surface is needed.
Installation rules
- Mark the level of the floor covering - stretch a rope between the supports and level using a level.
- Make recesses in the supports with the diameter of the beam. You can use a saw. When working, be careful, wear construction gloves and, if possible, safety glasses to protect your eyes from small chips.
- Drive the beams into the recesses. It is necessary to use only dry raw materials, since wet timber may warp and crack when drying.
- Form a lag structure. To do this, secure another one perpendicular to the mounted beam using a screwdriver, self-tapping screws and metal corners. Make the distance between the lags 50–60 cm so that there are no deflections, and install the first and last parts at a distance of 20–30 cm from the wall.
- Adjust to the required parameters and process the boards intended for the floor.
- Lay the boards on the joists. If necessary, make cuts near the supports. To ensure that there are no cracks and the joint is tight, beat them with a hammer through a punch made from scraps.
- Secure the floorboards to the frame with nails or screws.
- Apply wood protectants. You can take wood varnish and apply it with brushes.
Video “Installing a wooden floor with your own hands”
The video shows the basic processes for installing a wood floor:
Concrete floor in the gazebo
The concrete option is, without a doubt, the most reliable and durable of all presented. It goes well with the design ideas regarding the architecture of the gazebo, and working with it is very simple. In fact, laying the floor in this case is a regular concrete pour, which can be completed literally in a day (however, you will have to wait 2-3 days until it dries).
In order to pour a concrete floor in a gazebo, you need to follow several steps.
- Initially, you will need to lay the reinforcing bars at a height of approximately 3.5 cm above ground level (this action will ensure the stability of your future gazebo).
- Next you mix the concrete mixture. The ideal option would be a substance made of crushed stone, sand and cement (5:3:1) and pour the prepared surface, initially cleared of sand, grass and dirt. Now all that's left to do is wait.
To ensure that the concrete mixture dries evenly, cover it with a rag while it dries.
- The last step could be to cover the concrete floor with paving slabs (an optional step, however, many do just that for aesthetic reasons).
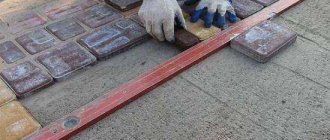
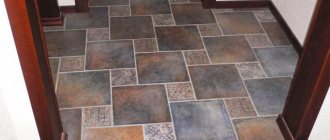
Masonry methods
Paving stones can be laid in different ways, creating an original floor covering. The most common are square and rectangular products. You can lay them in this way:
1291bea05e50e2b615c743ed7389b2eb.jpe- Using products of different colors to create interesting patterns or ornaments.
- Use two colors of products, laying them in a checkerboard pattern.
- Lay the material diagonally at right angles, making a herringbone pattern.
- Carry out transverse and longitudinal laying at the same time, creating a braid.
- Move the tiles evenly to the side (similar to the principle of laying bricks).
- Place products in one line.
Stone covering
If you like to see natural materials around you and are not afraid to work a little, stone coating will be your best option. Stone is the most budget-friendly, and in addition, if installed correctly, will ensure the durability of the gazebo floor.
To lay a stone floor in a gazebo, you will need to prepare a base of sand cushion. After this, fill the resulting base with the same concrete mixture of crushed stone, sand and cement (5:3:1). Wait for polymerization, then proceed to laying the stone.
It is advisable to choose stones with a slightly rough structure - first of all, this will be important when further walking on the floor - it will eliminate the likelihood of injury.
You need to understand that laying stone is not a task for a beginner, so think carefully before taking on this task - perhaps a tile floor will be an easier job for you.
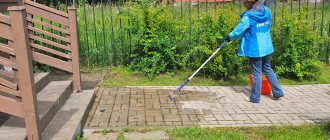
Surface pre-treatment
To ensure that the impregnation does not lose its properties, it is recommended to treat the wood material in advance in a special way. The work is carried out in two stages:
- Grinding. You will need a sanding machine (quickly) or you will have to spend a long time fiddling with sandpaper of different grits. The surface is leveled in the same way as before traditional priming or painting.
- Cleaning. Using a vacuum cleaner, all debris, chips and dust are removed from the sanded surface. The wood can even be washed afterwards.
The same procedure is resorted to if the appearance of a wooden building has clearly faded over the years. Alas, untreated wood loses its beauty over time, darkening and seeming to get dirty. In this case, the external unpleasant plaque is removed in the same way - by grinding.
It is advisable to apply a primer to the cleaned surface. Next, when the primer dries, the wood is coated with a couple of layers of antiseptic, applying it with a spray bottle or brush.
When the surface is ready, you can begin impregnation.
You can process the gazebo with this material
The floor in the gazebo is made of paving slabs
Tile is a material that people like to use because it is easy to handle. Often used for seasonal gazebos because the tiles prevent the growth of weeds. To make a gazebo floor from paving slabs, you will need to prepare an earthen pad.
To do this, you will need to make a recess of approximately 10-20 cm around the perimeter of the structure. The site is covered with sand and crushed stone (gravel and broken brick can be used), after which it is thoroughly compacted.
The pillow should be filled with a concrete mixture of crushed stone, sand and cement (5:3:1) and wait a few days (optimally - your support will dry in about 2-3 days).
Once the mortar has dried, you will need to wet the floor where you are laying it and tile it (preferably using a rubber mallet or something similar).
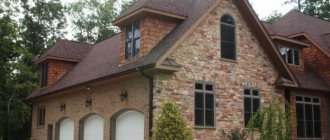
Types of structures
A metal gazebo, made of plastic and universal material, can have the following shape in plan:
- square;
- rectangle;
- polygon;
- circle.
The roof structure is a spatial system in the form of:
- arches;
- one, two or four slopes;
- tent;
- domes;
- cone;
- cascade of arches or waves.
Interesting are spherical gazebos, where the walls and roof are made as a single round structure.
The metal frame can be installed in two different ways:
- The vertical pipes of the frame are concreted into the ground. The rest of the structure is then attached to these racks. With this method, the presence of a foundation is not provided. In principle, having made the lower frame at some distance from the ground, you can lay the floor, but most often with this method of making an iron gazebo, the platform is concreted or paving slabs are laid out.
- First, a shallow columnar or strip foundation is made, sometimes a monolithic slab is poured, the area is laid out with tiles, etc. The frame is constructed separately and secured after at least the lower frame and racks are ready. If the foundation is columnar or strip, the pipe is placed on it and connected in place: only a crane can lift the finished structure.
This is a gazebo made of a profile pipe on posts
Which way is better? It depends from which side you look. If from the point of view of fastening reliability, the first one is better: the racks are walled up. This option is also more economical: there is no bottom trim and no costs for making a foundation. But such a structure, if it is without a floor, is only a summer gazebo. For winter, closed, you will need a floor.
A gazebo on a foundation is better from the point of view that it initially assumes the presence of a floor. In addition, the elevation, even if it is small, protects against splashes and dirt getting inside.
Assembly methods
Traditionally, metal is joined by welding. It's fast and reliable. But in the case of a country summer gazebo, a collapsible structure may be needed. After all, it is very unsafe to leave a large amount of iron in an unguarded dacha for the winter. In the sense that it could easily be stolen. In this case, the modules are welded, which are then connected to each other with bolts. As a rule, such collapsible metal gazebos consist of a frame to which an awning is attached, or other similar quickly mounted or dismantled fencing and the same lightweight roof.
For a prefabricated metal gazebo, frames for each side are welded separately, then assembled with bolts
The frame in collapsible gazebos is divided along its edges. If it is quadrangular, four separate circuits are welded with all the necessary jumpers. In hexagons there are six of them, etc.
Foundation
Before you start laying the floor in the gazebo with your own hands, you need to take care of the foundation. On the selected plot of land, you need to level the area and clear it of unnecessary debris. You should dig the required number of holes (according to the number of sides of your future gazebo) with a depth of at least 50 cm and insert support pillars into them.
The pillars should be secured with transverse strips, after which they can be filled with concrete mixture. The resulting square (or another shape, depending on the contours of the future gazebo) is covered with crushed stone and sand.
Foundation for a gazebo
Platform for a gazebo: what you need to consider when preparing
Before understanding the technological intricacies of arranging a site with your own hands, you need to decide on the choice of gazebo design, its purpose and internal design.
It is clear that if a pergola is built with a slatted roof that does not protect the structure from rain, then laying a wooden floor makes no sense.
So:
- In such a situation, it is better if the area for the gazebo is concreted and then lined with porcelain stoneware or laid with paving slabs, stone paving stones, or clinker bricks.
An area lined with a terrace board
. You can also line the area with garden parquet or make a terrace flooring from decking - a moisture-resistant polymer-composite board. The last option is good for any type of gazebo: light, solid, glazed (see Glazed gazebos: types and methods of construction), Finnish (see Finnish gazebos with barbecues for the dacha). Therefore, we will definitely pay attention to it throughout the article.
Monolithic base
Of course, preparing a site for a gazebo depends not only on what kind of roof there will be above it. It matters what the gazebo itself will be like. If this is an option assembled from factory parts, a site must be prepared for it in advance. In this case, the structure is not attached to the base in any way and can be dismantled and moved to another location at any time.
Platform for a prefabricated gazebo, tiled
So:
- The floor of such gazebos is the covering of the site. They are light in weight and do not require such thorough preparation as permanent structures. In the simplest version, the site is simply concreted, and it is done like this. First, the area allocated for the building is cleared of vegetation and the contour is marked.
- The size of the concrete area can correspond to the area of the future gazebo or be larger - it’s up to you to decide. According to the markings made, soil is excavated to a depth of 15-20 cm. Thus, the fertile layer of soil is removed. Instead, before pouring the area under the gazebo, a drainage layer should be poured: 5 cm of compacted sand and 8-10 cm of crushed stone.
Construction of a slab foundation
- Next, formwork made of boards or curb stones is installed around the perimeter of the excavation, and a concrete screed is poured. By and large, such a pour is a mini-foundation such as a monolithic concrete slab. Why "mini"? Yes, because the concrete thickness is a maximum of 5-6 mm and there is no internal reinforcement. This is quite enough to install a lightweight collapsible gazebo.
- As the dimensions and weight of the structure under construction increase, the power of the foundation increases proportionally. This means that the depth of the excavation, the thickness of the drainage layers and, of course, the concrete screed (12-15 cm) doubles. In this case, the thickness of the concrete is reinforced with a mesh connected from reinforcement bars 6-8 mm thick.
Brick gazebo on a concrete platform
- The concrete slab can be buried completely or halfway, or even brought to the surface of the ground, which is what we see in the photo above. This depends on the absorbency of the soil. If it is sandy or peaty, the water will quickly drain away after rain, but if the gazebo is built on clay soil and is not raised higher, its floor will always be flooded with water.
- There are types of soils where a monolithic slab foundation is generally the only possible option - for example, if the soil is weak or heaving. In other situations, it makes no sense to do this, since the price of such a design is quite high. It is better to give preference to a strip or point foundation.
Platform lined with porcelain stoneware
In this case, as a floor - if you want to cover it with porcelain stoneware or natural stone, pour a simple concrete screed along the inner perimeter of the gazebo, which was mentioned above. But there is also an arcuate way of facing a site in which concrete work may not be carried out. These are paving slabs or paving stones, and we will talk about them later.
Covering the site with paving stones
Paving stones can be laid on either a concrete or compacted gravel base. We have already talked about how to make a concrete screed.
The only thing is that in order to improve the drainage properties of the underlying layer, it is advisable to lay geotextiles under the sand cushion. After waiting the allotted time for the concrete to gain strength, which is 28 days, you can lay paving slabs, clinker or stone paving stones.
- Laying is not carried out along the screed - you first need to pour a thin layer of sand (2-3 mm) or a dry factory mixture specially designed for this on it. It compensates for the linear expansion of concrete and protects the integrity of the coating during seasonal soil shrinkage.
- There should be gaps of about 6-8 mm between the bricks or tiles, which are filled with dry sand-cement mixture. After laying is completed, the tiles are spilled with water, which, falling on the mixture, promotes its hardening.
Paving stones as a gazebo floor
Important! The golden rule, which states that the strength of the base should always be higher than the strength of the coating, also applies in this case. Therefore, laying paving stones on a concrete base only makes sense if the site has weak soil: sand, sandy loam, loess. If the soil is rocky, then it can easily support even a small building without a foundation, and not like a paving stone flooring.
- Why incur extra costs for installing a concrete screed if the soil on the site is dry and has normal density? After removing the plant layer, it is simply compacted thoroughly and, having laid geotextiles, a gravel cushion 10-15 cm thick is made, and then the same layer of coarse sand is poured and compacted.
Laying clinker paving stones on a sand bed
- Please note that now the order of the drainage layers has changed. In this case, the tiles or paving stones are laid on a sandy, well-compacted cushion. When making the underlying layers, it is advisable to make a slight slope so that any water that gets onto the paved area can drain quickly.
This is especially important if there is a concrete screed under the paving stones, and water can stagnate on it. In this case, the concrete is destroyed, the sand is washed out from the tile joints, and, as a result, after some time the coating begins to shake. If you are building a gazebo on a regular site, without a podium, then it is also advisable to organize high-quality drainage.
Flock flooring
The technology that makes it possible to create a flock floor appeared in the USA only 20 years ago, but during this time it has become popular throughout the world. Special polymer particles are sprayed onto the epoxy base. Then all this is filled with transparent varnish and hardens. The result of installation is a voluminous, textured and environmentally friendly floor for various types of premises.
The main disadvantage of flock flooring is the difficulty of creating such a floor. For installation, you will have to purchase a special tool that sprays the mixture, or use the services of a specialist. In addition, this floor does not allow air to pass through, and after hardening it is quite difficult to dismantle.
Do-it-yourself features
Wooden floor on joists and lathing
To make an inexpensive covering yourself, it is recommended to follow these steps:
- Install a foundation of wooden blocks. They are dug into the corners of the gazebo, and a cord is pulled along the level between them.
- Posts are marked to secure the floor.
- To tightly connect the strapping, a rounded part of the stumps is cut off with a chainsaw.
- Two planed boards are nailed to the posts.
- 2 more boards are attached to the corners.
- Intermediate logs are installed inside the harness using corners. This is necessary so that the casing does not sag.
- The floor pieces are cut to size. The boards are laid on the joists and screwed with long self-tapping screws.
Finally, treatment is carried out with an antiseptic and varnish in several layers.