When repairing floors, many questions always arise. This is not surprising if you have such nuances, because the floor is a part of the house that is used almost around the clock. There are many options for making this part of the home comfortable, but you need to dwell in detail on how to build a plywood floor along the joists.
The process of laying a plywood floor at the stage of fastening to the joists.
This type of coating is perfect if you need to do insulation, but it is impossible to fill a cement-sand screed, and even if there are large uneven areas.
What are lags
The bars that form the sheathing when installed are called lags.
With their help, the surface in the room is leveled, and they also serve as a basis for attaching sheets. They can be made of metal or concrete, but the use of plywood requires the use of wooden blocks. The construction of the floor will not be practical enough without lathing, since it gives the necessary rigidity to the sheets. Of course, there is a way to lay plywood without lathing, but this type of fastening can only be used if the room has a flat base. Without this, leveling the floor with plywood without joists will not be done well.
Laying joists on the street. First, they build a frame and connect the sections together.
For logs, timber with a cross section of 50×100 mm is usually used. The rectangular shape is necessary so that the sheets can be joined on the wide side. In other words, if you don't have a support pad, attaching the sheet will be difficult.
Also, before the logs are installed, they must be treated with antifungal and fireproofing agents.
Conclusion
There are several ways to install a plywood floor. The choice of technology depends on the type and quality of the base, as well as the purpose of the flooring (rough or finishing). But, in any case, you should strictly adhere to the above instructions so that the floor turns out smooth and durable.
The video in this article contains additional useful information on this topic. If you have any questions while reading the material, you can leave them in the comments, and we will be happy to answer them.
Some information about plywood
Plywood is included in the list of the most durable, best-suited building materials for eliminating unevenness in rough foundations. She is preferred for her harmlessness. Plywood does not contain very harmful volatile carcinogens, which cannot be said about chipboard (for more details: “Chipboard or plywood for the floor - pros and cons of materials”).
Versatility and durability make this material an excellent solution for the following work:
- elimination of unevenness of the old floor laid on logs;
- use as a base for dry screed;
- creating a clean floor covering;
- use as thermal insulation for rough foundations.
This relatively lightweight and wear-resistant material does not place excessive load on the floors, which makes it possible to lay it on an old floor with joists. Very often, plywood is used in multi-story buildings, where there are weak floors between apartments (read: “How to make a plywood floor in an apartment”).
The advantages of such flooring
Despite the fact that plywood floors are not considered the cheapest flooring method, when choosing the best option, it is recommended to give preference to them. Although such sheets cost an order of magnitude higher than chipboard, if we consider the environmental friendliness of the material, it is clearly the leader. To learn about which plywood is better to choose, watch this video:
Pressed sawdust is glued together using volatile carcinogenic adhesives that are extremely toxic to humans, so their use in residential areas is not advisable. In addition, such flooring has a number of positive characteristics that influence its choice:
- Thermal and sound insulation increases.
- The coating allows you to evenly distribute the load over almost the entire floor surface.
- If desired, you can organize free space under the sheets, in which all communications can be freely placed.
- High-quality leveling of the base before laying the finishing coating.
- Good performance.
- A simple method for replacing damaged areas.
- You are allowed to do all the work yourself.
Once the plywood floor is completely laid, you can begin laying the flooring. As mentioned earlier, almost anyone can perform all the steps on their own, and the result will not keep you waiting. The coating under laminate, linoleum or parquet will be durable and even.
Structure and types of plywood
Plywood is always a multi-layer material made from natural wood veneer. During its production, the veneer layers are positioned perpendicular to each other and glued together under pressure. Usually an odd number of layers is used, at least three. Therefore, this material is often called three-layer, five-layer or multi-layer plywood.
Plywood can be classified according to different characteristics. For example, according to the species taken for making wood, there is a difference between coniferous and hardwood plywood for the floor in a wooden house. For outer layers of plywood, veneer is obtained from:
- ate;
- pine trees;
- larches;
- fir;
- cedar pine.
The inner layers are often made from hardwood. There is also pure birch plywood, which costs slightly more than coniferous plywood, so it is less often used in construction for leveling floors.
Plywood can be classified according to its resistance to moisture, which makes it resistant to different impregnations to varying degrees:
FC is a material in which veneer is glued together with urea glue. This plywood has low moisture resistance, so it is only suitable for the production of furniture or interior decoration. FC is available in the following thicknesses: from 3 to 10 mm, then 12, 15, 18 and 21 mm. It is usually produced in square sheets with a side of 1525 mm, the density of which is 640-700 kg/m3, and the humidity is up to 10%.- FSF - here the veneer is glued together with phenolic resins, which give the material moisture resistance. In addition, it is mechanically strong and wear-resistant, so it is a common solution to the question of which plywood is best for the floor. FSF can be used not only for interior decoration, but also for exterior decoration, for example, along joists when laying a roof. This plywood has a lot of thickness options, ranging from 6 mm to 40 mm. Its sheets can be the same size as the already described squares or rectangles 1220 (1250) x 2440 (2500) mm, with a nominal humidity of the same 10% and the same density.
- BS, FB, FBS plywood options are glued with varnish or bakelite glue. This is the most durable and moisture-resistant plywood, capable of working even in extreme conditions, which is why it is used in shipbuilding and aircraft manufacturing. The thickness of these brands of plywood is in the range of 5-18 mm. Its sheets are produced very large - 1550 x 5300 (5600) mm, with a nominal humidity of 10%, but with a higher density - 1200 kg/m3.
- BV is a material impregnated with water-based bakelite glue. It has technical characteristics similar to the previous ones, but it does not have the same moisture resistance - water spilled under the laminate on a wooden floor dissolves the glue, and the plywood loses its properties.
- FOF is plywood, the surface of which is laminated with a film, and the veneer is impregnated with synthetic resin. How thick should FOF plywood be - from 3 mm to 40 mm, and the size of its sheets is approximately the same - 1220 (1250) x 2440 (2500) mm at normal density.
Peculiarities
To choose plywood for leveling the floor, you need to understand the features and classification of the material on the market. Plywood varies in grade, thickness, moisture resistance and material of manufacture.
There are 4 types of plywood that can be distinguished visually:
- The fourth grade has defects on the surface, rough, there are holes from knots, since the lowest quality raw materials are used for production.
- The third grade is of better quality than the previous one and there is less defect on the surface.
- The second grade has minor cracks and is smooth.
- The highest quality and most expensive first grade is well polished, all sides are without defects.
When choosing a variety, they are guided by price and quality. For the construction of a subfloor, plywood of the second and third grades is suitable. According to the processing method, they are distinguished:
- Unsanded plywood.
- Sanded (one or both sides).
Plywood is made from deciduous and coniferous wood (usually pine and birch). Wood veneer is bonded together using natural and synthetic resins. The top layer can be treated with a varnished water-repellent composition.
Based on resistance to moisture in residential premises, the following brands are distinguished:
- FBA.
- FSF.
- FC.
In bedrooms and other living rooms with low humidity, FK and FBA brands are laid, made on the basis of urea and albumin casein glue. They are environmentally friendly and have average resistance to moisture.
The thickness of the canvas is determined by the number of layers of veneer. An odd number of them are laid perpendicular to the previous one, creating a durable building material. For laying the subfloor, use plywood with a thickness of 10 mm and above.
An analogue of plywood in the construction market is OSB - oriented strand board. Such materials have similar properties, but differ only in production. For plywood, the raw material is wood veneer, and for OSB, wood chips are processed with natural resins.
OSB is divided into different categories:
- The first one is suitable for minimal load and dryness.
- The second is produced for low-traffic residential premises.
- The third is characterized by high moisture resistance and strength.
- The fourth is used in the construction of walls.
- Varnished or laminated – covered with a protective layer of varnish or laminate.
- Tongue-and-groove - has a connecting groove at the joints.
The best solution for the subfloor would be OSB 3, tongue-and-groove and easy to install. Such sheets are produced with a thickness from 0.5 cm to 4 cm.
Pros and cons of laying plywood on the floor
Advantages and which plywood is better for the floor:
- Plywood is a very environmentally friendly material made from natural raw materials, which cannot be said about fiberboard and OSB, which are industrial waste.
- Plywood moisture content does not exceed 12-15%.
- Due to its strength, plywood perfectly absorbs impacts. In the event of a strong impact, the screed will remain undamaged, and the plywood will only receive microcracks. This will not make the floor any worse.
- Plywood has excellent contact with various floor coverings, as it is made of wood.
- A floor made of plywood will meet the required quality characteristics, while it does not require a lot of time and resources to manufacture, and you do not need to have special skills. It can be done step by step.
- In addition, plywood serves as a kind of insulation, protecting the room from the cold given off by the concrete base.
- Plywood is an ideal solution when leveling floors with large differences, since the screed in this case will be more expensive, and the base will significantly increase in weight.
- Many varieties of this material allow it to be used as a rough and finished floor.
The negative qualities of plywood include the impossibility of its use in rooms with strong temperature changes (cottages or houses with temporary residence) and excessive humidity (baths, saunas, baths and swimming pools).
Laying plywood sheets on floors
Plywood base on screed.
When all preparatory measures have been completed, you can begin laying the material on the base. The list of materials and tools that will be required for the work depends entirely on the type of foundation.
If we talk about laying the floor on concrete, then this can be done in two ways: on a screed and on logs. The first method is used when the base is sufficiently flat and smooth, and plastic materials (cork, linoleum, etc.) will be used as the finishing coating.
To lay plywood on a screed you will need the following materials and tools:
- hand-held circular saw; hammer drill; screwdriver with cross-slot insert; paint brush; spatula for glue; plywood sheets; bitumen varnish; parquet mastic or bustilate; kerosene; self-tapping screws in dowels 5x60 mm.
Before laying the floor, the base must be thoroughly swept and vacuumed. Then it is covered with a layer of bitumen varnish, which must first be diluted with kerosene in a ratio of 1:5. Processing must be carried out with the windows open and the power supply in the panel turned off.
Floor plan for the subfloor.
Plywood with a thickness of 8 to 18 mm is cut into strips or squares using a saw and spacers are laid. There should be no seams coming together. There should be a gap of at least 2-3 cm around the perimeter of the room between the subfloor and the walls.
If the floor is laid under a finishing covering made of linoleum or cork, the plywood must be glued to the base with bustilate or parquet mastic. There is no need to leave mounting gaps. When laying oak or other parquet on plywood, the subfloor must be secured with self-tapping screws, and installation gaps of 2 to 3 mm must be left.
Each sheet of material is fastened with self-tapping screws as follows:
The plywood is drilled using a drill using the “square” method - holes in the corners, in the center and in the middle of the diagonals.
The central holes should be offset by ¼ of the width of the sheet. The sheet is removed and holes are drilled in the base according to the marks obtained. Dowels are hammered into the holes. Glue is applied to the base with a spatula, plywood is laid and screwed with self-tapping screws. The heads of the screws must be recessed into the plywood.
What kind of plywood is used for floor joists?
Multi-layer veneer boards come in many variations, allowing you to choose the optimal solution for a particular situation.
Variety
There are 5 categories of plywood quality. Elite is not used when installing flooring, so one of the following options is selected for work:
- I grade. Has minimal damage and defects that do not affect the appearance of the coating. Suitable for installation on joists and forming a finishing surface in all areas of the house.
- II grade. The slabs can be used to create a decorative coating that requires additional processing. To do this, existing cracks are sealed with special putty or sawdust with PVA glue.
- III and IV grades. Sheets of lower quality are preferable for subfloors. It is recommended to lay the products exclusively on the sheathing, since broaching with self-tapping screws ensures leveling of possible curvatures of multi-layer panels.
It is taken into account that material of quality group 4 should be selected especially carefully: some manufacturers produce products suitable only for creating disposable containers for transportation.
It makes sense to use first grade plywood only when arranging the finishing layer of floors; for a rough base, grades 2, 3 or 4 are suitable, while the latter is not advisable to install on highly loaded structures
Advice! To save money, you can use slabs marked 2/4. The numbers mean that one side of the product is second grade, and the other is fourth.
View
The sheets are divided according to the type of glue used, which is responsible for acquiring certain properties by the material:
- FBA. Based on albumin-casein composition. This option is environmentally friendly and suitable for children's rooms and bedrooms. The slabs are characterized by low resistance to high humidity, so careful waterproofing of the floors is necessary, which is especially important for the first floor of an apartment building.
- FC. Urea solutions are used to glue such panels. The material has average moisture resistance, which makes it possible to lay plywood on joists in the living room, bedroom and hallway.
- FSF. It is made on the basis of phenol-formaldehyde resins. High humidity resistance parameters make the material an ideal solution for bathrooms, kitchens, attics and enclosed loggias.
- FOB. Lined FSF slabs with laminated coating are suitable for all types of premises.
FK plywood is considered the most environmentally friendly, while it is undesirable to use moisture-resistant FSF sheets in residential premises, since this material contains formaldehyde
The remaining varieties are special, they are expensive and are used only in special cases.
Dimensions and thickness of sheets
The thickness of the plywood for the floor is important because the load-bearing capacity of the slabs depends on it.
When laying, the logs are placed in increments that are tied to the width of the cotton insulation tape. For the frequently used basalt type, this distance is 600 mm. Taking into account the thickness of the log, the span is 650 mm. It is not enough to cover it with panels 22 mm thick; it needs to be installed in 2 layers. Standard sizes of plywood sheets in millimeters:
- 3050 x 1525:
- 2440 x 1220;
- 3000 x 1500;
- 1525 x 1525.
The thickness of the slabs depends on the veneer and the number of layers. Panels of 4 – 30 mm are produced as standard.
Plywood thickness for laminate and linoleum
Thin sheets do not level the base well and do not resist loads sufficiently. The thickness of the room does not affect the height of the room; the change is considered insignificant.
Other factors when choosing thickness :
- the possibility of additional insulation and sound insulation of the surface due to a thick plywood layer;
- the degree of rigidity of the resulting base.
Valera
The voice of the construction guru
Ask a Question
The thickness of plywood for linoleum is at least 18 mm; a two-layer coating of 10 mm panels with alternating seams and sealing joints is allowed. For the upper layer, an environmentally friendly variety is taken (FBA, FK, FKM). Sheets with a thickness of 10–16 mm are placed under the laminate; grade II or III is taken, since defects will not appear under a thick layer of decorative material.
How to calculate the required quantity
The size of the sheet is taken according to the log pitch and the length of the room so that there is less cutting. Take into account the possibility of climbing to the floor using stairs.
Calculation procedure:
- calculate the square footage of one sheet, multiply the width by the length;
- determine the area of the room by multiplying the length by the width;
- The square footage of the room is divided by the area of the panel to obtain the number of sheets of plywood.
A factor of 1.05 is used to take into account cutting to size along the length of the sheets and the formation of the last strip. If the result is a fractional value, it is rounded up to the nearest whole number.
Requirement for distance between joists
The main element when constructing a plywood floor is the frame. The logs are a wooden beam 2 m long with a cross section of 40x70 mm. When constructing the frame, you must make sure that the logs do not have serious defects, since this will directly affect the durability and reliability of the floor.
As for the distance between the logs, it is determined in accordance with the size of the plywood sheets, but a distance of 30–40 cm is considered optimal.
As practice has shown, plywood floors are highly durable and reliable. Although the installation of such a floor cannot be called a cheap option for a subfloor, it has a high degree of heat and sound insulation, allows the use of almost any type of finishing floor covering and is characterized by increased durability.
Plywood floors
The following types of plywood are most often used in construction:
- FC is a moisture-resistant plywood based on urea resin, which is non-volatile and non-toxic. It has strength and elasticity comparable to BS aircraft plywood.
- NS – unpolished with casein glue. Before gluing parquet or other hard flooring onto it, it requires sanding.
- Ш1 is the main material used for the subfloor. Sanded on one side. The adhesive base is also casein.
- Ш2 – polished on both sides, on casein. For lightly loaded parts in dry rooms with a comfortable temperature it can be used as a substitute for FC.
What do you need to know before installation?
To check the room for humidity, lay out a film
How to make a plywood floor in compliance with all technological requirements so that it lasts a long time and you don’t have to regret your decision to use such a material?
To do this, you need to perform several steps and only then proceed with installation. First of all, it is recommended to acclimatize the sheets to the place of application. To do this, the material must be brought into the room that is planned to be covered.
The material must be allowed to rest at room temperature.
The period after which work is allowed to begin depends on changes in temperature and humidity conditions. If the conditions are almost identical, installation can begin the next day. With a difference of 10 degrees or more, acclimatization will take more than a week. All this time, the sheets should be stacked in a horizontal position.
While the material is acclimatizing, you can check the floor surface for the presence of condensate vapor. To do this, a polyethylene film is spread over an area of 1 m2, the edges of which are pressed tightly to the floor. The central part should be raised by 5 - 10 cm. Then you need to observe and draw appropriate conclusions from what you see:
- The film fogged up within 1 day - it is not recommended to make plywood flooring for this room.
- Within 2–3 days, small drops appeared. The concrete base must be insulated and covered with waterproofing. It is recommended to disassemble wooden floors, dry them, treat them with antiseptics and eliminate the cause of high evaporation. Otherwise, they will rot in 5–6 years. Only after this can you begin laying plywood sheets.
- In 5 days no drops of condensation appeared - a plywood floor can be made using all known methods.
Characteristics
Do not use plywood flooring in wet rooms
Although a plywood floor is much better than one made from chipboard, the material has a number of requirements, the fulfillment of which will significantly extend the life of the flooring.
This is due to the fact that wood, used as a raw material for the manufacture of sheets, is a hygroscopic material, therefore it is necessary to take into account the humidity of the room for which it is planned to be used.
In rooms with high humidity, plywood will begin to delaminate.
It is not recommended to use such coating in rooms with a high percentage exceeding 67 units. Laying untreated sheets is allowed at air humidity of no more than 60%.
This coefficient is used for rooms located in the temperature range from 17 to 28⁰С. If the value exceeds the above, the material begins to deteriorate.
For example, a room with a constant temperature of 15 or 35⁰C with high humidity and plywood flooring. In this case, after a couple of months of use, the plywood will begin to delaminate. Based on this, use in kitchens, bathrooms or shower rooms is not recommended.
This situation does not apply to sheets marked FC. They are subject to deeper processing and are not so sensitive to air humidity.
The moisture-protective properties of sheets can be increased using special primers designed for these purposes. They are made on the basis of polyvinyl acetate, and look similar to PVA glue.
The cost of impregnation is low, but the effect is high, so it should not be neglected. The treatment is performed on each side, and this is done until stains appear on the opposite side. After which the sheet is turned over and the other side is soaked. This must be done at least 2 times.
Wood fungicide
After the plywood has completely dried, it is necessary to apply a layer of protective antiseptic primer - a fungicide for wood.
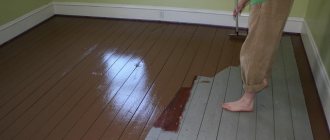
To increase the strength of the top layer, acrylic varnish is used, which is applied in 2 layers. If it is necessary to cover with stain, it must be painted before varnishing.
As an example of comparing the main characteristics with other types of materials used for subfloors, the following table is given.
Required tools and materials
To install plywood sheets on a wooden base, you may need the following tools:
- screwdriver;
- drill;
- hammer;
- screwdriver;
- level;
- electric jigsaw.
The materials used are self-tapping screws usually 30-50 mm long, nails or glue. The first ones are preferable to use, since they are the easiest to work with.
Self-tapping screws for wood
Laying plywood sheets on floors
Plywood base on screed.
When all preparatory measures have been completed, you can begin laying the material on the base. The list of materials and tools that will be required for the work depends entirely on the type of foundation.
If we talk about laying the floor on concrete, then this can be done in two ways: on a screed and on logs. The first method is used when the base is sufficiently flat and smooth, and plastic materials (cork, linoleum, etc.) will be used as the finishing coating.
To lay plywood on a screed you will need the following materials and tools:
- hand-held circular saw; hammer drill; screwdriver with cross-slot insert; paint brush; spatula for glue; plywood sheets; bitumen varnish; parquet mastic or bustilate; kerosene; self-tapping screws in dowels 5x60 mm.
Before laying the floor, the base must be thoroughly swept and vacuumed. Then it is covered with a layer of bitumen varnish, which must first be diluted with kerosene in a ratio of 1:5. Processing must be carried out with the windows open and the power supply in the panel turned off.
Floor plan for the subfloor.
Plywood with a thickness of 8 to 18 mm is cut into strips or squares using a saw and spacers are laid. There should be no seams coming together. There should be a gap of at least 2-3 cm around the perimeter of the room between the subfloor and the walls.
If the floor is laid under a finishing covering made of linoleum or cork, the plywood must be glued to the base with bustilate or parquet mastic. There is no need to leave mounting gaps. When laying oak or other parquet on plywood, the subfloor must be secured with self-tapping screws, and installation gaps of 2 to 3 mm must be left.
Each sheet of material is fastened with self-tapping screws as follows:
The plywood is drilled using a drill using the “square” method - holes in the corners, in the center and in the middle of the diagonals.
The central holes should be offset by ¼ of the width of the sheet. The sheet is removed and holes are drilled in the base according to the marks obtained. Dowels are hammered into the holes. Glue is applied to the base with a spatula, plywood is laid and screwed with self-tapping screws. The heads of the screws must be recessed into the plywood.
Material calculation
To correctly determine the quantity of products, you must follow the step-by-step instructions:
- The floor surface is measured and all data is transferred to paper. You should get a detailed diagram of the foundation with a lag laying system. This allows you to immediately calculate the order of placement and adjustment of all parts, which is especially important in rooms with ledges and niches.
- The appropriate sheet size is determined and a layout plan is drawn up.
- According to the data obtained, the required number of slabs is calculated.
When installing a floor using joists, first of all it is necessary to draw up an installation diagram for the joists, and then plan the laying of plywood based on it
If the room has the correct shape, it will be easier to calculate the consumption: for this, the size of the object and the dimensions of the sheet are converted into area, and the data in square meters is divided.
On a note! To make the task easier, you can use a table with the exact sheet area provided by the manufacturer.
Installation technology
Do-it-yourself laying of multilayer material along joists is carried out in a certain order.
Preparing the base
Work technology:
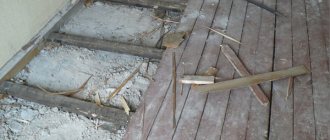
- The surface is cleaned of all excess. If there are remnants of the old coating, complete dismantling is carried out.
- Cracks and crevices are sealed with putty.
- Antiseptic treatment is carried out, the base is thoroughly dried.
- The surface is waterproofed. This can be done using a special covering material or thick polyethylene film. If the product sheets are joined, then the overlap distance is at least 10 cm. It is mandatory to lay the edges of the waterproofing on the walls.
Waterproofing is laid only on a dry base; if it is impossible to dry the base properly, then a vapor barrier membrane is used instead of polyethylene. A wooden beam is also prepared: it is impregnated with an antiseptic and fire retardant and dried well.
Creating a sheathing
The procedure for setting lags:
- The parts are cut to size. It is taken into account that wooden fragments must be located with a distance of at least 15 mm from the walls.
- The height is formed. To do this, the greatest curvature of the floor is determined.
- To speed up the work, a cord is pulled along both sides of the room. An alternative solution is to use a laser level.
- Laying begins from the edge with a gap of 10–15 cm from the wall. A substrate (pieces of plywood or boards) with a sufficient support area is placed under the exposed timber. The leveling parts are attached directly to the base. If the opportunity and skills are available, a special bolt system is used for the job.
At the amateur level, installing wooden joists on supports is easier and cheaper than installing a base on adjustable metal studs - The pitch is selected individually from 35 to 70 cm. It is recommended to adhere to the rule: there should be three logs per sheet with a width of 1525 mm and a thickness of 10–12 mm. The beam is attached to the substrate using screws, and jumpers are used for additional reinforcement.
- All parts are checked by level, a single plane should be obtained.
Step by step guide
At the initial stage of work, it is necessary to dismantle the old coating, if any. If laying a plywood floor on joists is carried out on a screed, then all cracks and potholes on it must be repaired. Then the entire perimeter of the surface to be sewn needs to be primed. After preparing the base, it is necessary to lay a waterproofing film. To do this, you need to spread it over the entire surface with a slight overlap on the walls.
The next step is to install the logs. Initially, the lags must be fastened around the perimeter of the room. To do this, a joist level is marked on the wall. If you have a laser level, then there is no need for marking. With this device, alignment can be carried out at the installation site. All our logs will be installed on substrates made of pieces of plywood or wooden blocks or boards. The substrates are installed along the line of placement of each log at a distance of 50 - 60 cm from each other. After installation at the level of one log, the substrate is fixed to the floor using dowels. You also need to remember that when installing substrates, under each of them you need to adjust a piece of old linoleum or roofing felt.
Preparing lags for further laying of plywood
It is important to note that the logs that are installed around the perimeter should not be in contact with the wall, that is, they are installed at a distance of 20 - 30 mm from each other. This placement is necessary for ventilation. After installing the logs around the perimeter, the remaining parts of the sheathing are installed. The distance between the floor joists under the plywood in our case is 70 cm. This distance was obtained by dividing the sheet in half. If sheets of other sizes are used, the distance between the logs will be different. For different cases it is 40 – 70 cm.
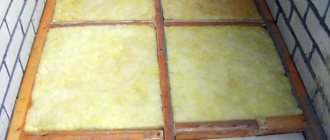
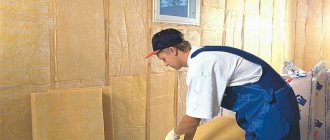
After installing the sheathing, insulation is laid between the joists. This can be polystyrene foam, mineral wool or expanded clay. As practice shows, the best option for the floor is mineral wool. It is not recommended to use polystyrene foam indoors due to harmful fumes, and expanded clay is less effective. Insulation mats should be cut 1 cm larger than the sheathing cells. When laying, such a mat will be tightly inserted between the sheathing bars.
After installing the insulation, the next step is to install a vapor barrier. It needs to be secured to the joists using a stapler.
Tools for work
To perform all the work efficiently, you will need a tool such as:
- Level;
- Roulette;
- Jigsaw;
- Miter saw;
- Hammer;
- Screwdriver.
As can be seen from the list, all work generally requires hand-held power tools.
Sizing adjustment
In most cases, when it comes to installing flooring, the problem that arises is the unevenness of the walls. This nuance does not allow installing parts of the coating exactly along the joists. To do this, you will need to trim each part along a line parallel to the wall.
We fasten the plywood sheet so that there is a small gap at the wall
Marking and cutting are not carried out in a complicated manner. The sheet is placed against the wall so that the second edge lies strictly perpendicular to the joist. You will also need a rail that is aligned parallel to the wall. A cutting line is drawn along it. In this way, trimming is done around the entire perimeter. When adjusting the dimensions, it should be taken into account that there must be a gap between the wall and the covering.
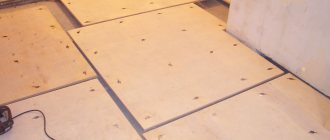
Installation of the first layer
If it was initially decided that the structure would be laid in two layers, upon completion of all work with insulation and sheathing, you can begin laying the first layer - this is a subfloor made of plywood on joists. In order to do the installation correctly, you must first lay out the cut parts along the entire row.
They are attached to the joists using self-tapping screws. There should be a gap of 3 - 4 mm between the sheets. This gap must be sealed with sealant. This technological gap is required for expansion. The installation of the first row is carried out in this sequence.
It is worth noting that moisture-resistant plywood for the floor must be used for the first layer. To drill holes you need to use a tool such as a comfirmat. This attachment fits onto the drill and makes a hole for the screw heads. The screw head, when screwed in, will be recessed into the slab.
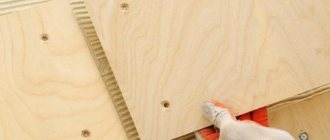
Second layer
When installing the second layer of flooring, all work is repeated, as when installing the rough one. An important point is that the sheets must be screwed together with mixed joints. For greater strength, the layers need to be glued together. This is done using construction glue. Installation of sheets must be carried out with the clean side. Thanks to this, upon completion of all work, a wooden covering is formed.
It is also possible to level the floor with plywood without joists. But this is provided that the surface where the installation will be carried out is level. The technology for working with sheets does not change.
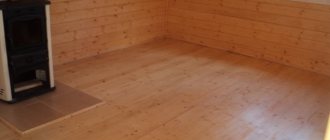
Surface grinding
After all installation work, grinding is carried out. This operation is necessary in order to remove all minimal irregularities from the floor surface. This is done mechanically using special grinding machines.
In order to carry out the work of installing plywood on the floor, you do not need to have extensive experience in construction. It is more important to know what kind of plywood to use when installing a floor on joists. The sequence of performing simple actions with the material is also important. If you follow all the requirements, you will get a coating that will last well for a very long time.
Did the article help you? ( 14 ratings, average: 4.00 out of 5)
Features of laying plywood under parquet and laminate
For laminate and parquet, you should know what kind of plywood to buy. The main task of laying laminate or parquet is to have a perfectly flat floor. Only moisture-resistant plywood should be used. There are several variations of installation under laminate and parquet:
- On the screed. The concrete must be dry, the surface smooth, clean, free of debris and unevenness.
- On the logs. Among the advantages we can highlight: the possibility of insulating the floor, hiding installation communications.
- On a wooden floor. One of the simple and effective styling methods.
Which is better: two thin layers or one thick one?
Plywood is a composite material. The layers in it are arranged crosswise with fibers to achieve sufficient rigidity and strength. Based on this, it becomes clear that in order to improve such characteristics, it does not matter at all how many layers are laid - two ten-millimeter layers instead of one twenty-millimeter layer or a greater number. And there won’t be a particularly big gain in price.
But when leveling very crooked floors, the number of layers plays a significant role here. When laying one layer, the unevenness will, of course, be smoothed out, but differences will remain at the joints of the plywood sheets. This is where a correctly laid second layer will help - the joints of the slabs of each of them will coincide with the center of the slabs of the other layer.
Conclusion: to insulate a flat base, you can install plywood floors along joists with your own hands in one layer with sheets twenty millimeters thick. When leveling a crooked base, two ten-millimeter layers with plywood slabs laid in a checkerboard pattern are better suited.
Protection, operation, storage
In order for plywood to serve for many years, you should know some of the nuances of working with it:
- The material should be acclimatized. 24 hours - with minimal temperature deviation in the store and the room for working with it. 4-6 days – with a difference of 9-12 °C, taking into account the humidity in the room. More than 7 days - with significant differences in temperature conditions, with defects in sheets, and high humidity.
- The damp atmosphere will destroy the material. Use in a damp area is prohibited.
- Laying is carried out only at 19-29 °C.
- Auxiliary processing of the material improves wear resistance and protection against fungi. The use of varnish improves strength, and the use of glue improves moisture resistance.
According to the above data, we can say with confidence that this is the best material for laying on the floor.
Working conditions
Before installation, it is recommended to keep the purchased material in the room for a certain time. We remind you that plywood is sensitive to temperature changes. This may take from 1 to 7 days, depending on the conditions under which it was previously stored.
If the plywood becomes deformed, it should be straightened by stacking the sheets.
Do not store material on a damp surface. The ideal condition for its flooring will be a temperature of +19 – +22 °C, which will ensure its long-term operation.
What can an error in calculations lead to?
What could be the consequences of incorrectly selecting the cross-section of the lags and calculating the distance between them? If the floors are laid on a concrete base, then the most important thing in this case will be the size of the step between the lags, which directly affects the behavior of the floor covering. If you attach a chipboard board to joists that are installed too sparsely, it can sag and even break. If ceramic tiles are placed on top, they will crack or fall out. The boards will simply “walk” and sag. Any of these options will require rework.
It will be much more serious to make a mistake at what distance the floor joists are placed, which at the same time serve as elements of interfloor ceilings. If in this case an insufficient number of such load-bearing elements is installed, the strength of the building structure itself will decrease, which is fraught with the most serious consequences - from irreversible deformations to complete destruction of the floors.
Do you have experience installing joists? Do you do calculations or just use tables? Write about it in the comments.
Chipboard or plywood?
Plywood is not the cheapest of flooring and wall covering materials. Chipboard is even cheaper. But let’s leave phenol-formaldehyde resins alone for now - volatile carcinogens, on the basis of which chipboard is made.
Let's do the following experiment: put two pieces of pipe on the floor and lay a sheet of plywood 12 mm thick on them. Let's stand on it and get off. What happened? Nothing. He bent over and straightened up. What about chipboard? Most likely, it cracked at greater thickness. And it will definitely crack if you jump on it.
You can do two more experiments: hold scraps of plywood and chipboard in water and see how quickly they swell and become limp. There is no need to hit the edge with a hammer: everyone knows that chipboard is fragile. Therefore, the question: “chipboard or plywood?” The decision is definitely in favor of plywood.
Stage 5. Format the sheets
Standard plywood sheets, as a rule, have dimensions of 125x125 cm. Here is an example of their installation:
However, many experienced craftsmen consider it necessary to cut them into four more parts to get squares with a side of 60 cm
These are not only more convenient to work with, but they end up with much more damping joints at the joints, and this is important for compensating for moisture and thermal deformations. And the sheets themselves will be much stronger, because they are now less susceptible to deformation
But after cutting the plywood, it is important to pay attention to the ends of the workpieces - there should be no delamination in them. If there are any, then just change them, the floor will turn out to be of poor quality
If you lay plywood in two layers, then divide the future thickness of the flooring by two:
Keep the plywood sheets for several days in the room where you will lay them. Just lay them on top of each other to avoid deformation; even better, place them on edge if the sheets themselves are not too thin. This is necessary to acclimatize the sheets, but if you make a plywood floor right away, without such preparation, then the laminate laid on top will go in “waves”: the sheets will simply pick up moisture from the air, like everything that is in such a room, and this will happen natural expansion. The plywood base will swell and the laminate will begin to lift in places, breaking the fragile locks. Needless to say, the finishing coating itself will not last long under such circumstances either.
And it is also important how different the humidity and temperature were in the warehouse. So, if the difference is small or the conditions are the same, it is enough to leave the plywood in the room overnight; if the difference is from 2 to 8 degrees, it’s about three days, and if it’s larger, it’s a whole week.
In what cases should it not be used?
Plywood should not be used in damp rooms
Despite the variety of impregnations, plywood is made from wood particles, so the moisture resistance of the material is manifested in a certain environment.
Conditions in which plywood cannot be installed:
- It is not recommended to use FBA, FC for finishing open loggias, balconies, kitchens or bathroom floors. The material does not emit substances harmful to health, but when exposed to water and exposed to it for a long time, it warps and swells.
- You cannot use plywood, even of a high degree of water resistance, for covering floors in bathhouses and saunas. There must be a healthy climate, and any type of wood-based products emit harmful substances under the influence of high temperature and steam.
Water resistance can be increased by painting and varnishing.
Successful examples and options
In this case, the flooring was made on an old wooden floor, maintaining horizontality, using sections of threaded rods covered with PVC corrugated tubes.
The floor is covered with plywood evenly, the seams between the sheets are treated with sealant and putty.
Installation on joists is made in solid sheets with a minimum of cuts, compensation gaps between the sheets are taken into account. Mineral wool is laid between the joists as insulation and sound insulation.
Preparations are being made for flooring along the joists, the concrete floor is leveled, and polyethylene film is laid for waterproofing.
The case when the recommended gap from the wall can be neglected is a narrow section of the floor covered with joists. For metal elements protruding along the edges, cuts were made with minimal loss of load-bearing capacity. Fastening with self-tapping screws. Mineral wool in the space between the joists.
Some styling tips
- Try to use thick sheets, in which case the distance between the beacons, when leveling, can be made slightly larger and naturally the base will be more reliable.
- If the height differences are no more than 20-30 mm, then you can do without lathing, then the height of the covering from the horizon increases by about 30 mm.
- When preparing the surface for linoleum flooring, it is advisable to use an industrial sander.
- The sheets should be fastened both along the edges and diagonally. The pitch length between the screws should be approximately 150 - 200 mm. In this case, make an indent from the edge of the sheet of about 20 mm.
- Self-tapping screws should be used 3 times larger than the thickness of the coating.
- The sheets should be fastened both along the edges and diagonally. The pitch length between the screws should be approximately 150 - 200 mm. In this case, make an indent from the edge of the sheet of about 20 mm.