Comfort in an apartment is important for any person. It allows you to relax after a busy day at work, forget about everyday worries for a while and simply have a pleasant leisure time. Creating a pleasing home environment begins with well-groomed walls. Wallpaper is still the most preferred cladding option. Many people know how to glue them. But only specialists know how to properly prepare a room for their application. In this article we will reveal all the secrets of the technological process of treating walls before decorating them with wallpaper.
Surface preparation process
Let's look at step-by-step instructions on how to prepare a wall for wallpaper.
How to plaster walls in an apartment under wallpaper: choosing a method and materials
There are several ways to level walls using plaster. The best results can be obtained by plastering walls along beacons. Careful preparation of the walls for plastering will be required, which means completely removing the old layer to the very base. After a detailed inspection, deep depressions must be sealed with a layer of plaster, making them as equal as possible to the main surface. The differences should not exceed 10 mm. The protrusions, on the contrary, need to be trimmed.
A laser level or a simple method involving the use of threads will help to detect defects. To do this, screws are screwed along the side edges at the top of the wall and plumb lines are lowered, and a horizontal thread sliding up and down is pulled between them. Stretching it along the wall, mark sections of the wall with recesses and protrusions.
After plastering the defects, before plastering the walls under the wallpaper, the surface is cleaned with a broom and coated with a primer, which will protect the wall from excessive absorption of moisture from the plaster mortar and prevent the appearance of mold and mildew. The type of primer is selected taking into account the material the main wall is made of. Sometimes a reinforcing mesh made of fiberglass or polyethylene is used for plastering, which is secured with a layer of mortar.
The best results can be obtained by plastering walls along beacons
Helpful advice! For plastering along beacons, special beacon profiles are used, which are installed from the corners with a range less than the length of the rule by 10 cm.
How to plaster a wall using beacons: the procedure for organizing work
Plastering on beacons is carried out using a certain technology. Before plastering the walls under the wallpaper, the beacons themselves are installed. You can get the correct level by using screws screwed into the wall up to the top along the profile installation line. The plumb line is hooked onto the top screw, and the rest are unscrewed until the caps are level with the plumb line thread.
All screws are installed flush along the profile installation lines, and a right angle is drawn between the plane of the screws and the surface of the adjacent wall. Then the profiles themselves are attached, and a little mortar is applied along the edges of the lines and evenly in the middle of the wall. The profile is applied in such a way that its base rests on the heads of the screws and goes slightly deeper into the composition. After the solution has dried, you can begin plastering.
If the final layer exceeds 10 mm from the initial level, the process of applying plaster will have to be divided into two stages. First, a solution about 5 mm thick is applied to the wall. After it has dried, the final plastering begins. A little more solution is applied and it is leveled using a rule that rests on the beacon profiles. The instrument is led from the bottom up, slightly swaying in different directions, without lifting it from the beacons.
For plastering on beacons, special beacon profiles are used
Lastly, the corners between the wall and the floor, as well as the wall and the ceiling, are drawn. This is done during the process of drying the solution, when it has already set, but is still wet. The work uses a special trowel to form internal corners. Only after the walls have completely dried are the beacons removed, and the remaining strips are rubbed with plaster mortar, focusing on the finished areas.
Stages
The step-by-step process includes:
- Removing boring finishes.
- Cleaning the surface from dust, debris and other contaminants.
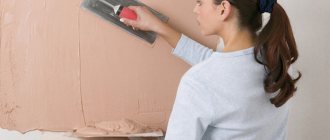
- Initial application of the primer layer. This stage involves treatment with a special compound to disinfect and prevent further absorption of moisture.
- Repairing defects. Elimination of visible defects is carried out with a mixture of gypsum, after which the surface is puttied.
- Alignment. To carry out this stage, you will need a special abrasive mesh material. You can level it with sandpaper.
- Final priming. The final stage of preparing the wall for wallpaper. Necessary to ensure good adhesion of the surface to the finishing material. In addition, re-priming will additionally treat the walls with an antiseptic.
Between the main stages of preparing walls for wallpaper with your own hands, there are intermediate ones, such as treating the surface with an antiseptic, wetting, collecting tools, preparing a solution, etc.
Important! The listed steps must be performed strictly in order; the sequence of work cannot be changed!
How to line the walls in an apartment with wallpaper: using drywall
Using plasterboard sheets (GKL) you can level almost any wall. This is due to a number of advantages of this universal material, among which are:
Using plasterboard sheets you can level almost any wall
- relative strength;
- ease of cutting and use;
- flexibility of the material, implying its effective use.
Depending on the type of material, the use of drywall will help not only to hide small unevenness on the wall, but also to build a full-fledged partition in the room. This kind of work can be done by anyone, even not the most experienced craftsman - just select the optimal option for installing gypsum boards and decide on the final shape. There are only three main ways to attach sheets:
- fixing drywall to the frame;
- fastening sheets directly to the wall;
- a combination of the two previous options. This method is used at the junctions of walls and ceilings, as well as at the junction of plasterboard walls and surfaces covered with plasterboard.
The frame method is the simplest and most affordable. To implement it, a special profile for drywall is used. This is done using a level, connecting the frame parts at bends. Next, cut the gypsum boards to the required size and attach them to the frame using screws. This method has a certain drawback, since the end result is that the cladding is relatively thick, concealing the usable area of the rooms by a couple of square meters.
Drywall is not puttied under the wallpaper, only the seams are sealed.
Before leveling the walls for wallpaper, it is necessary to carry out preparatory work, which involves cleaning them from the old coating to the base. It is advisable to prime the wall and be sure to treat it with an antiseptic.
Insulation and soundproofing of walls in an apartment under wallpaper
Drywall is used not only for leveling walls, but also for sound insulation, and also as insulation for walls under wallpaper. In this case, the option of gluing sheets to the wall is most often used. This method is also effective for partial repairs of walls or if it is necessary to construct window slopes and arches. This is possible thanks to the easy transformation of gypsum boards using a hammer drill.
Important! Plasterboard sheets are a universal material, since they can be used to easily and quickly level, insulate surfaces and soundproof walls. GKL are ideally suited for wallpaper, as they are easier to glue on a flat surface, and the canvases adhere perfectly to a gypsum base with cardboard.
The wall is first cleaned and primed, then markings are made. Gaps of half a centimeter are left under the ceiling and above the floor for better drying of the glue and holes are drilled for the dowels. The screws are screwed in so that the heads are flush with the wall surface. Special quick-drying mixtures are used as glue, which are applied to the back wall of the sheet in longitudinal strips and along its edges. After attaching the drywall to the wall using glue and screws, you need to allow time for the glue to dry.
Drywall is used not only for leveling walls, but also for sound insulation
Before you putty the plasterboard walls under the wallpaper, the seams between the slabs are sealed with a special mesh and covered with starting putty, creating a single, flat surface. Only after this, a thin layer of finishing putty is applied, but not necessarily over the entire wall, but where there were seams and holes from screws. When using drywall, the result is a perfectly flat and smooth wall. The price of preparing walls for wallpapering in this way will also pleasantly surprise you.
Materials and tools
To carry out high-quality repairs, you first need to acquire important tools and various mixtures:
- putty, gypsum mortar to level the wall plane and apply the base layer;
- primer for initial surface treatment;
- finishing putty to complete the preparatory work.
For information! It is better to choose a universal primer that can penetrate deeper into the wall.
A product purchased in a store contains instructions that must be followed unconditionally in order to carry out the repair efficiently.
How to properly remove old wallpaper
This procedure is the very first and most basic in the entire preparation process. It is considered simple, but still has some features.
Removing outdated material does not always go smoothly, because wallpaper can stick tightly to the surface. Let's look at the features of removal:
- To peel off old material that is difficult to remove, you can use special solutions that use only water and soap. This composition will help soften the materials.
- Dense types of material are a little more difficult to remove. Due to the density of the wallpaper, it is difficult for soap solution to penetrate under the wallpaper. This problem can be solved by simple cuts on the material, and it is necessary to leave the solution on the walls for a while so that they completely soften.
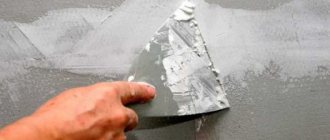
- The material is removed using a conventional metal construction spatula.
- Sometimes areas form from which it is quite difficult to remove the material. These problems are solved with the help of wet rags, which are adjusted to the wallpaper and then ironed. This will soften and remove the problem area.
- The most difficult thing is to remove vinyl wallpaper, because it consists of a couple of layers. The solution to this problem is to make a horizontal cut along the entire material. Such material is removed in one segment, starting from the top.
Tools
You will need to prepare the tools in advance so as not to waste time and simplify the process. The availability of tools depends on the nature of the old finishing layer and the quality of the coating.
Note!
Glass wallpaper - what is it? Pros and cons, types, features, characteristics, photos of design and combinations in the interior
Plain wallpaper - 150 photos of modern design. Rules for choosing and combining wallpaper in the interior: kitchen, bedroom, living room, hallway
Wallpaper framed on the wall in the interior: photos of original design and beautiful decor
Need to purchase:
- floor protection film;
- knife, it is better to choose a stationery knife, sharp;
- tape to avoid dirt;
- container for diluting mixtures;
- a brush for priming in difficult places;
- roller for applying the mixture to the wall;
- spatulas for leveling and applying the mixture;
- construction drill mixer for kneading.
All about wallpapering
What you need to prepare - Tools - Materials Instructions for preparing the base - Removing the old design - Leveling the surface - Priming the wall Rules for gluing - Where to start gluing - Gluing smooth areas - Gluing corners - Windows, doors, behind the radiator - Making invisible joints Peculiarities of gluing different types of materials — Paper — Vinyl — Non-woven fabric — Photo wallpaper How new wallpapers are glued to old ones Pasting plasterboard Bonding with a stretch ceiling Pasting the ceiling
Getting rid of old wallpaper layers
Before gluing new material, it is necessary to get rid of outdated finishes, be it paint, decorative plaster or faded wallpaper. Without this process, the preparation of a concrete wall for wallpaper is considered incomplete.
Several arguments why it is necessary to clean the surface and remove the old layer:
- Wallpaper that has been in the house for a certain time has practically no adhesion. If you apply glue to such a layer, it will soften and fall off. Even under slight pressure or weight, old layers cannot withstand the load.
- When gluing wallpaper onto an old coating, you will have to wait a long time for it to dry.
- After waiting for drying, unevenness will be revealed, the appearance will be spoiled and the work will simply go down the drain.
- The clutch will not be of high quality, which means you won’t have to dream of a long service life.
- Under the old layer, dirt, dust, and microbes that have accumulated over the years of operation will remain.
What an ideal wall should look like
In Soviet times, when changing decorative coverings, it was often practiced to apply new wallpaper directly onto old ones or onto newspapers. Thick wall layers can be found in many “aged” houses and apartments. Modern society rejects the “it will do” principle, offering instead a rational approach and verified calculations. Competent and beautiful decoration of the room with new canvases depends on the condition of the walls. The quality of the base and the scope of repair work can only be determined by first removing the previous coating. Experienced craftsmen put forward the following requirements for surfaces for wallpapering:
- The base must be clean and free:
- from previous paintings, paint and other possible coatings;
- from screws, nails, etc.;
- from fungal infections is a very important factor that greatly influences not only the appearance of the home, but also the health of its owners.
- Without cracks and numerous pores, which will contribute to reliable adhesion of the material to the surface.
- The base must be level and smooth. The assumption that a new trellis will hide all defects is completely wrong.
- The wall must be well dried. Otherwise, wallpaper glue, which contains water, will not be able to firmly attach the canvas to the wall. Increasing the temperature in the room will generally lead to peeling of the trellises.
- The same color of the base is of great importance when choosing thin wallpaper in light colors, otherwise the difference in color schemes will be noticeable even after repairs.
Taking into account the above criteria for preparing the surface for gluing, you will create a solid, high-quality foundation and the most comfortable conditions for further work.
Removing paint
You will also have to get rid of outdated paint if you need to thoroughly prepare the walls. The process is complex and will take a lot of effort and time.
Important! Painting will not interfere with the installation of the selected wallpaper, without preparation: primer, putty, etc. If the surface requires leveling, i.e. carrying out preparatory work, you will have to remove the paint.
Experts advise using one of 4 methods to thoroughly clean the surface:
- Manual - using available tools.
- Electromechanical - using electrical devices and tools, such as a drill, hammer drill, etc.
- Chemical - using special compounds.
- Thermal - using hot air. This is a burning method.
Removing paint and varnish coatings
In some rooms, such as the kitchen, enamel was used on the walls instead of wallpaper, which was simply used to paint the walls.
What to do in this case, there are also three possible options:
- Mechanical, using power tools;
- Chemical, specialized compounds are used;
- Thermal, using high temperature.
The first one is the most budget-friendly, you don’t have to spend much money, just stock up on tools and you can start dismantling the old coating. True, you will have to work hard here, but the second one, despite the price you will have to pay, is quite simple and quick.
The third option will also be quite problematic; it will require a special tool, time and effort.
Primer of walls
Priming before gluing is a process that helps get rid of cracks, pits and other defects. The primer is suitable for all surfaces. It can be used to prepare a wall made of plasterboard, concrete, or other material. The mixture strengthens adhesion, eliminates excess moisture, and gets rid of debris.
There are several types of primer. The choice largely depends on the financial capabilities and requirements of the owners of the premises. When selecting, the characteristics of the surface and its properties are taken into account. Sellers from specialized stores or instructions that come with the product will help you with your choice.
There are many primer compositions on the market, but there are mixtures that have proven themselves and are popular. They are recommended to be used in repairs by professionals:
- Acrylic solution (universal). It tends to penetrate deep into the wall. Dries in 5-6 hours, has no odor, and can be used on any surface.
- Contact composition. It has all the properties described above, but in the contact type they are more pronounced. Thanks to quartz particles, the solution penetrates deeper, and therefore seals unevenness and other defects more efficiently.
- Griftal solution is recommended for treating walls in rooms with high humidity. Drying time is a day.
Regardless of what kind of wallpaper you plan to use on a surface, priming is a mandatory step. It prepares wall surfaces for wallpapering for painting, non-woven, paper and other types.
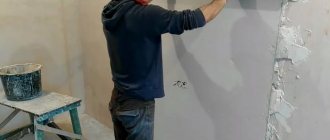
To apply the mixture you will need a roller. They can easily cover the entire surface, but for the corners it is appropriate to use a brush.
Removing old wallpaper
Very often it is this part of the work that takes the most time. But it happens that the process goes quite easily and quickly. As for recommendations, you need to follow the step-by-step instructions:
- To begin with, you should try to remove the coating with a scraper or spatula, simply prying up the edge and separating the sheets from the surface. If they come off without problems, you can use this method. But most often there are areas where the material holds firmly; you can leave them for now and remove the main part first to see what needs to be completed later.
- The easiest way is to wet problem areas with water and leave for 10-15 minutes. You can repeat the treatment if the moisture is quickly absorbed. Then carefully remove the residue with a scraper or spatula. Another solution is to treat all such places with a steamer: due to the high temperature, it acts much faster, you can remove the residue by simply heating it and immediately removing it.
- If the wallpaper does not yield and is difficult to remove, it is best to purchase a special product for removing it. Study the instructions on the packaging and act in accordance with them, following the recommendations for application, exposure time and method of removal. If everything is done correctly, even those coatings that adhere very firmly will come off.
- Non-woven wallpaper has its own characteristics. Very often, the top layer with a decorative coating is removed, and the lower paper part remains on the wall, which is very convenient, because it acts as an ideal basis for other wallpaper. But you can leave it only if it holds firmly and does not move away from the surface anywhere. It's easy to check - you need to wet the wall with a spray bottle; if somewhere the paper doesn't hold, it will move away from the base.
- If the walls are based on plasterboard or other sheet materials, you should act very carefully so as not to damage the surface. In this case, it is best to use special compounds and use a spatula rather than a scraper, since it is not sharp and will not damage the paper base of the plasterboard.
Leveling the plane
After the primer has dried, proceed to the leveling stage (plastering). This process is not necessary if, despite its “old age,” the plaster layer lies flat and does not crumble.
When leveling is unavoidable, the walls must be plastered before gluing. This is done with a high-quality gypsum composition. It is used to fill recesses, pits and other surface imperfections. To begin with, apply a centimeter layer with a spatula and level it. You will have to wait until it dries, and then, using sandpaper, sand the surface.
Next comes puttying. The solution is prepared and applied with a spatula. The putty must be given time to dry. It is then carefully sanded to ensure a smooth surface.
Need to know! If you plan to prepare the wall for liquid wallpaper, then puttying can be skipped. They will be able to withstand uneven surfaces, but will definitely brighten up dark spots. Before applying liquid wallpaper, it is better to cover the wall with a light water-based emulsion.
The entire preparatory process completes the stage - re-priming. This is a mandatory intermediate procedure between gluing and puttying.
You should know! One of the important preparatory stages is disinfecting the wall and treating it with an antiseptic. It can be carried out together with priming, which will protect the surface from mold, fungi and other unpleasant formations.
Why do you need to prepare walls before wallpapering?
According to technology, surfaces need to be prepared to ensure high quality work and eliminate any problems during its implementation. Wall preparation is a mandatory step for several reasons:
- Elimination of irregularities. If there are height differences, damage or protruding areas on the base, then they will be visible through the finishing, which will greatly deteriorate the appearance of the walls. The thinner the wallpaper used, the higher the requirements for leveling the surface; you need to take this point into account when choosing.
- Strengthening the foundation. It is often necessary to glue wallpaper to old plastered surfaces, which strongly absorb moisture. Because of this, all the glue goes into the wall and the wallpaper simply does not stick, so you have to redo the work. Treatment with a strengthening or deep-penetrating primer can solve the problem.
- Removing the remnants of the old coating, as well as anything that may appear on the wallpaper in the form of stains. You should not ignore strange stains, leave pieces of wallpaper or even entire stripes. This is especially dangerous if they begin to swell and peel off when they become saturated with moisture. Therefore, it is worth removing old coatings if there is even the slightest doubt about their reliability.
- Eliminating pockets of mold and mildew, as well as protecting the wall from their reappearance. If there are dark spots, they should not only be cleaned, but also treated with special compounds to eliminate the problem.
By the way!
Mold most often appears due to dampness and leaks in the roof or joints between slabs. To prevent its occurrence completely, it is first necessary to protect the structure from water penetration from the outside.
Puttying for minor imperfections
If the wall is relatively flat and has minor flaws, then the best option for preparing the walls for wallpapering with your own hands is to apply putty. When the surface is smooth, but has only minor cracks, it is enough to remove them point by point, slightly widening them with a chisel and covering them with starting putty.
The sequence of preparation work is as follows:
- Preparation of putty. It should be taken into account that the material quickly loses its properties in its finished form and dries out. Therefore, it is better to prepare as much mixture as the worker can use within 30 minutes.
- Using a wide spatula, the mixture is transferred to the surface and evenly distributed over the wall. It is important to hold the spatula at the correct angle.
- It is not necessary to grout after the surface has dried, the main thing is to level the surface.
Related article: How best to remove old wallpaper from walls
At this point, the preparation of the walls for wallpapering is almost complete. But, it remains to complete the finishing stage, without which the durability of the coating cannot be guaranteed.
Tips and tricks
The stages of preparing walls for wallpapering in an apartment belonging to a secondary housing stock were described above. Many people think that when they move into a new building, such difficulties will not arise - this is both true and not true. Yes, you won’t have to rip off the old finishing materials, but no one can guarantee smooth walls, so we’ll tell you how to properly prepare the walls for wallpapering in a new building:
- Throw a layer of creamy consistency plaster up to 1 centimeter thick onto the wall;
- After the first layer has been sprayed and dried, apply and carefully level the second layer to a thickness of 0.5 cm;
- The last layer, the covering, should have a thickness of 0.2 to 0.4 cm; after drying, it must be thoroughly rubbed and at the end we will get smooth walls.
Another non-standard situation is the use of liquid wallpaper. You can prepare the walls for gluing such wallpaper with your own hands not only by leveling, plastering and bending the walls, but also by painting them. We advise you to give preference to white tones, otherwise the paint may subsequently show through the wallpaper. After such preparation, liquid wallpaper will lay down more easily and will adhere more firmly to the wall.
Master's comment
Well, we figured out how to properly prepare a wall for wallpapering. As stated at the very beginning, the preparatory stage is the key to subsequent success. By carefully following the instructions, you will certainly be able to achieve repair results that will delight you and your household for many years. If any of the stages, for example, plastering, still raises questions for you, you can find materials on our website that detail the specific procedure for preparing walls.
Preparing walls is a multi-step process, and therefore we advise you not to rush to go through them all at once, but to let each of the materials used dry thoroughly before moving on to the next procedure. In this case, the wall covering will turn into a single monolith that will not collapse under the influence of moisture or heat, and therefore the wallpaper will not peel off and will decorate the interior for a long time.
FAQ
In my living room the walls are plastered in different colors. I attached the wallpaper, it is see-through. How to make sure that the walls do not show through?
Change the wallpaper to a denser one or putty, sand and prime the walls. You can use white water-based paint for a uniformly colored base. It will serve as a primer and even out the surface and color of the putty.
The plasterers left beacons in the wall, do they need to be removed before wallpapering?
Yes, it is necessary to remove beacons from any plaster, as they will rust and stains will appear on the wall under the wallpaper.
The workers pasted the wallpaper without priming the wall, and it began to peel off. It was decided to re-paste the wallpaper according to all the requirements, having previously primed the wall. Will the old glue be in the way, or should it be washed off?
Sand over the remaining glue and then prime. If this is not done, the primer may not apply evenly.
We primed the walls for wallpaper, but it was not possible to hang the wallpaper for 4 months. Does the surface need to be re-treated?
Vacuum the walls and coat them with a liquid solution of wallpaper glue a day before gluing. It will clog all the formed pores, and the wallpaper will stick well.
Is it possible to stick wallpaper on walls painted with oil paint or enamel without removing it?
If the paint sticks well all over the wall, you can. But the problem is that the surface is too smooth and will not provide good adhesion to the glue. To prevent the wallpaper from falling off after gluing, you need to treat the walls with sandpaper and cover them with a primer mixed with PVA in a 1:1 ratio.