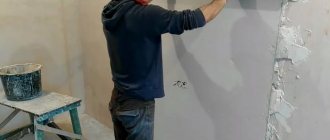
Surface preparation process
Let's look at step-by-step instructions on how to prepare a wall for wallpaper.
When can you glue?
After sanding, clean the walls from dust with a brush or dry rag. Then the walls are re-coated with primer. Once dry, it will leave a thin film that will prevent the glue from being absorbed. When the primer has dried, proceed to wallpapering the walls. Experts recommend doing this after 24 hours.
Stages
The step-by-step process includes:
- Removing boring finishes.
- Cleaning the surface from dust, debris and other contaminants.
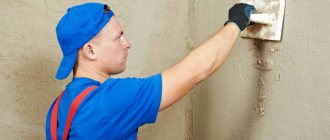
- Initial application of the primer layer. This stage involves treatment with a special compound to disinfect and prevent further absorption of moisture.
- Repairing defects. Elimination of visible defects is carried out with a mixture of gypsum, after which the surface is puttied.
- Alignment. To carry out this stage, you will need a special abrasive mesh material. You can level it with sandpaper.
- Final priming. The final stage of preparing the wall for wallpaper. Necessary to ensure good adhesion of the surface to the finishing material. In addition, re-priming will additionally treat the walls with an antiseptic.
Between the main stages of preparing walls for wallpaper with your own hands, there are intermediate ones, such as treating the surface with an antiseptic, wetting, collecting tools, preparing a solution, etc.
Important! The listed steps must be performed strictly in order; the sequence of work cannot be changed!
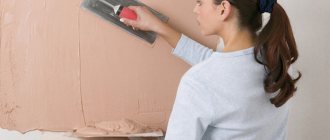
How to apply putty correctly
These procedures are required only when preparing a wall that has many noticeable defects. Even though this stage is not particularly important for preparing the wall, it would not be superfluous to consider its features. Let's look at the features of this event:
- The putty material is applied after the primer has dried.
- Before application, it is necessary to sand the wall using fine-grained sandpaper.
- Before applying putty, you need to carefully inspect the wall, because smooth walls do not require the application of this material.
- The composition should be applied using special construction spatulas.
Considering that putty will help eliminate wall defects, this event is also of high importance in the entire process of preparing the wall for wallpapering.
Materials and tools
To carry out high-quality repairs, you first need to acquire important tools and various mixtures:
- putty, gypsum mortar to level the wall plane and apply the base layer;
- primer for initial surface treatment;
- finishing putty to complete the preparatory work.
For information! It is better to choose a universal primer that can penetrate deeper into the wall.
A product purchased in a store contains instructions that must be followed unconditionally in order to carry out the repair efficiently.
How to glue wallpaper with a pattern in the corners
The joint of wallpaper in the corner can be almost unnoticeable if the canvas has a clear geometric pattern or the wall collapse does not exceed 2 cm vertically.
However, you need to try to keep the pattern shift to a minimum. Below are recommendations from professionals on how to achieve this:
- Cut and joined according to the pattern with the outer glued canvas, place the trellis on the floor with the side with the pattern facing up.
- Measure the distance from the edge of the last sheet to the corner above and below.
- The difference can reach several centimeters. Mark the points on the spread sheet using a pencil or small cuts. It is important to make a mark where the top or bottom is.
- Add 5 cm to the resulting dimensions and cut a piece of wallpaper of the required width.
- Join the wallpaper canvas with the cut sheet and lay it overlapping, overlapping the minimum point from our measurement.
- The part that overlaps the mark must be cut off. Cut the sheet to length.
- Coat the sheet with wallpaper glue and glue it end-to-end with the last sheet, gluing the overlap at the final stage. It is necessary to eliminate the formation of folds by working the corner and seam.
- Using a plumb line, we draw several vertical lines at a distance from the corner to the edge of the sheet. The step between the lines is 5 mm.
- Coat the next sheet with glue and fold it for impregnation.
- Glue the canvas in such a way that the central pattern matches perfectly. We glue the wallpaper, smoothing it towards the corner, focusing on the vertical lines.
- Once the overlap is complete, cut the connected parts using a metal profile and a sharp knife.
- Remove excess strips and roll the joint with a rubber roller.
Tools
You will need to prepare the tools in advance so as not to waste time and simplify the process. The availability of tools depends on the nature of the old finishing layer and the quality of the coating.
Note!
Glass wallpaper - what is it? Pros and cons, types, features, characteristics, photos of design and combinations in the interior
Plain wallpaper - 150 photos of modern design. Rules for choosing and combining wallpaper in the interior: kitchen, bedroom, living room, hallway
Wallpaper framed on the wall in the interior: photos of original design and beautiful decor
Need to purchase:
- floor protection film;
- knife, it is better to choose a stationery knife, sharp;
- tape to avoid dirt;
- container for diluting mixtures;
- a brush for priming in difficult places;
- roller for applying the mixture to the wall;
- spatulas for leveling and applying the mixture;
- construction drill mixer for kneading.
Causes of curvature
For a more detailed understanding of how to align the corner of a wall, we will need to familiarize ourselves in detail with how curvatures appear and what could be the reason for this. First of all, it should be noted that, despite the use of a whole range of tools by mason builders (from simple vertical plumbs, which can easily be made with your own hands using improvised means, to complex laser levels and other high-tech tools), brick or block The masonry still does not turn out perfectly smooth. It turns out that as a result of manual masonry, all kinds of convexities, concavities can arise, and tilts and deviations of both partitions and load-bearing walls from the vertical are possible. We must not forget about the irregularities that exist in the horizontal plane.
So it turns out that it becomes difficult to correctly and evenly hang wallpaper, which, as a result of curvature on the walls, as well as at the point of their contact, becomes completely unattractive. They may separate, or, on the contrary, form unsightly folds.
Note! Since any angle represents the very point at which two walls touch, their evenness is the determining factor. In cases where the walls are smooth, the angle will also be right (90 degrees, with rare exceptions). However, if the partitions themselves are curved, and even do not adjoin at a right angle, this can lead to the formation of excessive curvature and the appearance of irregularities noticeable to the naked eye.
Before wallpapering, you need to measure whether the corners are even.
In other words, that same line, which is a kind of “transition” from one wall to another, instead of a straight line turns into a curved curve, which, in very bad cases, is a kind of wave-like sinusoid. Moreover, there may be an option when the line noticeably deviates both horizontally and vertically from the initially specified parameters. By the way, in addition to the inability to stick wallpaper evenly, such cases are also fraught with the fact that you may experience difficulties when installing floor and ceiling skirting boards, and even when installing certain pieces of furniture.
So, there is hardly any need to provide further evidence of the difficulties and problems that can arise if the corners in a room are curved. Of course, to carry out high-quality repairs we only need right angles. Therefore, now let's move on to a more specific description of what exactly needs to be done in such cases.
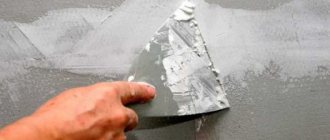
Getting rid of old wallpaper layers
Before gluing new material, it is necessary to get rid of outdated finishes, be it paint, decorative plaster or faded wallpaper. Without this process, the preparation of a concrete wall for wallpaper is considered incomplete.
Several arguments why it is necessary to clean the surface and remove the old layer:
- Wallpaper that has been in the house for a certain time has practically no adhesion. If you apply glue to such a layer, it will soften and fall off. Even under slight pressure or weight, old layers cannot withstand the load.
- When gluing wallpaper onto an old coating, you will have to wait a long time for it to dry.
- After waiting for drying, unevenness will be revealed, the appearance will be spoiled and the work will simply go down the drain.
- The clutch will not be of high quality, which means you won’t have to dream of a long service life.
- Under the old layer, dirt, dust, and microbes that have accumulated over the years of operation will remain.
mold under the wallpaper
We need advice from professionals, the situation is as follows: I was doing renovations 2 months ago, after 2-3 weeks yellow/pink spots appeared on the wallpaper on one of the walls. I tore off the wallpaper all over the wall and found mold underneath. Mold on the wall (the entire upper half of the wall, along the entire length) and on the inside of the wallpaper. When leveling the walls, the craftsmen did not dry it completely, because... We were in a hurry. The wall is interior, there was no mold previously, the radiators work well in the apartment and there is no humidity, the wallpaper is non-woven. Now the wall is dry, the mushrooms, as I understand it, are dead. How to correct this situation? Here is a photo of the wall under the wallpaper. Craftsmen say to anoint with copper sulfate and re-glue the wallpaper - is this enough or do you need to clean everything off?
Masters online: 59 Orders per week: 1,500 Offers per day: 897
It is better to treat with a chlorine solution (when working with chlorine, do not use ammonia solutions.). It's simple, copper sulfate can affect the appearance of other types of fungus. Before processing, you should completely clean the wall to the base (to brick or concrete). This will help completely prevent the appearance of fungus in the future. Good luck with the repair.
Good day! If you want to do it once, I advise you to knock down all the plaster down to the brick, prime it with a deep penetration primer, let it dry for a couple of hours, there are all sorts of deep penetration primers, take an antifungal one, then plaster it, then prime it again, I generally prime after each layer with putty, prime it and stick the wallpaper and nothing like this will happen.
Same problem. After cleaning and treating the wall (I applied the product three times), yellow spots appeared to remove mold. Is it mold again? The master has already hung the wallpaper.
did you completely knock down the plaster?
Yes, completely. The whole procedure took three days. Then the master tidied up the wall. And yellow spots appeared again. Maybe it's not mold? Couldn't he have stuck the wallpaper directly to the fungus?(
Did he put up the same wallpaper? If not, it means the priming fluid was bad or he didn’t do it at all, it shouldn’t be like that
No, the old ones were removed, new ones were pasted on. And now what i can do?
So far no stains have appeared through the wallpaper.
this needs to be looked at, or the previous master did not prime it well, this could be the problem, especially since the primer needs deep penetration
There is only one master. If I'm not mistaken, Rotband primer.
I completely agree with Evgeniy.
Evgeniy is right, knock everything down, strip it down to the base, prime it and do everything again.
Hello. You need to knock everything down and do it again, treat the walls with anti-mold before plastering. If this is not done, the mold will come back. You need to follow technology.
Hello. Several years ago I faced such a problem. First, I cleaned everything down to the ground, then sprayed the entire wall with RENOGAL, if my memory serves me correctly. It can be sprayed or applied with a brush. Within a day, my walls turned from black fungal to white. Just in case, I repeated the procedure. Then I treated the wall with a primer with a fungicidal effect. I also selected wallpaper glue with fungicidal components. If I'm not mistaken, this was in 2003, the problem has not arisen since. I may be wrong with the name of the company, but I think now there are many serious companies offering similar reliable products. I went to a store that sold only German paints. I spent time studying the assortment, bought the full set, and there was no problem. There is also SIKKENS ALPHA ANTIMOSS. No offense to your craftsmen, but copper sulfate is a thing of the past, and given the seriousness of my problem, at one time it only helped me for a month. Good luck to you.
Removing paint
You will also have to get rid of outdated paint if you need to thoroughly prepare the walls. The process is complex and will take a lot of effort and time.
Important! Painting will not interfere with the installation of the selected wallpaper, without preparation: primer, putty, etc. If the surface requires leveling, i.e. carrying out preparatory work, you will have to remove the paint.
Experts advise using one of 4 methods to thoroughly clean the surface:
- Manual - using available tools.
- Electromechanical - using electrical devices and tools, such as a drill, hammer drill, etc.
- Chemical - using special compounds.
- Thermal - using hot air. This is a burning method.
Primer of walls
Priming before gluing is a process that helps get rid of cracks, pits and other defects. The primer is suitable for all surfaces. It can be used to prepare a wall made of plasterboard, concrete, or other material. The mixture strengthens adhesion, eliminates excess moisture, and gets rid of debris.
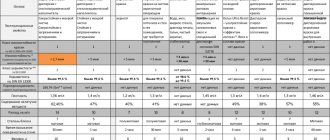
There are several types of primer. The choice largely depends on the financial capabilities and requirements of the owners of the premises. When selecting, the characteristics of the surface and its properties are taken into account. Sellers from specialized stores or instructions that come with the product will help you with your choice.
There are many primer compositions on the market, but there are mixtures that have proven themselves and are popular. They are recommended to be used in repairs by professionals:
- Acrylic solution (universal). It tends to penetrate deep into the wall. Dries in 5-6 hours, has no odor, and can be used on any surface.
- Contact composition. It has all the properties described above, but in the contact type they are more pronounced. Thanks to quartz particles, the solution penetrates deeper, and therefore seals unevenness and other defects more efficiently.
- Griftal solution is recommended for treating walls in rooms with high humidity. Drying time is a day.
Regardless of what kind of wallpaper you plan to use on a surface, priming is a mandatory step. It prepares wall surfaces for wallpapering for painting, non-woven, paper and other types.
To apply the mixture you will need a roller. They can easily cover the entire surface, but for the corners it is appropriate to use a brush.
Which coating should you choose?
Tip
First of all, it is important to consider the thickness of the wallpaper. You should not put thin wallpaper on walls that are not well-plastered - all the imperfections will be visible on them. You should not glue wallpaper with straight long stripes onto an insufficiently flat surface. To hide such a defect, you can use wallpaper with a large pattern.
There are many types of wallpaper today:
- paper;
- vinyl;
- non-woven;
- leather;
- bamboo.
Each option has its own advantages and disadvantages:
- Paper wallpaper is an inexpensive option, but it is easily damaged, which complicates the gluing process.
- Leather wallpaper is an element of luxury. They look attractive, but not everyone can afford them.
- Non-woven wallpaper is considered the best option for an apartment in a new building. Gluing them is quite simple, since they allow you to hide unevenness and do not deform when the new house shrinks.
Leveling the plane
After the primer has dried, proceed to the leveling stage (plastering). This process is not necessary if, despite its “old age,” the plaster layer lies flat and does not crumble.
When leveling is unavoidable, the walls must be plastered before gluing. This is done with a high-quality gypsum composition. It is used to fill recesses, pits and other surface imperfections. To begin with, apply a centimeter layer with a spatula and level it. You will have to wait until it dries, and then, using sandpaper, sand the surface.
Next comes puttying. The solution is prepared and applied with a spatula. The putty must be given time to dry. It is then carefully sanded to ensure a smooth surface.
Need to know! If you plan to prepare the wall for liquid wallpaper, then puttying can be skipped. They will be able to withstand uneven surfaces, but will definitely brighten up dark spots. Before applying liquid wallpaper, it is better to cover the wall with a light water-based emulsion.
The entire preparatory process completes the stage - re-priming. This is a mandatory intermediate procedure between gluing and puttying.
You should know! One of the important preparatory stages is disinfecting the wall and treating it with an antiseptic. It can be carried out together with priming, which will protect the surface from mold, fungi and other unpleasant formations.
Step-by-step instructions: the basics of wallpapering
After carefully preparing the walls, gluing wallpaper is not difficult if you follow a step-by-step work plan.
Protecting the room from contamination and ensuring suitable temperature conditions. All furniture and appliances are removed, electrical appliances are dismantled, and the room is de-energized. The floors are covered with film or other material, which is fixed with masking or regular tape. The normal temperature for gluing wallpaper on non-woven (vinyl) basis and other types is considered to be 18...20 degrees Celsius (unless the manufacturer gives other recommendations). Drafts should be avoided. In accordance with the preliminary markings, you choose where to start gluing the wallpaper. Since even (straight) corners are rare in standard houses, you should prefer a door or window opening as a guide. If you have an even angle, you can start there. Immediately choose the direction of gluing - clockwise or counterclockwise. It is not advisable to change the direction in the process.
According to the manufacturer's recommendations, apply glue to the strip or to the wall (in a strip along the width of the roll with a slight overlap in both directions) or wet a strip of self-adhesive film (for example, vinyl wallpaper on a non-woven base with an adhesive layer). It is convenient to do this on a painting table or on a clean, dry floor. Any glue that gets onto the work surface is immediately wiped off with a damp cloth (Read more about choosing and working with wallpaper glue here). The strip is folded for ease of carrying to the wall so that the side with glue does not come into contact with the front. It is necessary to allow the wallpaper to soak in the glue.
The strip transferred to the wall is applied to the surface, starting from the top (giving a margin of 3...5 cm for trimming), aligned according to the level or markings, smoothed from the middle to the sides
Particular attention is paid to the junction with the floor and corners.
Paste the next strip in the order of marking. Wallpaper should be glued to the wall in accordance with the pattern and direction; these points are taken into account at the stage of cutting the roll (it is advisable to mark the stripes in order or at the location of the sticker)
In addition to the general order of work, there are a number of nuances - how to glue wallpaper so that it looks neat and lies flat.
So, it is more convenient for two people to glue meter-long wallpaper on a wall - a strip smeared with glue is quite heavy, and it is less convenient for one person to smooth it than a standard half-meter one.
How to glue the wallpaper joints is up to the repairman to decide on his own. For more reliable and high-quality gluing, it is advisable to additionally coat them with regular or specially designed glue for joints.
It is important to accurately align the joints, without distortions or overlaps in different directions. If there is an edge that requires trimming, the operation is performed at the stage of cutting the roll
The question of how to glue wallpaper in corners requires special attention. Below is a version of a sticker with an overlap on a corner (external or internal) with a fairly even edge.
Rough angle stripes are calculated as shown in the illustration below.
Gluing liquid wallpaper (without putty) is much easier, since the material itself masks small irregularities in the walls and allows you to avoid thorough surface preparation.