If the brickwork makes the front of the house attractive, then the gray concrete walls are simply asking for finishing touches. Especially if they have sagging and unevenness. Plastering concrete walls is a popular finishing method that can be done with your own hands, without any special financial costs. How to properly plaster concrete yourself, with what compositions, in what sequence - information is not secret, but so necessary for a beginner in the plastering business.
Do I need to plaster concrete walls?
Concrete is a high-strength, durable material that is most often found in construction. The surfaces of concrete structures are unsuitable for wallpapering or painting, as they cannot boast of evenness. The best option for finishing concrete, leveling and smoothing out unevenness, is plaster.
This is a material with sufficient strength, forming a monolithic, even coating.
Advantages of plaster finishing:
- versatility;
- workability;
- possibility of additional insulation, sound insulation;
- it is possible to create the creation of various textures or structures;
- wide selection of materials (both in price and in other parameters);
- maintainability;
- environmental friendliness, etc.
By plastering concrete walls, they are protected from moisture, mechanical stress, mold, efflorescence, UV rays, and other destructive factors.
Finish plastering can be done with decorative mixtures, thus imparting originality to the facade or interior, which corresponds to the aesthetic taste of the owner. Since a long life for plastered structures is ensured by adherence to technology and the right choice of plastering materials, it’s time to talk about them.
Preparing the room for the installation of a kitchen unit
Ordering a kitchen set is only part of the work that needs to be done when starting a renovation. The first thing you need to think about is the layout, and then properly prepare the room to avoid operational problems.
Where to start renovating your kitchen
The first thing you need to do is draw a floor plan by hand or in a special program on the Internet. It should indicate not only the length and width of the room, but also the height of the ceilings, the size and location of door and window openings. The height of the window sill is also important. Don’t forget to mark on the plan the location of communications, the location of the gas pipe, if any, and heating radiators, and the location of the exhaust vent.
We recommend planning the size and content of your kitchen unit with specialists - this way you can take into account all the nuances.
If you decide to do this yourself, you need to check the following points:
- The length of the set and additionally the countertops so that they do not overlap the door casing or, in the worst case, do not block the doorway.
- Opening of all facades. It is especially important to check this for the outer drawers next to the window: the heating radiator often interferes with opening. You may have to move it or replace the cabinet with a false panel. Upper cabinets may have restrictions on opening due to lamps that hang too close to the unit.
- Access to gas pipe and tap. These are safety standards that cannot be ignored.
- Possibility of using a ventilation hole. You cannot completely cover it with cabinets, this disrupts air circulation. And not only for you, but also for your neighbors in the riser.
- Opening windows - This is especially true if you want to place the sink in front of a window. It is important to remember that you will need to change the window design or purchase a folding faucet if you want the windows to open further.
- The height and depth of the tabletop relative to the window. Most often, window openings are located below the level of the worktop - this complicates the installation of the set on the wall along the window. Some customers lay down part of the window to make the window sill and countertop at the same level. Such issues need to be resolved in advance at the stage of preparing the premises for the new kitchen.
How to prepare the walls, floor and ceiling for a new kitchen
When you have decided on the layout and taken into account all the necessary technical aspects, you can proceed to the rough preparation of the walls.
Dismantling the old coating
The very first stage is dismantling the existing coating and assessing the situation. Some walls may require major restoration. For example, in old houses the partition between the kitchen and the bathroom is very thin - it is simply impossible to hang heavy drawers on it. If this is your case, you will have to re-lay this wall from aerated concrete blocks with the installation of guides for wall cabinets. The total thickness of the partition should be at least 10 cm. If the house is old, then the floor covering will need to be replaced.
Leveling walls and floors
Proper preparation of the room for a new kitchen involves leveling the walls and floor. Why is it important? In addition to the aesthetic component, smooth walls minimize the presence of cracks and ensure proper opening of doors. If the walls are not aligned at 90 degrees, there is a possibility that there will be a gap between the kitchen wall and the vertical surface that is difficult to close. Also, a flat wall is needed for laying a backsplash made of ceramic tiles.
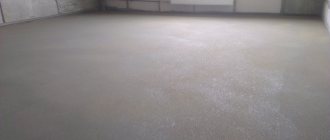
Leveling the floor in the kitchen is a vital necessity. Do you want the oil in the pan to always flow to one edge? A difference in the floor at the installation site of the kitchen unit of more than 1 cm can lead to the formation of gaps between the base and the cabinets. Therefore, pay special attention to the floor. What are the options:
sand-cement screed, strong and durable coating. Suitable if the height difference is more than 5 cm. Please note that the screed will need time to harden.
Self-leveling mixtures are ideal for floors where the height difference does not exceed 3 cm. This mixture can even be used independently, and it also hardens quite quickly. By the way, first check if there are any gaps between the floor slab and the heating pipes - they will need to be sealed first so that the mixture does not leak to the neighbors below.
How to plaster concrete walls
The general word “plaster” hides a great variety of different materials. To make it easier to navigate this diversity, it is customary to classify plaster compositions by type of base, place of application, additional functions, etc.
By purpose (in relation to a concrete base):
- conventional (used for rough leveling of concrete walls, sealing holes, cracks, joints, cracks);
- decorative;
- special (X-ray protective, noise-reducing, sanitizing, etc.).
By place of application: façade, universal and interior.
Since concrete can be different, for example, gas and foam concrete structures are often found in private homes, not all plaster mixtures are suitable for plastering. To solve the question of how to plaster concrete structures, you need to get acquainted with the main types of compositions.
Cement-sand mixture
More often than others, cement-sand mixture (CSM) is chosen as plaster on concrete for exterior work. Cement is a binder that, when the solution hardens, forms a high-strength artificial stone that is resistant to frost. Sand filler does not reduce the strength of this stone, but it can significantly reduce the amount of cement used. The size of sand grains affects the workability of the mixture and the texture of the cement coating.
In addition to these two components, the cement mixture contains additives that give the solution the necessary qualities. They are used to increase the plasticity of the solution, increase frost resistance, water resistance, as well as other parameters of the working mixture and finishing coating. For some coatings, white cement is used.
Main advantages:
- strength (depends on the brand of cement used, the ratio of components);
- durability;
- frost resistance;
- waterproof;
- versatility (used outdoors and in various types of premises);
- ease of preparation and application of the solution;
- maintainability;
- availability, low price of components;
- manual or mechanical application possible;
- fire resistance;
- good adhesion.
The cement composition is not suitable for use in areas with seismic activity, as well as for houses located close to railway lines. Mineral plasters do not withstand vibration loads and building shrinkage. Therefore, for new buildings it is more rational to choose mixtures based on polymer bases.
When can further finishing work be carried out?
Only after the base has completely dried should you begin further work on finishing the wall.
For good adhesion, you need to apply a primer and wait for complete drying again, this will take about a day.
Putty in two layers is the next step. The coating must dry completely. After all the work done, they begin cladding with decorative materials:
- sticking;
- painting;
- tile laying;
- whitewash
Plastering is an excellent and most optimal way to get rid of unevenness and defects. Beautiful walls are the key to a good renovation.
Preparing the walls
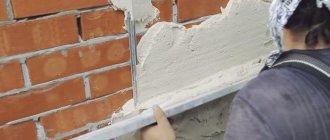
In order for the plaster to hold tenaciously, meet technical qualities, not be covered with stains of emerging rust or efflorescence, and serve for a long time, it is necessary to prepare concrete surfaces before plastering. That is, the surface at the time of applying the mixture must be clean, dry, and rough. There should also be no cracks, large shells, or excess metal inclusions.
Preparation procedure:
- Remove unusable old coating (whitewash, wallpaper, peeling plaster layers, paint);
- Protrusions and swells of concrete are cut down. The protrusions of cellular concrete are planed. To repair chips, cracks, and sinkholes, DSP with proportions of 1:3 is used. In case of large defects, “patches” are made with reinforcement.
- The smooth concrete surface is “speckled” with notches to increase adhesion.
- Remove excess metal elements, otherwise, once they rust, they will cause rusty streaks to appear on the finishing surface. The remaining metal objects are insulated using oil paint.
- The surface is cleaned of stains of various origins (foci of mold, grease, efflorescence, rust).
- Dust is swept or washed off the walls.
- The clean surface is primed and then dried.
- If the thickness of the plaster layer is ≥7 mm, beacons are installed.
- If the thickness of the leveling coating is large, a reinforcing mesh is attached to the concrete.
If hidden internal wiring is provided, then grooves are made when preparing the walls.
Preparing the surfaces
Concrete or brick wall
Before gluing wallpaper on such a surface, you must use putty. In this situation, two stages are implied - applying the starting layer and then the finishing layer. In this case, it is necessary to clean the surface of debris, remove flaking old plaster and remove dust using soil.
Leveling the walls yourself
The starting putty can be applied in a layer as thick as 60 mm in one go. It has a coarse-grained structure and therefore allows you to quickly prepare the surface for finishing. Usually they use a beacon system, which makes it possible to properly level the surface.
How to plaster concrete walls
Beginners are especially interested in how to plaster a concrete wall with their own hands. Therefore, below we provide detailed instructions for performing each work operation + videos.
The technology for plastering concrete structures includes:
- Surface preparation in accordance with standards.
- Impregnation (application) of the primer composition.
- Drying.
- Installation of reinforcing mesh (if provided).
- Applying tile adhesive as a future base
- Installation of beacon strips.
- Preparation of the solution.
- Performing spraying.
- Mixing the mixture, making soil.
- Preparing the coating mixture, applying the coating.
- Performing grouting.
Padding
If the plaster mixture is applied to a porous base, the wall will immediately begin to absorb water from the solution through near-surface pores and microcracks. When hardening, a dehydrated composition will not have enough water for the reactions to occur. As a result, a durable, durable coating is not formed.
To prevent the pores of the base from “robbing” the solution, a primer is used - coating the surface of the base with special compounds. The second reason for using a primer is to ensure reliable adhesion of the coating to the base material. An important task of primer compositions is antifungal protection.
Why do you need putty under wallpaper?
Remember what wallpaper used to be like? Paper, with edges that had to be cut off on one side and overlapped. This made it possible not to worry too much about the smoothness of the base; most often, the walls were covered with old newspapers before the final finishing.
Today, old newspapers have already been abandoned, but the unevenness of the walls still requires some tinkering to get the wallpaper to fit as it should. That is why many people prefer to immediately entrust these chores to third-party craftsmen who will do it faster, without unnecessary nerves and with high quality.
Modern wallpaper is glued end to end. And the slightest hole or protrusion at the junction of adjacent canvases leads to a poor-quality seam. Ideally, it should be completely invisible, which is why the base needs to be carefully leveled. But the role of putty is not only this.
Functions of putty
In addition to the final leveling of walls or ceilings, finishing putty allows you to solve other problems, which include:
- Elimination of defects such as cracks, chips, large scratches, etc.;
- Giving the base greater strength;
- Increasing the adhesive properties of the base - its ability to firmly adhere to the finishing coating;
Note. Primer compounds fully possess this property, and in some cases it is enough to use only them if other qualities of the putty are not relevant in your case.
- Reducing the ability of the wall material to absorb moisture. This is important for high-quality wallpaper stickers and allows you to save glue;
- Leveling the surface color. White putty will reliably protect the wallpaper (see Decorating walls with wallpaper in the correct form) from stains that can show through it from an untreated wall.
As you can see, putty has many functions, and any of them can play a decisive role in the quality of the finish.
Features and differences of external and internal work
The operating conditions of façade plaster differ from those in which interior finishing is used. The finishing work conditions also differ.
The following conditions are general:
- temperature below +30°C, above +5°C;
- air humidity – up to 60%;
- the electrical wiring of the wall is de-energized;
- They try to protect from inquisitive children and animals.
Plastering of concrete walls on facades is carried out in dry weather. They build protection from rain and scorching sunlight over the fresh covering, and cover it from strong winds.
There are no strong drafts in the premises. Heaters or fans are not used to dry walls.
Why putty the walls in front of the wallpaper if they have gypsum plaster on them.
Despite the fact that almost all bags of gypsum plaster indicate: “does not require puttying,” much depends on the professionalism of the master. To achieve the desired result when plastering walls with gypsum plaster, you must perform the following steps: Plaster the wall to a certain width immediately along the entire height, without interruption. Trim the plaster vertically and horizontally until it hardens at a certain time. Shine the walls correctly.
If at least one of the above conditions is not met, unwanted bumps, drops, and pits will appear. Thin, smooth wallpaper can highlight wall imperfections. Heavy, dense, textured wallpaper will hide wall defects as much as possible.
We advise you to carefully check the walls before making a decision. Bring a burning light bulb as close to the wall as possible. Thanks to the shadows, all the imperfections will appear and you will understand how well the walls were glossed. But be warned! Glossing for different types of wallpaper and even for painting may vary in price. Be clear about your requirements for the walls before carrying out work.
Features of concrete ceiling plaster
Plastering a ceiling is more difficult. Leveling the ceiling surface is done in two layers according to the beacons. Apply the solution with a spatula and level it using the rule. After the first layer has dried, a second one is applied, which is designed to eliminate possible small defects. Applying the second layer is called rubbing. During grinding, a reinforcing fiberglass mesh is built into the layer, which prevents shrinkage cracks from forming. In this way, the ceilings are immediately provided with additional protection from cracking and shedding of the plaster coating.
Plastering concrete walls is a job that not only men can handle. Women also do plastering of concrete walls with their own hands. This activity is especially exciting when it comes time for decorative finishing. You will find a detailed description of decorative finishes in the “Decorative plaster” section.
Recommended Posts
Recently viewed by 0 users
No registered user is viewing this page.
Kitchen design trends 2020: fashionable styles, colors and accessories
Choosing curtains for the kitchen: fashion trends and current prints (45 photos)
How to furnish a kitchen on a budget, but not at the expense of style: 7 smart tricks
The best articles on the IVD website
Are you a professional architect or designer?
IVD. Repair and finishing
Are you a professional architect or designer?
The IVD.ru website is a leading Internet project dedicated to the issues of reconstruction and interior design of residential premises. The main content of the site is the archive of the magazine “Ideas for Your Home” - exclusive author’s articles, high-quality illustrations, practical tips and lessons. A team of professionals is working on the project in close collaboration with famous designers, architects and leading publishing experts.
On our website you can choose comprehensive design solutions; view detailed reviews of the market for construction and finishing materials, furniture, machinery and equipment; compare your own ideas with design projects of leading architects; communicate directly with other readers and editors on the forum.
Creating a protective layer
Many modern building materials used for the construction of low-rise private houses have rather poor resistance to moisture. In their manufacture, the main emphasis is on increasing the thermal insulation characteristics by creating internal voids. If such walls are not additionally protected with facade plaster, moisture that penetrates into the voids during freezing will begin to destroy the material from the inside.
We are talking about walls made of:
- Treble brick.
- Foam concrete.
- Aerated concrete.
- Arbolite (based on cement and sawdust).
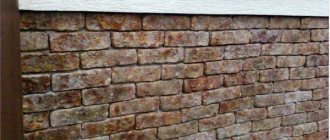
Decorative effect
The purpose of plaster is not always limited to protecting or leveling walls. A novelty in construction technologies is the so-called. “wet facade”, where a layer of decorative plaster is laid on top of the insulation (usually foam plastic). Thanks to this, you can not only insulate the external walls, but also give them a finished look that does not require finishing.
Application of decorative plaster
Decorative plasters have also become widespread in the field of interior decoration due to the ability to create original textures and imitations. Such materials are very convenient because their application does not require a perfectly flat base (like wallpaper or painting). As a result, it is possible to impart individuality and originality to the interior design of the room.
An example of finishing a room with decorative plaster
Modern decorative plasters are offered in different forms:
- Textured.
- Embossed.
- Individual sculpting.
- Bas-reliefs (special stencils are used for their production).