In the article we will find out what are the dimensions of the currently produced ceiling tiles - length, thickness and height; what kind of density it is and other qualities; how to mark the ceiling for tiles and how to stick them.
To purchase tiles in the required quantity, you need to calculate the ceiling. For which, of course, you need to know the size of one tile
The size of the ceiling tile is determined primarily by the convenience of calculating its quantity.
Most of the produced ceiling tiles of all types have dimensions of 50x50 centimeters. In this case, the edges do not necessarily have to be smooth: the seams between the tiles can be jagged, wavy, or have an even more complex shape.
The package size of ceiling tiles is also optimal for simple purchase calculations: eight tiles with a total area of two square meters.
In addition to square ones, rectangular ceiling tiles measuring 100x16.5 centimeters are also produced; on sale, however, it is much less common.
Glue selection
After calculating the number of tiles, you need to select the adhesive. To do this correctly, you can ask the manager. He will tell you which glue is recommended for gluing the selected ceiling tile. Glue for gluing wallpaper on the ceiling is not suitable for
You can also read the instructions or certificate included with the material. Many experts use special “Titan” glue for foam tiles, universal “Eco-Naset” or liquid nails.
It is not recommended to buy Moment glue. It becomes very dark over time, so excess that accidentally stains the front surface appears.
The consumption rate of the selected glue is indicated on the packaging. In accordance with this value, the required amount of substance should be purchased per 1 m², based on the area of the ceiling, regardless of the size of the foam tiles.
Universal
Compositions of this type are presented in the following varieties:
- Eltitans. Excellent bonding of concrete, plaster and wood surfaces. The joining seam is very soft. The disadvantages of the material include its long drying time.
- Titanium. It has good viscosity. Capable of reliably gluing metal, glass and plastic substrates. Dries quickly.
- Master. It has an almost identical composition to titanium, but costs an order of magnitude less. Unlike the original, it has a pungent odor and takes longer to dry.
- Moment. Dries very quickly and has excellent adhesion to various materials. The disadvantages of “Moment” include its high cost and significant operating costs. To achieve economy of composition, it is recommended to apply it using a gun.
For gluing foam plastic tiles to the ceiling, glue brands such as “Hvat”, “Lakra”, “Dragon”, etc. are also often used. They are very similar in their characteristics and cost.
The best manufacturers of polystyrene foam boards
The best guarantee of quality is the name of the manufacturer. In order to protect yourself, you should look towards the products of famous companies that value their reputation. Among the largest manufacturers it is worth noting:
- Armstrong is a company that produces both the most common and quite non-standard tiles. Performance qualities are excellent in any case;
- Ormit is a tile made in Germany, characterized by high moisture-resistant qualities, a wide range of sizes and colors;
- Antares – accepts all types of slabs, the color range is varied. Also produces skirting boards and corners;
- Matrix is a Chinese-made tile of small thickness. The main advantage is the low price;
- Angara, another Chinese manufacturer with an attractive pricing policy, produces panels with a thickness of no more than 8 mm.
When buying tiles, in any case, it is better to make sure that they have quality certificates.
Foam tiles
Before tiling the ceiling, you need to decide on the choice of material. The following types of material are available for finishing the ceiling surface:
- pressed foam panels made by stamping. The material has a porous structure, which becomes clogged with dirt during use. It is recommended that after installing the panels, paint them with acrylic paint. The material is inexpensive, brittle and wrinkled, and inconvenient to work with. When choosing this type of coating, you should take the material with a reserve of about 10%. The thickness of a single panel ranges from 6 to 12 mm;
- extruded. The panels are small in thickness, only 2-3 mm, but quite dense and expensive. Profiles imitating wood or natural stone are produced. Foamed polystyrene material is easy to care for, but cannot be painted. The paint literally rolls off the smooth surface;
- injection. The difference from other types of tiles is the clearly visible pattern that is obtained during production. The materials can be painted and are not difficult to install. The cost is average.
The easiest way to glue the ceiling is with extruded tiles. This type of coating is easier to maintain.
The usual shape of the panels is square. But, non-standard, rectangular panels are produced. You can cover the ceiling with seamless tiles, the edges of which can be wavy or smooth.
Foam ceiling tiles are considered the most popular material for gluing ceilings. But there are other types of tiles made from the following materials:
- acrylic. Such profiles visually increase the height and area of the room;
- tree. Environmentally friendly profiles;
- ceramics. This type is used in rooms with high humidity;
- metal. Effective, durable and non-flammable material, but very expensive.
When choosing profiles for the ceiling, pay attention to how the material combines with the interior and furnishings
Characteristics
Most often, people give preference to foam plastic boards for finishing the ceiling. The reason for this popularity is due to the fact that they are considered to be of very high quality, and their cost is not so high, so anyone can afford them. Price - from 10 rubles.
There are several options for the production of the presented finishing materials.
Let's look at them in more detail:
- Pressing is a process during which compaction occurs using an industrial press. The product obtained in this way has a thickness of 7-8 mm.
- Injection is a method of producing tiles based on their olives. The molten material is sent to the desired mold and compacted under the influence of high temperature conditions. If you buy a slab made using this method, its thickness can reach 14 mm.
- Extrusion is considered the most common method for producing polystyrene tiles. But I can also get tiles from extruded foam using a secondary method. Most often, such material is covered with decorative film.
The video shows foam ceiling tiles:
When purchasing material, it is very important to make the right choice and choose tiles from high-quality construction foam. Opt for polystyrene foam, which is flame retardant and non-flammable.
You can verify the presence of the presented properties if you carefully read the information presented on the product.
The most popular shape of ceiling tiles remains square. Their size is 50x50 cm. You can also buy rectangular tiles, but they are not so common and are used when finishing the ceiling in public buildings.
Of course, foam tiles are not a luxury. It finds its buyer when it comes to decorating a room in which a presentable appearance is not the main goal of renovation work. Most often they are used in a country house. Also, foam tiles can be used to temporarily change the environment. Such a product costs approximately 30-40 rubles per 1 m2.
If you want to maintain the beautiful appearance of your ceiling for a long time, then you should not wash the foam tiles; they must be vacuumed. This process is much simpler and easier. In addition, wet cleaning may leave various stains on the surface. This is precisely what proves the effectiveness of dry cleaning. To clean foam ceiling tiles, use a fluffy brush. It allows you to perfectly remove dust from relief elements.
The photo shows foam ceiling tiles:
But there are situations when tiles need to be washed. But for these purposes you should definitely use special detergent compositions. But when choosing them, it is necessary to take into account that each product has its own characteristics. In addition, the room in which the tiles are installed remains very important. If this is a kitchen, then care should be carried out more intensively and more often.
The video explains how to paint foam ceiling tiles:
You can wash foam tiles on the ceiling using liquid products. It is not recommended to use powders, as abrasive wear of the surface will occur, resulting in marks on the treated surface.
If you use a stamped plate, you should not wash it. You can only carry out wet cleaning in extreme situations and do all the work very carefully. If you have injected or extruded tiles on the ceiling, you can wash them as soon as they become dirty. They are not afraid of any mechanical stress.
Varieties
Foam boards refer to several types of products that differ in their manufacturing method.
Based on this feature, polystyrene foam ceiling slabs are divided into three large groups:
Pressed. We are talking about square elements 50x50 cm, 5-8 mm thick, with a not very obvious pattern and relief. During the manufacturing process, polystyrene foam blanks are subjected to figure stamping. The structure of pressed tiles is characterized by friability and the presence of pores. This is the cheapest type of ceiling tile, which gets dirty quite quickly. To slightly increase its decorative properties, painting with acrylic compounds is used.
- Extruded
. Products of this type have a smooth surface and a specific shine. On production lines, the mass is first melted and then pressed through a special metal sieve. As a result, this preserves the structure of the material from the formation of visible pores. Extruded polystyrene tiles are available for sale in a wide variety of colors. Often there are very believable imitations of marble, wood and other natural materials. There is also an option with a laminated coating. This type of product is also classified as budget. - Injection
. These slabs are distinguished by ideally even edges, which allows for almost complete masking of seams. There is no need to paint injection products, as they are equipped with complex floral patterns or imitations of gypsum stucco. Thanks to its rather large thickness (almost 14 mm), the prospect of applying deep and pronounced patterns opens up. During the manufacturing process, molds filled with molten material freeze at elevated temperatures.
Measuring harmful emissions
It should be remembered that styrene can accumulate in the body, gradually reaching dangerous concentrations that lead to intoxication. When staying indoors for a long time, it is not difficult to exceed the permissible limit. If you notice a deterioration in the health of yourself or your family members, or complain of poor sleep, we recommend that you conduct a study of air samples in the apartment. But keep in mind that laboratory analyzers may not show increased doses of styrene.
The fact is that in Russia a threshold concept for measuring harmful substances is used. Multiple tests are carried out to show acceptable levels. This does not take into account the substance’s ability to accumulate in the body. In Western countries, the USA, and Japan, a linear concept operates. The total influence of the absorbed substance is taken into account. Based on this, the maximum permissible standards of styrene are reduced many times over. Environmentalists in our country are sounding the alarm, demanding a revision of the maximum permissible concentration for polystyrene foam and a change in the hazard class of this building material.
Features of the material
Expanded polystyrene is a gas-filled mass made from polystyrene and its derivatives, which also includes styrene polymers. In everyday life, the material is mistakenly compared to polystyrene foam, but this is only a type of the latter. At the same time, the polystyrene foam that is common in households is indeed expanded polystyrene. The manufacturing technology is expressed in filling the granules with gas dissolved in polymers. Then the mass is heated with steam. As a result, the granules increase to such a size that they occupy the entire shape and begin to press against each other. And high quality natural gas is used. In polystyrene foam for finishing, additives play an important role. This improves sound insulation characteristics and strengthens the material. Some varieties imitate metal, wood and marble. Special versions are also produced. These include:
- Fire-resistant raw materials. Its granules contain carbon dioxide.
- Vacuum polystyrene foam. There are no gases in it.
How to glue tiles to the ceiling - two technologies
Foam or polystyrene ceiling tiles are attractive because they allow you to quickly and inexpensively tidy up a less than ideal ceiling. If the ceiling is relatively flat, the tiles are glued with special glue. It is applied in a thin layer, but provides reliable fixation.
This method will not work with uneven ceilings: the tiles simply will not stick if there are large differences, or the appearance will be deplorable. There is not always time, desire or opportunity to level. Moreover, this finishing option is often considered temporary, with plans to then make a suspended or suspended ceiling. Therefore, there is no point in wasting time and money. In this case, another technology is used - using adhesive for drywall or putty. They work no worse than glue, at the same time leveling the base.
Before starting work, unpack all the material, make sure it is the same color and size. If there are irregularities or sagging, they are cut off with a blade or a sharp knife. Now you can begin installing the ceiling tiles on the ceiling.
How to glue on a flat ceiling
If the ceiling is flat, use regular adhesive for polystyrene or foam tiles, the technology is as follows:
- Apply a thin strip of glue around the perimeter of the square and diagonally. There is no need to coat the edges of the tiles.
- Place the tile in place and smooth it with your hand.
- We hold it for a while until the glue “sets.”
- We repeat the same with the next tile. We apply it to the edge of the already pasted one, if necessary, combine the pattern, and then press the rest of the part. Docking must be carried out as accurately and carefully as possible so that steps do not form later. Align the edges to the nearest millimeter.
- Repeat with the remaining fragments.
- If necessary, the ceiling tiles can be trimmed. It is convenient to do this on
As you can see, everything is very simple and these are all the rules on how to glue tiles to the ceiling. Just one caveat: you need to press one square to another tightly. If you have already glued it and there is a gap left, you can move it by pressing a wooden strip to the free edge. If you try to do this with your hands, you can break the foam or polystyrene, but it’s easier to achieve what you want with a flat bar.
If the ceiling is uneven
If the ceiling has significant unevenness, gluing the tiles with regular glue will not work. To remove significant differences, use drywall adhesive or putty. The mixture is diluted to a paste-like state, applied to the ceiling, and grooves are formed using a notched trowel. The amount of glue depends on the overall curvature, but it is advisable to start with a minimal layer. The area on which glue is applied at a time is approximately 4 fragments. During this time, the composition will not have time to set, and leveling such a fragment is not difficult.
The tiles are laid on a layer of glue. It sticks well and moves without problems. Having aligned the edges of the laid fragments, take a rule or a building level (preferably one and a half meters) and align the tiles in the same plane. Just press the fragments harder in the right place.
Then the composition is applied to the ceiling again, and, again, to about 4 tiles. All of them are set in the same plane, or at least so that there are no sudden changes. Only in this case you need to make sure that the required layer of glue does not grow too quickly - it is better not to apply more than 3-5 mm, otherwise everything will fall.
https://youtube.com/watch?v=eZPYhhpCoyI
Cleaning and caulking
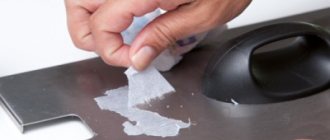
You know how to glue tiles to the ceiling, but there are still some nuances, without knowledge of which a decent result is unattainable. When working, adhesive often gets on the front side of the tile. It must be removed immediately and completely. You can use a sponge or a soft, non-fading cloth. Wipe the surface immediately after placing the fragment in place. After just a few minutes, this will no longer be possible and traces will remain. Therefore, while working, keep a bucket of water and a sponge/rag on hand.
If there are small voids left between the slabs, you can fill them with the same mastic or putty (if it is white), but immediately remove the excess. Another option is white acrylic caulk. It perfectly masks all crevices and adheres well to polystyrene foam and polystyrene. You can fill thin cracks with a rubber spatula, and immediately wipe off any excess with a damp cloth.
What can you paint with?
Painting a tiled ceiling is not only a good way to give the coating a presentable look, but also provides the following advantages:
- Providing enhanced protection against high humidity, temperature fluctuations and negative influences.
- Neat and well-groomed appearance of the ceiling.
- Protection against yellow plaque that appears after some time of use of the foam.
To paint the ceiling, you can use different types of such compositions. In most cases, water-based paint is used, which is characterized by environmental safety, short drying time, increased density and affordable price. This composition retains vapor permeability and remains fire resistant. It prevents the proliferation of fungi and harmful microorganisms.
Acrylic models are water-resistant and highly durable, they look bright and beautiful, and dry quickly. Disadvantages include poor vapor permeability and high cost.
Paint requirements
Before purchasing a coloring composition, you should make sure that it meets the following requirements:
- optimal degree of density;
- resistance to moisture and chemicals;
- long service life and aesthetic appearance;
- no vulnerability to chemicals.
Harm of polystyrene
To understand whether ceiling tiles are harmful, it is worth taking a closer look at what they are made of. Expanded polystyrene was invented for the needs of the military industry, thanks to polymerization. It was used as a heat and sound insulator. Little thought was given to the dangers of what was invented. Subsequently, the economical material became widespread in the construction and packaging industries.
This monomer causes irritation of the mucous membranes of the nasopharynx, severe headaches, and disruption of the nervous system. It has a negative effect on hematopoiesis and leads to leukemia. Destroys the liver, leading to toxic hepatitis. Possessing an embryogenic effect, with systematic contact it causes disturbances in the intrauterine development of the fetus.
Another dangerous property of styrene is its ability to accumulate in the body, so even small doses pose a threat. In addition to the above, when oxidized by oxygen, which is part of the air, formaldehyde is released, which is included in the list of carcinogens. When microscopic portions are inhaled daily, the skin becomes pale, an inexplicable loss of strength and depression occur. International organizations to combat cancer indicate a connection between formaldehyde released by polymer coatings and the risk of developing nasopharyngeal cancer. These processes accelerate with increasing temperature.
During fires, even those samples that are recognized as low-flammable begin to melt, emitting toxic smoke. Fatal intoxication can occur in a few seconds, so the chances of survival in a room decorated with foam elements are minimal. Thus, the harm from pasting ceiling tiles is beyond doubt.
Marking
In order to glue foam panels efficiently and beautifully, you must first apply markings.
You need to decide where to start finishing the ceiling:
- from the corner of the room;
- from the center of the room.
In the first case, you should measure 50 cm from the wall and draw a line to the opposite wall. Next, perpendicular to it, after 50 cm, mark the lines and complete the marking according to the appearance of the chessboard. It is better to start from a noticeable corner and end at the door. It is convenient to apply straight lines using a painting cord.
In the second case, you need to find and mark the center of the ceiling. To do this, just apply diagonals. At their intersection is the center of the ceiling. You can use another method.
From the middles of opposite walls, beat off perpendicular lines with a paint cord. They intersect in the center of the ceiling.
Pasting technique
Let's look at how to glue foam ceiling tiles. Advice from professionals will help you cope with the job:
- The option for applying the adhesive composition depends on the type of mixture. If it is acrylic putty or cement mortar, it is better to use a spot application so as not to add weight to the base. Using liquid nails, non-aggressive adhesive compositions, you can apply a path along the entire perimeter, to the central point, and then level the mixture over the entire surface of the decorative part using a spatula.
- Pasting is carried out with doors and windows closed. There should be no drafts so as not to disrupt the drying process of the mixture - this can affect the bonding strength.
- Read the ingredients and how to apply it. There are adhesives that you need to spread, then attach the tiles to the ceiling, peel them off and let the composition dry a little. Manufacturers also produce glue that must be applied to the back of the decor and the base surface.
- Apply glue to the tile, wait 1-2 minutes for setting and glue the element to the ceiling at a pre-marked point.
- Take the next part, attach it to the previous one without glue, visually assess the evenness and you can apply glue. Evenness must be checked in the first row for each element, and selectively in subsequent rows. Thus, the owner gets the opportunity to quickly adjust the layout if a slight shift occurs somewhere.
After the entire plane is decorated, trimmed elements are laid along the edges, you can seal the seams with sealant, applying the composition in a thin layer to prevent thickening. The final touch is to decorate the joint between the ceiling and the wall with skirting boards, baguettes or decorative slats.
The tiles can be painted, painted or varnished, the main thing is that the parts are firmly and securely fastened, the finishing technology is selected according to the requirements and taste of the owner. For example, in rooms with high levels of humidity, the decor is painted to protect it from water, and in open areas with aggressive exposure to wind and sun, the finish can be varnished with waterproof varnish without aggressive components or solvents in the composition.
Installation of skirting boards
After painting is completed, you can begin gluing the ceiling plinth. This matter has its own tricks that make the work easier:
- It is more difficult to hold a baseboard against a wall than a tile because it is longer. Therefore, the plinth, greased with glue and put in place, is fixed with small nails every half meter, driving them into the wall. After a day, the nails can be removed and the holes from them can be sealed with acrylic putty.
- It is very difficult to join parts of the plinth that meet in the corners of the room. To make them look beautiful, you need to use a miter box - a special carpentry device for cutting material at an angle. The angle is set to 45 degrees. After gluing the plinth, the cracks in the corners are coated with acrylic putty.
- The final stage of work is painting the baseboards using water-based or acrylic paint.
Placement methods and markings
Squares on the ceiling made of foam plastic or polystyrene are placed with their edges along the walls or diagonally. When gluing diagonally, the material consumption is greater - there are more scraps and not all of them can be used, but visually it looks better - it is more difficult to notice the seams.
Gluing most often starts from the chandelier. In this case, it is easier to “fit in”, since the edges of the plates can be trimmed a little, and the resulting gap will then be closed by the chandelier socket. But not all rooms have a chandelier - often there are several lamps and they can be located on the walls. Then they start gluing from one of the walls, most often from the one opposite the entrance. With this approach, most likely the outer row will be cut off, and it will not be so noticeable near the entrance.
If you need to glue tiles to the ceiling from a chandelier, markings are necessary. In a square room everything is simple - we find the center and start from there. To do this, take a painting cord, one end in one corner, the other in the opposite corner, pulling the cord and letting go, we get a line on the ceiling. We repeat the operation with another pair of corners. We found the center, it’s easy to glue tiles from it. For diagonal gluing, there are already guides, but for parallel gluing you will have to make two more stripes - through the center to the opposite walls (in the figure above).
But this is a very rare case. More often the rooms are rectangular, and the chandelier is not located in the middle of the ceiling. Therefore, you will have to do more complex markings.
To begin with, we also find the center of the room (painting cord along the diagonals). If it coincides with the place where the chandelier is attached, great, we’ll “dance” from it. If not, move the starting point to the chandelier. The rest of the markings are the same. We measure the distance from the starting point of installation to the nearest wall. Using this value, draw squares as shown in the picture above (use painter's cord). By drawing the diagonals, we get guides for laying continuous tiles. Using them we level the edge of the first row. The more accurately we set this row, the easier it will be to glue the tiles onto the ceiling further.
Styling tips
Installation begins from the center of the ceiling or the mounting point of the chandelier. To find the middle, pull the threads from the corners diagonally. The intersection is marked, and perpendiculars are drawn from it to the walls. These lines will help guide the tiles evenly when laying them.
The sequence of work is as follows. First, one or four elements are glued in the middle. In the first case, you need to set aside distances from the central point equal to half the size of the slab (that is, with the standard one - 25 cm). And in the second, the corners of the elements are oriented in the middle.
Then the remaining tiles are glued around. Many manufacturers put arrows on the reverse side. The marks are used as a guide when gluing, so that the pattern on the tiles faces in the same direction.
As a rule, the distance left at the walls is less than the width of the part. Narrow gaps can be covered with plinths. If the gap is larger, cut the tiles with a sharp knife. It needs to be placed on a flat surface and held so that it does not break during the process.
It is advisable to paint inexpensive pressed tiles. Then the seamless foam ceiling will not turn yellow, and dust will not accumulate in the micro-recesses. Laminate cladding is not covered with anything. The injection room can be painted if you want to give it a different color.
The walls in the rooms are not always parallel. If there is a strong discrepancy, it is better to choose tiles with a small pattern. A large pattern is much more difficult to fit.
It is important to consider the location of the chandelier. If it is not in the middle of the room, it is also better to move the central panel
Otherwise, it will appear that the casing is displaced. But if the pattern is small, then the shift will not be noticeable, since there are no visible seams between the elements.
Criterias of choice
When choosing ceiling tiles, you should carefully examine the product, in particular:
- there should be no dents on their edges;
- the angles must be straight (exactly 90 degrees), otherwise uneven seams will form during installation;
- the drawing must be clear, without flaws.
You can check the strength of the product in the following way. You need to take it by one of the corners and hold it horizontally. High-quality tiles will withstand the test and will not break under their own weight.
It is important to consider the specifics of the room when choosing a specific type of panel:
- Extruded is suitable for any room, but often has profile defects and an uneven back surface.
- Injection is suitable for rooms where it is necessary to achieve the appearance of a seamless ceiling. It is durable and fireproof, easy to paint and easy to maintain.
- Pressed is suitable for rooms with minimal requirements for heat and sound insulation. The material is inexpensive, but fragile and sensitive to moisture.
Having assessed the features of all types of tiles, you can choose it for your own needs in accordance with the specified parameters. After which you can proceed directly to the installation itself.
Which is better: suspended ceiling or ceiling tiles?
The undoubted advantage of ceiling tiles is the ability to cope with the work without professionals. It is enough to buy the appropriate brand of glue and calculate the amount of material, and the gluing process will not be difficult. Also, the advantages include low cost. Perhaps this is all that can be said about the benefits of this material, now let’s talk about the disadvantages:
- Cannot be used in the kitchen: the surface is difficult to clean from the inevitable layer of soot and dirt.
- The products are flammable and do not comply with fire regulations. Expanded polystyrene is “famous” for its record-breaking short combustion period - less than 4 seconds.
- It cannot be installed in the bathroom, as the material has a low moisture protection threshold. If there is a leak from above, the adhesive may break down and peeling may occur.
- Installation requires a flat surface, only minor cracks are allowed.
- It should not be used in new buildings where the building is subsiding, leading to peeling of the ceiling covering elements.
- The glue does not erode for a long time, an unpleasant odor is felt, and air toxicity increases.
- It will not be possible to reliably hide communications, for example, electrical wiring.
- Even a slight increase in temperature is undesirable. Lighting fixtures get hot, so they need to be mounted as far as possible from the ceiling (minimum distance - 30 cm).
- The aesthetic appearance of the room suffers. The seams between the elements are noticeable and yellowness appears. Tile finishing does not fit into most interior solutions due to its excessive decorativeness.
Stretch ceilings, on the contrary, are distinguished by their aesthetics and ability to fit harmoniously into the interior. A smooth surface is provided, without the slightest defect. The widest choice of colors and the possibility of photo printing are attractive.
Installs within a few hours. Easy to clean: wipe with a soft cloth dampened with a small amount of detergent. It is environmentally friendly and not harmful to humans and animals.
When starting a renovation, everyone decides for themselves what is better - a suspended ceiling or affordable ceiling tiles. It is worth considering that in most respects, an environmentally friendly stretch ceiling is superior to a coating made of foam elements, creating a beautiful modern interior and maintaining health.
Placing tiles on the ceiling
There are two rules that builders use when gluing ceiling tiles:
in a small room it is placed on the ceiling surface parallel to the walls. In this case, work begins to be performed from the corner located opposite the entrance to the room
The fact is that the eye first falls on this particular place in the room, so it is important to ensure parallelism between the walls and tile joints there; in large and spacious halls and in those rooms where the walls and partitions are not parallel to each other, tiles installed from the center visually benefit. It is not glued parallel to one of the walls, but diagonally
Conventionally, the center of the room is chosen to install the ceiling chandelier. Of course, with this option for finishing the ceiling surface, the consumption of tiles is much greater than in the first case, but since the price of the material is low, there will not be much overspending on the family budget. An example of such installation of finishing material can be seen in the photo.
In practice, these two methods are often combined. For example, tiles are glued starting from the center, but at the same time they are placed parallel to one of the walls. You can also find a diagonal sticker that starts from the wall. Using simultaneously two types of tiles of different colors (preferably in contrasting colors), the ceiling is made into a checkerboard pattern, and a spiral or snake is run along its surface. Thus, finishing costs will be minimal, and the appearance of the room will significantly improve.
When carrying out work on gluing tiles, the elements have to be cut in place, for which they use a regular knife, only a sharp one. It is convenient to cut polystyrene foam boards in a straight line, placing them on one side of the tabletop, which in this case will be a guide.
Based on the above, we can conclude that polystyrene tiles are an ambiguous finishing material, but if you need to make inexpensive ceiling repairs and not waste a lot of time, this option is quite acceptable.
Bonding scheme
There are also some nuances here. You can simply lay it from the center of the room to the edges, observing the strict geometric order of the slabs. All of them touch at the corners, forming a kind of lattice of slabs on the ceiling surface. This is the simplest and most common installation method. But, there are other options for how to glue foam tiles to the ceiling.
Offset installation. In another way, this option is called “taking a running start.” Each adjacent row of panels is shifted relative to the previous one by half a panel. It turns out that all the tiles are displaced relative to each other, creating a pattern on the ceiling.
Another popular option for gluing such slabs is a diagonal layout. This is a special version of the row pattern, only in this case, the pattern is built not along the walls, but diagonally. In some cases, using diagonal laying will help hide geometric defects in the room. Gluing the slabs this way is a little more difficult, in addition, there will be more waste with this scheme than when laying the parts in rows. This should be taken into account when calculating the number of required slabs.
Characteristics of polystyrene tiles
Among the advantages of polystyrene foam ceiling tiles, the following should be noted:
- inexpensive cost, which starts in retail from 30 rubles; only lime whitewash will cost less;
- the ability to hide significant defects in the ceiling surface without puttying and other preparatory measures;
- the material can make unevenness on the base base invisible, but for large differences it is better to opt for a suspended structure;
- The tiles are easy to care for; they can be washed with any, most importantly non-abrasive, detergent;
- finishing work using ceiling tiles does not require professional construction skills; every owner of a house or apartment can install it without much effort;
- quick completion of the repair; finishing a medium-sized ceiling in a room together with decorative molding will take no more than one day;
- decorating the ceiling surface with tiles does not reduce the height of the room. For comparison: any suspended structure will drop below the floor slabs by at least 5 - 10 centimeters. With a ceiling height of no more than 2.5 meters, tiling is the most reasonable solution. Sometimes it is combined with suspension systems;
- in the case when there is a desire to change the polyurethane tiles to another finish, there will be no problems dismantling them. The material is easily attached to the surface with just a few drops of adhesive, and the weight is insignificant, so the slabs can be removed with minimal damage to the floor.
Polystyrene ceiling tiles have the following disadvantages:
- the material they are made of is flammable and the fire safety of the apartment will be in question;
- soot, dirt, grease - contaminants are inevitable in the kitchen; wiping them off the surface of the tiles is an almost impossible task. This is especially true for the grainy surface of tiles produced by stamping or injection;
- The seams between adjacent slabs are clearly visible; they, of course, can be made inconspicuous, but invisible - no. The clearly visible presence of joints affects the appearance of the ceiling, while seamless surfaces (plasterboard or tension) look much better;
- the material turns yellow from soot and absorbs odors, so consumers who smoke indoors are better off abandoning this option for finishing the ceiling with polystyrene foam tiles. Similarly, you should not glue paper wallpaper.
How to glue foam tiles to various surfaces
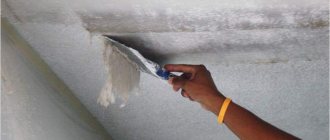
Any rough ceiling must be prepared for gluing. If we are talking about a surface whitened with chalk, it must be cleaned by washing away the chalk to the base. It is useless to glue tiles to chalk - they will very soon come off and fall. If the ceiling is covered with lime, you need to run your hand over it and check the condition of the lime. Peeling areas should be removed with a spatula. If this procedure is neglected, the tile will come off in the same way as from a chalk base. Only after cleaning the ceiling can you start priming it.
As for ceilings made of concrete, plasterboard and wood, everything is much simpler here. These bases do not need to be cleaned; they should be immediately covered with soil.
The primer for this procedure must have deep penetration. Shake the container well, pour the primer into a paint tray, and then apply a thin layer to the ceiling using a roller. After the first layer has dried, the procedure should be repeated. Careful priming will improve the adhesion of surfaces, and therefore contribute to more durable adhesion of the ceiling tiles.
The next stage is marking the ceiling. If the tiles are glued in a straight line, it is enough to mark the center of the room - it will be at the intersection of lines running from the middle of the sides of the ceiling. If you plan to glue the tiles in a diamond shape, the center is marked by the intersection of diagonal lines originating in the corners of the room. For marking, it is most convenient to use a painting cord - it will allow you to immediately remove the gluing lines.
When choosing adhesive for foam tiles, you should avoid aggressive solvents in its composition, as they will simply corrode the product. It is also better to avoid water-based glue if gluing is done on a lime or chalk surface.
The best option would be the so-called polymer-based liquid nails. It is best to start pasting from the middle of the room. The adhesive must be applied in a strip around the perimeter of the tile and dropwise in the center. Having glued a square of the first four tiles, they should be aligned relative to each other and the marking lines. Since liquid nails are quite thick in consistency, this step will not be difficult. This way the entire ceiling is covered. The final tiles along the walls are trimmed if necessary before gluing.
At the end of the work, the seams between the tiles must be puttied. A narrow spatula works well for this purpose. It will create the appearance of a uniform surface without seams. Finally, the tiles are primed and painted in two layers of water-based paint.
Preparing the base
Before gluing tiles to the ceiling, the surface must be prepared. First, we remove everything that can fall off. If there is a significant layer of whitewash on the ceiling, it is better to remove it - although the ceiling tiles weigh little, over time they can fall along with the whitewash. Therefore, we clean it dry with a spatula or wash it off with water. If large “craters” are formed during the cleaning process, it is better to seal them. It is easier to use starting putty or the remains of any plaster composition for this.
Before tiling the ceiling, you need to prepare it.
If the base is loose, free-flowing, you cannot do without a primer. For concrete it is better to choose “concrete contact”, for a gypsum base - any deep penetration composition. After drying, you can begin gluing polystyrene or foam tiles to the ceiling.
Applying glue
Depending on the glue used, its application may vary, but the general principles remain the same. For example, glue is applied either dotted or in a solid line to small protrusions on the inside of the product. If there are none, then it is applied in the corners and in the center.
It is best to apply putty or glue directly to the tiles so as not to overlap the ceiling markings. This is best done with a comb used for tiling. If there are uneven surfaces up to a centimeter, use a comb with a large tooth of 11 millimeters or more. In the event that you see that the applied glue will not be enough, you can carefully apply it to the ceiling. This must be done in such a way that the drawn axes are not erased, and the direction of spreading the glue on the ceiling and on the tiles is opposite. For example, if you applied glue on the tiles towards the door, then on the ceiling you need to spread it in the direction away from the door.
Special glue, for example ELTITAN, needs to be applied differently. Since you need to wait 15-20 minutes before laying, you can save your own time if you apply glue to a whole batch of tiles at once - 3-5 at a time.
Tool
You need few tools to work with foam tiles, and they are all quite accessible.
You will need:
- painting cord for marking the ceiling before gluing;
- scissors or a special mounting knife for cutting tiles;
- spatula (as well as putty) for leveling the surface of the ceiling before gluing;
- application roller and primer;
- thread, tape measure and pencil for marking tiles;
- a brush (or gun) for glue, a clean cloth to remove excess glue.
Sticking on a whitewashed ceiling
You can finish the ceiling surface with tiles on almost any base covering. But it is not always possible to glue ceiling tiles to a whitewashed ceiling. In this matter, everything depends on the following points:
- type of whitewash;
- features of applying old coating.
If chalk whitewash has been applied, then it is better to refuse tiles as a ceiling finish. The material will definitely start to come off.
Next, we’ll tell you how to stick tiles to the ceiling after whitewashing using lime. Old whitewash will have to be removed if:
- old finishes easily come off the surface;
- there are several layers of lime whitewash on the ceiling that are already peeling off;
- Frozen lime was used as whitewash, reminiscent of the chalk coating method.
The tiles used in the case of an old whitewash coating can only be light. These can be profiles made of polystyrene foam or extruded polystyrene foam.
Installation of tiles consists of several stages:
- preparatory work;
- primer of the cleaned surface;
- marking;
- installation of foam profiles with finishing.
Let's take a closer look at how to properly glue tiles to a whitewashed ceiling.
Preparatory work
Preparatory activities consist of the following:
- run your hand over the old whitewash coating and make sure that the whitewash does not smudge;
- then the surface is cleaned with a brush, then wiped with a damp sponge;
- After the previous steps, you need to check again how well the old layer holds up. Using a spatula, remove any suspicious areas of whitewash. If the lime begins to fall off, then you need to remove these parts, capturing a few extra centimeters.
The preparatory work has been completed and priming work can begin.
Applying primer
The primer improves the adhesion between the base ceiling surface and the adhesive.
The primer is applied as follows:
- before using a deep penetration primer, the composition is shaken and poured into a special container from which it can be taken with a roller;
- the roller is impregnated with primer and lightly squeezed. Then you need to roll over the cleaned whitewash surface of the ceiling. The layer is applied thinly. To reach hard-to-reach areas, use a brush;
- you need to wait for the primer layer to dry completely, then apply a second layer.
If large defects are found on the surface, they need to be puttied.
Marking
The quality of the future finishing of the foam cladding depends on the correctly applied markings.
The markup is done like this:
- mark a point at the intersection of the ceiling diagonals. This will be the center mark;
- Next, lines are marked along which you need to align the foam tiles. The location of these lines depends on the installation method.
You don't have to mark the entire ceiling surface. You can mark only two central lines, then align the remaining profiles along them.
Sticking
Before installing the panels, you need to cut off any burrs from them. It is better to use liquid nails or polymer glue as an adhesive.
Installation is done like this:
- installation starts from the center of the ceiling;
- glue is applied around the perimeter and center of the profile;
- the profile with applied glue is aligned with the markings and pressed against the ceiling;
- This is how a square of panels is laid out, and subsequent foam profiles;
- gluing in corners, at joints is carried out after trimming the profiles;
- After the glue hardens, the gaps between the profiles are puttied.
To finish and seal putty joints, you can paint foam tiles. If the profile has a rough rather than glossy structure, then the surface is pre-primed. The paint is applied in two or three layers using a roller. The first layer goes along the direction of the light, the next one goes across the natural light.