Rubber boots and shoes made of EVA are worn not only by fishermen, hunters and tourists, but also by ordinary city residents. Due to its waterproofness, the material has gained popularity, however, punctures, cuts and other damage occur with it much more often than with any other shoes.
A puncture can be caused by stepping on a branch or protruding piece of ice. Experienced users of EVA shoes know that they should always carry a repair kit special for this material. This article will tell you how to seal rubber boots, as well as PVC and EVA boots at home.
What do you need for work?
To repair boots made of EVA material, it is necessary to prepare a repair kit consisting of two patches and an adhesive composition.
The patch is cut from any durable, waterproof material.
Additionally you will need:
- degreaser;
- rags to remove excess adhesive mixture protruding beyond the edges of the patch;
- a piece of fabric;
- 2 bags.
To repair PVC shoes, in addition to patches and glue, you need:
- fine-grained sandpaper;
- degreaser;
- a rag to remove traces of glue along the edges of the patches;
- hairdryer
To protect the skin of your hands from the influence of glue, all work is carried out with rubber gloves.
How to care for rubber shoes?
You can store EVA waders, like rubber (silicone) ones, in the utility room or on the balcony. This material can withstand low temperatures well. The storage location must be at least 1 m away from the heat source (for example, a heating radiator). Shoes should not be exposed to direct sunlight.
It is recommended to wash shoes after each use. A soft cloth and soapy water (or warm) work well for this. It is recommended to wash not only the outside, but also the inside. When the product is dry, it can be removed. It is recommended to store in an upright position. There should be no pressure from foreign objects on the shoes. Otherwise, the shape of the product will be deformed. Before long-term storage, it is recommended to additionally wipe the surface of the boots with a water-glycerin solution.
Shoe covers can be washed in a machine at a temperature not exceeding +40°C. Dry them naturally.
How to seal boots
For shoes made of ethylene vinyl acetate, a special EVA glue is used.
- The resulting adhesive seam does not allow moisture and direct flow of water to pass through;
- the composition does not spread during gluing;
- after application, the mixture acquires a yellowish tint, but over time it becomes completely transparent;
- due to the long service life of the composition, shoes will not leak for a long time;
- since the product is spread in a thin layer, it will last for a long time;
- period of use – 2 years.
For EVA, you can also use the universal composition “Moment”.
These products are not suitable for PVC. Repair kits are sold for rubber boots. They are convenient to use for quick repairs while fishing or hunting. The kit includes glue and a transparent patch film. After gluing the patch, the adhesive seam dries in no more than an hour. Hunters and fishermen often use the KU-3105 repair kit.
Composition and distinctive features of EVA glue
The composition of EVA adhesive is a polymer composite based on foamed ethylene vinyl acetate.
When compared with other adhesive solutions, the following list of distinctive features of EVA can be identified:
- The polymer used in production is elastic and finely porous, which gives the finished product an orthopedic quality - a memory effect. When eliminating defects, the glue restores and preserves the original shape of the product.
- The solution is resistant to moisture, so the restored shoes can be worn in all weather conditions, and can also be used for fishing, when you often need to stand in the water.
- The polymer is wear-resistant, which eliminates the need for frequent repairs of products. In addition, the solution is impervious to chemically aggressive substances, including solvents and oils.
- EVA glue has a long shelf life, does not become moldy over time and does not promote the growth of bacteria.
- The substance is hypoallergenic, which expands the possibilities of its use in the field of repair of medical knitwear and footwear.
Along with a large number of positive aspects, EVA glue has a disadvantage, which is insufficient mechanical strength. The sealed area can be easily pierced or cut with a sharp object.
Preparing boots
- Before filling the hole, dirt must be removed from the damaged area, washed and dried.
- A patch is prepared separately; it can be cut from old fishing boots, waders or tires.
- The reverse side of the patches is carefully rubbed with sandpaper or a file to improve the adhesion of the glue to the surface.
- The surface of the shoes is degreased with acetone or another solvent.
- The adhesive mixture is selected. It is better to use products that indicate that they are intended for gluing shoes or rubber.
First study the instructions on the glue packaging.
Is it possible to repair the soles of rubber boots?
If the puncture is small and internal, for example, from a nail on the sole, then it is not recommended to enlarge the hole with sandpaper. In case of internal damage, the glossy layer is missing, so there is no need to clean it. Access to the damaged area can be achieved by turning it outward. To do this, you will need to bend the shoes in the area of the defect. The puncture is treated with an alcohol-containing compound or other degreasing substance. When it wears off, the surface will be ready for further work.
Shoes must be kept curved, as when treating with a degreaser. Glue is applied to the defective area, which independently and evenly fills the entire space, and is returned to the boot in its original position (do not bend). Just wait until the glue is completely dry.
When the glue is completely dry, you can check the quality of the repair work. To do this, you will need to place the boot on a paper napkin and then pour water into it. If the sole was sealed correctly, the paper will remain dry.
Sealing EVA boots
- The cut area is compressed so that the porous EVA base protrudes out.
- Apply glue to the damaged area.
- 5 minutes after applying the first layer, the glue is applied a second time.
- Another 5 minutes later. The edges of the cut are joined end to end and compressed tightly.
- The glue is applied thinly each time so as not to reduce the quality of the gluing.
- Complete hardening of the seam will occur within a day.
There is no need to use patches to repair minor cuts on EVA shoes.
Purpose
EVA glue was created specifically for the rapid repair of products made from ethylene vinyl acetate. Most often, the solution is used for the restoration of shoes made of this material, when it is necessary to ensure a high level of water resistance. Such shoes include hunting and fishing boots, as well as silicone varieties.
The foamed polymer contained in the composition not only protects against water penetration, but also retains heat due to its special structure.
The characteristics of the solution also make it possible to use it for repairing polyurethane products. They are actively used in the fields of medicine, decoration, and construction. After application to the object being treated, the solution dries and becomes transparent, leaving no visible streaks or stains on the surface.
See also
Composition and use of conductive glue, the best brands and how to make it yourself
Sealing PVC boots
- The damaged area is sanded and degreased.
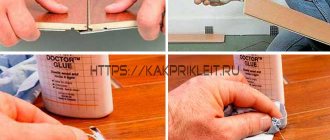
- Glue is applied to the cut and the underside of the patch after 15 minutes. re-application is done.
- After 30 min. After the second layer, the glue is heated with a hair dryer.
- A patch is applied to the damaged area, heated by a hairdryer, both on the outside of the boot and inside it.
- The patch on the shoe must be held for at least 5 minutes, from the inside the patch is pressed with a rag wrapped in a bag.
- A load wrapped in a bag is placed on top of the taped boot. You can use shoes 24 hours after repair or after the time specified in the instructions for the glue.
How to seal leather boots?
How to seal shoes
- thoroughly clean the repair area;
- remove threads, remaining glue and degrease (alcohol, acetone);
- apply glue following its instructions for use;
- Carefully press the areas to be glued together (for this it is better to place the load inside);
- stand for at least 20 hours.
Interesting materials:
How to connect Beats headphones to Android? How to connect iPhone 7 headphones to a computer? How to connect JBL headphones to PS4? How to connect headphones to Honor Magic Watch 2? How to connect headphones to iPhone 7? How to connect headphones to a laptop Wireless? How to connect Sennheiser headphones? How to connect Sony headphones via NFC? How to connect Sony WH 1000XM3 headphones? How to connect a navigator to a tablet?
Sole repair
- First, the sole area is processed on a sharpening machine; it should become completely smooth.
- For the sole, a patch will not give a long-term result, because the patch will quickly wear out while walking. The sole can only be sealed with sealant or liquid patch.
- The smoothed surface is cleaned and degreased.
- The sealant is injected into the cut (or puncture) and applied twice over the damage.
You can place a small piece of nylon into the crack on the sole and heat it thoroughly with a soldering iron. This repair is enough for 2-3 uses of shoes.
Pros and cons of EVA
Positive aspects of use:
- Seam resistance to moisture and water. After restoration, the shoes can be easily washed under running water, and there is no need to worry about leakage.
- Reliably glues even in inconvenient places.
- When exposed to temperatures, the seam does not lose its properties and does not crack.
- The viscous consistency prevents the substance from spreading during repairs.
- The seam is not noticeable after drying.
- Availability.
- Economical. Manufacturers recommend applying a thin layer. The quality of gluing cannot be increased by the thickness of the layer.
- Hypoallergenic, the seam does not absorb foreign odors, and dirt is easily washed off.
The nuances of repairing shoes with voids
To reliably seal the sole of a shoe, you need to carefully examine the rubber that covers the honeycomb of the base. In places where it is damaged, it must be removed. Clear all cavities of debris, fill with sealant and pieces of porous rubber.
Before gluing, it is mandatory to degrease the shoes with a special product that is safe for the material. Do not neglect this point, otherwise the seam will be unreliable and will quickly come apart.
conclusions
Wearing repaired shoes with your own hands is comfortable and pleasant. And saving on paying for a shoemaker’s services is even better. We hope that the recommendations in the article helped you figure out how to seal sneakers and other types of shoes with your own hands so that they last for many years. Before starting work, we recommend watching training videos on how to properly glue rubber and other popular materials in order to understand all the intricacies of the work.
The article discusses the best types of glue for shoe repair. Follow the recommendations on how to repair soles at home, stock up on the necessary tools and get to work.
How to glue the sole of a shoe with your own hands: cold and hot method
Now that a high-quality adhesive composition has been selected, it’s time to start repairing shoes yourself. In practice, there are two most popular and effective ways to properly glue shoes.
- Cold technique . It is quite easy to use and does not require any special skills from the master. If the sole bursts in half, then just clean the joint, apply adhesive to it and firmly press the two halves. It is important to ensure that there are no voids left in the seam. After the parts are securely connected, the product is placed under pressure and left for at least 10 hours.
- Hot technique . How to glue parts this way? The manufacturer advised using glue to repair shoes using this method only in cases where the sole is very hard. You need to apply the adhesive to the top of the shoe and leave for half an hour. Afterwards, the sole is heated using a burner or hair dryer, pressed to the top and held for at least half a minute. You can put on shoes after such gluing only after two days.
Both of these methods make it possible to ensure high bonding strength of parts. The seam resists moisture and frost.
Sports shoe repair: sealing the soles of sneakers
Most often, sports shoes, namely sneakers, tear during wear. Are you wondering how to glue the sole to sneakers for which, at first glance, nothing will help? Repairing the soles of sneakers with your own hands is not a difficult task, but you need to do everything correctly. Due to their specific nature, such shoes have a soft bottom part, so holes easily appear on them.
To seal worn shoes, you should thoroughly clean the hole from dirt and debris. Then treat with a degreasing agent, and only after that pick up the glue. If the hole is too big, we first glue a fiberglass mesh. Next, you need to fill the hole with glue, and then secure it with construction tape so that the surface remains perfectly flat.
The specifics of how to seal the soles of sneakers are simple and clear. To reliably glue sneakers, you can use domestically produced epoxy resin. If the sole of your sneakers often peels off in the toe area, then before gluing, the area should be well sanded and degreased. Then cut out the patch, process it as well and apply glue to both surfaces. Press the sole onto the top of the shoe and hold for 15 seconds, then place under a press for 24 hours.
What shoe glue to use to fix a hole in a sneaker?
What kind of adhesive should be used to seal the sneakers yourself at home? Fixing a hole in the sole is not difficult. But as for the glue, it must be strong, elastic and abrasion-resistant. For these purposes, we recommend using Seam Grip from an American manufacturer. It has ideal seam elasticity, so it can be used to securely seal rubber. In addition, the following adhesives are suitable:
- Polyurethane adhesive Desmokol;
- EVA;
- Secondary glue Super Moment for shoes;
- Kenda Farben SAR 306.
Professionals recommend using Desmokol at home; it is easy to use for DIY shoe repair. To do the job correctly, we recommend watching a video on how to glue a hole in a shoe:
How to repair winter boots at home?
Most often, the sole of winter boots resembles a honeycomb, and voids form in them over time. It is difficult to seal boots with such problems, but it is possible. Empty honeycombs are filled with micropore scraps or another type of rubber, but only porous. To carry out this work, you will have to bend the insole, and then fill everything with sealant.
Sometimes you also have to replace the insole, because it shrinks over time. Therefore, we glue it after filling all the honeycombs. When the sealant has completely hardened, the surface must be thoroughly degreased and the PVC boots must be sealed using the usual method. Then coat it with a thin layer of glue, press it and put it under pressure. Before you get started, we recommend watching the video instructions on how and with what to seal the rubber sole:
Leather boots: how to restore their appearance?
Often, when wearing leather shoes for a long time, cracks and tears appear on their surface. How to seal boots and restore their original appearance? There are several ways to solve this problem. But first you need to find out the level of damage, and then begin to fix the problem.
Liquid skin will help restore a beautiful appearance. It can be purchased at a shoe store. Before applying this product, you must carefully cut off the skin in areas of severe damage. Next, clean all areas, degrease, and only then use the product.
How to seal boots if the tears are very large? You can use shoe glue, which is applied to the torn piece with a cotton swab. The tear site is smoothed out well, pressed with a finger and held for a couple of minutes. We recommend that you wrap your finger in a rag first, otherwise it may stick.
Resurrecting rubber boots
Before you start working, you should decide what to seal your rubber boots with so that they can serve you for some time. For rubber boots, glue based on neoprene or polyurethane is suitable. The methods of their use are very similar. We glue the elements, strictly following the instructions.
- First, you should thoroughly clean the material from dirt and degrease it with acetone.
- Next, sand the entire surface onto which the adhesive will be applied. There is no need to touch the textiles.
- Apply glue to both surfaces. You don’t have to think long about how to glue the soles of rubber shoes. Desmokol or Nairit are perfect. After application, you need to wait about 5 minutes, because this will only be the first layer.
- When it has dried, apply another one and wait a quarter of an hour. Then you should wait until it dries completely.
- How to seal a rubber boot more securely? Using thermal activation. To do this, the glue on both parts is heated with a hairdryer, and then the damaged parts are connected.
- Press them well together and wait for them to dry. This will take at least 24 hours.
After correct manipulations, shoes can last for many more years.
How to restore the adhesive fastening of a sneaker using a patch
Repairing the sole of a sneaker is not too energy-intensive, but quite painstaking. If the rubber has simply moved away from the top, then using a cotton swab you can apply glue, press down and leave to dry. And if the protruding part of the sole is worn out, then overlays should be used during repairs. How to glue them so they don't come off?
Before gluing the sneakers, their surface should be well sanded. Cut a piece from polyurethane that exactly resembles the missing part of the sole. The cut is also processed and degreased. Apply glue to the sole and overlay, press both elements firmly against each other and leave under pressure for a day.
Another way
If the sole bursts, you can fill the resulting crack with nylon or rubber. To do this you need:
- Trim off all excess pieces of the crack in the sole. Wash your shoes well and dry your shoes, because the rubber insert will not stick to the dust.
- Carefully sand all joints.
- Cut a piece from an old bicycle tire. Then sand again and degrease with acetone.
- Bend the shoe, opening the crack, then coat all the cuts with glue and place the piece in the recess.
- Close the crack and put the shoes under pressure for a day.
DIY boot repair: the best way
Whatever type of glue is chosen, it is important to follow the technology for its use. After all, if you do not follow the instructions, the appearance of the boots will deteriorate and their service life will decrease. Once the adhesive has been selected, it is important to know exactly how to glue the sole to the shoe securely and firmly.
To seal a cracked shoe sole, strictly follow the step-by-step instructions:
- remove the insole;
- Use a piece of leather from the inside of the shoe to press the hole;
- Squeeze glue out into the crack from the outside so that it completely fills the entire space;
- hold the piece of leather for 10 minutes so that the adhesive composition cools down a little;
- leave the shoe upside down until the glue has completely hardened;
- carefully cut off the pieces of leather inside the shoes;
- put the insole back in.
How to fix shoes?
It is much more difficult to repair women's models on the platform. For these purposes, adhesive for shoe soles should be chosen based on polyurethane. To seal your shoes you will need:
- knife with a sharp blade;
- sandpaper;
- universal glue;
- degreaser;
- dry rags;
- brush with stiff bristles;
- newspaper;
- putty knife;
- a piece of porous rubber.
Now you can get started:
- Initially, carefully inspect the product and assess how damaged it is;
- remove metal heels;
- if the sole has come off in several places, then it is better to completely tear it off and re-glue it;
- treat the surfaces with an abrasive material, then degrease and remove the remaining old glue with a spatula;
- dry the shoes and apply adhesive to both halves;
- spread the adhesive over the entire surface with a brush, then wait a quarter of an hour and apply the glue again;
- wait again until the glue dries, then attach both elements to each other, press down and place under pressure.
To learn more about how to repair shoes using glue, we recommend watching the video instructions:
