The comfort of a home depends on many factors, including the quality and appearance of the flooring. We all love aesthetics, beauty, so that everything is in a single beautiful style and all design elements match each other.
Every person appreciates comfort and wants to make their apartment or house an even more comfortable place to live. And creating such comfort requires certain knowledge, financial investments and the ability to maintain it so that individual elements do not gradually deteriorate.
The choice of flooring depends on many factors, the main one of which is the individual wishes of each person. Some may like parquet, others prefer cheap and simple linoleum, and many choose laminate.
Advantages and disadvantages of laminate gluing
Laminate is one of the most popular types of flooring, which is distinguished by its beautiful appearance, quality and reliability.
Many people wonder why glue is needed for laminate flooring, whether it needs to be glued and how to use it correctly?
There is a myth that slats need to be glued to the floor. Naturally, this is complete absurdity and nonsense. This type of flooring can only be laid using the floating method, and a special adhesive is used to seal the joints (seams) between the panels.
Gluing laminate floors together is just one of several popular, proven installation methods, and you can resort to it after analyzing the pros and cons and compare it with conventional installation without the use of glue.
To better study the issue, it is worth studying both the strengths and weaknesses of this method, then summing up the results and finding out how to glue the laminate to the laminate in the best way.
Features and Pros:
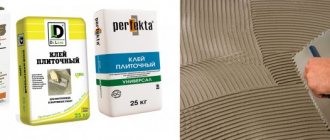
- When gluing panels, it is necessary to use a special specialized composition for laying lamellas in order to ensure a certain strength indicator.
- This type of covering is very durable and will last at least five to seven years longer than a similar flooring with a conventional lock fastening.
- The installation process is absolutely independent of the geometry of the room; neither corners, nor curves or doorways play a role.
- There are special water-repellent versions of compounds, when used, moisture will not get inside and under the flooring.
Along with the advantages, this method also has a number of disadvantages:
- The first of them is the impossibility of using the floor immediately after installation is completed. You should wait about a day for all joints and seams to dry completely.
- Another important drawback is the impossibility of using this type of coating if you want to install a heated floor system.
- Financial costs are also higher, as is the total installation time of the entire structure, and reusing the panels is no longer possible, even if you clean them of glue.
- It is not so easy to carry out installation on your own, it is difficult, and if you do not have the proper experience, then it is much better to use the services of a specialist, but this is again a financial cost.
The procedure for laying laminate using the adhesive method
Installation of laminate flooring with glue can be done without outside help, special knowledge or additional tools. The main thing is to strictly follow the installation technology and be attentive to each stage of the work.
Laying laminate on glue is done as follows:
- Before applying the glue, the ends of the laminated panels are thoroughly cleaned of dirt and dust.
- Before gluing, the joints are degreased using special solutions designed for working with laminate.
- The areas where the glue is applied are cleaned with fine-grained sandpaper.
- The glue is carefully applied to the surfaces to be glued, and its excess is removed.
- Laminate panels are connected to each other as tightly as possible.
- Excess glue is removed again.
- The panels pressed tightly against each other are kept for at least 15 minutes.
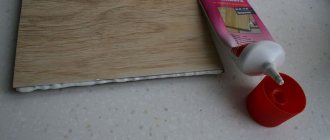
When choosing an adhesive for laminate flooring, you need to take into account not only the reputation of the manufacturer and the requirements for the laminate floor, but also the date of manufacture of the adhesive mixture, and also pay attention to the composition of the adhesive and its environmental safety. The main thing is that the composition does not include ethereal volatile compounds that are dangerous to human health. Fortunately, today manufacturers offer an incredibly wide range of adhesives for laminate flooring at quite affordable prices. Therefore, finding a suitable glue will not take much time, and purchasing it will not require large expenses.
Knowing the properties of laminate glue, the features of a particular type of adhesive composition and the technology for laying laminate on glue, which we discussed in our article, you can install the laminate on glue in the shortest possible time, without resorting to the help of specialists and using only your own strength .
How to use laminate adhesive?
Obviously, the key functions of the glue are primarily to protect seams and joints, as well as to give the floor a more beautiful appearance. Locking systems are endowed with a lot of weak points, and the seams are not sealed. The service life of coatings with interlocking joints is lower.
When laying such a floating floor, all panels are glued together, rather than attached to the underlay or sub-base. The end of each new panel is attached to the end of the previous one, each new row is shifted by half relative to the previous one. This ensures high reliability of the entire structure.
It is impossible to figure out how to glue laminate to laminate without understanding how the monolithicity of the coating is ensured.
There are two methods for this:
- gluing laminated panels together;
- tightly fixing the planks to the base (not recommended!).
The second option is applicable only to large areas, and has recently been used extremely rarely, since wooden structures are sensitive to even the slightest changes in the microclimate.
Therefore, it is quite advisable to choose the first type - with a movable base. The ends of each subsequent plank are attached to the ends of the previous one. When laying the second row, the panels are glued together, but as mentioned above, it is necessary to ensure that the rows are offset. Thus, a reliable floor with sealed seams is obtained in just a few hours of work.
During work, it is recommended to observe a technological break. Having laid the first three rows with seams sealed, take a break and return to installation only after the glued joints have dried. This is how laminated boards are glued together.
The need for gluing laminate
Laminated panels are a popular floor covering that includes several compressed layers of fiberboard, MDF, and polyvinyl chloride tiles. The surface of the board (lamella) is a special film, the purpose of which is to protect the material from abrasion, moisture, and damage. The inner layer includes a special impregnated kraft paper backing that will be in contact with the backing. The side edges are covered with protective wax; the ends have locks for the joints of the boards.
The class of material is selected depending on the conditions of its operation; installation on the floor is carried out by simply joining the strips or using a locking connection. Previously, a special laminate without locks was produced, which could only be glued. Now any material has locks, regardless of the fastening method.
So is it possible to glue this material? This is a very necessary stage of work; gluing will seriously improve the quality of installation, its strength, and durability. If you manage to purchase a laminate with a structure without locks, you will have to glue it when laying it in any case.
How to choose the right glue?
It is possible to glue a laminate reliably only if you use a high-quality adhesive composition that has the necessary parameters and good characteristics.
It is not recommended to purchase products that contain synthetic solvents as components, since they are not used for residential premises.
When choosing glue, it is better to adhere to certain recommendations of professionals:
- high resistance to exposure to dampness and moisture is a very important indicator; it is optimal to choose hydrophobic solutions;
- good adhesion (cohesion, adhesion) with the selected flooring; without this parameter, it is impossible to obtain long-lasting and reliable bonding;
- prostate removal of excess, drops and stains, since during the work it will not be possible to do without the substance getting on the front side of the lamellas;
- long service life of the laid covering;
- ease of installation, this is very important for craftsmen who carry out installation with their own hands;
- environmental safety of the environment, because the flooring is carried out in residential premises;
- good resistance to changes in temperature and humidity;
- ability to withstand periodic heating and cooling;
- high strength and reliability coefficient when exposed to any mechanical circumstances.
Choosing the right adhesive to be used during the installation of laminated panels is not at all difficult; the main thing is to correctly understand the recommendations and rules described above. It is also important to remember that a high-quality product cannot be relatively cheap, so you must first prepare for financial costs.
Tips for choosing glue
How to glue laminate and how to choose the right material? It is important to take into account the basic criteria by which all such compositions are produced. They must be resistant to moisture, otherwise gluing will not make sense. The glue must also provide excellent adhesion to the substrate. Below are other rules for choosing a product.
Base for laminate
You can glue the laminate board to concrete (screed), plywood, OSB. Depending on the type of substrate chosen, you should look for an adhesive composition. It must be suitable for the base material, providing sufficiently strong adhesion.
Purpose of the premises
The load on the floor must be taken into account when selecting glue. If laminate is installed at home, the loads are moderate, but in shopping centers, stores, and office spaces, the special hardness and strength of the adhesive is important.
Conditions of use
In addition to the load, it is necessary to provide for the frequency of contact with water. Sealing of joints and the ability to withstand certain operating conditions are also written in the instructions for the glue. These characteristics should not be neglected.
Temperature resistance
Typically, laminate is used only inside heated rooms; it is not used at subzero temperatures. Therefore, temperature fluctuations are taken into account mainly when installing heated floors. But the use of the adhesive method for heated floors is seriously limited and is almost never practiced; only a professional can perform such a task.
Drying time
The shorter the curing time, the more difficult the installer’s job. If a dry film forms on the surface of the composition, adhesion to the surface deteriorates. A longer time between application and polymerization will be more convenient for the master, and will also ensure high quality and good adhesion. Therefore, you should not strive for a minimum drying time; it is better to wait a sufficient period before starting to use the coating.
How to glue laminate together?
The basic rule when choosing glue is to purchase exactly the composition that is designed for this type of work. The glue must be of a brand adapted specifically for laminated panels in order to achieve soft gluing and without dirt on the seams.
Water-dispersed solutions
If laying the flooring will be done with your own hands and means, it is best to choose these universal solutions.
Such compositions are intended for installation using the “floating” method - gluing the lamellas together without fixing them to the subfloor.
The price of the product largely depends on the components that are added during the manufacturing process of the adhesive, as well as on the manufacturing company.
Based on synthetic resins
The use of products based on such resins guarantees durability, quality strength and high resistance of laminated flooring to side effects from moisture.
But it is not advisable to use them in the process of installing floors with a thickness of less than 14 mm.
In most cases, products based on synthetic resins are used for auxiliary processing of locking joints and making the entire structure solid.
Two-component polyurethane compounds
When laying laminate using the adhesive method, two-component polyurethane waterproof adhesive mixtures are ideal.
Two-component laminate adhesive does not require pre-treatment of the ends of the panels, as well as their primer before installation, and in addition, it guarantees excellent adhesion and hardens quickly.
Cross-linked polyvinyl acetate is used as a binding element in such adhesive mixtures, which ensures the strength of the connection and the durability of the floor covering.
One-component polymers
Polymer one-component laminate adhesive does not contain water or solvents. The conditions for using this adhesive require a strong, level and dry base.
One-component polymer-based adhesives harden very quickly, so excess should be removed immediately after laying each subsequent panel.
Under no circumstances should you use water-based compounds (PVA glue and other similar adhesives), as they will not achieve the intended result, but, on the contrary, will only damage the panels.
Ideally, purchase glue from a well-known, time-tested manufacturer to have confidence in quality and reliability. A sales consultant will always advise and help you decide on the choice of an inexpensive but necessary product.
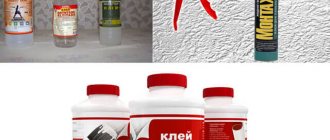
Among the most popular brands are:
- "Cleo" is a French glue produced in half-liter bottles.
- Tomsit is an environmentally friendly two-component product that is used for all types of wood coverings. This composition is moisture resistant and is often chosen for use under heated floors. Sold in a package weighing 0.75 kg.
- "Kisel" is a high-quality German glue, also available in 750 ml bottles. This glue is most often used when you need to fasten the edges of an old coating.
- As an alternative, you can use a sealant to seal the joints, especially ClickGuard or Masterfix brands, which are water-repellent. As a rule, it is sold in 290 ml cans.
When purchasing sealant, be sure to pay close attention to the color, since after installation it should harmoniously match the shade of the flooring. So clearly establish what exactly you need - spruce, pine, oak or beech.
Popular glue brands
There are several manufacturers that produce really high-quality products. The most accessible are three brands of adhesives:
- "Tomsit." Leader in this segment of goods for the construction market. Tomzit adhesives are not affected by moisture, they are not affected by temperature and household chemicals. Even with a very long service life, adhesives do not lose their adhesion quality. The cost of funds is moderate, the price of work will be very profitable. Adhesive can be used to attach vinyl adhesive laminate and other materials, including wood flooring.
- "Cleo Laminate". Produced in France, it is a high-quality product for any laminated flooring. The elasticity and strength of the connection are the highest, and it will not be difficult to remove glue from the laminate if there is excess of it - there will be no stains left.
- "Kisel". This is a German brand that allows you to connect conventional and floating floors. The brand’s adhesives are environmentally friendly, free of toxic substances, and safe for humans. The cost is higher than the price of the Russian analogue, but the quality is valued higher by professionals.
There are also less popular products on sale:
- BASF FAST 3000. It is a synthetic two-component product with a minimal amount of evaporation. Features fast drying – 2 hours.
- SIPOL. Italian glue with very high quality of adhesion to surfaces. Suitable for gluing laminate to any base, including concrete screed without a backing. Also sold as a two-component formulation.
- ADESIV PELPREN PL6. Another two-component product, characterized by the absence of water, solvents, and safety. Easily removed from the surface of the laminate in strips.
- FORBO 157 MS. Consists of a one-component mixture, produced in Switzerland. It dries in 2 days, is expensive, but can be used even on heated floors, and does not emit harmful substances (does not contain solvents).
How to properly install laminate flooring with glue?
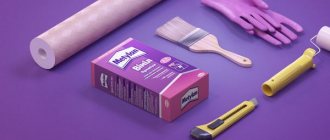
Before installation you need to first prepare:
- At a minimum, purchase the correct composition so that it is not water-based PVA, after which you will have displaced joints, a curved surface and swelling of the lamellas. After this, the damaged floor will no longer be repairable, and it will need to be completely removed and a new one laid. In highly specialized stores it is very easy to find a good, high-quality and inexpensive water-repellent composition that is suitable for this coating.
- Instructions from manufacturers are not a mere formality, but contain a rational grain, so strictly follow the instructions for use and do not overdo it with the amount of composition. The best method is to evenly coat the entire length of the joint groove with the substance, on both the short and long sides of the board.
The actual installation work consists of the following stages:
- You should lay the first row of panels, leaving a gap of 0.5-0.8 mm around the entire perimeter of the room. The first panel is placed with its groove against the wall, and after its installation, glue is applied to the surface of the groove of the board, which is adjacent. It is important to apply the composition as evenly and uniformly as possible.
- Next, you should insert the next panel into the groove with a tongue and groove and tap it using a mallet or a simple wooden block. If, after beating, residues of the composition begin to appear on the surface, they should be removed with a previously prepared damp cloth. Then you repeat the same thing until the first row of boards is completely installed.
- The first row of boards is installed, and you can move on to the second row. Cut the entire board into two halves so that the end seams are staggered.
- Apply adhesive to the side of the cut board and attach it to the panel of the previously installed first row using a block, and do the same operation to remove the protruding glue.
- Take the next board, apply the product to the side and end grooves and attach it to the first row of the second panel. Then repeat the same procedure with a damp cloth.
- After installing the third row, leave the structure for several hours to dry.
- Subsequently, you can continue installation until the coating is completely installed.
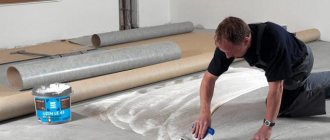
Leveling the floor before installation
For laminate flooring, leveling the floor is urgently necessary; without this stage of work, the consequences can be dire. Inexperienced craftsmen may not pay due attention to alignment, as a result of which they will receive the following:
- when laid on a curved surface, the load on individual elements will be higher, and the floor will deteriorate faster;
- the locking joints quickly become loose, and in just a couple of months they can begin to be damaged;
- Uneven gaps appear between the boards, which gives the floor an unaesthetic appearance.
The base must be as level as possible, and the materials used for this purpose must have high strength. Most often, leveling is carried out using tile adhesive, OSB and plywood, resulting in a so-called “dry screed”. Here are the features of the work:
- Plywood. Laying this material is advisable if the height differences are noticeable, but there is no high humidity in the room. Large deforming elements are removed and the floor is covered with an antiseptic composition. They cover the wooden sheathing with plywood, mount it on the floor, and secure it with self-tapping screws.
- Glue. You can also attach laminate to tile adhesive, making a kind of screed out of it. But this option is only suitable if there are small surface defects. The height differences in this case are no more than 3 mm. The glue is combined with sawdust or small shavings to prepare putty. The floor is poured with this mixture, leveled, and small cracks are sealed along the way.
- OSB. With this wear-resistant material you can easily make a dry screed, the price will be low. Installation is similar to that for plywood sheets.
Summarize
As you can see, the question of how to glue the laminate together is solved quite simply, and installation of the coating can be done by a person who does not have such experience. To do this, you do not need to have any special knowledge or skills; just attention, patience and following simple instructions are enough.
So if you have a desire to install the flooring in this particular way, you can safely cast aside any doubts and purchase everything you need to install the laminate.
Is a sealant justified in practice (When a sealant may be needed)
The use of sealant is justified if the laminate without moisture or water-resistant qualities is laid in a place where it may periodically come into contact with water. This could be the kitchen or hallway. In other cases, processing the laminate seams will only be a safety net. Even if you spill water on the laminate and wipe it right away, nothing bad will happen to it. And if there is a flood in your apartment, no sealant will save the laminate. Insurance is voluntary and requires additional costs. For a room of 50 square meters you will have to spend from 2000 to 3000 rubles on processing the seams.
The sealant is applied to the top tenon of the laminate. Lock joints are not processed because this may prevent the panels from being tightly secured.
In modern renovations, craftsmen refuse to use glue to attach the floor covering to the base. Laminate manufacturers talk about treating seams, but they say that this is not necessary with a high-quality laminate and leave the decision to use a sealant to the customer's choice. It is enough to choose the right laminate for a specific location and care for it according to the manufacturer’s instructions.
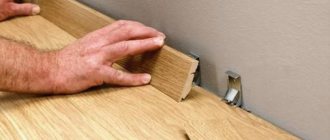
Methods for installing a T-profile
“How to install a T-shaped threshold? We've already laid the flooring! Give us a regular threshold with holes.” - sometimes our managers have to hear. “Uncle” was always for quality repairs. And to the question “What thresholds do you recommend?” our employees, as one, will answer: “T-shaped.” not out of spite or a sales plan, and therefore “T-eshka” looks great. The T-shaped threshold is beautiful: the heads of the nails do not stick out, and if the threshold is matched to the color of the floor, then the floor covering appears intact. Visually, solid laminate looks more expensive. And “T-eshka” is simply safer. Over time, the heads of the nails in the usual threshold become unscrewed and stepping on them is still a “pleasure”: your socks will tear, your legs will be scratched. In general, when choosing a threshold, the answer is obvious - “T-eshka”, all that remains is to figure out how to install it. Some people think that installing a threshold can only be done before laying the floor covering, while others do not think of installing a profile with glue. Let’s say right away that all methods are reliable, there is no “best”, and think “What to install on?” it is necessary based on the situation and the stage of repair.
If the renovation is just ahead and the flooring has not yet been laid, you can install a mortgage. This is a profile with a strip that is fixed under the floor covering. The profile can be bent radially, so the thresholds can be installed along a curved joint. There are two strips: for coating 9-12 mm in thickness and for coating 12-15 mm in thickness. The first is suitable for laminates, tiles, and engineered wood, and the second is suitable for parquet and thicker tiles. It is important that one of the coatings does not “walk”, i.e. did not expand from heat and humidity in order to rigidly fix the mortgage, usually tiles act as such a covering. In this case, a T-shaped threshold is installed as follows: under the floor covering (tile) where the expansion joint will be, a mortgage is inserted and pressed to the floor; another floor covering is laid with an indentation of 5-7 mm; After the coverings are laid and the embedded strip is fixed, remove the rubber insert from the embedded strip, then put the elastic band on the leg of the T-profile, and together with the elastic, hammer the T-profile into the embedded part.
If the floor covering has already been laid or both parts of the covering can “walk”, then bi-dowels will be needed. This is a dowel with a groove into which the “T-eshka” is inserted. Its size is 45 mm in length and 7 mm in diameter. It is important to understand that this method requires drilling and is not suitable for heated floors. To lay a threshold using a Bi-dowel, you need to drill holes at equal distances in the expansion joint, insert dowels into them, then insert the profile into the groove of the dowels and tap with a mallet for a tight fit.
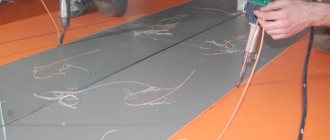
This is the simplest method that can be used after laying the flooring and does not require drilling. It is important to glue with rubber adhesive, which shrinks and does not crack under pressure from the expansion of the floor covering. We recommend TYTAN CLASSIC FIX adhesive. In addition to being rubber-based, it is also suitable for bonding non-porous surfaces. Typically, liquid nails are designed to glue porous surfaces to smooth ones, and with TYTAN glue you can glue an aluminum, stainless or brass threshold to any base: concrete, board or stone. In addition, the glue is transparent, so if you accidentally drop it on the floor somewhere, there will be no traces left. These liquid nails will not lose their properties in high humidity or freezing temperatures - they will be very convenient for gluing thresholds on the concrete porch of a private house. And the last pleasant feature of TYTAN liquid nails is that they set instantly and firmly. Even those who have never carried out repair work can handle installing the threshold with glue. Simply apply glue to the back of the profile header at intervals of 5 cm to 10 cm. The more often you apply the glue, the more securely the profile will hold. In fact, all three installation methods are not difficult. We described each one step by step so that even a non-expert finisher could understand it. Choose the one that suits your stage of renovation and situation, set the threshold and enjoy the aesthetic appearance of the flooring for a long time.
The need for an adhesive mixture
To obtain a solid laminate flooring, the slats are laid on the floor using locks using compounds for gluing together or tightly fixing the slats to the base. This raises the question, is it necessary to glue the laminate at all?
The answer is quite simple: complete fixation of the planks is not used, the panels are sensitive to changes in microclimatic conditions, and the coating quickly deforms.
But the use of compounds for sealing joints is simply necessary. Therefore, when laying, use a movable base, tracking the displacement by 1/3 of the panels, treating the ends of the boards with glue for fastening.
Installation of laminated panels
Based on the above, the main functions of glue are:
- Protection of seam connections and lamella joints from moisture.
- Protection from deformation.
- Improving the aesthetic appearance of the floor.
- Protection of the laminated coating from the appearance of cracks.
During work, you should not forget about the technological break: after laying three rows using the compounds, evaluate the result, continue working after the glue has dried. There are several types of special formulations; you should choose the most suitable one.
Installation technology
The laminate is laid on a perfectly flat surface. When laid on an uneven floor, the panels will become loose over time and cracks will appear through which moisture will penetrate and the laminate will swell.
During installation, it is necessary that the end part of the next panel fits into the end part of the previous one, thus creating a complete complete row. The rows are connected to each other by a locking connection.
The next row of panels is installed offset by half the length of the panel. To do this, the panel is visually divided in half and laid in a checkerboard pattern. Don’t forget to lubricate the end part and sides of the panels with glue.
Each plank should fit tightly without gaps. For tight installation, beat with a rubber hammer or block. Installation of the floor covering should be carried out at a temperature of at least 15 degrees.
Some people wonder if adhesive is necessary to install laminate flooring on wood floors, or if it is only needed for ceramic tiles. Is it even worth gluing laminate flooring to a wooden floor? Many people believe that this improves the durability and water resistance of the coating.
To do this, the wooden floor must be well prepared, without cracks or loose floorboards. The clean floor is degreased and covered with a primer. Each panel is coated with glue and laid on the floor. When connecting the panels together, you need to press them against each other and leave them there for 15 minutes so that the glue sets.
To prevent excess glue from escaping through the joints, experts advise taping them with masking tape.