How to join ceiling plinths in the corners is one of the main questions asked when repairing ceilings. When installing ceiling plinths, difficulties arise when it is necessary to adjust the joints of individual elements. And, if on straight sections you can stick the fillet on the first time, then you have to tinker with the corners. Therefore, a reasonable question arises: how to join the ceiling plinths in the corners so that the connections are invisible.
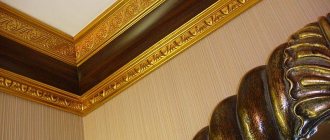
Correctly joined internal corner
It is important to know
A carpenter's miter box is a tool with which you can cut a fillet exactly at an angle of 45 °. The connected planks will form a right angle. A miter box of simple design is suitable for such work.
Miter box for joining skirting boards
If this tool is not available, you will have to mark using a ruler and a protractor. The cut lines are marked using a pencil. You need to understand that a fillet with internal cavities cannot be accurately cut in this way.
To make the cut perfectly even, you should use a jigsaw - when performing the operation with a hacksaw, the edges of the plinth will be torn.
The area where it is planned to install the plinth must first be leveled, cleaned of construction dust, and primed.
Installation secrets
A few tips to help you get the job done efficiently:
- The installation of the planks begins only after the finishing of the walls and ceiling is completed.
- When making cuts, it is not recommended to press hard on the plank with a tool: with too much pressure, the wood will crack and the foam will crumble.
- To join parts in the inner corner, the cut is made from the outside of the plinth; for the outer corner, vice versa.
- In order for the work to be carried out accurately, it is advisable to use a special tool (miter box), otherwise you will have to make an effort and be very careful to do everything correctly.
- To get rid of all cut imperfections, you should treat the joints with sandpaper.
- Before gluing the ceiling plinth in the corners, try on the parts and only then fix them.
If it was not possible to fit the fillets perfectly
Let's seal the gap with sealant.
It may very well be that the first time not everything will go as smoothly as we would like. In this case, it is better to leave a gap between adjacent elements of the baseboards, which can be masked using silicone sealant. To do this, carefully fill the gap with the compound, smooth out the sealant with your fingers, and remove excess mass with a wet cloth.
If the cut is smaller than necessary, and when you try to join the plinths, one of them “goes” to the side, take a utility knife and trim the cut, or sand it with fine-grained sandpaper.
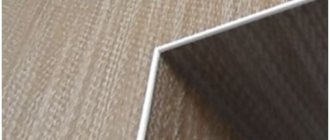
Cutting strips for 90° angles
When decorating the ceiling, it may be necessary to join the plinth for the external and internal corners, depending on the configuration of the room. Every room has internal corners, but not every room has external corners.
Scheme for trimming adjacent fillets
When placing the fillet on the miter box, it is important to consider that the side of the plank that is pressed against the side wall of the installation will be glued to the wall, and the side located at the bottom of the miter box will be glued to the ceiling.
Straps for right angles are cut at an angle of 45°. The fillet, which is planned to be placed on the wall on the right, is cut off from the left end. The plinth is placed in the tool, fixed, then cut with a sharp tool. Wooden plinths are cut with a hacksaw or jigsaw, plastic ones with a stationery knife.
If you use a manual one (knife or hacksaw), act carefully so that the cut area is smooth and the edges are not torn. Having completed this operation with both planks, they are first applied to the installation site and examined to see how tightly they fit together. If it was not possible to join the parts closely, the cut location is adjusted or another, better cut is made.
Manual trimming
Trimming the baseboard manually may be necessary if the angle is not straight or if the miter box could not be found. How to join the plinth in this case?
The angle is measured with a protractor and the resulting value is divided in half. The final number is the angle at which the planks need to be cut.
Using a protractor and a pencil, markings are applied to both baseboards. Using a utility knife or jigsaw, cut off the excess part of the fillet along the marked lines.
Place the finished parts on the corner and check the accuracy. If there are any shortcomings, correct them using a sharpened stationery knife.
Slicing without a miter box
How can you join skirting boards if you don’t have a miter box or a protractor at hand?
You will need:
- pencil and ruler;
- jigsaw or stationery knife.
Operating procedure:
- One plank is applied to the joint of the walls.
- Using a pencil, draw lines on the ceiling where the baseboard meets the surface.
- Remove the first bar, take the second one, and apply it at the site of the planned installation. Draw another line.
- The intersection of two marks on the ceiling is the point that needs to be transferred to both planks.
- After completing this procedure, a cut line is drawn on each plinth (from the edge of one side to the intended point).
- According to the resulting marks, a cut is made using a jigsaw or a stationery knife.
It may not be possible to cut the fillets perfectly evenly the first time. It makes more sense to first try making cuts on small sections of the baseboard.
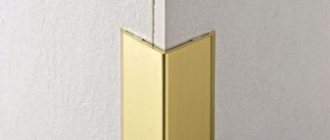
If you can’t make perfectly even cuts, you can use special decorative corners. In this case, there is no need to cut the strips - they are installed close to the decorative corner.
Cutting skirting boards for external corners
Having learned how to join ceiling plinths in internal corners, it is quite easy to understand the process of cutting planks for external ones.
The plinth is applied to the ceiling, and the area where the cut will be made is marked with a pencil.
How to join a ceiling plinth
The part is placed on the miter box at an angle of 45° and cut. If the plank is planned to be placed on the right side of the corner, then it should be cut on the right. Using the same method, cut the baseboard that needs to be installed on the right.
Afterwards, both parts are placed at the site of future installation and the accuracy of the fit is checked.
Some nuances
After the first corner is mounted, we can say that part of the path has been completed, and more difficult. Despite this practice, there are still some nuances. As a rule, many people make the mistake of cutting decorative elements to length. In order to avoid serious mistakes, it is necessary to cut with some, albeit small, margin.
To begin with, you should think about a 10-15 cm margin, although this is not necessary, since 1 cm is enough for a margin. Using a sharp tool, you have to cut the plinth several times so that it fits exactly with its “other half.” Naturally, this process takes a lot of time, but the result is worth the effort, and the slightest errors are leveled out with the help of putty. The only problem is plastic skirting boards, which require a perfect fit, since imperfections can hardly be corrected with putty. If you don’t have experience working with such skirting boards, the consequences can be unpredictable, especially since you can’t cover up visible flaws with putty, and if you do, then over time the putty will spill out, exposing the joints.
How to glue a ceiling plinth (baguette, fillet, moldings) Joining the plinth.
Watch this video on YouTube
Joining planks at non-standard angles
If renovations are carried out in a house that belongs to the old housing stock, the room may have non-standard shapes: for example, have rounded corners. The work of joining the plinth in such rooms is considered the most labor-intensive and difficult.
In this case, the fillets are joined using parts cut from ordinary skirting boards or using ready-made polyurethane moldings.
Prepare the planks yourself as follows: cut the fillets into pieces, taking into account the degree of curvature of the angle; in total, about 5 - 6 parts may be required. First, all parts are applied to the corner and adjusted if they do not fit tightly together, or if the bend of the corner cannot be repeated.
When all the parts are glued, the part is puttied, filling the voids if there are any left, and only then they start gluing the plinth on straight sections.
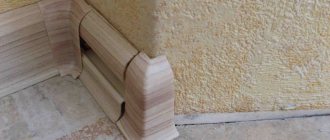
Gluing prepared parts
When installing, glue or liquid nails are applied to the back side of the plank at the points of contact with the wall and ceiling, and the ends of the product to be connected are also treated.
The glue-coated strip is applied to the installation site, carefully and not pressing it too hard. It is recommended to do this with the edge of your palm, especially if the baseboard is made of foam plastic, since dents easily form on it. In this case, glue may appear along the edges; it must be immediately removed from all surfaces with a clean rag or napkin. While the glue dries, the parts are fixed with masking tape.
After the glue has completely dried, the paper tape is carefully removed, the joints of the planks are filled with a sealant of a color that matches the baseboard material, or the cracks are filled with putty. The installation process is now complete. If necessary, the installed plinth is painted.
The process of installing ceiling plinths on internal and external corners with your own hands is quite simple, but the stage of cutting products requires great precision. If it is carried out incorrectly, the entire structure will be installed incorrectly, the planks will not fit tightly to the wall, and large gaps will form at the joints of the fillets.
How to properly join ceiling skirting boards: getting ready for work
To work you will need:
- baseboard;
- glue;
- stationery knife;
- metal hacksaw with fine teeth;
- ruler;
- roulette;
- pencil;
- miter box;
- sealant;
- dry clean cloth.
How to make a miter box with your own hands
As for the miter box, if you don’t have one, it’s easy to make the tool yourself. Take three sanded boards and connect them using self-tapping screws in the shape of the letter “P”. Now make the cuts so that the baseboard can be easily cut at the desired angle. Usually the middle line is sawed at an angle of 90°, and the extreme ones - 45°. The cut should reach the place where the side walls of the miter box are attached to the lower base. The side walls are made of both wood and aluminum. Metal tools will last longer.
Before gluing the plinth, the surface is puttied and primed
Before starting work, the ceiling surface and walls where the skirting boards are attached must be prepared. They are cleaned of dust and old finishes, smoothed with putty and primed. Any water-based paint that improves the adhesive properties of the glue is used as a primer.
Choose acrylic or silicone based glue. As an alternative, you can use putty, then, in addition to gluing the frieze, you will be able to eliminate unevenness on the wall surface. Glue is used to fix baguette to wallpaper, putty to walls.
Adhesive for ceiling plinths
“Liquid nails” cannot be used for plastic fillets, since they contain solvents that deform the baseboard.
If you wish, you can make your own glue. To do this, mix putty and PVA glue in a 1:1 ratio, give the substance 5-10 minutes to infuse. The solution must be worked out within 2 hours, as it hardens quickly. Polystyrene foam, plaster and wooden fillets are fixed to this glue.
To make it easier to work, mark a reference line under the ceiling using a paint cord.
In case of strong unevenness and distortions of the walls, the plinth will only highlight the imperfections. However, this rule also works in the opposite direction. Even with uneven corners, the situation can be corrected with the help of a correctly glued ceiling frieze. The main thing is to maintain consistency when working. Attach the first element from the corner closest to the entrance to the room. When installing, try to create as few joints as possible.
The need to join the ceiling plinth
Attaching the molding is by no means the final stage of the repair, because you still have a lot to do. Remember that it is customary to glue the baguette before painting the ceiling surface and wallpapering. When installing ceiling plinths, the main difficulty is joining the ceiling plinths, which consists of connecting individual strips in the corners of the room and connecting when extending the strip along the entire perimeter of the walls.
Traditional ceiling skirting boards come in strips of varying widths and lengths. It is customary to choose the width of the strip depending on the size of the room. The length of the strip can reach from one meter to several. Since the installation of skirting boards is always carried out from standard strips, during the work it will not be possible to do without joining them. In this case, it does not matter fundamentally what material the fillets are made of - gypsum, foam plastic, wood or other polymer material.
Of course, you can find fillets in stores that are already prepared for joining in the corners of the room. In this case, the reverse principle appears. When working with such a plinth, you will have to make straight, rather than oblique, cuts to connect the elements frontally. True, the price of such accessories is much higher compared to classic strips.
The joining of the ceiling plinth should begin with careful preparation of the surface where it will be attached. It must be absolutely dry, smooth, free of dirt and dust. Before joining the ceiling plinth, the surface must be leveled, puttyed and primed. If you are going to attach a baguette to plaster, then experts recommend initially covering it with a water-based paint composition.
High-quality joining of skirting boards is considered feasible, even if the corners in the room are uneven, the main thing is to adhere to the technology of this process. Installation of the strip begins from the corner of the room near the entrance. To correctly cut a strip at an angle of 45 degrees, you need to place its end in a special device - a miter box, which is a U-shaped box with slots located at different angles.