Clinker is dried, crushed and subsequently fired clay. Thanks to the shape, clinker bricks are made for paving roads or tiles for finishing facades. The building material is durable during use, but fragile during the finishing process. For installation, a special adhesive composition is used. Clinker tiles for the facade are a relevant option when it is necessary to hide construction defects, update the appearance or make the building attractive.
History of clinker creation
The first production of clinker bricks was located in Denmark. In any case, the craftsmen sought to obtain a material superior in strength to natural stone. Rapid urban growth led to the development of new materials and raw materials that replaced the stone industry.
Some builders claim that the material was obtained in Holland.
The production of such raw materials was a real breakthrough. But it was only at the beginning of the 19th century that a real revolution took place in the field of construction. Then clinker began to be used not only for paving roads, but also for finishing houses and interior decoration of individual interior elements.
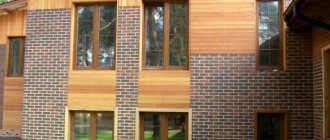
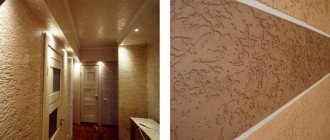
In the process of development of the construction industry, clinker tiles and bricks have not lost their relevance. Designers and architects actively use the material in the process of decorating walls. Finishing the facade of a house made of aerated concrete blocks with clinker tiles is the best option for finishing the building.
In the beginning, processed clay bricks were used only for paving roads. Then they began to make not only bricks, but also tiles from clay. This type of building material began to be used for finishing the facades of houses. Increased resistance to low and high ambient temperatures makes the material relevant in many regions. Additionally, the tiles do not absorb moisture, do not fade, and are environmentally friendly raw materials of natural origin.
Advice from the experts
Clinker tiles absorb no more than 4% moisture. Such properties put forward special requirements for the consistency of the glue - it should not be liquid. Ceramic tiles absorb a lot of moisture; liquid adhesive is not a problem for them. At the same time, the glue should not be very thick. Why? Firstly, its adhesion to both load-bearing surfaces and tiles is significantly reduced. Secondly, the mixture hardens quickly, making the installation process much more complicated.
The consistency of the glue is extremely important
Any adhesive that gets onto the tile surface must be removed immediately. Pay special attention to clinker with an uneven front surface. Don't wait for the glue to dry. The fact is that high-quality glue is difficult to clean later; it adheres very firmly to the texture. Use a clean, damp sponge or cloth for cleaning.
The production technology allows for slight differences in color shades in one batch of clinker tiles. To avoid the appearance of large areas with different colors on the façade, periodically take tiles from several packages. The facade will look beautiful, and some difference in shades will serve as an additional decoration. When purchasing, pay attention to the batch number, it is indicated on the packaging. If you need to purchase additional tiles in a few months, then there is a high probability that this batch will no longer be available for sale.
It is not recommended to lay clinker tiles in very hot and windy weather. If it is not possible to wait for suitable conditions, then you can lightly spray the surface of the clinker tiles on the back side with water. This will improve adhesion and fixation reliability will increase.
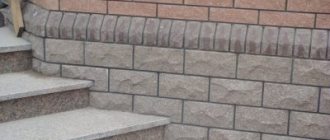
Combination of clinker tiles and facade decor
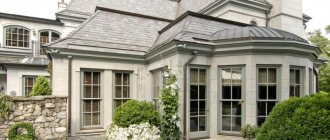
Facade clinker tiles
Finishing the facade with plaster and clinker tiles
Production technology
Clinker production is quite developed in all countries. Many people use old “recipes” for making them. Each manufacturer adheres to certain manufacturing technologies, but the base remains the same:
- At the initial stage, the base raw material crumbles into small particles, which are then compressed.
- Basic raw materials are obtained by combining simple and shale clays. Sometimes broken earthenware or fireclay is used. Flux and coloring oxide are used less frequently.
- Dyes are additionally added to the batch. Additionally, various crumbs, glitter, and other decorative elements are added.
- The prepared mass is pressed through a special mold using a special machine.
- Conventional presses make flat tiles, but extrusion makes it possible to make different shapes, patterns and sizes from clinker raw materials.
- After preparing the mold, cutting is done. Thus, the thickness of each tile is formed.
- The prepared elements are placed in tunnel kilns, where firing is carried out at 1300 degrees Celsius. The procedure is carried out within a week.
- After firing, secondary finishing is carried out - grinding, cutting off edges, secondary painting.
Many builders believe that German products are the best option. The most popular brand is Stroeher. Domestic manufacturers make material of the same high quality. The most popular clinker tiles produced in Russia:
- Keralite. Producing a variety of material options for over 100 years. Average price per m² 1105 rub.
- Eco Clinker. The company has become the best alternative to imported suppliers, since the cost for clinker materials from a domestic supplier is 1,130 rubles. per m².
Other companies are smaller manufacturers compared to the brands presented. The quality of the product can be indicated by the price, which for well-known manufacturers is usually more than 1 thousand.
Do-it-yourself facade cladding technology
The walls must be plastered before facing.
To install the finishing layer, you will need tools that you purchase in advance.
List of devices for work:
- grinder with a stone circle;
- serrated hammer for scoring, trowel for applying glue;
- grout gun, notched trowel;
- usually, level, plumb line, tape measure, rubber hammer.
For stickers, special-purpose tile adhesive is used, which is used for interior or exterior decoration.
Preparation
Check the straightness of the wall or the horizontality of the floor and steps. The surface is leveled with plaster mortar, large protrusions are knocked down. Smooth surfaces are notched for good adhesion.
Install the insulation on the surface, if such a layer is provided by the technology, then attach the waterproofing. To install the tiles on the mortar, use the first layer of plastering, in which a reinforcing mesh is installed. The surface is smoothed during the application of the solution.
Installation
The process involves preparing a solution to coat the surface. The work is done with a drill with a whisk; manual kneading will not give the required homogeneity of the mixture.
Work order:
- make preliminary markings of the proposed rows;
- pull the serial thread for control;
- glue is applied to the surface with a trowel and smoothed onto the base;
- laying begins from the window or door openings, if there are none, then from the corner of the wall, trimming is done if necessary;
- The installation of tiles is checked with a level and the uniformity of the seams is ensured.
The intersection of the seams is made crosswise or the tiles are placed offset. In the second case, the elements are shifted so that the middle of the second row of bricks falls on the seam.
Grout
The process refers to the final stage. The composition for filling the joint must be dense to prevent moisture from penetrating under the clinker. Use a gun to fill the seam or use a thick plastic bag with a corner cut off. For compaction, jointing is used, which also forms the shape of the mortar for hardening.
Sometimes a metal rod 6–8 mm thick is inserted into the seams during laying. If it is laid evenly, grouting the joint is easy after removing this element.
Areas of application
The popularity of the material is determined by the versatility of the structure and texture of products of various shapes and designs. The areas of application of the material are varied:
- Cladding the house with clinker tiles inside and outside.
- Lay tile paths or finish other parts of the landscape.
- Cladding of aerated concrete from which a house or pool is built.
- Design of pedestrian zones and recreation areas.
During the construction of modern buildings, a ventilated façade made of clinker tiles was obtained. Over time, the material began to be used to form other types of front parts of buildings. This option is used due to the fact that the tiles are easily and securely attached to aerated blocks, wood, concrete, and brick.
The best manufacturers
Ferdhaus Klinker has been producing cladding materials for almost 160 years. The raw material is selected clay, which is processed by firing using the latest equipment.
ABC produces structural, glazed clinker tiles in more than 50 shades. The products meet all required standards and have quality certificates.
Roben production is located in many countries in Europe and the world. The company offers over one and a half thousand types of products for sale, including clinker. Facing material is produced for different purposes. The company has many awards and prizes.
The Ukrainian supplier of clinker finishing Clinker Bud carries out direct supply from European brand manufacturers.
The Russian manufacturer Keralite produces clinker for exterior finishing. The products are characterized by durability, resistance to wear and shock.
Advantages and disadvantages
Like any finishing material, clinker tiles have advantages and disadvantages. Due to the fact that natural raw materials are used for production, tiles of any format have exceptional advantages compared to other finishing options:
| Positive points in using tiles | Negative qualities of finishing material |
| Completely natural raw materials that are not harmful to health. | It is not advisable to use material without facade insulation. The surface may be additionally supercooled due to the presence of finishing. The composition of the base has micropores that retain cold. |
| Does not absorb water and is well ventilated due to the presence of micropores. | |
| The tiles can withstand more than 300 freezing and thawing cycles. | |
| Depending on the thickness of the material, the fragility of the elements is determined. Until the tiles are laid, they break easily and cannot withstand mechanical stress. | |
| The surface is rough, so it is a popular option for laying roads and sidewalks. | |
| Not exposed to chemical influences, resistant to fungi and mold. | The cost of the product is much higher with other types of finishing materials for the facade or interior details. |
The benefits of using a finishing option outweigh the negative consequences. The pricing policy for natural raw materials is more affordable than natural stone or brick.
Specifications and Applications
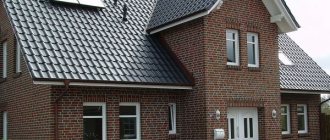
Clinker is particularly durable and has unique qualities of permanence. Thanks to the slow firing process, it achieves a high degree of homogeneity, becomes hard, frost-resistant (resistant to frost and sudden changes in temperature), waterproof (absorption percentage less than 8%), and the penetration of oils and fats.
The tiles are invulnerable to the corrosive effects of atmospheric agents, impacts, abrasion, fire and strong mechanical stress, and have a very durable structure.
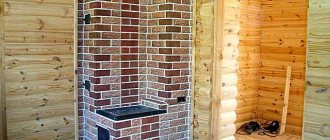
- Clinker is technically perfect, it is ideal for both interiors and exteriors and is used not only in residential architecture, for cladding rooms in the house, but also in the industrial, sports, and public sectors as a coating for external facades, edges and bottoms of swimming pools.
- The tiles do not slip and do not deteriorate when in contact with water purifying chemicals. Clinker is often required to create floors for yards, driveways and areas with heavy foot traffic.
Types and formats
There are several types of clinker tiles. The difference lies in the functional features:
- Technical. Facing base for sidewalks and roads. Often used for laying floors in public spaces.
- The waterproof option is used for finishing rooms with increased hydrostatic load.
- A facing variation used for finishing the interior and exterior of houses.
- Special configurations of elements used for arranging architectural objects of complex structures.
The dimensions and thickness of any option are determined by production features and scope of application. Typically, tiles look like bricks with standard parameters. You can find any alternative to natural stone and metal. There is even a wood color option. There is a fireproof material variation for hazardous objects.
Finishing of facade walls
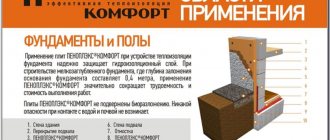
Clinker tiles can be used in combination with almost any building materials and insulation, both polystyrene and wool. The tiles are glued to the surface of the walls using very flexible frost-resistant adhesives, and then filled with an appropriate solution.
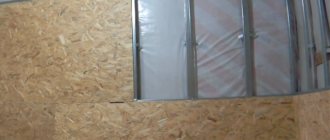
In the case of uninsulated walls, the tiles can be fixed directly to the wall. If we want to ensure better ventilation of the structure, we can additionally use a casing made of waterproof OSB boards, attached to the wall with a grille, usually aluminum. Then we glue the clinker layer onto the OSB boards.
- In the case of gluing clinker tiles to walls insulated with polystyrene foam, it is recommended to use its version with increased shear strength, designated EPS 100.
- In turn, when attaching tiles to walls insulated with cotton wool, façade wool should be used. Even at the design stage, it is worth considering the use of additional ventilation of the walls, made using the above-mentioned technology, using OSB boards and grids supporting them.
- Thanks to this, the thermal insulation properties of mineral wool can be used even more effectively due to freer air flow and the associated evaporation of moisture.
How to choose clinker for a facade
Before you start choosing a material, you should decide on the type of facade and the place of finishing. Clinker facade tiles are selected in accordance with the following parameters:
- Color palette. Conventionally, this parameter is divided into 4 sectors: brick, sand, dark and light.
- Pay attention to the dressing. There are a lot of textures and additives that make the surface unique. The most popular option is “brown Munich smooth”, similar to a standard brick.
- You need to choose the right grout, which should differ in color from the base of the tile.
- Choose the appropriate price that will be optimal for this type of material. The optimal value is a price of 1000-1300 rubles. per square.
In accordance with this, LSR and other materials are selected. It is important that each component fits into the overall finishing concept.
Is it worthwhile to insulate the house before tiling the façade?
It is difficult to argue that an insulated house is much better than a house without insulation. Energy savings and more. But, living in my house without insulation, I never froze. Despite the fact that there were still cracks in the walls of the house in some places, since it was impossible to caulk them: all because many of them were simply not visible.
The second factor that worked against the use of insulation is purely theoretical. Based on the fact that the thermal conductivity coefficient of the foam block is 0.14 W/(m.deg.C), exactly the same as that of pine, from which houses have long been built, and laminated veneer lumber, from which many people now build, we can assume that the foam block , in terms of thermal conductivity properties, the same as wood.
Taking into account the fact that houses made of logs and timber usually have a wall thickness less than houses made of foam blocks and are not insulated in any way, a house made of foam blocks with a wall thickness of 300 mm will fully satisfy my requirements for thermal insulation of enclosing structures. Moreover, in the places where the logs adjoin each other, the thickness of the walls becomes minimal.
In addition, previously houses were built from foam blocks without insulation. The outside was covered with brick or plastered. By the way, many people still build this way.
And third. To tile a house with natural decorative tiles using insulation, you need to attach the insulation to the wall layer by layer, then plaster the wall over the insulation, applying several layers using a reinforcing mesh, and only then glue the tile itself on top of the plaster. Since the wall, unfortunately, does not hold any fastenings well, the decision was made to apply decorative tiles for cladding the house without insulation.
Laying tiles step by step
Laying of clinker tiles is carried out in accordance with the type of facade and interior design. The curtained façade requires a special approach during the installation process.
There are special design options that require the presence of metal profiles. The tiles themselves are arrays of clinker slabs that fit together like puzzles.
This design option is very easy to install. An insulating compound is poured into the void or mineral wool is laid. The clinker ventilated facade does not have insulation devices inside. With standard installation, installation is carried out according to a standard scheme, like any other finishing material of this type. The same tools and fastening composition are needed.
Selecting glue and calculating material
Finishing the facade of a house begins with determining the amount of material to work with. Initially, calculate the required number of tiles. Calculations are formed in accordance with two parameters: the main part is in m², and the corner part is calculated in linear meters.
Determine the area of the building walls: multiply the height by the length of the walls. Calculate the area of unprocessed elements - windows, doors. Subtract the area values of the elements from the total area value. It is worth taking into account the gaps between the tile seams, which will reduce the amount of material needed. Thanks to such calculations, the price of the work can be easily determined.
Find a good glue. First, determine the place where the material will be attached - this is the determining factor for the choice. But the following brands are considered the best: "Quick-mix" - RKS, "Terta" - Extrabond 131, "Ceresit" SM-117, "Knauf" - Fliesemkleber, "Baumit" - Baumacol Flex, "Litokol" - Litoflex K 80. Brands are also used in other configurations.
Preparation
First, the surface is prepared. Level out differences and chips using a certain material. Sweep away debris and dust after treatment. It is not advisable to place the material on drywall. The ideal base would be concrete with a thickness of at least 10 cm. Prime the surface of the walls. Prepare a mixture with glue for installation. Place standard elements for laying tiles at hand. If necessary, insulation panels are installed. First, the profiles are fixed in accordance with the plumb lines. Then thermal panels are installed.
Installation
The material is laid in different ways, but it is advisable to use the standard option. Installation is carried out in accordance with the following algorithm:
- Apply a primer-adhesive or cement mixture to the prepared surface with a spatula.
- First, the second row is laid out from the ground, and only then the rest of the finishing material is glued.
- To control the width of the tile joint, builders insert special crosses.
- If necessary, cut the base of the tile, but the seams should be sanded down with sandpaper.
The installation technology used is the same as for laying conventional tiles. Therefore, you need to check the position of each element using a plumb line and level.
Features of cutting clinker tiles
The best option is to cut clinker tiles using a professional machine with a diamond blade and water cooling. This way you can get a perfectly flat cut surface and almost completely eliminate the risk of cracking or chipping. But such equipment is quite expensive; purchasing it is only beneficial for professional craftsmen, for whom laying tiles is their main income, not a pastime. If you do not have a machine, you will have to cut the tiles with a cylindrical grinder and a diamond disc.
Diamond cutting wheel
Important. There are two types of diamond blades: for cutting concrete and ceramics. Discs are not interchangeable and cannot be used for other purposes. What are the differences between the disks? For cutting concrete, the plane of the discs has through slots to remove large amounts of dust; discs for tiles do not have such holes. They only have small indentations where the diamond chips were applied. Discs with slots hit the tiles hard, which causes chips. Always keep these differences in mind.
Prices for angle grinders (grinders)
Angle grinders (grinders)
How to cut clinker tiles with a grinder?
- Prepare a level and stable stand and ruler. Draw a cutting line on the tile, making sure it is exactly on both sides.
- Cut the tile along a line of no more than half the thickness in one pass. Never try to cut off the disc in one pass, it will definitely crack.
- Turn the tile over and cut it in the same way, only reduce the cutting depth even more.
- Place the notched part on the flat edge of the table and, with sharp pressure on the edge of the tile, break it off along the cutting line. The more confident your movements are, the less risk you will end up with a marriage.
- Very carefully trim the edge of the cut with a grinder. Tilt the disk at the maximum possible angle, do not press it too hard, remove irregularities gradually.
Cutting tiles with a grinder
Keep in mind that cutting a strip less than one centimeter wide from clinker tiles is very difficult. To do this, you must have experience working with electric tools and clinker. If the technology requires gluing such pieces, then be prepared for a lot of waste.
Video - Master class on cutting clinker terrace slabs
Video - How to quickly cut clinker tiles
Mixtures used for cladding a house with natural stone
During the cladding process, I used ordinary building mixtures, which I bought at the construction market and building materials store.
To begin with, after sanding the surface, I used Ceresit ST-17 primer. Milky liquid. It lay down well and was absorbed. Before starting work, somewhere on the Internet I read a statement from a specialist that it makes no sense to use various concrete contacts for foam blocks.
The glue was chosen between Ceresit CM 17, Ceresit CM 16 and litoflex k80. The characteristics are approximately the same. Ceresite has a good reputation, but the price is higher. Everyone's expenses are the same. In the end, I glued everything on litoflex. When choosing, I tried to glue it with all three glues. I liked litoflex the most. Somehow it was easier to work with him. And the important thing is that the solution has a shelf life of up to 8 hours. A whole shift!
The grout was from the same manufacturer as the tiles. White, heat-resistant, moisture-resistant, for external and internal use “Terracotta”. It has one good quality - it does not leak out of the seam if it is filled too much, even if it is sealed very thinly. True, it smears very much. If it gets on the tile, then that’s it, nothing can remove it. Even when it dries properly, it leaves a mark after removal.
This manufacturer has one drawback. Different batches of dry mix have different shades. I came across bags with a frankly red-colored solution instead of white, which only appeared when the dry mixture was mixed with water. I had to file a claim with the retail organization and change the bags. You should definitely look at the batch release date if you purchase grout at different times or in different places.
After grouting the joints, the tile manufacturer recommends applying a water-repellent solution to the surface of the finished wall. I chose the first one I came across. After applying and drying the solution, the tiles completely stopped absorbing water. Drops of rain simply flow down the wall. Without hydrophobization, the tile absorbed this water very well and at the same time changed color to a darker one.
Clinker panels for facades
The undeniable advantages of clinker tiles make this material ideal for cladding buildings. However, it requires considerable time to complete the work. How to finish with clinker in the shortest possible time, without additional costs and loss of quality? An ideal reasonable solution is to use panels with clinker tiles without insulation or thermal panels.
Despite the distinctive advantages of facing materials with an insulating layer, for certain buildings there is simply no need to use thermal panels. This applies to frame houses, prefabricated panel buildings, where an insulation layer is already provided. This category includes buildings that are created using permanent EPS formwork technology. It is also inappropriate to use thermal panels to install a ventilated façade system. There are also architectural structures for which thermal insulation work is not provided. These are garages, outbuildings, gazebos, stone fences.
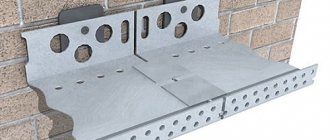
Diagram of the device and fastening of the clinker panel
A non-insulated clinker panel is a durable, bend-resistant sheet material on which rows of clinker tiles are firmly fixed using glue or other technology at a certain distance to create the illusion of real brickwork. The front part of the facade panel is created in such a way that each subsequent sheet is a continuation of the previous one. In the free areas and between the rows, special washers or brackets are provided for attaching the panels to the wall.
Fiber cement, oriented strand boards or glass-magnesite boards are used as a base-substrate for clinker tiles.
Oriented strand boards are made from wood chips with the addition of epoxy resins using pressing technology. They have a uniform structure, high strength, moisture resistance, and good heat and sound insulation properties. Their own weight is insignificant, which does not burden the prefabricated structure.
Depending on the type of clinker panel, a certain type of glue is used for fastening
Clinker tiles are attached to the panels using polyurethane adhesive, which provides good monolithic adhesion.
The composition of fiber cement panels is based on synthetic (fiberglass, polymer) or natural fibers. The mortar mixture can be molded and processed under high temperatures and high pressure in special autoclaves, where the necessary polymerization and crystallization of the components is achieved. Even at the production stage, clinker tiles are pressed into a fiber cement board. The result is a reliable, strong adhesion of the two layers.
These panels are environmentally friendly, durable, and have high strength properties. However, they have a significant drawback: their weight is greater than that of their analogues, which complicates installation work. The 10 mm thick fiber cement board itself weighs 10 kg, plus clinker tiles, which, depending on the thickness of the product, add another 15-20 kg.
The slabs are mounted using metal brackets on anchors. Therefore, they are used for walls that can withstand significant loads. The estimated cost of such panels, depending on the manufacturer and type of clinker, is 1900-2500 rubles/m², which does not exceed the price of clinker tiles for bricks, but greatly facilitates installation work.
Tiles of the smallest thickness are used for decorative wall cladding
The basis for glass-magnesite boards is a composite sheet 8 mm thick. It is highly resistant to chemicals, temperature changes, and ultraviolet radiation. The material has good thermal insulation properties and a high noise absorption coefficient.
The main advantage of the panels, which allows them to be used for finishing not perfectly smooth surfaces, is the good flexibility of the product.
Today there is no uniform standard for the production of panels with glass-magnesite-based clinker tiles. Each manufacturer produces its own range of facing products. The average price of the product is 2800 rubles/m².
Helpful advice! You can place an individual order for the production of a clinker panel of a certain sample with a mosaic layout of tiles of different textures and colors.
Panels with clinker can be made of non-standard size and shape, but it is worth considering that the cost of such an order will be high