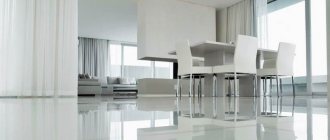
Self-leveling floors are a relatively recent invention, but their popularity is growing at a rapid pace - this is due to the convenience, cost-effectiveness, and speed of installation of this type of coating. There is no better solution when buying an apartment in a new building, when you have to start with a concrete base and want to avoid expensive work. Self-leveling compounds allow you to quickly, without much difficulty, obtain a perfectly flat, durable surface, devoid of seams and joints. In addition, the resulting result is aesthetically attractive. If necessary, dismantling such a surface will also not cause serious difficulties.
Self-leveling flooring is an excellent solution for budget renovations
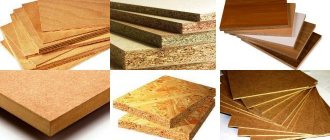
Main options
Most often, floors are filled with solutions based on cement (mineral) and synthetic materials (polymer). The most popular of them are:
- Polyurethane - their advantage is high compressive-tensile strength, which guarantees resistance to mechanical stress, shock, and elasticity;
- epoxy - very durable, can be used in rooms with high humidity;
- methyl methacrylate - resin-based, most often used at various industrial facilities;
- cement-acrylic self-leveling floors are highly resistant to mechanical damage, load, and moisture.
Due to its versatility, acrylic flooring is best suited for many tasks.
Most often, floors are filled with solutions based on cement (mineral) and synthetic materials (polymer).
Types of self-leveling floors
In hardware stores you can find 4 main types of self-leveling floors. This is an epoxy composition, polyurethane, cement-acrylic, methyl methacrylate. Each of them has its own characteristics of use and composition. Before we talk about acrylic coating, it makes sense to talk about other types of self-leveling floors in order to evaluate the advantages and disadvantages of the material being described.
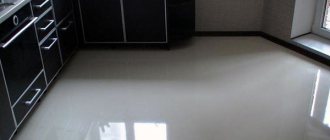
Kitchen living room with self-leveling floor
Epoxy self-leveling floor
This type of self-leveling floor, as you might guess from the name, is based on epoxy resins. After hardening, such a coating is very resistant to various types of influences, including cleaning with abrasive substances, however, it is still not recommended to use powders for its treatment, as this reduces the service life of the floor, and its appearance gradually deteriorates. The material also perfectly resists all kinds of chemical influences - it is not afraid of alkalis, acids, oils, and other organics.
Epoxy self-leveling floor
Epoxy floors can be installed on almost any surface - metal, wood and, of course, reinforced concrete. Most often, they are installed in workshops, industrial sites, in the food and pharmaceutical industries - that is, where the negative impact on the coating will be maximum. This type of floor is easy to keep clean - it does not absorb pollutants, and stains can be easily removed using any cleaning products.
On a note! The advantages of epoxy floors include their practicality and durability, environmental friendliness (the mixture only emits an unpleasant odor during pouring). Also, thanks to the special properties of the material, it can be used to create beautiful decorative coatings in swimming pools, saunas, gyms, and apartments.
Epoxy floor in a warehouse
The only drawback of such a floor is its lack of elasticity, which limits the possibilities of its arrangement in some rooms. Epoxy flooring is not poured in buildings where there is a high risk of foundation movement or impact deformation of the floor.
Prices for epoxy self-leveling floors
epoxy self-leveling floor
Polyurethane self-leveling floor
This type of floor is made on the basis of polyurethane, it is durable, has a long service life, is a fairly light type of coating, does not weigh down the screed and does not put pressure on the foundation. By the way, polyurethane has the greatest strength among all other polymer components used to create self-leveling floors.
Polyurethane self-leveling floor
Polyurethane flooring is waterproof, which allows it to be installed in rooms with high humidity. The material is often used in warehouses and production workshops. The advantages of the material include resistance to temperature changes, lightness, strength, and long service life. The only drawback is the complexity of installation - the material is demanding on the base (it must be perfectly clean and level). Also during pouring there is a high consumption of material.
Installation of polyurethane flooring
Methyl methacrylate self-leveling floor
The main components of this floor are methimethacrylate resins. This coating can be called universal, since it can be poured anywhere, from industrial sites to apartments. The material is so durable and not subject to negative environmental influences that it can even be installed outdoors.
Methyl methacrylate self-leveling floor
On a note! The technical characteristics of methyl methacrylate flooring can be changed by adding various additives. Thus, it is possible to increase the material’s resistance to environmental influences, make it more flexible, or, conversely, increase its density.
Methyl methacrylate self-leveling floor in production
The advantages of methyl methacrylate self-leveling materials include the ability to lay the coating even during cold weather and sub-zero temperatures, a significant hardening speed, and resistance to the effects of temperature or sunlight. But the high rate of hardening of the material is also its disadvantage, because in this case you have to work very quickly so that the floor does not have time to harden before the work is completed. Therefore, this material is not suitable for beginners. And such a floor smells very unpleasant during installation, which limits the possibility of using it in a confined space - work can only be done in well-ventilated areas.
Methyl methacrylate floors - layers
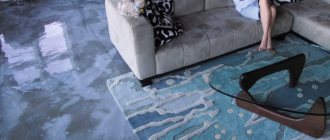
Acrylic self-leveling floor
Acrylic flooring is made using high quality cement, polyacrylate copolymers, and special filler. Initially, such floors were used only in industrial premises, but now the scope of use has increased significantly. The floors are highly durable, which allows them to be used where the impact on the surface - both mechanical and chemical - is maximum. Acrylic floors have also been used in rooms where the humidity level is quite high. Often such coatings can be seen at metro stations, showers, shopping centers, etc. When installing, there is no need to even install waterproofing - the coating itself copes well with excess moisture and does not allow drops of water to pass through.
Another example of an acrylic self-leveling floor
On a note! Acrylic floors do not slip, which significantly increases the possibility of their use in various fields.
Acrylic flooring is often recommended by experts for use as a leveling layer for laying other materials. For example, it can act as a base for tiles or laminate.
Colored self-leveling floors with chips
On a note! Acrylic floors in the USA are called “hard” - this coating is often used for arranging tennis playgrounds. For example, the US and Australian Opens are held on hard court. One of the manufacturers of such acrylic floors is SportFloor.
Gym
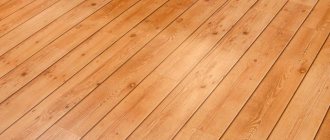
Despite the fact that acrylic floors are quite undemanding in terms of installation conditions, it is still recommended to apply them to a well-prepared base. In general, such material will fit perfectly both on a fresh screed and on an already used surface. Laying can be done on asphalt, concrete, wood, metal, ceramics, etc. - on almost all types of surfaces. Also, before pouring the floor, the base should be pre-primed to improve the adhesion of the material.
On a note! An acrylic coating will easily hide all microcracks on the surface of the base, however, it is better to additionally seal large gaps before applying the material so that the mixture consumption does not increase.
Do-it-yourself self-leveling floor in the kitchen - distribution of the mixture and rolling with a needle roller
The advantage of acrylic flooring is that the layer retains its elasticity over time. The material remains flexible yet hard even after many years of use.
Advantages and disadvantages
Acrylic self-leveling flooring has a number of undeniably positive properties:
- high resistance to damage and chemical compounds;
- moisture resistance;
- elasticity;
- versatility - suitable for foundations of any degree of unevenness;
- fire safety;
- environmentally friendly - does not emit toxins.
Acrylic self-leveling flooring has its advantages and disadvantages.
Due to its safe properties, such flooring is used even in medical institutions. But they have their disadvantages:
- not such a wide selection of textures and colors as with conventional coatings;
- some compositions are very expensive and require complex surface preparation;
- difficult to carry out repairs (often it is necessary to replace the entire floor)
However, these shortcomings are fully compensated by the positive properties of self-leveling flooring, and its use is gaining increasing popularity.
The disadvantages of gender are compensated by positive advantages
Minuses
Disadvantages of epoxy coating:
- Only a fixed floor can be selected as the base: concrete slab, ceramic floor tiles, brick, stone base. This is due to the lack of elasticity of the material.
- Not suitable for areas with high vibrations.
- Difficult dismantling. Epoxy floors are difficult to remove because... they adhere firmly to the surface of the base.
- It is not sold as a ready-made mixture - before pouring, both components must be thoroughly mixed at low speed with a construction mixer.
- Dries quickly - you need to have time to fill the prepared material within 30 minutes.
- Quality requires strict adherence to installation technology and time for drying. The floors are ready for use in three days.
Are you looking for a reliable contractor for pouring polymer floors? Contact us - quality assurance.
Choice of coverage
When choosing, what matters is the area where the floor covering will be applied, the conditions, the timing of the work - for example, methyl methacrylate solutions have a very short hardening period, so they can be put into operation in just two days, polyurethane solutions can withstand high dynamic loads well, and the peculiarity of cement-acrylic self-leveling floors – their ability to effectively level even the most difficult areas. It is the latter option that is most suitable for residential premises due to its safety and aesthetic appearance.
The self-leveling floor can level even the most difficult areas
Advantages
The popularity of this method of installation is due to the performance properties of the coating:
- Self-leveling floors are universal and have found application in premises for various purposes. In home construction, they can be seen in any room, but they are especially popular in bathrooms. They can be found in retail and exhibition halls, in medical and educational premises and other facilities with a high level of traffic. This coating is often used in industrial and warehouse areas.
- The coating does not accumulate dust and static voltage on its surface.
- The material is not destroyed by chemical reagents.
- Thanks to the monolithic nature of the coating and the absence of joining seams, the coating is moisture resistant, easy to care for and clean from dirt, which, like moisture, is not absorbed into the structure of the material.
- The coating is completely hypoallergenic and environmentally safe.
- The coating can be included in the “warm floor” system.
- Self-leveling floors are durable (at least 25 years of service) and do not require updating.
- The technology for creating coatings with images and 3D effects has significantly expanded the decorative potential of this material.
Warehouse floor
Among the disadvantages of the coating, the following are noted:
- Difficult dismantling and the inability to correct errors when pouring the composition.
- Difficulties during pouring due to lack of experience in carrying out such work.
- Strict adherence to all stages of the technological process is necessary.
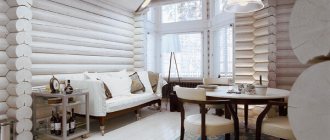
Studio interior in modern style
Prices for self-leveling floors "Starateli"
self-leveling floors prospectors
Features of cement-acrylic mixtures
The composition usually includes the following components:
- cement as a binder;
- acrylic, other polymer fillers;
- special fine sand;
- additional additives, usually mineral.
There are a large number of different options for fills, differing in composition, hardening conditions, suitability for various types of substrates, and decorativeness.
There are a large number of different fill options
How to fill bathtubs with plastic inserts with acrylic
Leveling the self-leveling floor with tile adhesive.
Level the floor with tile adhesive. Plastic liners are used for quick repairs of bathtub surfaces. They are bought by size and simply inserted into them with glue. Advantages: minimal loss of time for repairs. Disadvantages - plastic liners peel off from surfaces and crack. Water gets into the free space, an unpleasant odor appears, fungi multiply, etc. Those who have already used plastic liners no longer have the desire to repeat their mistakes. An excellent alternative to liners is filling the bathtub with acrylic. But to do this, you first need to remove the old liner; this is not so easy to do. How to get it out with minimal damage to the surface?
Step 1. Review the item's state
Pay attention to ways to seal the space between the wall and the bathtub. Most often, liner delamination occurs at the bottom, where there are heavy loads and an increased likelihood of water getting into the cracks
Step 2. Remove the decorative element of the overflow hole. Do not turn off the drain yet; water trapped under the liner will flow through it.
Step 3. Remove the waterproofing between the bathtub edge and the wall. If the edging is made with a ceramic belt, carefully remove it
To do this, you need to pry up one edge with a sharp, hard tool, carefully increase the chipping force, and do not allow damage to the materials. If a sealant based on plastics is used, the work is simplified
The sealant can be removed with a knife or screwdriver; small residues can be scraped off or sanded. The seal must be removed; it holds the side of the liner in place.
Step 4. Prepare a grinder with a thin cutting disc. The most difficult work begins - cutting the plastic liner into small segments.
During cutting, a through hole is sure to form in some place. Start removing the insert from there.
Step 5
Insert a screwdriver into the gap between the tub and the insert and carefully lift it up. The plastic will begin to crack along the cut lines, insert the screwdriver deeper and move it along the cracks
The hole has become wider - use a chisel or other tool with increased dimensions. Continue shooting each segment one at a time. If some areas are firmly glued and do not come off, no problem. Let the plastic break off around them, remove those parts that do not create great difficulties.
Removing the liner
Step 6. Only firmly glued pieces of plastic remain on the surface. Place a chisel at the contact point and lightly tap it with a hammer to remove them. Shallow scratches on the enamel or small pieces of an unremoved plastic insert are not critical; they will either be sanded off when cleaning the surface with sandpaper or simply covered with liquid acrylic.
Next, you need to follow the algorithm described above - clean the surface from dirt and calcium deposits, degrease, dry and cover with liquid acrylic for the bath.
Surface cleaning
Degreasing the bath
Pour acrylic onto the sides
Continue pouring
The bath can be used after 36 hours
What does the cost depend on?
The issue of price is one of the main ones in construction and repair work. The materials used for laying self-leveling mixtures are not cheap, but significant savings are provided by the conditions for carrying out the work - the ability to do it yourself, and the speed of drying the layer. The cost of such a floor largely depends on the chosen composition and layer thickness - a properly carried out preparatory stage will also help save money. The price is necessarily increased by special properties - for example, greater transparency, unusual coloring, antistatic or anti-slip effect.
The issue of price is one of the main ones in construction and repair work.
How to fill it yourself?
So, when everything is clear with the features of the filling technology, it’s time to start installation. The process does not take much time and occurs in 4 stages.
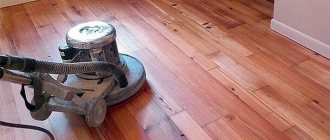
Preparing the subfloor
- Initially, it is necessary to prepare the site where the pouring will take place. All specks are removed from the area, greasy stains are wiped off and detachments of the cement-sand and concrete screed (if any) are eliminated.
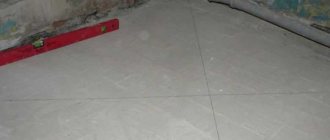
- Next, you need to check the horizontal planes of the floor using a building level. You need to start from the calculation that the size of the permissible difference should not be more than 3 centimeters. These steps will allow you to fill without cracking. If there is a large difference, you will have to resort to casting another layer.
- If severe unevenness is observed, they must be eliminated using a chisel and hammer. Large areas of depressions are sealed with cement mortar (putty can be used). Make sure the surface is dry before pouring.
- After the above, you need to start priming the prepared base plane. This process occurs using a wide brush or roller. The choice of a specific tool depends on the area of the room where the work is being done. Thanks to the primer, the possibility of porosity in the base is eliminated. Thus, the layer hardens evenly.
Beacon installation process
The horizontal plane is level solely thanks to the beacons. They help maintain a horizontal surface during the leveling process. Beacons can be made from auxiliary materials:
- cement;
- putty;
- thick working composition of the poured material.
Figures resembling a cone are made from the above materials. They are placed at a distance, usually not exceeding 1 meter. For accuracy, you must use a building level and a spatula.
Beacons for self-leveling floors
Working staff
Take a container into which the prepared mixture is poured. She, in turn, is filled with water. The proportions are indicated on the product packaging. In most cases, working with the preparation of the mixture involves using a container of 10 liters.
Next, you need to thoroughly mix the composition with water. To do this, it won’t hurt to use an electric drill and a special attachment. The main thing to remember is that the fluidity of the composition is possible within 15 minutes. Then hardening occurs.
Fill
The work takes place in a room with a temperature of 15 to 20 degrees. The possibility of draft is excluded. Filling occurs in a snake pattern, evenly distributed over the area. The solution is leveled using a spatula.
After the leveling procedure, the next step is to remove air bubbles from the layer using a spiked roller. After finishing the pouring, it is necessary to ensure the surface temperature does not exceed 25 degrees. Drying occurs within 2 days.
What does consumption depend on?
When calculating consumption, it is necessary to take into account the area of the room, density, consistency of the solution, and planned thickness. To reduce consumption, it is necessary to level the base as thoroughly as possible. The degree of surface evenness and the corresponding calculation of the layer thickness are carried out using laser level measurements.
To reduce consumption, it is necessary to level the base as thoroughly as possible.
Instructions for creating a decorative coating
This task in itself is simpler, since a self-leveling floor made from polymer mixtures can only be poured onto an already leveled base. Otherwise, you will have to make a thick layer, which will lead to unreasonably high costs. In other words, a decorative self-leveling coating is created after all the steps described above have been completed.
If you need a single-color colored floor, then the selected and tinted mixture is simply poured over the primed surface and rolled with a needle roller. Since it is laid in a thin layer and has good fluidity, you can do without beacons. To ensure that the solution penetrates into corners and hard-to-reach places, immediately after pouring it, you can use a spatula or squeegee to initially distribute the mixture.
The plastic mixture itself spreads over the surface Source viprusstroy.ru
Technology of work execution
The peculiarity of the self-leveling acrylic mixture is a heavy liquid solution, which, when spreading, creates a perfectly flat surface. In this case, the thickness of the level is small, it dries quickly (a few hours are enough). The whole process is divided into certain stages.
- Preparatory – the room is cleaned as thoroughly as possible from dirt and dust.
- The evenness of the surface and the corresponding height level (layer thickness) are calculated.
- A primer is applied to improve the adhesion of the floor to the base.
- The primer layer is dried.
- The solution is being prepared.
- The solution is laid and dried.
The floor should be carefully leveled with a special roller or spatula.
After completing the main work and drying the self-leveling floor, a finishing coating is applied - most often special varnishes. Also, the cement-acrylic base is suitable for subsequent installation of floor coverings.
After drying, apply a topcoat
Base and finishing levelers
Levelers for roughing (basic) processing and finishing (finishing) differ in composition and characteristics.
Basic ones have a coarser texture, a larger fraction, serve to eliminate significant defects and are applied in a thick layer to ensure strength.
The main component of base levelers is most often cement, which provides strength and the necessary adhesion
Finishing agents, in addition to leveling the base and increasing its stability, result in an even and smooth surface due to a more complex and uniform composition.
When carrying out cosmetic repairs, you can level a floor that has minor defects using a finishing screed
Possible mistakes
Proper installation requires careful attention to all work carried out. Certain points to take into account:
- too high humidity of the base surface;
- increased content of dust and dirt;
- poorly carried out degreasing of the surface;
- fragility of the base surface, presence of cracks;
- poorly mixed filling solution;
- non-compliance with technology, violation of the sequence and timing of laying layers.
Poor preparation of the base and violation of installation technology can lead to cracking of the self-leveling floor.
To avoid problems in the future, it is worth carrying out the work correctly
Calculation of the amount of mixture and its preparation
After you familiarize yourself with the characteristics, read the reviews and decide which mixtures are most suitable for filling the floor, you will need to calculate the required amount of composition. The density of the self-leveling floor mixture is 1.3 kg/l per 1 m2. To fill a layer of 1 mm for each square meter of floor you will need 1.3 kg of dry powder, for a floor of 2 mm - 2.6 kg, and so on.
How to make your own self-leveling floor mixture? There are a few basic rules to remember. The powder should be poured into a container with water, and not vice versa. This way you will be able to obtain a solution of uniform consistency. The amount of water is calculated according to the recommendations on the packaging. It is best to mix the solution with a drill with a special attachment.
Particular attention should also be paid to the time during which the mixture thickens, and all work should be done in such a way as to use the prepared solution before it begins to set
https://youtube.com/watch?v=w5LqDTsJzTc
Special blends
When pouring cement self-leveling floors in open spaces (outdoors), it is necessary to use frost-resistant compounds; their difference from conventional ones is their significant resistance to temperature changes and shift cycles (freezing-thawing). This option is well suited for areas near the house, parking, and garden gazebos.
For outdoor work it is worth using the appropriate mixture
Acrylic floor installation
Let's look at how the process of laying acrylic self-leveling goes.
Floor Grouting Tools
Table. Pouring self-leveling floor.
| Steps, photo | Description of actions |
| Step 1 | The subfloor is thoroughly prepared. All kinds of protrusions are removed, large cracks are sealed. Large construction debris and fine dust are removed. To remove the latter, it is recommended to use a vacuum cleaner. Sometimes the surface can be sanded, but in the case of acrylic floors this is not necessary. |
| Step 2 | The treated and cleaned surface is primed to increase adhesion. Without it, the material will adhere to the surface worse. Further work is carried out only after the primer layer has dried. |
| Step 3 | The mixture for filling the floors is being mixed. The procedure takes place immediately before applying the mixture to the surface. All components necessary for preparing the acrylic mass are mixed in the container. Next, the mixture is gradually applied to the floor surface and leveled using a spatula. You need to work quickly, since the acrylic mixture polymerizes in just 15-20 minutes. |
| Step 4 | The poured mixture is rolled with a needle roller so that all excess air comes out of it. They move along the surface of the self-leveling floor in special shoes - paint shoes, which have spikes on the soles. |
| Step 5 | After a couple of hours, the surface of the already drying acrylic floor is covered with varnish or resin - a finishing layer is formed that provides additional protection for the material and increases water resistance. |
| Step 6 | Over the course of another two hours, the acrylic floor is finally dried. After this period, you can move around the floor, put furniture on it, and carry out further repair work. |
Paint shoes and needle roller
Prices for needle roller for self-leveling floors
needle roller for self-leveling floors
Manufacturers
The best compositions for making cement-based screeds.
- “Prospectors” – gives greater thickness, can be used for significant unevenness. It can be used both outdoors and inside houses, at high humidity, and after complete hardening it is very durable. The manufacturer also has a quick-hardening mixture with the addition of gypsum - less durable, but optimal for finishing living rooms.
- "Osnovit Skorline" - includes various polymer additives, is used in living rooms, and is characterized by rapid drying.
- “Unis Horizon” is a fast-hardening mortar, ensures commissioning within 3 hours after pouring, and can be used in damp rooms.
- "Volma" - used in conditions of high humidity.
- Knauf is a well-known manufacturer of high-quality cement mixtures used on various types of substrates (including wood).
Knauf self-leveling floor
In addition to conventional mixtures, decorative ones are popular - such compositions are laid in three stages - a base, a layer with the addition of decorative elements, and a finishing layer.
A wide variety of cement-acrylic mixtures allows you to make the right choice for a room with any conditions.
Preparing for work
Before you start pouring a decorative self-leveling floor, you should prepare thoroughly. It is not enough to just purchase the necessary mixtures; you also need to buy special tools and materials, although the list is very small.
Tools for pouring self-leveling floors
To create a decorative floor you will need:
- two-component primer with deep penetration properties;
- epoxy-based putty for leveling the base;
- a transparent primer that will be used to fill the decorative layer;
- the mixtures themselves for the self-leveling floor;
- finishing varnish (glossy or matte);
- Grinder;
- vacuum cleaner;
- a design printed on banner fabric, film, or glitter and other decorative material;
- needle roller;
- damper tape;
- protective film;
- construction mixer for mixing the mixture;
- paint shoes;
- squeegee;
- container for mixing components.
Using a needle roller
Only after everything is at hand can you proceed directly to the work.
Epoxy products
This is perhaps the best concrete floor paint, wear-resistant and very durable. The film formed by the epoxy composition can withstand very serious mechanical loads. In addition, floors painted with this type of product do not lose their impressive appearance even if, for example, some alkaline compounds, machine oils, solvents, etc. are spilled on them.
Concrete surfaces treated with epoxy paint actually look very beautiful. These products can be used to paint floors in hangars, garages, repair shops, production workshops, etc. In addition, epoxy paints are considered the best option for finishing stairs and porches. These compounds do not turn yellow over time, have good waterproofing properties and can also be applied to fresh concrete.
The disadvantages of this type of tools include, first of all, some difficulty in working with them. The fact is that any epoxy paint for concrete consists of two components, poured into different containers. Before use, they must be thoroughly mixed, strictly observing the proportions specified in the instructions. And this, of course, is an additional waste of time. In addition, epoxy paints have a fairly high consumption rate. They should be applied in at least 2 layers. In this case, after the first treatment you should wait at least a day.
To reduce consumption, manufacturers of this type of paint recommend using special primers, also made on an epoxy base. They increase the adhesive properties of the floor surface. The disadvantages of such a product as epoxy paint for concrete also include the fact that when using it in the future it is quite difficult to change the color of the coating.
Reviews
Existing reviews from painters and ordinary users who use acrylic paints for professional and domestic purposes mainly emphasize their positive qualities. The following aspects of the use of acrylate compositions are highlighted.
- Durability – the service life of paints from well-known manufacturers ranges from 5 to 10 years.
- A wide range of colors is achieved by the presence of ready-made colored compositions or by adding dyes (colors) to the base paint. Existing technologies for compounding pigment additives make it possible to recreate almost any color palette.
- Low vapor permeability and a high degree of protection from atmospheric moisture are ensured by a durable and solid layer of acrylic polymer.
- High drying speed - reduces the overall duration of work.
- Easy to handle - acrylic paints can be diluted with running water and applied with a roller, brush or spray gun.
Among the negative aspects of the paint, poor stability at low temperatures during storage is noted. Cooling below 0 °C can lead to separation and irreversible deterioration of the mixture.
There are acrylate compositions that can be stored and used at subzero temperatures, but they are inferior to non-aqueous-based analogues due to their high price.
What are the advantages of acrylic paints?
One of the attractive features of this paint and varnish material, which includes water, acrylic resins and various pigments, is the abundance of colors and shades. In addition to the traditional shades of brown that were previously popular, now buyers can choose any colors they like that best suit the design of the room. If the desired color is not in stock, it can be ordered. This service is provided by manufacturers and sellers in large shopping centers and stores.
Different colors of acrylic paint
Acrylic floor paint, which has the most positive customer reviews, allows you to maintain its attractive appearance for many years. In addition, she:
- not afraid of ultraviolet rays;
- devoid of a sharp unpleasant odor;
- retains properties at low and high temperatures;
- moisture-proof and fire-resistant;
- easy to apply and dries quickly.
Another advantage of this material is that it is easy to care for wood flooring painted with it. There are no special cleaning technologies or recommendations for choosing detergents. Floors can be cleaned from dust and dirt with a damp cloth or using a vacuum cleaner. Therefore, to the question whether it is possible to paint the floor with acrylic paint, the answer is completely unequivocal - “Yes!”