The modern world does not stand still - it is improving, making new discoveries that simplify human life and make it brighter. The wall finishing technology industry is also developing and offers a variety of decorative materials. Liquid wallpaper appeared on the market in 1997, but has already gained popularity all over the world. They have many advantages: a high degree of wear resistance, fireproof, do not attract dust, wall decoration has no joints or seams, and do not fade over time.. Anyone can apply liquid wallpaper to a wall.
Tools and materials
Before you start decorating the walls, you need to purchase all the tools and materials that will be needed when applying liquid wallpaper to the wall.
How to apply liquid wallpaper on walls, see this video.
Materials:
- Liquid wallpaper. You need to calculate the area of the walls in advance and buy the required number of packages of material, taking into account the fact that one package is consumed for 3-4 square meters. m. It’s better to play it safe and buy wallpaper with a reserve. In a separate article, you can read more about the types of liquid wallpaper.
- Plaster or putty. Both materials are actively used for the last stage of wall finishing, but the purpose of their use may be different. If putty is necessary to seal cracks and level the surface layer, then plaster can even out deviations from the level of up to 15 cm. Everyone can choose the desired type of dry material and prepare it themselves.
- Primer. Application of this composition is necessary to strengthen the surface and reduce moisture absorption. If the surface is too smooth, then choose a primer with sand.
- Acrylic lacquer. The solution will protect the wall in the kitchen or bathroom, covered with liquid wallpaper, from exposure to water.
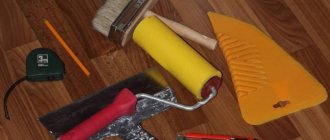
Tools:
- Deep containers. Containers are needed for preparing liquid wallpaper, so their volume must be at least 7 liters per package. A bucket or basin works great.
- Putty knife . It is necessary to choose from organic glass or stainless steel with a smooth surface.
- Trowel (transparent grater). A special tool for applying liquid wallpaper.
- Spray. Needed when applying material to a wall by spraying. It can be replaced by a special gun or Hopper spray gun.
- Putty . To prepare high-quality material, you will need a mixer, and to putty the walls, spatulas of different sizes.
- Paint roller or brush for applying primer to the surface.
- Structural roller. This tool will allow you to leave beautiful patterns on the wall.
- Pencil, eraser, ruler , if you plan to create a pattern on the wall.
Preparation of material and work: infographics and step-by-step instructions
Manufacturers indicate instructions for preparing liquid wallpaper and its use on the packaging, but familiarizing yourself with the general operating algorithm will not hurt.
- Pour clean, warm water into the prepared mixing container (temperature 25...30 degrees Celsius). Quantity according to instructions class=”aligncenter” width=”440″ height=”270″[/img]
- Pour the dry mixture into the water. If you plan to add glitters or pigments, first add them to the water, stir well, then add the main mixture
- Mix the mixture BY HAND! Mixing with a construction mixer or other mechanized tools is only permissible for liquid wallpaper with a uniform structure, without pronounced fibers
- We keep the prepared mixture for at least 10…12 hours (we follow the manufacturer’s recommendations). It is convenient to store the kneaded mass in a packaging bag
- Apply the finished mixture to the surface of the wall/ceiling with a spatula, trowel or plastic grater. We will tell you in detail how to do this correctly further.
- Dry for 24...48 hours at a temperature of at least 15 degrees Celsius. It is permissible to use air conditioners, fans, heaters of various types
Let's take a closer look at the process. So:
- Choose a plastic or metal container, the volume of which is approximately twice the volume of the dry mixture and water. It’s easy to check the size: the package with dry wallpaper should fit freely in the container, and there should be free space around it. Pour water into the container in the amount required for kneading ONE package.
- Fluff the dry mixture directly in the bag (if its size allows it) or in another separate container (can be on a thick plastic film spread on the floor). The goal is to get rid of lumps and mix the composition evenly. Pour the prepared mixture into a container of water.
- Mix the mixture thoroughly with your hands, paying attention to its homogeneity. After reaching the required consistency, cover with film or a lid and leave to “infuse” for 8…12 hours. Important: the finished wet mixture can be stored for up to five days without loss of properties and ease of application in a hermetically sealed container!
- We apply wallpaper to the wall. To do this, we use any convenient tool - a spatula, a grater, a trowel, even just our hands - trying to achieve approximately the same thickness of the layer. To speed up the process, you can press a lump of the finished mixture against the wall with your palm and then level it with a tool. You can distribute the mass in different directions - up and down, left and right. It is better to avoid circular movements in this case, since the structure of the material can be disrupted.
A complete master class on preparing and applying liquid wallpaper is presented in the video.
Mixture consumption
The packaged mixture contains all the necessary components, so you can immediately pour it into a container and gradually fill it with warm water up to 40 degrees, stirring constantly. 1 package of liquid wallpaper weighing 1 kilogram requires 6 liters of water . However, these indicators may vary among different manufacturers, so before preparing the material you should definitely read the attached instructions. It will also be useful to read the article, liquid wallpaper at home.
A mixture of liquid wallpaper in a package
Asterisk IMPORTANT! For more convenient application to the surface, the solution must be left for 8-12 hours and thoroughly mixed again before starting work.
Features of preparing different surfaces
The preparation of different surfaces has some nuances that must be taken into account.
- Concrete, partially plastered or putty walls. Such surfaces are highly porous; they will not be perfectly white even after 5 layers of water-based paint. It is better to putty and prime them first. It happens that old concrete walls peel and crumble, such ones must first be coated with a strengthening primer,
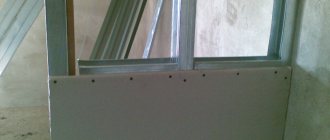
Puttying drywall
- Drywall. If liquid wallpaper is applied to drywall, it is better to putty not only the joints, but the entire surface.
- Leak locations. Previously, leakage areas were often treated with copper sulfate; if any, they must be covered with oil paint.
- Wooden surfaces, fiberboard, chipboard, plywood. Liquid wallpaper is applied to such materials only after making sure that they are securely fixed and that they will not deform under the influence of moisture or other environmental conditions. Before finishing, the wooden surface is treated with a primer in two or three layers or painted.
- Walls that were previously painted different colors. To this day, in old buildings, under all layers of finishing, you can find this high-design solution - walls painted in two layers, dark bottom and light top. It is better to remove such a surface, but you can also putty or paint it with facade paint and glue (3:1).
Ceiling preparation
Surface preparation
In order for the work to be of high quality and last a long time, you need to properly prepare the surface . First of all, old wallpaper and layers of paint are removed. If there are any unevenness or other defects, putty. After this, apply a primer to the wall. If you do not follow these recommendations, then when the liquid wallpaper dries, all the imperfections will be visible. It is better to take care of this in advance and do the job efficiently.
Priming walls before applying wallpaper
If there are any unevenness, the walls are puttied
The second stage of working with liquid wallpaper for walls
After the set period has expired, a large lump of wet mass is again dumped into the container. The required amount of wallpaper that is supposed to be used is immediately dumped into the basin. Then all the lumps are thoroughly mixed so that they combine into a homogeneous mass.
The instructions give instructions on the volume of water added.
When mixing, water is added to increase the elasticity of the material. Soaked lumps of wallpaper have become too elastic, it will be difficult to apply them to the wall; water will correct this defect.
Stir water into the mixture until smooth. After this, leave the mixture for 5-10 minutes, and for now work on the walls.
How to glue correctly?
Wall decoration with liquid wallpaper has several methods of gluing . The structure of the material resembles a putty solution, so to say “glue” is somehow incongruous, so this process should be called “applying to the surface.”
Applying liquid wallpaper with a transparent trowel
Knowing all the nuances, rules and sequence of actions, each person will be able to not only finish the walls, but also do it efficiently.
Liquid wallpaper: features, advantages and disadvantages
Liquid wallpaper has a special texture that is unlike anything else; it is this feature, combined with excellent quality characteristics, that has played a key role in their popularization.
- The material is easy to prepare and does not require a lot of clean space for cutting and spreading, which is necessary in the case of roll wallpaper.
- Manufacturers often claim that liquid wallpaper can hide any surface irregularities, but there is only a grain of truth in this. They are really not as demanding as vinyl, and even more so paper wallpapers, but they can only hide small defects; irregularities of more than 3 mm will appear on them after drying.
It is very convenient to work with liquid wallpaper even without the help of a partner
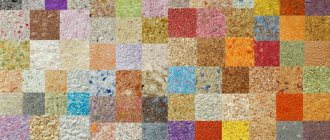
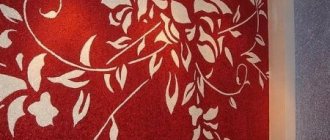
- The variety of colors here is not as rich as that of traditional wallpaper, this is a fact, but by combining different colors, you can create any patterns, most often geometric or floral shapes, less often various silhouettes and images.
- This finish is seamless, which is important in the aesthetics of the interior.
- Liquid wallpaper is convenient for finishing complex geometric surfaces.
- The moisture resistance mark does not mean that the wallpaper can be washed, but only that it can be used in rooms with high humidity, for example, in the bathroom.
- If a small area of wallpaper is damaged, you can cut it out and seal the hole with a newly diluted mixture. Therefore, it is recommended to save some leftovers.
Different shades and structures of liquid wallpaper will allow you to create a unique interior
Step-by-step instructions for beginners
Let's take a closer look at each of the methods of applying liquid wallpaper to the wall.
Method 1. Spatula
The mixture is already ready and has stood for about 12 hours . Immediately before work, you need to mix it thoroughly and perform the following steps:
- Step 1. Using a small spatula or simply using your hands, take the finished material from the container and applied to the wall.
- Step 2. Using a spatula you need to level the liquid wallpaper, the layer of which will be 1.5-3 mm.
- Step 3. The composition is applied in small areas, and after filling the surface area of 1-1.5 meters you need to level it with a transparent float or trowel, having previously moistened the instrument with water from a spray bottle;
Hand Right IMPORTANT! It would seem that this is the end of the step-by-step instructions, but you need to know the following rules:
- Liquid wallpaper should be leveled at eye level ; it is not recommended to bend over or stand on tiptoes to avoid defects and unevenness;
- you can take a spatula made of plastic or metal , the main thing is that it has a flat surface;
- movements to distribute the mixture should be short and directed in one direction.
After completing pasting the entire area of the wall, you should wait until it dries completely, which lasts up to three days , depending on the humidity in the room.
Method 2. Spray bottle
This method is used more often by specialists than by ordinary people. The main reason is expensive equipment. However, when using it, consumables are spent 2 times less and, accordingly, time too.
The video will show you how to apply liquid wallpaper with a spray bottle.
- Step 1. Fill the spray bottle with a mixture that should resemble liquid sour cream, so when making the solution you need to add a little more water than indicated in the instructions (for example, instead of 7 liters - 8.5).
- Step 2. Point the tool at the surface and smoothly, without stopping in place, move to the side, paying attention to the absence of empty areas.
- Step 3. After applying the wallpaper, you need to smooth it with a grater or trowel..
Star Half (Inverted) IMPORTANT! To prevent the appearance of empty or transparent areas, after the first layer has dried, you can apply a second one.
Method 3. Drawings
The advantages of liquid wallpaper are that with their help it is possible to implement any design idea , pattern or pattern on the surface. This method will require more time and patience.
- Step 1 . A drawing is drawn on the wall with a pencil.
- Step 2. The space inside the picture is filled with a mixture 2 mm wide , extending 1-2 mm beyond the boundaries, which is then moved with a spatula to create boundaries.
- Step 3 . After complete drying, liquid wallpaper is applied to the remaining surface, not reaching the edges a few millimeters.
- Step 4 . Using a small spatula, you need to move the layer towards the drawing to form a clear outline. Level the surface with a trowel.
Possibility of applying wallpaper to paint
Basically, all people want to make repairs in a short time, while investing a small amount of finance. This is where the question arises: is it possible to apply liquid wallpaper to paint?
The paint coating on the wall surface is not so easy to remove. This task takes a lot of time. Especially when the previous paint coating was applied as expected and is currently not even cracking.
To remove paint you will have to use a special tool. Since a spatula or ax will not give the desired result when removing paint from a wall, a chemical solution is used. You can replace it with a grinder with an attachment - a grinding wheel for metal.
During redecoration, it is allowed to apply liquid coatings to the paint. But, it must be firmly attached to the wall. It is better to completely remove cracked areas.
Therefore, it is advisable to apply liquid wallpaper over paint only on smooth surfaces treated with putty.
How to make a ceiling with your own hands - 135 photos and video descriptions of how to make various types of ceilings- Combined bathroom - stylish design methods and examples of competent interior selection (125 photos)
How to install an interior door frame with your own hands - 130 photos and step-by-step installation video
Protective varnish
Applying protective varnish to liquid wallpaper has many advantages:
- the coating becomes stronger , so its service life is extended;
- imparts moisture-repellent properties , which is a huge plus when the wallpaper was applied in the kitchen or bathroom;
- a layer of varnish fixes the original colors of the wallpaper, which does not threaten burnout in the future.
Protective varnish is applied after the wallpaper has completely dried with a wide brush, roller or spray . This type of varnish is almost invisible on the surface, so the material looks natural.
What do liquid wallpapers consist of?
Their production is carried out from safe ingredients. The main ones are cotton and fiber. In some cases, polyester particle fibers or synthetic fibers are added to the composition.
It cannot do without special additives - binder substances. Sometimes, wallpaper is supplemented with dyes and particles of decorative decorations.
How to remove it yourself?
There are several types of removing wallpaper from the surface, but the simplest and most cost-effective option is to use water.
This short video will show you how to remove liquid wallpaper from a surface.
In this case you will need: warm water, a brush, a scraper or a metal spatula .
Dip the brush in water and brush it over the wall section several times. After 7-10 minutes, the material will be saturated with moisture and soften . After this, you need to carefully remove the layer using a spatula. If the process causes difficulties, then it is necessary to soak the liquid wallpaper with water again.
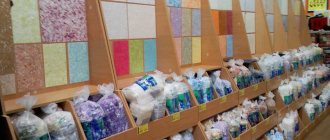
Types of liquid wallpaper
To produce this finishing material, several types of raw materials are used: cellulose (that is, a product of deep processing of wood), plant fibers (cotton), animal fibers (wool, silk) and synthetic.
In addition to the base substance, the mixture necessarily includes binding components (glue) and decorative inclusions - dyes, glitters, fillers. Accordingly, liquid wallpaper can be divided into groups:
- cellulose This is the most budget option, although the price of the product largely depends on the brand, composition and the presence of additional inclusions;
- cotton A relatively rare species, the base for which is pure cotton fibers;
- silk. Despite the name, natural silk is rarely used in such wallpaper; its synthetic substitutes are more often used;
- combined.
Most often you can find cellulose and combined liquid wallpapers on sale. The first type has no additives other than binders and dyes, the second may include glitters (an additive to create shine), fillers in the form of fibers of various origins, granules, pigments, and so on.
In any case, the product sold is a dry mixture, supplied in bags or boxes. It requires the addition of water and, if desired, additional decorative elements.
How to care
In order for the color and texture of liquid wallpaper to be the same, you need to use a portion prepared at a time on one wall. Because the ingredients are mixed by hand, subtle distinctive nuances are possible. At the same time, they will not be noticeable on different walls.
Liquid wallpaper is easily “repaired”. It is enough to remove the damaged or contaminated fragment and apply a new one in its place. But if the original coating was applied a long time ago, or it was exposed to cigarette smoke or kitchen soot, then the color of the new patch may differ significantly. Think about this in advance.
By the way, diluted wallpaper can be stored in the freezer. Just in case. This type of wallpaper is removed from the wall in the same way as the most ordinary ones.
Features of the material
Liquid wallpaper is a finishing material for application to walls and other surfaces. Sold in the form of a dry mixture combining cellulose fibers and various additives: silk, wool or cotton fibers, small mineral fractions, polymer beads, mica, crushed algae. An essential component of the mixture is adhesives and additives that protect the mixture from fungus. Water-based dyes will help give the mixture the desired shade, but often the mixture is sold uncolored and acquires color during the dilution process.
Depending on the additives, the type of coating changes: it can be almost smooth or rough, imitating rough plaster. Before application, the mixture is soaked, after which it is distributed in an even thin layer over a previously prepared surface.