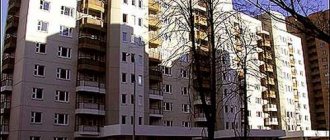
About 50% of the country's total housing stock is occupied by panel apartment buildings. At a certain period of time, it was the construction of such structures that made it possible to provide housing for many citizens. The main problem of such structures is the leakage of panel joints. That is why sealing external seams in a panel house is the main task necessary for high-quality insulation of the building.
This allows you to improve the microclimate in the apartment and also reduce energy consumption. This measure helps to get rid of mold and other problems. Sealing of interpanel seams in panel houses is carried out by industrial climbers. You can carry out such repairs yourself only on the first two floors of the house.
Signs of depressurization of seams
Main features:
- low heat and sound insulation;
- drafts in the room;
- getting corners wet;
- freezing of walls;
- mold formation.
If you encounter the above characteristic features, we recommend that you immediately contact a specialized organization to inspect the facade of the building. In the overwhelming majority of cases, these activities are carried out at high altitude using the industrial mountaineering method and require the involvement of appropriate specialists.
Among the reasons for the violation of seam tightness, experts most often name:
- Wall deformation associated with leaks at vertical joints. In winter, such joints freeze and heat escapes through them.
- Low quality of concrete used in the manufacture of slabs. Over time it may crumble. This leads to destruction right down to the reinforcement frame.
- Violation of concrete slab production technology or non-compliance with current standards. This may lead to the product not conforming to geometric shapes. Because of this, the joint is uneven and has increased dimensions.
- Harsh climatic conditions in the region. Concrete building materials can be destroyed by frost and sudden temperature changes in the off-season.
It is important to know!
To identify defects in slabs, it is necessary to use not only visual inspection, but also special thermal imaging equipment. It shows exactly where there are heat losses associated with depressurization of joints.
Signs of leakage
The destruction of materials filling the internal space of the joint between panels rarely goes unnoticed, as it is accompanied by depressurization of the seam, which entails a huge number of problems that negatively affect the comfortable living conditions of all residents of a condominium residential building. Residents of these houses literally physically feel such problems, since they are in the air, are reflected on the walls of the apartments, and negatively affect the well-being and health of apartment residents, especially children and the elderly.
The main factors indicating a violation of the tightness of seams in a panel apartment building include the following:
- The occurrence of a leak or frostbite in the area of the joints, which indicates their significant deformation.
- There is high humidity in apartments.
- Peeling of wallpaper, the appearance of mold and mildew on the surface of the walls.
- Deterioration of the microclimate due to humidity, mold, dust and polluted air from the street.
- The appearance of drafts that can be felt even with closed windows and doors.
- Violation of the temperature regime, increased heating costs in winter and high air conditioning costs in hot weather.
Methods and technologies
Sealing work involves insulating the seam cavity and waterproofing it. Initially, the panels may have chips or unevenness on the surface. But even if the geometric deviations in shape are only a couple of millimeters, the risk of moisture penetration into the joints increases significantly.
The space between the panels should be insulated, which will avoid the formation of “cold bridges”. The top of the joint is insulated with a waterproof mixture. Such work should be carried out during the construction stage of the building. Although they are usually done purely nominally - they cover the seam with cement. Over time, under the influence of the environment, it collapses, and then whole pieces fall out of the joints. Water and frosty air immediately penetrates inside. There are 3 methods.
| Technology | What is included in the list of works? |
| Plaster joints | The seam is sealed superficially; the process does not remove old sealant or cement; the waterproofing is applied directly to it. The most budget option, which is suitable only for cases where the insulation is not damaged and has retained its performance characteristics. |
| Waterproofing the joint | It is carried out with preliminary removal of worn mastic. The previously used insulation is partially removed if it has already lost its properties. It is replaced, after which the joint is sealed with mastic on top. |
| "Warm seam" | The joint is completely cleaned and recreated from the very beginning. Construction foam, insulation and waterproofing mastic are used. |
It is important to know!
The cost of the work usually depends on the size and number of joints that have become unusable, as well as whether they have been waterproofed previously. There are primary and secondary sutures. But the most correct approach is considered to be an integrated approach, which allows you to maximize the energy efficiency of the building and protect the walls from moisture penetration. This technique is called "warm seam"
Warm seam
The most effective option for sealing joints. The seam is completely cleaned and done from scratch. This is reliable protection against moisture and freezing. Homeowners and apartment owners always order it because they make their homes energy efficient for themselves.
Execution steps:
- The joint is completely unstitched. In the case when it is plastered, gating is used. All debris is removed and dust is blown out.
- If there is mold on the walls of the apartment, then the joint is treated with a special compound to prevent its re-spread.
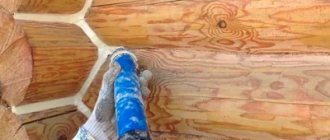
- The joint is blown out with polyurethane foam. It fills existing voids and penetrates even microcracks, sealing them reliably.
- Insulation (Vilaterm) is installed. It plays the role of a heat insulator and also dampens vibrations.
- A layer of mastic for external sealing with a thickness of at least 3 mm is applied. It protects the surface from moisture.
When carrying out work on arranging a “warm seam”, industrial climbers must follow the rules described in the regulatory documentation:
- SNiP 3.03.01-87 Load-bearing and enclosing structures;
- TR 196-08 Technical recommendations on the technology of sealing and sealing joints of external wall panels;
- Technical instructions for sealing joints.
It is important to know!
Work is prohibited if the street temperature is below -5 degrees. They should be postponed if it is snowing or raining outside.
Primary sealing
It is carried out in new houses immediately after completion of construction work. For thermal insulation, the joints are filled with Vilaterm. Mastic is applied on top to serve as waterproofing.
Stages of work:
- Surface preparation. Removing dust and dirt.
- Hollow insulation is laid. Cuts are made on it at a distance of 20 cm.
- Foam is blown through the slots.
- A layer of mastic is applied.
Regulations:
- TR 196-08 Technical recommendations on sealing technology. and sealing joints;
- VSN 40-96 Instructions for sealing. joints of walls and window blocks.
Secondary seal
The technology is used when processing old joints that have previously been insulated or sealed. Partial or complete replacement of the insulation can be carried out, depending on the degree of its wear.
Stages of work:
- Cleaning the seam from insulation (if necessary).
- Removing contaminants inside the joint.
- Blowing with construction foam and placing insulation.
- Sealing the seam from the outside. High quality mastic is used.
During secondary sealing, climbers are guided by the following standards:
- SN 420-71 Building codes and regulations for sealing. interpanel seams;
- VSN 19-95 Instructions for the technology of sealing butt joints of external wall panels.
conclusions
Thermal and waterproofing of panel joints in old houses should be carried out in accordance with the “warm seam” technology. This will protect the wall from further destruction, as well as create favorable conditions in the apartment. It is better if the wall is treated over a large area at once, otherwise after a few seasons moisture may destroy part of the repaired surface.
When it is necessary to make temporary repairs, it is permissible to perform cosmetic finishing of the walls or partially insulate the seams. This will help prevent further damage to the walls. It is not recommended to seal cracks from the inside. This is not only wasted money, but also an additional reason for moisture to stagnate in the joints between the panels.
You can figure out how to seal the seams on the outside of a panel house by following the instructions for the “warm seam” technology. However, all work at height is carried out by industrial climbers. This will allow you to do the work better and protect yourself from possible injuries.
Recommended Posts
Heat exchanger for the chimney
Calculation of house ventilation
Natural ventilation in the garage
Layout diagram of a Dutch oven with a stove
Lining the stove in the bathhouse with bricks
How to remove a ventilation pipe through the roof
Repair without opening the joint
The cheapest option is to seal the panel seams without opening them. It is better if this method is used only if the joint coating is in good condition. First, the seam is examined. Using a spatula, remove the old mastic. If the cement composition has retained its reliability, you can save money and perform cosmetic repairs. However, in most cases this solution does not lead to a better result.
Then do the following:
- The cleaned seam is treated with deep penetration primer. It is better if it contains fungal additives.
- If necessary, the damaged areas of the seam are sealed with mortar.
- Afterwards, the entire joint is covered with mastic with water-repellent properties. In the store you can find various formulations that consist of one or two components. Many experts prefer two-component polyurethane-based compounds.
The components of the solution should be mixed with a mixer. In this case, you must follow the instructions on the packaging. The front edge of each panel is covered with construction tape so that it is not stained with mastic.
Technology: how to miss correctly?
The general process of carrying out work on sealing seams and insulating them in panel houses consists of two stages:
- Surface preparation. Cleaning the area from dust and dirt, adhering layers. Using an industrial vacuum cleaner, a rag, a sponge with water and further drying the surface. The joints must be thoroughly cleaned and degreased. If necessary, primer is applied.
- Insulation and sealing works. Vilaterm insulation is installed in a prepared, clean and dried seam. When laying thermal insulation, it is necessary to make cuts along its length into which polyurethane foam or putty is poured. The cuts should be made every 20 cm. The seam should always be much larger than the seam.
When choosing a specific technology for processing joints, the nuances of sealing may differ slightly.
Cement composition
It works like this:
The cleaned, degreased and primed surface with the addition of a fungicide solution is sealed with a prepared cement composition.
The spatula should distribute the solution evenly and blot well to completely fill all the pores.- A layer of insulation can be laid inside the prepared space before pouring.
- After the joint has dried, it can be additionally treated with bitumen mastic (water-repellent). One- or two-component formulations can be used.
Sealant
Manufacturers offer the use of various ready-made sealant compositions that are used for expansion joints, “Hot Joint” technology and sealants based on polyurethane and acrylic components. After preparatory work, sealants can be used both outside and inside buildings.
Apply sealant to a cleaned and degreased surface and allow to dry. The heating tape can be inserted with a spatula. But even without tape, the seam will be securely sealed. Sealants well seal the joints of self-supporting insulating wire and sandwich panels.
Mastic
The putty sealing method includes initial cleaning and treatment of the joint with a primer, as well as fungicidal additives. The finished one- or two-component composition is placed in the seam.
In practice, two-component polyurethane-based putties are often used due to their stronger qualities, as well as good water-repellent properties.
Warm seam
This technology is considered the most reliable and high-quality, since it is complex and consists of three components. After preparing and thoroughly cleaning the seam, the main work is performed:
Priming is carried out, and then the cement layer of the lining in the seam is restored.- After drying, the joint will need to be primed again.
- Take polyurethane foam (1/4 of the seam) and apply it along the entire length.
- After increasing the size of the foam rubber, the polyethylene foam is laid end-to-end, in the form of a twisted bundle of a certain width, which makes it possible not to cut the increased foam.
- The tourniquet is carefully compacted (pressed) with a spatula.
- Check the boundaries of the sealed seam - they should be 10% larger than the width of the gap between the tiles, but be at the level of the seam.
- The next step after the layer has dried is to apply bitumen mastic, which will reliably protect against moisture.
When working with this technique, special attention is paid to polyethylene foam. It is recommended to work with it very carefully, as it is very easily damaged.
Polyurethane foam
Most often it is used in the complex method of sealing joints.
- The foam is evenly applied to the area cleaned with acetone and at the same time the selected insulation beams are screwed on.
- After the foam has dried, the protruding parts are carefully cut off with a construction knife.
- Then the gap is primed again and treated with bitumen mastic.
Important! Any work must be carried out strictly according to the instructions, thoroughly mixing the compositions to be prepared using a construction mixer.
Partial seam opening
If part of the coating is damaged or there is no seal behind the cement mortar, it is necessary to partially open the joint between the panels. This method is more reliable than cosmetic repairs. The work is performed in the following order:
- First, the destroyed cement composition is removed. When opening only a certain part of the seam, you need to drill holes in it every 25 cm. In this case, you must use a 10 mm drill.
- Then the empty areas behind the plaster should be filled with foam. To do this, use a construction gun, which conveniently dispenses foam.
- After the foam has hardened, its protruding part must be cut off. The entire seam should be treated with a primer. All areas that have been exposed must be plastered.
At the final stage of work, the joints are treated with bitumen mastic.
How and with what to seal the joint between the panels so as not to crack
Now let’s look at how to ensure that sealed interpanel joints do not crack and spoil the finish. Such cracks are especially unpleasant on painted ceilings; they are not visible under the wallpaper, although severe cracks can tear the wallpaper.
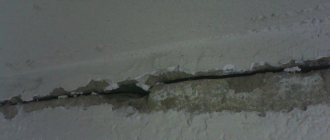
Crack between panels in the ceiling
The first is to seal the joints between panels with silicone or polyurethane caulk (which is specifically designed to seal joints) instead of insulation.
Apply plaster on top and reinforce with serpyanka mesh. Let's take the most durable plaster, for example, Fugen or Perlfix glue (Knauf). You can use cement-sand mixture M300 or tile adhesive.
Firstly, be sure to reinforce all joints between the panels with serpentine mesh and seal them with plaster - this will partially protect the seam from cracks.
Methods for repairing interpanel seams
Depending on the scale of the work carried out and the depth of intervention in the structure of the old seam, repair of the interpanel space is usually divided into three categories:
- Without opening the seam (cosmetic, superficial).
- With partial opening.
- With opening of the seam along the entire length.
Surface sealing of interpanel joints
The most cost-effective option is surface treatment of interpanel seams, without opening them and removing old materials.
This method is optimal if the joint area is in fairly good condition and there are practically no voids inside, but the tightness of the seam is compromised due to cracking of the mastic or microcracks have appeared on the panels themselves. Surface sealing is characterized by simplicity and high speed of work. The repair includes several stages:
- Removing old mastic by scraping the material with spatulas.
- Treating the joint with soil. If possible, it is better to use compounds with an antifungal effect.
- If there are small voids, they can be carefully filled with cement composition.
- Upon completion of preparation, the entire length of the seam is covered with water-repellent mastic. The material is applied with a spatula, creating a layer 1-3 mm thick. Both one-component and two-component formulations can be used for processing. At the same time, to achieve the highest quality and effective sealing, it is better to use two-component polyurethane-based sealants, which are characterized by pronounced elasticity and a high level of moisture resistance.
Sealing joints with partial opening
If the condition of the seam is generally satisfactory, but there are small defects (less than 15% of the total area), you can limit yourself to repairs, during which the joint will not be opened completely, but partially. This termination method is implemented as follows:
- The cement composition that has undergone destruction is removed, and in the area of the seam that is being restored, holes are drilled using a drill with an indentation of 20-25 cm.
- Through the holes made, the voids present behind the layer of plaster are carefully filled with polyurethane foam. In order to accurately dispense the material for work, it is preferable to use a construction gun.
- The seams filled with insulation are left for 12-24 hours for the material to harden, after which the excess foam is carefully cut off.
- A primer is applied along the entire length of the interpanel joint, and the areas that have been exposed are plastered.
- The final stage of sealing is treatment with mastic to ensure sealing.
Sealing of seams with a full opening
Carrying out repairs in this way provides the most effective result, since the interpanel space is completely freed of old materials, filled with insulation and protected from moisture penetration by applying a sealing compound. The most common option is sealing using polyurethane foam as an insulating material, in which the sealing is performed as follows:
- The old seam is opened with a puncher or other tools to a depth of 3-7 cm.
- The opened seam is freed from the remnants of old materials and is well cleaned of various contaminants.
- Polyurethane foam is introduced into the cleaned cavity, and upon completion of filling, work is suspended for 12-24 hours, which is necessary for the material to harden.
- Excess hardened foam is cut off.
- The mastic composition is applied with a spatula. The layer of sealing material should be 1-3 mm.
Insulating joints with polyurethane foam is second only to the “warm seam” technology in its effectiveness. In this case, the preparatory work is carried out in the same sequence: the seam is opened and cleaned of any types of contaminants. Vilatherm is used as insulation in the “warm seam” technology - a fine-celled material made of high-density foam polyethylene, supplied in the form of solid bundles or cylinders with a hollow structure inside. This material is placed tightly into the voids, after which all remaining gaps are additionally sealed with polyurethane foam. Final processing involves removing excess foam and treating with mastic. The result of such restoration is a space filled as tightly as possible with insulation, reliably isolated from external factors thanks to a layer of impenetrable sealant.
Why do you need to seal the space between the slabs?
Particularly important is the external filling, which fills the gaps between the vertical and horizontal slabs.
The primary coating is suitable for all types of slabs involved in the formation of load-bearing and partitions: monolithic, self-supporting, sandwich panels, wooden and even metal insulating wires.
Re-lubrication of the seam space will be required in the following cases:
- Incorrect drafting of a construction project.
- Significant violations of the construction process technology regulated by SNiP and SN.
- Displacement of panels due to improper installation, which results in improper shrinkage of the structural part of the wall.
- Deformation of panels due to harsh climate (temperature changes, prolonged precipitation) and destructive external mechanical factors.
- Incorrect execution of stages of the construction process.
- The use of low-quality consumables, as well as products with different elasticity that are incompatible with each other.
- Strong tension on self-adhesive sealing tapes (cable leading to destruction of the cement composition).
- Low quality concrete from which the slabs are made.
The main regulatory rules applied in work when sealing panel seams are:
- SNiP 3.03.01-87.
- CH 420-71.
- TR 196-08.
- VSN 40-96.
- VSN 19-95.
The following factors lead to the consequences of a lack of tightness:
- Conscription training.
- Freezing of walls.
- Wet corners.
- Mold formation.
- Lack of sufficient heat.
- Low acoustic and sound insulation.
Sealing the seams of the primary or secondary plane after preparing, joining and cleaning the space is carried out using:
- polyurethane foam;
- Vilaterm type insulation;
- sealing mastics.
Sometimes it is allowed to fill the seams with construction adhesive, cement mortar and sand of resistant brands of Portland cement (for example, M500). But in practice, inclusion can be carried out simultaneously with several substances. The main thing is that small voids are filled.
Detection of defects requiring insulation and sealing is carried out visually, as well as with the help of industrial devices - thermal imaging cameras that identify areas of the wall with heat losses.
Seam insulation and anti-mold treatment
Insulation of seams is carried out using the “Warm seam” technology - this is when the insulation of the interpanel space is carried out through holes drilled at a distance of 15-20 cm through “vilaterm” or a thin layer of plaster (for some series P-44T, P3-M, KOPE, I- 155, etc.) In series (I-515/5 II-18/12 P II-68 1-515/9M, etc.) the insulation can only be filled if the seam is opened. This is called 100% seam opening. Macroflex insulation is filled into the seam, then Vilaterm cord is laid and the seam is finally sealed with Oxyplast or Rustil mastic (sealant). Treatment with an anti-mold is carried out if there is mold in the seam.
Technology of sealing and insulation work in detail:
“Warm seam” is a modern, reliable and durable technology, therefore this method of repairing (or initially sealing) seams between slabs is one of the most relevant services of our company. The entire range of work is carried out primarily at heights and in any weather, and therefore requires not only special equipment and unprecedented safety measures, but also remarkable qualifications from the working personnel. Our company employs industrial climbers with extensive experience, and our main selection criterion is (among other things) a high level of personal responsibility.
Our company’s specialists guarantee a full range of construction works for the implementation of the “Warm Seam” technology. This set of works includes the following stages. 1. Preliminary insulation of the seams between the slabs to protect against external precipitation. This stage applies to new buildings and houses that are just being put into operation. The space between the panels is filled under pressure with foam and insulated with a special tube, which is “recessed” into the foam. Then everything is leveled with a solution and additionally sealed with a special sealant. This sequence of actions guarantees the achievement of maximum results in terms of water resistance, thermal insulation and resistance to UV radiation. 2. The second option concerns the reconstruction of joints in panel houses as part of a major renovation of the facade. This service is a set of measures to restore the sealing and thermal insulation properties of seams in accordance with the requirements for new buildings. Moreover, if the insulation is in satisfactory condition, our craftsmen will insulate it with a sealant from the outside without compromising the integrity of the old insulation. Our company’s specialists offer a full range of repair and restoration work on waterproofing interpanel joints. Such a complex provides for certain technological stages, namely: cleaning the seam from old insulation material (if there was any at all), removing leaking mortar or sealant; maximum possible degreasing of the seam; treatment of the seam with antifungal impregnation; washing the seam against mold; arrangement of the seam using the “Warm seam” technology. Based on the experience of our specialists, we strongly recommend not to resort to the help of craftsmen with a dubious reputation, as well as those specialists who offer prices below market prices. As a rule, the results of their work appear in the first season. The seam allows moisture to pass through, dampness and fungus appear in the room, and such craftsmen do not fulfill warranty obligations (and are not always provided for).
Materials for sealing seams
We use only high-quality materials and technologies to restore the tightness of joints with high weather resistance, water and air tightness. This allows us to achieve excellent results, even when working at sub-zero temperatures.
The color of the mastic for all types of panel buildings, in most cases is white. That's what we use.
Why do seams break and what are the consequences?
The joint between panels is the weak point of any panel structure. It is these seams that mainly suffer from the influence of meteorological factors, such as sudden temperature changes (frequent transitions through zero), constant high humidity in winter (relevant for the entire Moscow region). In summer, the seams between the panels dry out due to exposure to ultraviolet rays (direct sunlight). Therefore, cracks and mold often appear at the joints of the slabs, leaks occur, and air and moisture pass through in winter. Due to such damage, condensation and excess moisture appear in the space between the panels, and drafts and fungi appear in the rooms, humidity increases and the temperature in the room decreases.
What do we use to seal and repair seams?
Our team of industrial climbers is ready to offer you high-quality and affordable services for sealing and repairing seams in stone, brick, panel, block and other houses of any series. All work is carried out using certified safe and modern materials. The materials we use are frost-resistant, durable and environmentally friendly. Collaborative work can be done at any time of the year.
We have the most favorable conditions
We can offer a flexible payment system, moreover, the cost of our work is no higher than that of our competitors, and for some services we can offer you even more favorable prices!
Sealing seams in apartments.
Sealing of interpanel seams in apartments above the 2nd floor is carried out using the industrial climbing method. This requires access to the roof. To gain access to the roof of the building, you must submit an application to the DEZ addressed to the chief engineer on behalf of the tenant of the apartment in which the seams will be sealed or the balcony joints will be sealed. This application is accompanied by a letter of guarantee from our company stating our guarantees not to damage the roof of the building during the work. As well as certificates for climbers who will seal interpanel seams. We ourselves will take these documents to the DEZ. The customer is only required to sign the application.
Sealing external seams
Work guarantee
The main thing is not the technology chosen for sealing joints, but the quality of materials and the experience of specialists.
We guarantee our work from 3 years for private clients, up to 5 years for legal entities. Another warranty period is associated with a large volume of work for legal entities. For individuals, even after the expiration of the warranty period, preferential servicing of the facility is possible. The estimated service life of materials is 15-20 years. Material manufacturers provide a warranty on materials. We use only trusted factories that produce sealants and insulators. Since our main type of work is sealing and repairing balconies, we purchase materials in bulk and have a 15% discount on sealants. The discount will be passed on to you accordingly. Therefore, at the same prices, it turns out to be cheaper for us to complete the seams.
Sealing seams and joints of metal structures.
Prefabricated metal structures, various hangars, warehouses, require sealing of seams. The main reason for the leakage of the roof of such metal structures is that the joints between the roofing sheets are poorly attached to the sheathing. And the gap between the sheets is quite large. A large gap will leak regardless of the amount of sealant used to seal the seam. The only correct method of roof repair is to eliminate large gaps between the sheets of the structure, and then seal the joints of the metal structure.
Nuances of internal thermal insulation of seams
Internal thermal insulation of interpanel seams with sealant or polyurethane foam is not a full-fledged method of combating cold and dampness and can only be considered as a temporary measure. The fact is that with such thermal insulation, the entire thickness of the slab continues to freeze in the area of the seam, the dew point moves closer to the living quarters, and the moisture accumulating in the joint continues its destructive effect. At the same time, there is an inevitable increase in the humidity of cold areas of the walls, condensation of moisture on them and, ultimately, the appearance of fungus or mold.
At the first opportunity, care should be taken to ensure complete thermal insulation on the outside of the building.
Sealing plaster joints.
In some panel houses, in order not to carry out scheduled sealing, developers seal the interpanel seams with a plaster mixture. In this case, the interpanel space is not filled. The joint of the panels is simply plastered. Inside, between the panels there are voids. Moisture and cold air still seep through the plaster, and water from the roof can spread along empty seams into apartments.
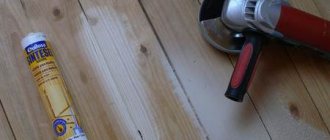
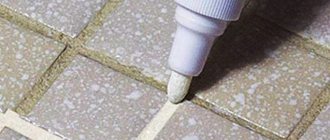
It is sometimes difficult to open the plaster interpanel seam along its entire length. For example, the interpanel gap is very narrow and is plastered “conscientiously” with high-strength concrete. In this case, you can qualitatively fill the interpanel space using polyurethane foam. It is necessary to drill holes in the seam every 20-30 cm and foam the seam through the holes. The foam expands inside the seam and fills the empty space. Then it is necessary to coat the seam with sealing mastic on top of the plaster in order to completely waterproof the seam. In this case, the plaster seam over the foam serves as excellent protection for the insulation (spray foam) from coloring, and a layer of sealant over the plaster provides excellent protection for the entire interpanel seam from moisture.
Drilling a plaster joint. Applying sealant.
Warm seam technology
The highest quality way to seal interpanel seams is this technology. Its cost is quite high, but the result lives up to expectations. The work is carried out according to a simple scheme:
- The interpanel seam should be opened along its entire length. The old sealant must be completely removed. The entire surface of the seam is treated with a primer.
- Then the seam should be filled with foam. It must be remembered that it can triple. That is why the foam should be applied to the depth of the seam. It is necessary that it fills about a quarter of the thickness of the panel.
- When the volume of foam begins to increase, it is necessary to lay Vilaterm in the joint - this sealant is made of polyethylene.
- Thanks to this, the foam will not come out. This seal is sold as hollow tubes. However, there are often continuous options. Vilaterm can have dimensions exceeding the dimensions of the seam by 10%. It must be installed in the desired place with a spatula. It should be slightly pressed into the mounting foam.
- It is better if the Vilaterma roller is located at the same height as the outer edge of the panel. After sealing the seam, you just need to apply water-repellent mastic to it.
This technology for sealing joints today is the most effective way to repair the external surfaces of panel houses. When choosing this method, the work efficiency is the highest. The seam is insulated, becomes waterproof, and also protected from precipitation. This allows you to increase the service life of the entire house.
Sealing of interpanel seams in multi-storey structures is carried out by professionals. It is possible to conduct experiments only at the level of the first and second floors - if the scaffolding is secure. In other cases, it is necessary to call industrial climbers.
Sealing of glazing seams and ventilated façade panels.
Many panel houses built in the last century are usually insulated and faced with a ventilated facade. Most modern buildings are built with a ventilated facade. Therefore, sealing seams of glazing and ventilated facade panels is work that is quite in demand in modern megacities. Failure to seal the seams of ventilated facades occurs due to violations of construction technology or building maintenance rules. We can not only seal the seams of ventilation facade panels, but also carry out a full examination of the causes of facade defects, as well as carry out high-quality repairs of the ventilated facade.
How to seal joints on the ceiling
According to the old technology used in the Soviet era, interpanel cracks (otherwise known as rustications) were tightly packed with tow and then filled with plaster mortar. Moreover, the latter was supplied mechanically through a hose from a special station.
Since simple lime or cement plaster does not have elasticity and has an average degree of adhesion, ceiling cracks appeared already during the shrinkage of the building. During the first renovation, the neighbors from the upper apartment begin to spill out, or even fall off in whole pieces. The same picture was observed on the ceiling of the top floor due to a violation of the roof waterproofing.
The current technology for sealing slab joints does not provide for filling them with any solutions. Instead, elastic polymers are used - polyurethane foam and rollers (bundles) made of polyethylene foam. Next, the joint is leveled and cosmetically finished using the following materials:
- deep penetration primer;
- ready-made gypsum-based plaster mixture;
- finishing latex putty;
- reinforcing element - fiberglass mesh, serpyanka or fiberglass.
If builders allow a large difference between the floor slabs, then it is extremely difficult to level it by plastering. The best way out of the situation is to finish the ceiling with sheets of plasterboard, creating a flat surface. But there are also seams between gypsum boards that can crack as a result of shrinkage. So the materials listed will be useful in this case too.
This is what a crack between plasterboard boards looks like
How to seal seams in the house yourself
If you wish, you can seal the walls without involving specialists. Of course, we are not talking about work at height; repairs here need to be entrusted to professionals. Most often, internal insulation of seams is carried out independently on an emergency basis, when they are not ready for the winter season, or sealing of external walls on the 1st-2nd floors.
Preparation
First you need to purchase mastic, foam, insulation (depending on the chosen option of work), calculating their quantity by linear or square meters. You will also need:
- putty knife;
- sandpaper;
- metal brush;
- vacuum cleaner;
- sponge and water;
- broom;
- solvent.
All furniture and belongings are removed from the room so that the room is empty. The old coating is completely removed from the walls and from the joint, using any available means: spatulas, brushes, etc. Before starting the main stage, the joint must be clean, for which it must be vacuumed or washed, and then dried well and treated with a degreasing solvent.
Insulation
It is advisable to fill the large interpanel gap with polyurethane foam, and lay a layer of thermal insulation on it in the form of a hollow durable tube (using the “warm seam” technology). There is an option to first put insulation and then foam it. After drying, excess foam is cut off, leaving space for mastic.
Applying sealant
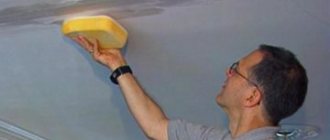
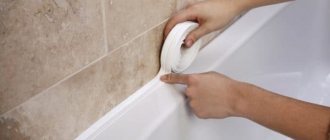
The sealant is applied carefully in a continuous line along the entire length of the seam. Some compounds are more convenient to apply with a spatula, others with a construction gun. Excess mastic or sealant is removed immediately with a wet sponge, otherwise the composition will harden tightly.
Applying the finishing coat
Many experts recommend applying another layer of coating after mastic, which will be decorative. Typically, a cement-sand mortar (plaster) suitable for outdoor work is used for this purpose.
If for some reason the layer turns out to be thick, it is better to put a mesh in the base, otherwise the cement may quickly crack. After drying, the finishing coat can be painted with frost-resistant paints.
Our prices
The exact cost will depend on many factors, including the urgency and scope of work. Continuous sealing
Unit units up to 10001001-5000Over 5000
| Primary sealing using “warm seam” technology (filling voids with polyurethane foam, installing Vilatherm, coating with mastic) | m.p. | from 250 | from 180 | Great Dane |
| Secondary sealing of interpanel seams without opening (removal of the top layers of sealant for maximum adhesion, application of sealant) | m.p. | from 120 | from 90 | Great Dane |
| Secondary sealing with partial opening of the old seam (opening seams in local places, installing vilatherm, coating with mastic) | m.p. | from 280 | from 260 | Great Dane |
| Secondary sealing with 100% opening of the old seam (opening the seam, patching out the contents, filling the voids with polyurethane foam, installing vilatherm, coating with mastic) | m.p. | from 320 | from 280 | Great Dane |
Selective sealing
Unit units up to 10001001-5000Over 5000
| The cost of work is determined individually based on the volume of work, the locality of the placement of “working” joints on the building, and the type of sealing. | m.p. | Great Dane | Great Dane | Great Dane |
Sealing seams using injection method
Unit units up to 10001001-5000Over 5000
| Secondary sealing of interpanel seams without opening using the injection method (removing the top layers of sealant for maximum adhesion, injecting mounting foam along the entire plane of the seam, applying mastic) | m.p. | from 280 | from 260 | Great Dane |
Advice from the experts
In old houses and apartments there are almost always areas contaminated with mold. To get rid of it, it is recommended to carry out anti-mold treatment of the fireplace before sealing. The result will be more effective if you further dry the walls with a heat gun.
In addition to sealing interpanel joints, it is worth paying attention to other sources of heat loss: old glass windows, low-quality doors, an uninsulated roof, an uninsulated attic (in a private house). Through such zones, up to 20% of heat can be lost, and additional sealing of windows and doors, as well as interpanel seams, will seriously improve the indoor microclimate and make living more comfortable!
Sources
- https://kronotech.ru/fasadnye-raboty/germetizaciya-mezhpanelnyh-shvov
- https://teplota.guru/teploizolyatsiya/pravila-zadelki-shvov-panelnogo-doma.html
- https://2proraba.com/teplo-ventilyaciya/germetizaciya-naruzhnyx-shvov-v-panelnom-dome.html
- https://stroi-md.ru/zadelka-shvov-panelnogo-doma/
- https://www.promalpservice.ru/germ.html
- https://StroyAlp.ru/shov2.php
- https://kraska.guru/germetiki/stroitelnye/germetizaciya-mezhpanelnyx-shvov.html
[collapse]
What to do with the joints of the slabs on the ceiling
The question is of course rhetorical. You can eliminate them.
Read below about how to deal with cracks of different depths.
Working with a wide, shallow joint
We are talking about cracks between the joints of the slabs, approximately 30 mm deep. In this case, work to eliminate them is carried out using construction foam. The technology for sealing the seams of floor slabs involves the following algorithm of actions:
- The hole is filled with foam using a mounting gun.
- Give time for the polyurethane foam to set. This is approximately 2-4 hours.
- After which, using a construction knife, the remaining foam is removed. You can leave a small notch - about 5 mm. This will allow the working material to grip better.
- Next, the recess is filled with elastic putty. We work with a spatula with a narrow and wide blade. The putty is applied with the first tool, and the solution is held on a spatula with a wide blade.
- To properly (process) seal the seams, you need to work with a spatula with a wide blade. After applying the mixture, excess must be removed.
Read below about what to do with a wide joint.
Working with a wide joint of great depth
We are talking about seams whose thickness exceeds 30 mm. In this case, the use of polyurethane foam will be ineffective. It is better to use other materials. Waterproofing joints between floor slabs involves the following algorithm of actions:
- Having discovered a deep recess, it is necessary to fill it with heat-insulating material. This can be: polyurethane foam or polyethylene.
- A sealant is used to fix the material.
Note!
It is better to use a sealant that resists moisture as much as possible.
- The subsequent procedure is to seal the wide crack with NTs grade cement. It is necessary to leave a groove. Its depth should be within 5 mm.
- When the cement mixture has dried, latex putty is applied. We use a spatula to level the surface.
Some craftsmen prefer to seal deep joints using ceramic tile adhesive.
Working with deep and narrow joints
The seams of the floor slab in question can be sealed using the method described above. The workflow for filling floor slab joints includes the following steps:
Using a piece of insulation that has been pre-applied with sealant, it is placed in a pre-arranged groove
It is important to close the notch tightly. After tamping, you should leave a small recess, about 10 mm. Depth within 5 mm. The space is filled with NTs brand cement.
After the cement mixture has hardened, latex putty is applied. We use a spatula to level the applied solution. In addition to the activities listed above, you need to perform a number of operational actions, which will be discussed below.
Contributed by NIIMosstroy
Approved by the Moscow General Plan Development Department
"5" December 1996
Effective date
"1" January 1997
The scope of work to repair joints at the site is determined based on survey data. It depends on the type of defects, the most likely causes of their occurrence, the location and nature of their manifestation, as well as the type of joints being repaired.
What does sealing the interpanel seam give?
One could ignore the crumbling interpanel joints if the sealant and mastic spilling out of the inter-panel space did not lead to serious problems:
The design of a panel house is such that an increase in size or complete destruction of the seal leads to the formation of huge gaps between the walls and floor, through which water and cold penetrate into the apartment; Regular freezing of water accumulated in the interpanel joint gradually destroys the edges of reinforced concrete slabs, which, in in turn, can lead to its partial destruction with the formation of huge holes and chips.
For your information! The service life of materials, mastic and sealant used to seal interpanel joints, even under ideal operating conditions, rarely exceeds ten years.
If during the shrinkage of the panel house box there was movement or settlement of the foundation, then the sealant from the interpanel seam could collapse and fall out in just a couple of years. The technology for processing interpanel seams provided for a two-layer seal, consisting of insulation, waterproofing and an outer mastic layer that protects the porous mass from moisture and solar ultraviolet radiation.
The first attempts to repair interpanel seams by numerous handicraft and semi-legal companies boiled down to simply filling the joint between the slabs with ordinary bitumen mass, which is used to patch holes in the roofing of high-rise buildings. The destroyed edges and cavities of the interpanel seam were filled with polymer concrete mass and covered with a mixture of resin and tar. To prevent the black spot from irritating the residents of the panel house, traces of repairs were painted over with paint to match the building's façade. Such a seal survived a maximum of one or two hot summers, during which the bitumen melted and flowed out of the joints. In addition, the thermal insulation properties of such sealing of interpanel seams were practically zero.
Even with successful repairs, frost continued to appear on the corners of apartments in panel houses, moisture condensed and fungal plaque continued to grow. But most often, in winter, the bitumen seal came away from the concrete wall like a cake and played the role of an improvised drainage gutter. Rain flows of water flowing down the panel walls were redirected by the peeled seal directly into the cavity of the interpanel seam. It was especially difficult for residents of the first and last floors of the building, whose apartments could be subject to real flooding.
With the advent of PPU aerosol packaging, interpanel seams began to be sealed using polyurethane foam. Foamed seams retained heat well, but quickly became unusable due to freezing and the destructive effects of solar ultraviolet radiation.
Interpanel seams. Sealing: general rules
Depending on the condition of the seam, secondary sealing is divided into two types.
If its condition is satisfactory, if the old insulation has not undergone significant destruction, secondary treatment can be limited only to the application of a new outer layer of waterproofing mastic. If all the signs of severe destruction of the interpanel seams are clearly visible, then when resealing them, certain work is required. These include: opening the seam, removing all old fillers that have become unusable, and carrying out the entire complex of sealing work, as when performing primary sealing.
When performing repair work on panel joints, you must follow some rules:
- In the event of leakage between panel joints in the end wall, the interpanel seams of the entire end façade of the building, as well as the joints between the end panels and the longitudinal wall, are sealed.
- If a vertical joint of a longitudinal facade leaks, all vertical seams along the entire height of the house are sealed. In addition, all horizontal joints adjacent to it are sealed.
- If a defect is detected in a horizontal joint, all joints located on three to four vertical rows of panels must be sealed.
- When carrying out repair work on panel joints, one should take into account the fact that at the joints the sealants are subject to tension and compression. This is influenced by temperature fluctuations, shrinkage and “creep” of concrete, as well as loads arising during settlement of the entire building. Moreover, with an increase in the ratio of the thickness of the sealant layer to the width of the interpanel seam, such loads become stronger. For this reason, the sealant layer should be half the width of the seam.
It is easier to fill with foam from inside the building using the following instructions:
1. Work should begin with the baseboards of the outer wall, which serve as the border between the street and the apartment.
2 Special holes must be drilled in the corners of the connecting surface of the outer wall and floor, ceiling. The recommended hole spacing is 20 cm.
3. To seal the seam we use foam. We fill the joint and corners with mounting material. The space should be filled to a greater extent; we apply polyurethane foam until the excess material comes out of the seam.
4 Wait for the foam to dry. We cut off the excess material with a special knife.
The use of polyurethane foam will not harm the sealing of the room; any room will thus be insulated.
Our readers are concerned about problems with insulating joints.