Home / Installation, repair, maintenance / Sealing holes and cracks / Ceiling repair - sealing the seams between the slabs
Any renovation in an apartment starts from the ceiling. In panel houses, a phenomenon such as cracks is often observed.
They most often appear at the joints of concrete ceilings. No matter how you whiten the ceiling, they will come back again, reminding you of the incorrectly performed repairs. The question arises of how to seal the seams between the slabs on the ceiling.
Sequence of work execution
Repairing a seam is quite a labor-intensive job that must be done meticulously, otherwise the bad work will be visible later, no matter how much you paint or whitewash it. Haste in this matter is a big hindrance.
The sequence is as follows:
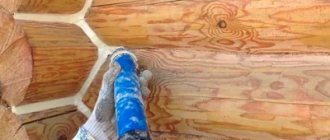
- We expand the seam between the concrete floor slabs using a hammer drill or a drill equipped with a spatula attachment. We clean off the old remains of the cement screed or filler with a knife or spatula. If this is not done, then the fresh solution will not adhere well to the concrete, and the stones from the old plaster cannot be sanded off.
- We clean the crack and the surface of the ceiling from dust. We coat the entire seam with a pre-prepared primer. This must be done liberally and thoroughly, after which the primer must dry well.
- According to the instructions, mix the gypsum plaster with a construction mixer. If you need a small amount of plaster, you can do without a mixer. The finished solution should be similar to thick sour cream.
- We begin to fill the crack with plaster. We fill deep furrows in several passes, each time thoroughly drying the previous layer. We fill especially deep seams with polyurethane foam, the remains of which, after drying, are cut off with a knife. Then we level the surface by rubbing gypsum plaster well into the pores of the foam.
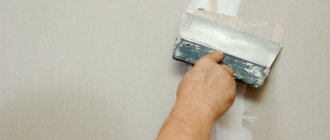
- Now we need to let this whole song dry well and then proceed to strengthen the seam by gluing masking tape. The tape should be 2-3 cm wider than the seam. Then putty is applied on top of the tape.
- The seams should dry completely again. Then the surface of the ceiling slabs is primed and the surface is finished with putty. The putty should be applied in a thin layer. Instead, you can use painter's fiberglass, prime it and then paint it with the paint you like.
5) Why can a circular hollow-core slab burst?
.
Very often, when installing floor slabs, you come across a broken slab. This most often occurs from improper storage of floor slabs or transportation.
In the photo below you see how circular hollow-core floor slabs should never be stored.
All these slabs burst, and the lower ones in several places. I took a closer photo
Many times I saw how the slabs seemed to be folded correctly, but winter passed, the base under the slabs became limp, the middle of the slab touched the ground and the slab burst.
To prevent the slab from bursting, you must be careful when storing slabs in stacks. To do this, you need to make a good base under the edges of the first slab (bottom).
It is advisable that the slabs lie horizontally
It is important that the first linings under the slabs are high, in case it begins to sink into the ground
Under no circumstances should the middle of the slab touch the ground, since it is almost 100% likely that it will burst, not just one, but also those on top of it!
The following spacers between slabs are usually made from wooden slats
Here you need to pay attention to three factors:. a) So that the slats are thick enough so that the plates do not touch each other
a) So that the slats are thick enough so that the slabs do not touch each other.
b) So that the wooden slats (spacers) are located one above the other VERTICALLY.
c) Spacers are laid 200 - 400 mm from the edge of the slab.
The height of a stack of slabs on a good, solid base can reach a maximum of 2.5 meters (8 - 10 rows).
.
.
Useful tips and unconventional ideas
- Instead of foam, you can use ceramic tile adhesive to seal deep cracks.
- A painting mesh can be successfully replaced by ordinary gauze or a bandage. A thin fabric that is pre-soaked in water and steamed with an iron is also suitable so that the fabric does not shrink afterwards.
- To avoid much hassle with leveling the ceiling, you can cover it with seamless polystyrene foam tiles.
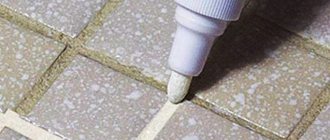
- Small seams are sealed with seam putty or acrylic sealant. We do not recommend using silicone sealant because paint does not adhere to it.
- Another idea from folk craftsmen is simultaneous reinforcement and filling of cracks. This is done as follows: mix a thick cement mortar with the addition of a small amount of liquid glass, dip a piece of bandage into it, roll it into a rope and place it in the gap. You need to act quickly - the solution with glass dries very quickly. Use the same solution to level the ceiling and, after drying, sand it with sandpaper.
- Be careful in areas where there might be wiring, otherwise you may damage it with the drill and create more work for yourself.
Where to start if the apartment is on the top floor?
Let's start our article with the most complex and expensive option.
So, if your apartment is located directly under the roof, then before you start sealing the cracks inside, it would be a good idea to see what’s going on on the roof.
This is very important, because if seams appear, then it is very possible that there is some damage on the outside. And if these “holes” are not patched up, then your joint putty will last until the first good rain
Fortunately, most high-rise buildings have a soft roof covered with roofing felt. It’s not very expensive, so it’s better to spend some money, but do everything for sure.
Of course, you are unlikely to get by on your own here. Not even because of labor intensity, but because laying roofing felt requires special heating tools. Where did a simple, albeit very homely person, get them from?
You don't need a lot of material. Place the sheets in the place where you can definitely see that the coating is worn out and cracked.
And after you solve the main problem from above, you can take on renovations inside the apartment.
Preparation of tools and materials
If you are thinking about the question of how to seal the seam on the ceiling between the slabs, then you should prepare tools and materials, including:
- putty;
- putty knife;
- drill blade;
- masking tape;
- fine-grained sandpaper;
- sealant gun;
- primer;
- perforator;
- mixer;
- PVA glue;
- acrylic sealant.
As a putty, you can use a dry gypsum mixture, but when choosing a primer, you should prefer one that has deep penetration.
The spatula should have an elastic, flexible blade, while the hammer drill can be replaced with a drill. But it will require a shovel-shaped attachment. If you cannot find sandpaper, you can use a sanding mesh.
b The second method is more labor-intensive.
You can also disperse the plates, that is, make small equal distances between them.
For example, to cover a floor you need 10 slabs and there remains a hole of 500 mm (half a meter). We install the first slab from the edge of the inner wall (so that there is no gap). We install the second slab with a slight indentation of 55 mm from the first.
Ten slabs are nine joints between them. Dividing 500 mm into 9 joints we get 55 mm distance between the plates.
Next, we tie the formwork (board) from below under this hole between the slabs. We place reinforcement in the gap between the slabs and fill it with concrete.
.
.
Recommendations for choosing materials
Sooner or later, you may also be faced with the question of how to seal the seam on the ceiling between the slabs. The technology for carrying out the work is described in the article, but to achieve a high-quality result it is necessary to select the right materials.
You should purchase NC cement in the store, which is used to fill deep joints.
This material has expansion properties when hardening, so it fills the entire space of joints and seams. You will also need dense thermal insulation materials, which are necessary for sealing wide seams. It is better to purchase those made of foamed polyethylene or polyurethane.
Experts also advise using elastic putty. When purchasing a serpyanka mesh, you must take into account that its width should extend beyond the limits on both sides by 50 mm. For the final work, you will need primary and finishing putty, which will be used to finish the entire ceiling area.
Monolithic sections with a width of more than 300 mm
If the gap between the slabs is from 100 to 300 mm, we construct a monolith with reinforcement. Options are also possible here.
Option 1
Used when formwork from below is not possible .
- We install load-bearing beams with a cross-section of 40x100 mm on the edge, in increments of 1 m, resting on adjacent slabs;
- We attach the formwork panels to the load-bearing beams with wire twists;
- We cover the formwork with roofing material or film;
- We install the reinforcement cage on the glasses so that the reinforcement is 30...50 mm above the formwork;
- We are concreting.
Option 2
If it is possible to secure the formwork from below, you can use reinforcement to construct the supporting structure.
- We construct the formwork;
- We make mounting parts from A1Ø8…12 reinforcement (depending on the width of the gap to be bridged), taking into account that there must be a distance of at least 30 mm between the bottom of the formwork and the reinforcement;
- We lay protective material on the bottom of the formwork;
- We install mounting parts;
- We lay reinforcement or reinforcement cage;
- We are concreting.
Important!
Do not settle for filling the gap between the wall and the slab with lightweight concrete cellular blocks (foam concrete, expanded clay concrete, etc.) - they do not have the required load-bearing capacity. Taking into account the arrangement of furniture along the walls, this section of the floor is subject to a large load, this will lead to the destruction of the blocks and the need for costly repairs of the floor.
Reference
The areas between the wall and the slab are sealed in the same way.
This story tells not only about sealing seams, but also about anchoring the slabs to each other:
How and with what to seal the seam
If you are faced with the question of how to seal the seam on the ceiling between the slabs, you must decide on the order of work. These manipulations can be considered quite labor-intensive; haste in this matter will become a hindrance. First, the seam is unstitched; for this you need to use a drill or a hammer drill; the tool should be supplemented with an attachment in the form of a spatula.
The remains of the cement screed are removed with a spatula or knife. If this step is neglected, the fresh solution will have poor adhesion to the surface. The resulting gap must be cleaned of dust and its surface coated with a generous layer of primer.
The layers should be allowed to dry. Gypsum plaster is mixed with a construction mixer. If you need very little composition, then you can do without a mixer.
The solution should have the consistency of thick sour cream. The crack is filled with plaster, and the furrows should be decorated in several passes. Each previous layer must be dried before laying the next one.
If you are thinking about how to seal the seam on the ceiling between the slabs, then you can use polyurethane foam. It is used when the seams are especially deep. After drying, the remaining material is cut off with a knife, the surface is leveled, and gypsum plaster should be rubbed into the pores of the foam.
Final works
After all the above steps have been completed, the layer should be allowed to dry. Only then can you begin to strengthen the masking tape. Its width should be 3 cm larger in relation to the seam.
Putty should be applied on top of the tape. These layers must be completely dry.
The surface of the slabs is primed and finishing putty is applied. It is applied in a thin layer. Instead, you can use painting fiberglass, which is primed and painted in the desired color.
Alternative Material Options
Quite often, novice craftsmen think about how to seal the seam on the ceiling between the slabs. Instead of foam, adhesive is sometimes used for laying ceramic tiles. The painting mesh can be replaced with a regular bandage or gauze.
A thin fabric that needs to be soaked in water and steamed with an iron is also suitable to avoid shrinkage.
In order to facilitate the work, the ceiling is peeled off with polystyrene foam tiles, which have no seams. Small cracks can be sealed with acrylic sealant. Silicone sealant should not be purchased, because it does not hold paint.
Another solution would be the simultaneous formation and subsequent filling of cracks.
First, a thick cement mortar is prepared, to which liquid glass is added. The bandage is dipped in this composition, rolled up into a rope and placed in the gap. You need to work quickly, because the glass solution will dry in a short time.
The same composition can be used to level the ceiling, and after drying it can be treated with sandpaper. When deciding how and with what to seal the seam on the ceiling between the slabs, you must be careful, because there may be wiring in the ceilings that must be protected from damage.
Recommendations from specialists for carrying out work
Many people are interested in knowing how to seal the seam on the ceiling between the slabs; the instructions presented below will help you with this. Before cleaning, the surface should be treated with water from a spray bottle. It is better to wet only the part of the ceiling that you plan to work on at the moment.
The moistened area is left for 15 minutes, and then you can get rid of the old coating and move on to the next area. The entire procedure is repeated again in the new zone.
Until the entire ceiling plane is cleaned, the work must be repeated again and again. As soon as you can get rid of the old coating, you will be able to estimate the amount of work to be done. As a rule, there are several joints per room, the number of which sometimes reaches three.
When thinking about the question of how to seal the seam on the ceiling between the slabs, the options presented above are worth considering. At the preparation stage, the seam should be cleaned, deepening by 50 mm. Next, using a wide brush or iron brush, the seam is cleaned of small concrete residues.
To seal the seam, you can use special rollers made of foamed polyethylene. It is important to choose products of the desired thickness. A strip of sealant is applied to one side.
Afterwards, the roller can be inserted into the previously primed joint. You need to use a spatula for this. The craftsman should ensure that there is room left to fill the space with concrete.
When sealing joints with expanding concrete, it is necessary to install recesses for decorative plaster. Once the solution has dried and the groove has been prepared, elastic putty can be applied to the surface. The work should be carried out using two spatulas, one of them should be wide, the other medium or narrow.
Features of installation on your own
Before you start work, you need to familiarize yourself with the standard flow chart for laying floor slabs. It describes in detail the stages of work, equipment and safety precautions, and includes drawings.
To lay concrete products, lifting equipment is required; a crane operator and two certified slingers will be needed. Do-it-yourself installation of slabs without qualified assistants is contrary to safety regulations.
During unloading or work, it is not recommended to drag blocks or let them fall freely. Ideally, you need to build supports (from wooden beams) specifically for storing the slabs. You can plan to lay the panels at once, lifting them directly from the truck: this will allow you to save a lot, since the crane operator has to pay for each lift, and the materials will be more intact.
The panels must be laid on cement mortar from M100 so that they rest on the load-bearing walls by at least 100 mm. In this case, you need to ensure that the position of the mounted floor slab is level and that each of them fits perfectly. It is recommended to check the level of the panels with each laying. If necessary, they are lifted by crane and repositioned. After finishing the masonry, the slabs are cleaned and the joints are filled with cement mortar.
Installation of slabs on gas silicate blocks requires a larger area of pressure on the supports (up to 250 mm), since they are less durable than baked bricks. In this case, it is advisable to strengthen the walls with a reinforced belt.
Quality control of installation of floor panels
During work, it is necessary to monitor the symmetry of laying the slabs on the spans. The laying depth of adjacent blocks must be the same. To do this, check that the solution is of the same thickness and no more than 20 mm
It is not allowed to use building mixtures that have begun the setting process, especially not to dilute them with water. It is important to ensure that deviations in the position of the plates in the plane are no more than 5 mm.
Installation of prefabricated monolithic ceiling
The advantages of this type of construction are low cost, relative safety of work, no need to rent lifting equipment and hire highly qualified workers. Small lightweight slabs of various types can be used: cellular, ribbed, beam. But there is also a minus: it takes time for the concrete to set.
Laying beam-type slabs consists of the following steps:
- drawing up a work plan, calculating materials, fittings and other things;
- formwork assembly;
- installation of wooden or iron supports;
- installation of waterproofing on formwork made of roofing felt or polyethylene;
- reinforcement;
- laying slabs;
- repeated reinforcement (if necessary, depending on the type of beam);
- pouring with liquid mortar using cement grade from M300;
- after 28 days, remove the formwork.
Installation of cellular concrete slabs is carried out according to the same principle.
It is important to arrange a canopy or cover the structure with film so that weather conditions do not affect the quality of work
Price
When buying slabs, pay attention that they are smooth, with a good surface, without radioactive background from the reinforcement. One product costs the buyer from 3,800 rubles
The price of laying slabs includes equipment rental, hiring a crew, and the cost of materials and electricity. A prefabricated monolithic ceiling with your own hands costs only 1,000 rubles/m2, since it does not require additional expenses.
Work methodology
A wide tool is used to collect the compound from a container, and a narrow tool is needed to apply putty to the joint. The solution is compacted into a seam and leveled to the level of the ceiling surface. Excess putty should be disposed of.
After 2 days, which are necessary for the mixture to dry, you can begin to reinforce the seam. To do this, a thin layer of putty is applied to the surface, onto which the mesh is fixed. It should be pressed into the solution and the excess should be removed with a spatula.
The primer is applied after the joints have dried using a roller. It is better to apply it in two layers.
After the ceiling has dried, plastering can begin. First, a thin layer is applied, and after it dries, you can apply the finishing layer, which should be smooth. When applying it is necessary to use a spatula, leveling the surface to an ideal state.
Filling a hole in a seam
Now you know how to seal the seam on the ceiling between the slabs. We hide the seams along with the holes in them.
In this case, you can act in one of two ways. The inside of the hole is sealed, which can be done with a narrow brush. The inner walls are cleaned of dirt and sprayed with primer.
As soon as the first layer has dried, you can begin applying the second. When thinking about the question of how to seal the seam on the ceiling between the slabs, you need to read the tips.
From them you can find out that the seams, like the holes, are filled with polyurethane foam. After it dries and expands, the excess should be cut off, and a cone should be cut in the inner space of the hole, the height of which will be 50 mm. These manipulations are necessary for laying cement mortar.
Necessary materials
In order to properly and reliably putty the seams between the floor slabs, it is necessary to carry out preparatory work on jointing and sealing the seams, as well as purchase the necessary materials that have specific properties and are suitable specifically for this purpose:
- For deep seams, NTs grade cement is required, the peculiarity of which is that it expands during hardening, allowing it to densely fill deep seams and joints;
- For a wide floor seam, it is necessary to use sealing materials made of foamed polyethylene or polystyrene, or polyurethane foam;
- Deep penetration primer;
- Putty with residual elasticity, for example, latex;
- Serpyanka with a width of at least 20 cm;
- Ceiling putty, preliminary and finishing;
Tools: narrow and wide spatulas, brush and spray bottle.
Technology of work execution
- Floor seams are usually sealed simultaneously with ceiling repairs, so it is more convenient to carry out the preparatory work as a complex.
The old coating is removed from the ceiling: whitewash or water-based paint is moistened with water from a spray bottle, left for 10-15 minutes and removed with a wide spatula until the plaster is applied. If the ceiling is covered with a thick layer of putty, it is cleaned only in those places where it has poor adhesion. If there are traces of rust on the ceiling, they are removed with special compounds. The seams between the slabs are opened: the old putty and plaster that are poorly secured in the joints are removed. If necessary, you can use a hammer drill. After processing, the seam should have a U-shaped or slightly expanded inward shape so that the putty holds better. Remove dust from the resulting seam by sweeping it away with a brush and wiping it with a damp sponge. Removing old coating from the ceiling and preparing the seam - Inspect the resulting seam. If its width is more than 3 cm and its depth is small, it is sealed with polyurethane foam. To do this, lightly moisten the seam with clean water and apply foam from a balloon. Wait for it to expand and begin to harden, after which the excess is removed, cutting it off with a knife so that a triangular-shaped depression with a maximum depth of 0.5 cm is formed at the seam site. If the seam is deep and not wide, it must be sealed with polystyrene foam, polyethylene foam or any other elastic material. The seam is pre-treated with a deep penetration primer and dried well. The seal is secured using a moisture-resistant sealant; the surface of the concrete must be dry. The sealant is placed deep into the slab, and the seam on the outside is sealed with NTs grade cement mortar so that a small depression remains at the joint. The cement mortar is dried.
Removing old coating from the ceiling and preparing the seamSample of a putty seam with polyurethane foam inside
- Putty for rust with residual elasticity, for example, latex, is applied to the prepared recess with hardened mounting foam or cement mortar.
Level it flush with the surface of the slab. It is convenient to put putty into the seam using two spatulas: apply a sufficient amount of putty to the wide one, and put it into the seam with the narrow one, compacting and smoothing it inside the seam. After applying the putty to part of the seam, smooth it out with a wide spatula, removing excess. The process of applying latex putty - The solution is dried for 24 hours and the joints are puttyed.
Apply a layer of preliminary putty to the seam and adjacent surface of the floor slabs and glue sickle or paint mesh over it, pressing it into the layer of putty. Iron with a spatula along the direction of the seam. The width of the serpyanka or mesh must be at least 20 cm. Dry the putty and, after drying, level it with sandpaper. Apply another layer of preliminary putty with a finer grain to the entire ceiling, leveling it with a wide spatula. Dry and sandpaper. After this, a layer of smooth finishing putty is applied, dried, smoothed with fine sandpaper and painted. After applying the putty, dry it for a day - If the floor slabs have a height difference of more than 1 cm, the ceiling will have to be plastered after sealing the seams.
Plastering is done with a gypsum-based composition over a reinforcing painting mesh. The ceiling is treated with a special “concrete-contact” primer containing solid particles - it creates a rough layer on the surface of the slabs and facilitates the adhesion of the solution. The mesh is attached to a layer of plaster, carefully smoothing it out. After the plaster has completely dried for 2-3 days, you can begin to putty. Ceiling plastering technology
The ceiling made in this way looks absolutely smooth, there is no destruction of the seams, and the resulting microcracks, due to the plasticity of the putty, remain invisible. However, this method is unacceptable for apartments in new buildings - the house will settle within three to four years, and the slabs will inevitably move. Therefore, for new houses it is better to use other types of ceiling finishing, for example, suspended ceilings.
In order to properly putty the seams between the tiles on the ceiling, you need to carry out preparatory work. The seams that are located between the ceiling tiles are considered to be one of the most difficult defects. For many decades, people tried to fight this problem, but as a result, the cracks made themselves felt again. This happened for various reasons, such as settling of the house or ground movement.
The current building materials market can offer a wide range of products that can help in this situation. One solution to hide this defect is to install a stretch ceiling, but not everyone can afford this luxury. What to do in this situation?
How to seal joints between floor slabs
From time to time, the seams between the floor slabs are sealed.
These elements of building structures diverge when the building shrinks and soil moves as a result of changing temperature conditions.
This problem can be solved in several ways. Some believe that the best option may be to install plasterboard ceilings.
But the height of some rooms does not make it possible to use this option. What method of sealing slabs on ceilings is most suitable?
To determine this, you need to familiarize yourself with the list of materials suitable for such work, as well as the seam sealing technologies used.
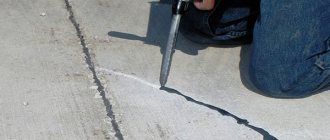
Crack at the junction of floor slabs
If the apartment is on the top floor and a gap has formed between the floor slabs on the ceiling, there is always a possibility that water will begin to penetrate into the room in the near future.
In the winter season, these circumstances will cause special troubles.
Therefore, in such situations, repair work must begin with an inspection of the roof, and if the defects formed on the coatings are not eliminated, then sealing the cracks formed between the floor slabs may be work done in vain.
It must be remembered that the seams between the slabs can diverge on all floors, and not just on the topmost ones. This problem arises as a result of the shrinkage process of the building that occurs in the first months after construction.
Content:
How to remove expansion joints if they are very visible? If you decide to use a material such as wallpaper or fabric for the ceiling, then the best option for closing the seam would be to use polyurethane foam and putty. If the ceiling is painted, then it would be better to use a method that will be of higher quality.
When sealing seams on the ceiling, you need to use only high-quality working materials.
If you do not follow this simple rule, then after a certain period of time the seams will appear again and the ceiling will have to be leveled again.
Sealing seams on the ceiling using polyurethane foam is the easiest and fastest
Covering the seams on the ceiling can be divided into 5 stages:
- First of all, you need to widen the crack. To do this, you can use a hammer drill or a special spatula;
- After this, using a construction knife, you need to clean the seam and coat the crack with a special primer. This stage must be done with a brush;
- Next, the seam must be filled with foam using a construction gun. When the foam is thoroughly dry, using a construction knife, the excess is removed to a smooth surface;
- The next thing to do is mix the mortar primer. The mixture is carefully applied to the seam using a spatula. Movements must be smooth and confident in order for the putty to completely fill the empty space of the foam;
- After half an hour, it is necessary to apply an additional layer of putty using a wider spatula.
This method is suitable not only for sealing ceiling seams. It can also be used if there is empty space between the pipes that go into the ceiling.
After the mixture has dried, it must be primed, then the entire surface of the ceiling must be treated with putty.
putty
After the gap has been sealed with polyurethane foam, the joint must be puttied. To do this, let's look at which putty is suitable for our purposes. The best composition of putty is considered to be a mixture of sand, lime, cement and gypsum, as well as special additives, based on the purpose of the future putty.
The following types are distinguished:
- Universal
- Starting
- Finish
Universal – one of the most common, suitable for any stage of work. They are easy to use and quick to apply.
Starter - used to prepare the working surface. They contain a special proportion of incoming materials so that with the help of such putties it is easy to level the working surface.
Finishing – make it easier to apply the finishing touches to the ceiling and provide a smoother surface.
Putty compositions have many options. But all of them can be divided into 2 types:
- based on sand and cement;
- based on cement and lime.
Putty based on sand and cement is just suitable for leveling cracks in the ceiling.
Cement putty is used in rooms with high humidity.
You can also distinguish putties according to the main binding material:
- gypsum based
- cement based
- based on mineral materials
Also, according to the dispersion of putties, there are:
- finely dispersed (with small particles up to 20 microns),
- medium-dispersion (no more than 80 microns),
- coarse (more than 80 microns).
In the store you can find putty in ready-made diluted form, this will save your time. But if you want to save money, you can buy it in dry form.
When choosing putty specifically for the ceiling, pay attention to:
- How viscous a solution do you buy?
- Putty dispersion.
- The packaging must indicate the consumption per square meter.
- How resistant is the putty to temperature changes?
Initial putties should be well compatible with the concrete slab and primer.
The recommended thickness of the applied putty layer is 1.5 -2.5 cm. When choosing a putty for filling cracks, you can take a universal one, or you can choose by type of activity:
- for sealing cracks and cracks;
- for decorative purposes;
- for concrete base;
- for plastering surfaces;
- moisture-resistant plaster;
- for plasterboard products.
Here your choice should depend on the activities that you plan to carry out.
There are specialized putties:
- putty for urgent repairs, capable of expanding;
- putty for sealing joints between plasterboard floors;
- elastic mixtures, with the help of which you can ideally quickly repair cracks in the ceiling;
- putty for sealing joints in the ceiling.
The joint between the wall and the ceiling: choosing the material
Another problem that can very often be encountered is a crack between the walls and the ceiling.
What to do with such a seam? This problem will interfere with high-quality ceiling finishing. Of course, you can resort to the method described above and seal the joint with construction foam, but there are several other materials that can save the situation.
For example, to close a seam you can use:
- Gypsum mortar;
- Synthetic putties;
- Moisture-resistant putties.
The best option to seal the joint between the wall and the ceiling is construction foam, since after application it begins to expand during drying, thereby filling all empty spaces
If there are large joints, then you can use a reinforcing mesh, which must be placed in the crack that has formed. Most often, cotton or linen is used for this, which is soaked in glue. The final stage will involve applying plaster, which will help consolidate the result.
Preparatory stage: how to cover the seams on the ceiling between the slabs
In order to prevent the seam from being visible in the future, it is necessary to carry out some finishing measures, which include the use of special materials. However, first you need to prepare the ceiling for work. Since the primer is applied exclusively to a clean surface, first the old coating is removed and the old cement and lime are cleaned off.
It is important to remember that you cannot apply subsequent layers of material until the previous one has dried. This is a very important point that must be observed. If you do not pay attention to this and neglect the rule, the quality of the final work can be seriously affected.
Final leveling work
After the main work is completed, you can begin leveling the surfaces. This is done using abrasive mixtures.
Non-woven fabric can eliminate all minor irregularities on the ceiling
It is very important to remember that you can start painting the ceiling only when all repair work is completed.
Using non-woven fabric, you can get a wonderful ceiling. It needs to be glued before you start using putty.
This way you will get a flat ceiling. After the finishing putty has been applied, the ceiling is primed one last time. Finally, the ceiling can be given absolutely any look using paint or other material.
What is the characteristic of finishing the ceiling surface using paints and varnishes?
The quality of finishing of the ceiling surface in residential and public spaces is extremely important. When entering a room, one of the first things that catches your eye is the ceiling. Accordingly, its attractiveness largely determines the overall impression of the room’s decoration.
Ceiling paint for concrete is the simplest, most affordable material, but at the same time allows for a neat and attractive finish. And in industrial and utility buildings, painting concrete ceilings is used even more often than other finishing methods.
Painted concrete ceiling in garage
It is worth noting that this type of cladding of ceiling surfaces has become relevant in modern interiors: loft, industrial, techno, contemporary, minimalism.
The benefits of painting the ceiling
- You can apply the composition yourself without the help of professional teams.
- Using paint to decorate ceilings is one of the most budget-friendly options. Naturally, suspended and tensioned coverings will cost many times more.
- Thanks to the use of paints and primers, the concrete surface is additionally protected from the effects of adverse factors.
- This finishing method is excellent for rooms with low ceilings, since the facing layer has a minimum thickness.
- Applied in accordance with the rules, the composition will delight the eye with its attractive appearance for a long time.
Along with this, it should be understood that the process of painting, especially a surface located at a height, is quite labor-intensive.