To increase the strength and durability of concrete, special compounds are used to seal cracks and seams. Sealant for concrete waterproofing prevents the penetration of moisture, dust, and aggressive gases into structures.
The material is a viscous or paste-like substance, which is used to isolate joints of concrete parts, expansion joints, holes, junctions of structures made of other materials, cracks and other defects.
Sealant for concrete by composition
Depending on the basis on which the concrete sealant is made, it can be of the following type:
- Silicone sealant for concrete protects it from moisture as much as possible and has good elasticity. It is worth noting that this material has a high degree of adhesion and is resistant to many influences.
- Acrylic concrete sealant is considered the safest and is usually used for interior work. Acrylic sealant contains no solvent, so it is suitable for painting. Before using this material, it should be diluted with water.
- Polyurethane sealant tolerates high humidity well and does not react to chemicals. This type of sealant is recommended for use on façade or some interior work.
- Silicate sealant for concrete is characterized by increased heat resistance and is recommended for use in sealing fixed joints.
- Butyl rubber - a concrete sealant based on this type is highly durable and reliable, and is resistant to various weather conditions and chemicals.
- Bitumen sealant for concrete is highly moisture resistant and is recommended for use in exterior and interior work where there is high humidity.
- Polysulfide - a concrete sealant made on this basis has high elasticity and resistance to chemicals. This type of sealant does not shrink, does not lose its properties due to temperature changes and protects concrete from dynamic loads.
Preparation of concrete structures for repair
Before choosing a repair method, inspect the structure and determine the extent of the damage. Based on the results, the technology and composition for repair are selected.
At the next stage, the crack is widened. Remove fragile elements, dust, and small debris from the hole. To do this you will need a brush or vacuum cleaner. Exposed fittings are cleaned of rust.
Stages of repairing cracks in concrete.
Small cracks are opened to such an extent that the solution can be poured inside. Large cracks are prepared for strengthening: grooves are cut in the walls across the holes, into which reinforcing wire is then installed.
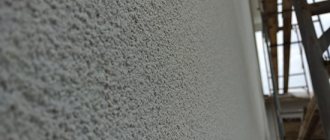
The inner surface of the crack and the adjacent areas are treated with primer, which enhances adhesion.
Sealant for concrete when ready
When ready for use, concrete sealant comes in two types:
- One-component - a sealant that is completely ready for use and does not require any manipulation.
- Two-component - a sealant that must be prepared before use, namely, mixed in a certain proportion, it is indicated on the package.
It is worth noting that, regardless of the type of readiness for use, each sealant has its own indicators of elasticity, elasticity, and setting time.
We repair the screed
How to repair cracks in a floor screed depends on the degree of deformation of the subfloor.
Sealing microcracks
Shallow, small cracks usually do not cause problems. They arise due to improper concrete drying conditions. If they begin to appear soon after pouring, the floors should be wetted and covered with film.
Very thin microcracks can be left untouched or covered with liquid cement mortar or tile adhesive. If the width reaches several millimeters, it is better to play it safe and seal such cracks to the full depth.
- The crack is opened by cutting off the concrete on both sides of it with a grinder with a diamond blade, which is set at an angle to the crack.
If the amount of work is small, you can get by with a chisel and a hammer Source wp.com
- Pieces of concrete and cement dust are removed from the resulting triangular furrow.
- Its walls are well impregnated with a deep penetration primer.
- After the primer has dried, fill the recesses with the solution, applying it with a small slide.
- As soon as the solution sets, but does not completely harden, the excess is removed from the surface with a spatula.
If you immediately level the repair mixture over the surface, then during the drying process it will shrink and a depression will form.
Sealant for concrete by type of application
Each type of concrete sealant has its own specific requirements for application to the surface.
There are 3 types of applying sealant to a concrete surface:
- A type of sealant that is applied using a putty knife.
- Brush type of sealant, when it is applied using a brush.
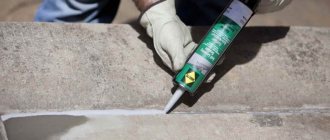
- A pouring method of applying sealant to a concrete surface, which requires the use of a special construction gun.
Waterproofing seams prices, price and cost of 1 linear meter
| Name of works | Unit | Price in rubles |
| Waterproofing of cold joints: - Work on installing a groove - cleaning the groove - layer-by-layer compaction with a non-shrinking composition | m.pog | 600 |
| Waterproofing of interblock seams: - Work on installing a groove - cleaning the groove - layer-by-layer compaction with a non-shrinking composition | m.pog | 400 |
| Waterproofing of expansion joints: - Work on installing a groove - cleaning the groove - sealing an elastic profile - sealing a non-shrinking composition - a set of injection works | m.pog | 4900 |
| Waterproofing expansion joints using waterproofing TPO tape: A device for sealing the contour of an expansion joint using elastic tape with epoxy adhesive | m.pog | 990 |
| Injection waterproofing of seams / shut-off waterproofing - Work on installing a groove - cleaning the groove - layer-by-layer compaction of a non-shrinking composition - Work on constructing boreholes and installing packers - a set of injection works - dismantling packers and sealing injection holes | m.pog | 1200 |
| Cement-mineral waterproofing | m2 | 600 |
| Waterproofing of communication entry points: - Work on installing a groove - cleaning the groove - layer-by-layer compaction with a non-shrinking composition - Work on constructing boreholes and installing packers - a set of injection works - dismantling packers and sealing injection holes | PC | 6900 |
Cost calculator for waterproofing joints
Click to open the calculator and calculate the cost of work
Calculation of the cost of injection and suture waterproofing
The nuances of choosing a sealant for concrete
When choosing a sealant for a concrete surface, you should pay attention to the following points:
- An indicator of strength and hardness, because the stability of the seam and its durability depend on this.
- Hardening time of the material.
- Consumption indicator.
- The higher the adhesion level, the better the grip.
- Level of elasticity.
- How mobile the material is, this is especially worth considering for vertical work.
- Frost resistance of the material.
Tools and equipment
To seal concrete joints, the following are used:
- spatulas;
- valves – necessary for high-precision dosing and distribution of materials;
- material supply systems are high-performance industrial equipment for supplying sealants;
- systems for dosing, mixing and controlling materials.
When sealing concrete joints, applicators and flow guns (both cold and hot) are widely used.
Plan for working with sealant
Regardless of what type of work and volume is performed using sealant, everything should be done according to a specific plan, namely:
- Prepare the working surface: remove large cracks, clean them of debris, seal them with cement mortar; if there are any stains on the surface, they need to be removed.
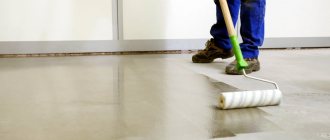
- Surface primer. This should be done using a roller or brush on a cleaned surface. Apply the primer in 2 layers and let each coat dry thoroughly.
- Prepare the solution using a drill with an attachment or a construction mixer; you can also buy putty already prepared for use.
- Apply putty to the surface in 2-3 layers, so that each layer is no more than 0.5 cm thick. Allow the material to dry for 24 hours.
Remove any unevenness using a sander.
Types of damage
The choice of method for repairing structures depends on the type of cracks. They are:
- by degree of penetration: superficial - shallow and deep, through;
- by size: hairline (up to 1 mm), medium (from 1 to 10 mm), wide massed (11 mm or more);
- in relation to reinforcement: without exposure, with complete or partial exposure;
- by location: local, spread over all surfaces, corners, edges;
- by impact on the structure: no effect, reducing strength by 5–50%, destroying when strength is less than 50%.
The best sealants for concrete
Below is a list of manufacturers and models of concrete sealant with a brief description that have proven themselves to be the best in their work.
Parabond Construction
One of the popular sealants for concrete, suitable for interior and exterior work in horizontal and vertical positions.
- The quality of this material fully complies with the European standard, it is made on the basis of polyurethane, one-component type.
- At an average temperature of 23 degrees Celsius, it dries within 30-35 minutes.
Accent 117
One of the best frost-resistant sealants for concrete surfaces. This material is made on the basis of acrylic and is a one-component type.
- Accent 117 sealant has a very high level of adhesion and can be used when working with horizontal and vertical seams.
- At an average temperature of 23 degrees Celsius, it dries within an hour.
Soudaflex 40 FC
High quality polyurethane one-component sealant for concrete. This material has absolutely no odor, has good elasticity and can be painted.
It is worth noting that such a sealant is maximally resistant to heavy loads, absorbs vibration and is resistant to many chemicals.
Hermes PU-724
Sealant for concrete, which is made on an acrylic base and is of the two-component type. This material has high moisture resistance and is recommended for outdoor work.
Hermes PU-724 sealant has a high level of adhesion and is durable and resistant to temperature changes.
IQ Lux PU-724
A popular two-component concrete sealant made from polyurethane rubber.
- This material is excellent for both indoor and outdoor use.
- IQ Lux PU-724 sealant has good elasticity and is resistant to temperature changes.
Briefly about the main thing
In order not to have to decide how to repair the blind area, you must initially follow the technological process.
Before restoring the screed, you need to find out the root causes.
The seam between the blind area and the plinth can be sealed, the cracks can be expanded and tightened, and finally rubbed with cement mortar.
If the cause of the damage is a poorly prepared foundation, then it is better to redo everything.
Write in the comments what you think - is there any point in repair work with a blind area, or in any case is it better to disassemble everything and redo it again?
Photo of the best sealant for concrete
Causes of leaks
The main reason for the formation of leaks in the premises of a building and home is improperly done waterproofing or its absence in principle.
In the absence of high-quality waterproofing:
- If the room is underground, water, groundwater and moisture are absorbed into the base of the foundation and walls made of concrete or brick (these materials easily absorb water), and then gradually destroy it. The destruction of concrete occurs due to the influence of various minerals in the water, as well as due to seasonal temperature changes. In winter, the moisture that is absorbed into the concrete freezes and thaws in the spring, thereby destroying the concrete. As a result of such destruction, pores, voids and microcracks are formed in concrete, brick, FBS blocks, etc., through which water subsequently penetrates into the room, forming more and more leaks every year.
- If we are talking about leaks in places where the roof or balcony is located, rainwater falls on the concrete base, is absorbed into it and comes out on the ceiling indoors in the weakest place. Constant water pressure and temperature changes destroy the concrete ceiling in the same way as in the case of underground water.
What are the dangers of constant leaks:
- Constant leaks lead to an increase in voids and microcracks in concrete or other substances, which in fact leads to increased leaks from year to year.
- Formation of mold and mildew hazardous to health.
- Flooding of premises, damage to property and finishing materials.
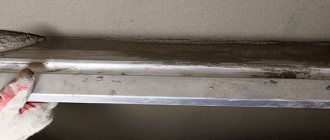
Main leak locations
Leaks tend to form at the weakest points in a structure and then spread further as other elements of the structure deteriorate. As a rule, leaks first begin to form in the following places:
- Cold joints, concreting joints and inter-block joints - we are talking about the joints between the slab and the wall, the ceiling and the wall, or the interruption of the concrete pouring procedure.
- Places where pipes or other communications enter buildings.
- Cracks – if there is a crack in the wall, then water will first flow through it.
- Destroyed section of concrete
Leak examination - Identification of leak locations
One of the most common problems faced by the owner of a home or building is dampness, water seepage and the resulting damage. Often, difficulties in finding the source of moisture leaks lead to unsuccessful measures to eliminate them and, as a result, even financial losses, since the source was identified incorrectly. With the advent of advanced inspection methods and non-destructive testing, it has become possible to accurately determine the location of the leak.
Before carrying out work to eliminate various leaks, you need to determine their source. The most important aspect of the inspection or assessment will be to locate where water or moisture has entered the premises. To do this, it is best for you to contact an experienced and large company whose specialization is waterproofing itself. It is such an organization that will be able to send its engineer to you to conduct an examination and identify places where water can pass.
You can read more detailed information regarding the examination of waterproofing systems in the article - “Construction examination of waterproofing - Methods of testing, examination and inspection.”
Injection protection
This method of waterproofing various seams is one of the newest and most effective technologies for protecting a building from moisture penetration. It is used to restore and protect structures in the most inaccessible places. This method allows you to perform seam sealing without opening the finish.
The essence of this technology is to pump waterproofing solutions into the seams using a special injection pump. At the same time, even minor cracks and seams are filled evenly due to high pressure and a certain consistency of the solution. Polymerization of the material occurs within a few minutes.
In some cases, the use of epoxy resins is allowed. This material is most effective for restoring the mechanical integrity of a building structure. Epoxy resins have excellent adhesive properties and allow you to repair various damage to either cold external or always warm internal surfaces. But the connection made using such material turns out to be quite rigid, which does not always correspond to the operating conditions of expansion joints.
The process of waterproofing by injection is presented more clearly in the following video.
Independent installation of a waterproof expansion joint with a metal profile
The construction of expansion joints in concrete floors can be carried out using a special metal profile, which is important in industrial premises.
How to make a waterproof seam with a metal profile:
- A long plaster rule or string is used to mark a line for cutting grooves 20-30 wide and up to 4 centimeters deep (corresponding to the height of the metal profile).
- Cutting the seam with a wall chaser (several at once, followed by cutting out the concrete with a hammer drill and cleaning with a cylindrical grinder).
- Carrying out level control using a laser level.
- Filling the bottom of the seam with a layer of reinforced polymer concrete, finishing the surface.
- Inserting special bolts into the profiles, installing them in the correct position, connecting two profiles into a solid structure with fixation with nuts and connecting elements. The distance between the profiles can be different; it is indicated in the project, taking into account the type of expansion joint. Make sure that the bottom plane of the profiles lies without distortions in any direction. The profile fits into place without effort. At the joints of the profiles there is a guide rod and a hole, which guarantee the strength of the connection of several elements into one structure. Before joining, the elements can be coated with high-quality metal glue.
Fastening the profile with dowels, drilling holes of the required diameter on wide horizontal planes according to the size of the plastic elements of the dowels. The approximate depth of the hole that is drilled should be 2-3 centimeters greater than the length of the dowel, then it will be easier to drive it in. Screwing the metal elements of the dowels all the way with an electric drill, checking the quality of fixation. Dowels are attached in increments of 40-50 centimeters. Dismantling the installation kit - removing the nuts and metal tie, which is secured with bushings with internal threads. After unscrewing, the bolts do not need to be cut off, since they are located below the upper plane of the profiles and in the future a decorative insert will be attached to them
On the profiles you also need to unscrew the nuts that temporarily fix the bolts. Laying an elastic replaceable insert: a roll is rolled out along the profile (starting from the end), carefully pressed into the seating protrusions until it stops. The insert should lie flat, without gaps or distortions; the remaining piece is cut off with a mounting knife. Installation of decorative overlays made of stainless alloy steel (most often used for loaded floors) or aluminum
The surface of the pads includes the ends of the mounting bolts. Everything is fixed with nuts, the position is adjustable, eliminating gaps between adjacent elements. Next you need to remove the protective film. Installing a protective cover on the profile (it is removed after the coating has hardened).
.